Exercise - Add logic to the function app
Let's continue with our gear drive example, and add the logic for the temperature service. Specifically, we're going to receive data from an HTTP request.
Function requirements
First, we need to define some requirements for our logic:
- Temperatures from 0 up to 25 degrees should be flagged as OK.
- Temperatures above 25 up to 50 degrees should be flagged as CAUTION.
- Temperatures above 50 degrees should be flagged as DANGER.
Add a function to your function app
As we described in the preceding unit, Azure provides templates that help you build functions. In this unit, you use the HttpTrigger template to implement the temperature service.
In the previous exercise, you deployed your function app and opened it. If it isn't already open, you can open it from the Home page by selecting All resources, and then selecting your function app, named something like escalator-functions-xxx.
On the Function App screen under the Functions tab, select Create in Azure portal. The Create function pane appears.
Under Select a template, select HTTP trigger.
Select Create. The HttpTrigger1 is created and displays in the HttpTrigger1 Function pane.
In the Developer menu on the left, select Code + Test. The code editor opens, displaying the contents of the index.js code file for your function. The default code that the HTTP template generated appears in the following snippet.
module.exports = async function (context, req) {
    context.log('JavaScript HTTP trigger function processed a request.');

    const name = (req.query.name || (req.body && req.body.name));
    const responseMessage = name
        ? "Hello, " + name + ". This HTTP triggered function executed successfully."
        : "This HTTP triggered function executed successfully. Pass a name on the query string or in the request body for a personalized response.";

    context.res = {
        // status: 200, /* Defaults to 200 */
        body: responseMessage
    };
}
Your function expects a name to be passed in either through the HTTP request query string, or as part of the request body. The function responds by returning the message Hello, <name>. This HTTP triggered function executed successfully., echoing back the name that was sent in the request.
From the source file dropdown list, select function.json to view the configuration of the function, which should look like the following code.
{
  "bindings": [
    {
      "authLevel": "function",
      "type": "httpTrigger",
      "direction": "in",
      "name": "req",
      "methods": [
        "get",
        "post"
      ]
    },
    {
      "type": "http",
      "direction": "out",
      "name": "res"
    }
  ]
}
This configuration file declares that the function runs when it receives an HTTP request. The output binding declares that the response is sent as an HTTP response.
In the Template details section, in the New Function field, enter DriveGearTemperatureService. Leave the Authorization level as Function, and then select Create to create the function. The Overview pane for your DriveGearTemperatureService Function appears.
In the Function menu, select Code + Test. The code editor opens with the contents of the run.ps1 code file. The default code that the template generated for us is listed in the following snippet.
using namespace System.Net

# Input bindings are passed in via param block.
param($Request, $TriggerMetadata)

# Write to the Azure Functions log stream.
Write-Host "PowerShell HTTP trigger function processed a request."

# Interact with query parameters or the body of the request.
$name = $Request.Query.Name
if (-not $name) {
    $name = $Request.Body.Name
}

$body = "This HTTP triggered function executed successfully. Pass a name in the query string or in the request body for a personalized response."

if ($name) {
    $body = "Hello, $name. This HTTP triggered function executed successfully."
}

# Associate values to output bindings by calling 'Push-OutputBinding'.
Push-OutputBinding -Name Response -Value ([HttpResponseContext]@{
    StatusCode = [HttpStatusCode]::OK
    Body = $body
})
Our function expects a name to be passed in either through the HTTP request query string, or as part of the request body. HTTP functions must generate a response by writing to their output binding, which is accomplished in PowerShell Functions with the
Push-OutputBindingcmdlet. This function returns the message Hello, $name, echoing back the name that was sent in the request.From the source dropdown list, select function.json to view the configuration of the function, which should look like the following.
{
  "bindings": [
    {
      "authLevel": "function",
      "type": "httpTrigger",
      "direction": "in",
      "name": "Request",
      "methods": [
        "get",
        "post"
      ]
    },
    {
      "type": "http",
      "direction": "out",
      "name": "Response"
    }
  ]
}
This configuration declares that the function runs when it receives an HTTP request. The output binding declares that the response is sent as an HTTP response.
Test the function
Tip
cURL is a command line tool that can be used to send or receive files. It's included with Linux, macOS, and Windows 10, and can be downloaded for most other operating systems. cURL supports numerous protocols like HTTP, HTTPS, FTP, FTPS, SFTP, LDAP, TELNET, SMTP, POP3, and so on. For more information, see the following links:
To test the function, you can send an HTTP request to the function URL using cURL on the command line.
Expand the Logs frame at the bottom of the trigger function pane. Select Filesystem Logs in the drop-down at the top of the Logs frame. The log frame should start accruing trace notifications every minute.
To find the endpoint URL of the function, from the command bar, select Get function URL, as shown in the following image. Save this link by selecting the Copy to clipboard icon at the end of the URL. Store this link in Notepad or a similar app for later use.

Open a command prompt and run cURL to send an HTTP request to the function URL. Keep in mind to use the URL that you copied in the previous step.
curl "<your-https-url>"Tip
You might need to wrap the URL in quotes to avoid issues with special characters in the URL.
If you're on Windows, runcURLfrom the command prompt. PowerShell has a curl command, but it's an alias for Invoke-WebRequest, which isn't the same ascURL.The response should look like the following.
This HTTP triggered function executed successfully. Pass a name on the query string or in the request body for a personalized response.Now pass a name in the request. To do that, you need to add a query string parameter named
nameto the URL. The following example adds the query string parametername=Azure.curl "<your-https-url>&name=Azure"The response should look like the following.
Hello, Azure. This HTTP triggered function executed successfully.The function executed successfully and returned the name that you passed in the request.

Secure HTTP triggers
HTTP triggers let you use API keys to block unknown callers by requiring a key as part of the request. When you create a function, you select the authorization level. By default, it's set to Function, which requires a function-specific API key. It can also be set to Admin to use a global "master" key, or Anonymous to indicate that no key is required. You can also change the authorization level through the function properties after creation.
Because you specified Function when you created this function, you need to supply the key when you send the HTTP request. You can send it as a query string parameter named code. Or, use the preferred method and pass it as an HTTP header named x-functions-key.
To find the function and master keys, in the Function App menu, under Developer, select Function Keys. The Function Keys pane for your function opens.
By default the function key value is hidden. Show the default function key value by selecting Show value. Copy the contents of the Value field to the clipboard, and then store this key in Notepad or a similar app for later use.

To test the function with the function key, open a command prompt and run cURL to send an HTTP request to the function URL. Replace
<your-function-key>with the function key value you saved, and replace<your-https-url>with the URL of your function.curl --header "Content-Type: application/json" --header "x-functions-key: <your-function-key>" --request POST --data "{\"name\": \"Azure Function\"}" <your-https-url>Review the cURL command and verify that it has the following values:
- Added a
Content-Typeheader value of typeapplication/json. - Passed the Function Key as the header value
x-functions-key. - Used a
POSTrequest. - Passed the Azure Function with the URL for your function.
- Added a
Check the logs.
The Code + Test pane should open a session displaying log file output (ensure Filesystem Logs is selected in the drop-down at the top of the Logs pane). The log file updates with the status of your request, which should look something like this:

```output
2022-02-16T22:34:10.473 [Information] Executing 'Functions.HttpTrigger1' (Reason='This function was programmatically called via the host APIs.', Id=4f503b35-b944-455e-ba02-5205f9e8b47a)
2022-02-16T22:34:10.539 [Information] JavaScript HTTP trigger function processed a request.
2022-02-16T22:34:10.562 [Information] Executed 'Functions.HttpTrigger1' (Succeeded, Id=4f503b35-b944-455e-ba02-5205f9e8b47a, Duration=114ms)
```
```output
2022-02-16T21:07:11.340 [Information] INFORMATION: PowerShell HTTP trigger function processed a request.
2022-02-16T21:07:11.449 [Information] Executed 'Functions.DriveGearTemperatureService' (Succeeded, Id=25e2edc3-542f-4629-a152-cf9ed99680d8, Duration=1164ms)
```
Add business logic to the function
Let's add the logic to the function, to check temperature readings that it receives, and set a status for each temperature reading.
Our function is expecting an array of temperature readings. The following JSON snippet is an example of the request body that we'll send to our function. Each reading entry has an ID, timestamp, and temperature.
{
    "readings": [
        {
            "driveGearId": 1,
            "timestamp": 1534263995,
            "temperature": 23
        },
        {
            "driveGearId": 3,
            "timestamp": 1534264048,
            "temperature": 45
        },
        {
            "driveGearId": 18,
            "timestamp": 1534264050,
            "temperature": 55
        }
    ]
}
Let's replace the default code in our function with the following code, to implement our business logic.
In the HttpTrigger1 function pane, open the index.js file, and replace it with the following code. After making this change, on the command bar, select Save to save the updates to the file.
module.exports = function (context, req) {
    context.log('Drive Gear Temperature Service triggered');
    if (req.body && req.body.readings) {
        req.body.readings.forEach(function(reading) {

            if(reading.temperature<=25) {
                reading.status = 'OK';
            } else if (reading.temperature<=50) {
                reading.status = 'CAUTION';
            } else {
                reading.status = 'DANGER'
            }
            context.log('Reading is ' + reading.status);
        });

        context.res = {
            // status: 200, /* Defaults to 200 */
            body: {
                "readings": req.body.readings
            }
        };
    }
    else {
        context.res = {
            status: 400,
            body: "Please send an array of readings in the request body"
        };
    }
    context.done();
};
The logic we added is straightforward. We iterate through the array and set the status as OK, CAUTION, or DANGER based on the value of the temperature field. We then send back the array of readings with a status field added to each entry.
Notice the Log statements when you expand Logs at the bottom of the pane. When the function runs, these statements add messages in the Logs window.
Open the run.ps1 file, and replace the contents with the following code. After making this change, on the command bar, select Save to save the updates to the file.
using namespace System.Net

param($Request, $TriggerMetadata)

Write-Host "Drive Gear Temperature Service triggered"

$readings = $Request.Body.Readings
if ($readings) {
    foreach ($reading in $readings) {
        if ($reading.temperature -le 25) {
            $reading.Status = "OK"
        }
        elseif ($reading.temperature -le 50) {
            $reading.Status = "CAUTION"
        }
        else {
            $reading.Status = "DANGER"
        }

        Write-Host "Reading is $($reading.Status)"
    }

    $status = [HttpStatusCode]::OK
    $body = $readings
}
else {
    $status = [HttpStatusCode]::BadRequest
    $body = "Please send an array of readings in the request body"
}

Push-OutputBinding -Name Response -Value ([HttpResponseContext]@{
    StatusCode = $status
    Body = $body
})
The logic we added is straightforward. We iterate through the array and set the status as OK, CAUTION, or DANGER based on the value of the temperature field. We then send back the array of readings with a status field added to each entry.
Note the calls to the Write-Host cmdlet. When the function runs, these statements add messages in the Logs window.
Test our business logic
We're going to use the Test/Run feature in Developer > Code + Test to test our function.
In the Input tab, replace the contents of the Body text box with the following code to create our sample request.
{
    "readings": [
        {
            "driveGearId": 1,
            "timestamp": 1534263995,
            "temperature": 23
        },
        {
            "driveGearId": 3,
            "timestamp": 1534264048,
            "temperature": 45
        },
        {
            "driveGearId": 18,
            "timestamp": 1534264050,
            "temperature": 55
        }
    ]
}
Select Run. The Output tab displays the HTTP response code and content. To see log messages, open the Logs tab in the bottom flyout of the pane (if it isn't already open). The following image shows an example response in the output pane and messages in the Logs pane.
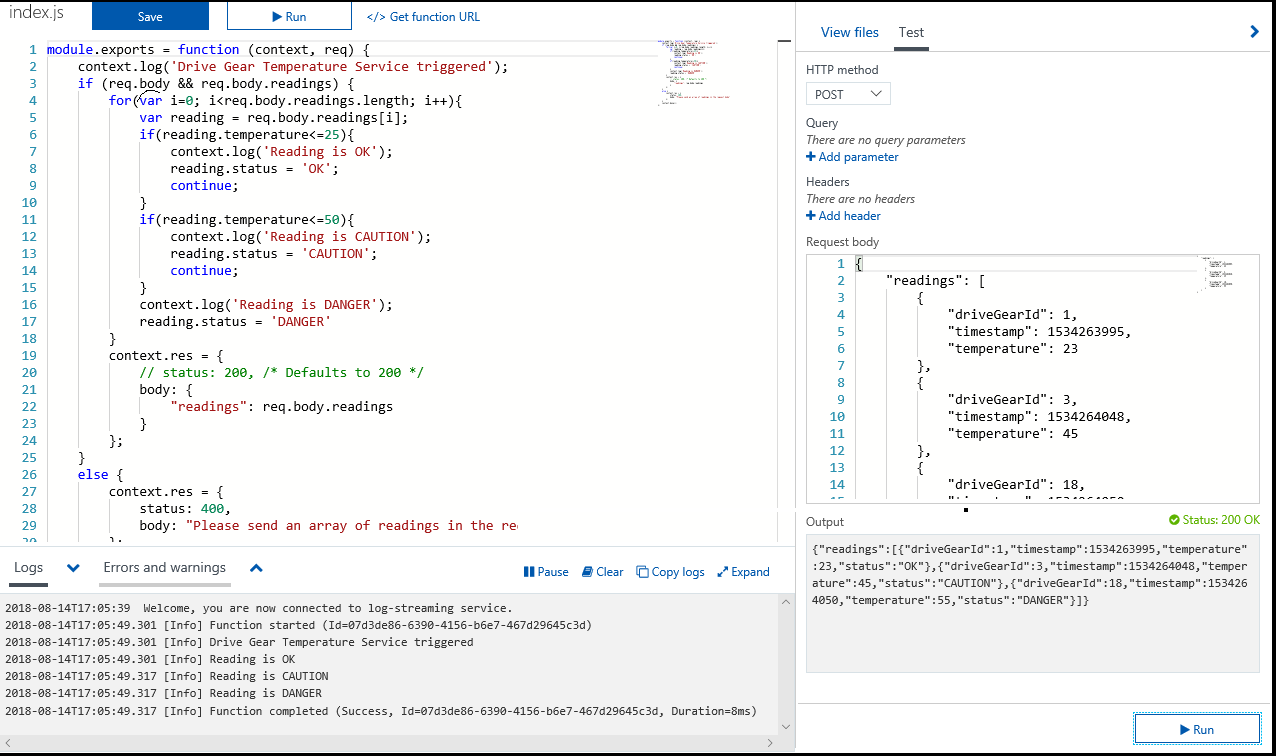
The Output tab shows that a status field has been correctly added to each of the readings.
In the Developer menu on the left, select Monitor to see that the request has been logged to Application Insights. The Monitor pane appears for your function.
The Invocations Tab of the pane displays Invocation Traces for each of your function invocations. Select the Date(UTC) value for one of the invocations and view the detail about the execution of your function.
