Use Azure Event Grid to route Blob storage events to web endpoint (Azure portal)
Event Grid is a fully managed service that enables you to easily manage events across many different Azure services and applications. It simplifies building event-driven and serverless applications. For an overview of the service, see Event Grid overview.
In this article, you use the Azure portal to do the following tasks:
- Create a Blob storage account.
- Subscribe to events for that blob storage.
- Trigger an event by uploading a file to the blob storage.
- View the result in a handler web app. Typically, you send events to an endpoint that processes the event data and takes actions. To keep it simple, you send events to a web app that collects and displays the messages.
If you don't have an Azure subscription, create an Azure free account before you begin.
When you're finished, you see that the event data has been sent to the web app.
Create a storage account
Sign in to Azure portal.
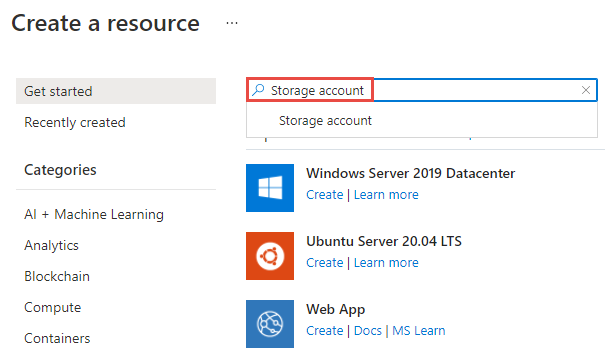
To create a Blob storage, select Create a resource.
In the Search, enter Storage account, and select Storage account from the result list.
On the Storage account page, select Create to start creating the storage account. To subscribe to events, create either a general-purpose v2 storage account or a Blob storage account.
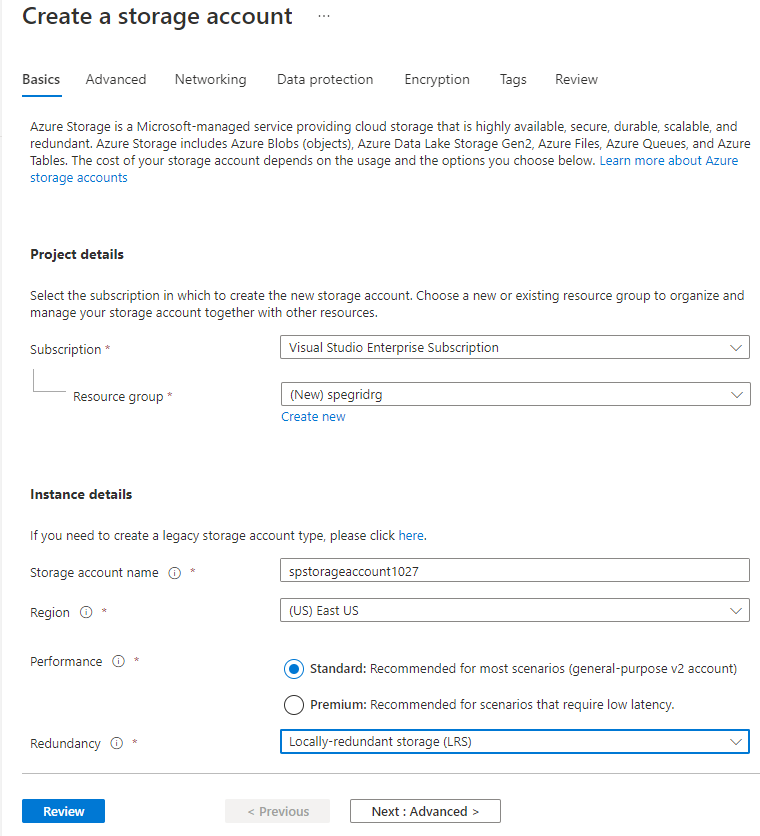
On the Create storage account page, do the following steps:
Select your Azure subscription.
For Resource group, create a new resource group or select an existing one.
Enter the name for your storage account.
Select the Region in which you want the storage account to be created.
For Redundancy, select Locally-redundant storage (LRS) from the drop-down list.
Select Review at the bottom of the page.
On the Review page, review the settings, and select Create.
Note
Only storage accounts of kind StorageV2 (general purpose v2) and BlobStorage support event integration. Storage (general purpose v1) does not support integration with Event Grid.
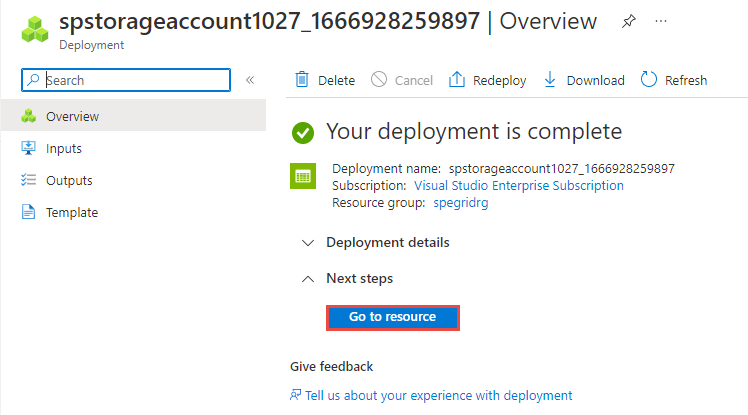
The deployment takes a few minutes to complete. On the Deployment page, select Go to resource.
On the Storage account page, select Events on the left menu.
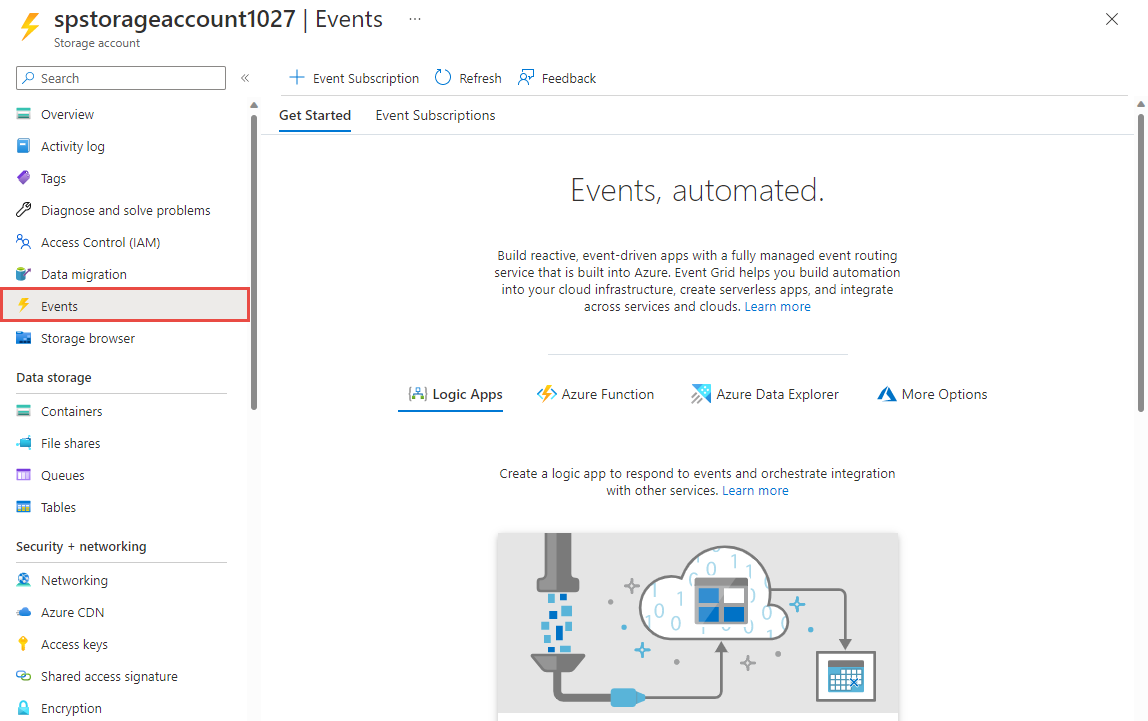
Keep this page in the web browser open.
Create a message endpoint
Before subscribing to the events for the Blob storage, let's create the endpoint for the event message. Typically, the endpoint takes actions based on the event data. To simplify this quickstart, you deploy a prebuilt web app that displays the event messages. The deployed solution includes an App Service plan, an App Service web app, and source code from GitHub.
Select Deploy to Azure to deploy the solution to your subscription.

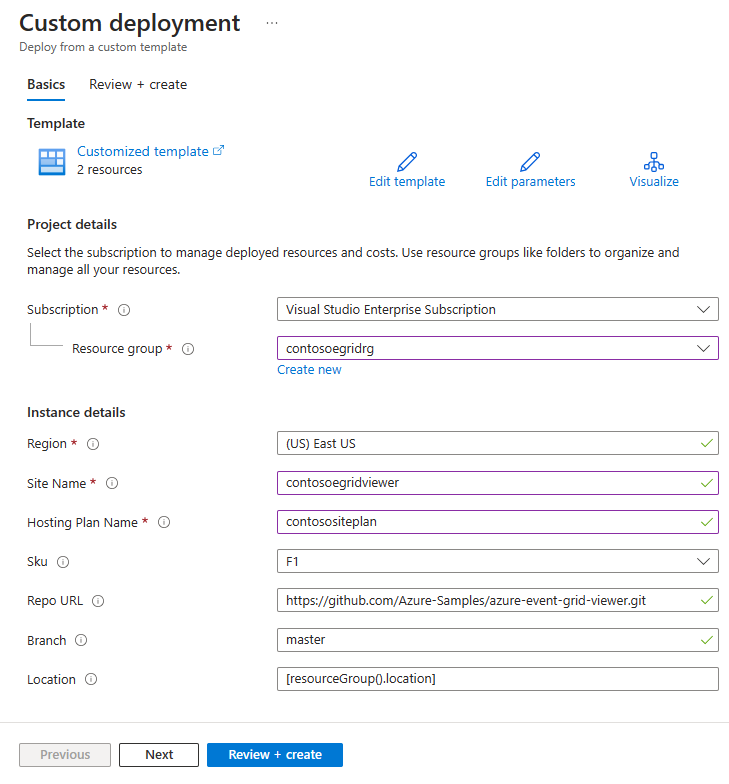
On the Custom deployment page, do the following steps:
For Resource group, select the resource group that you created when creating the storage account. It will be easier for you to clean up after you're done with the tutorial by deleting the resource group.
For Site Name, enter a name for the web app.
For Hosting plan name, enter a name for the App Service plan to use for hosting the web app.
Select Review + create.
On the Review + create page, select Create.
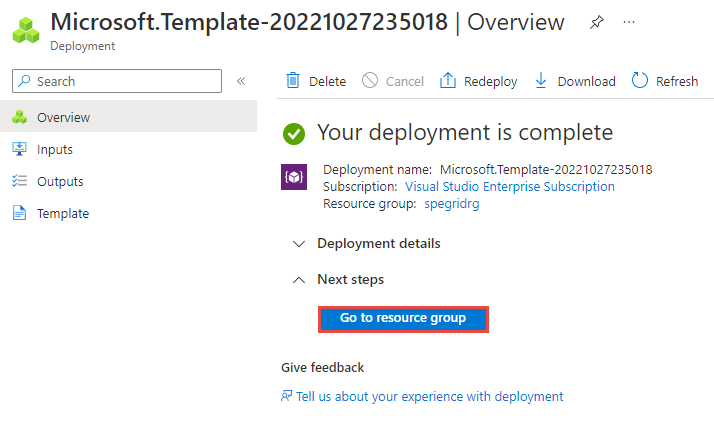
The deployment takes a few minutes to complete. On the Deployment page, select Go to resource group.
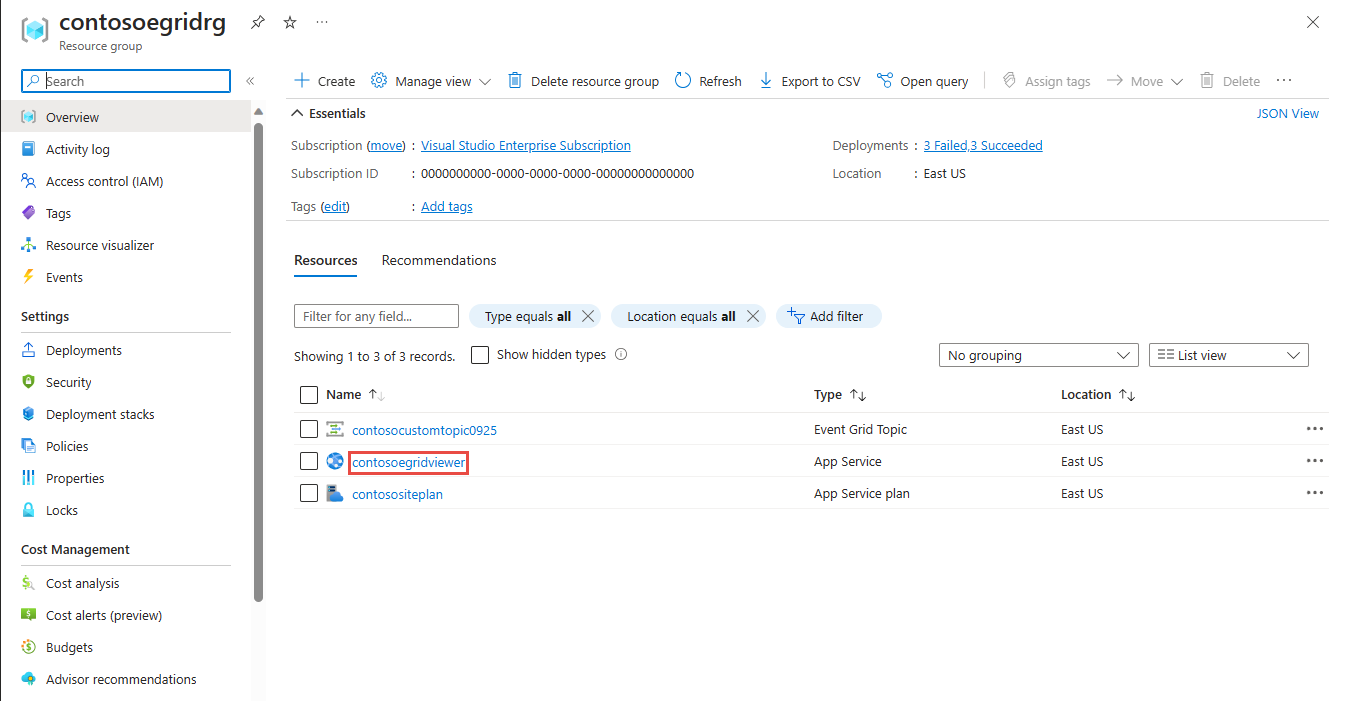
On the Resource group page, in the list of resources, select the web app that you created. You also see the App Service plan and the storage account in this list.
On the App Service page for your web app, select the URL to navigate to the web site. The URL should be in this format:
https://<your-site-name>.azurewebsites.net.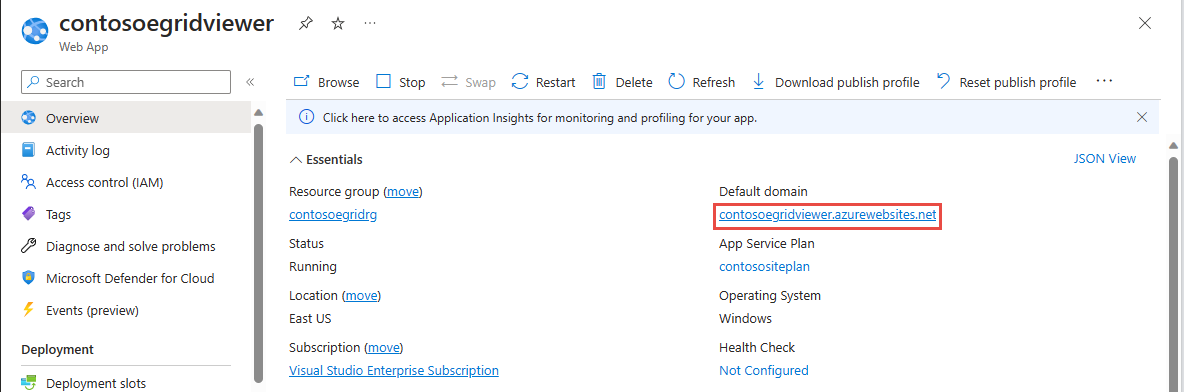
Confirm that you see the site but no events have been posted to it yet.

Important
Keep the Azure Event Grid Viewer window open so that you can see events as they are posted.
Register the Event Grid resource provider
Unless you've used Event Grid before, you'll need to register the Event Grid resource provider. If you’ve used Event Grid before, skip to the next section.
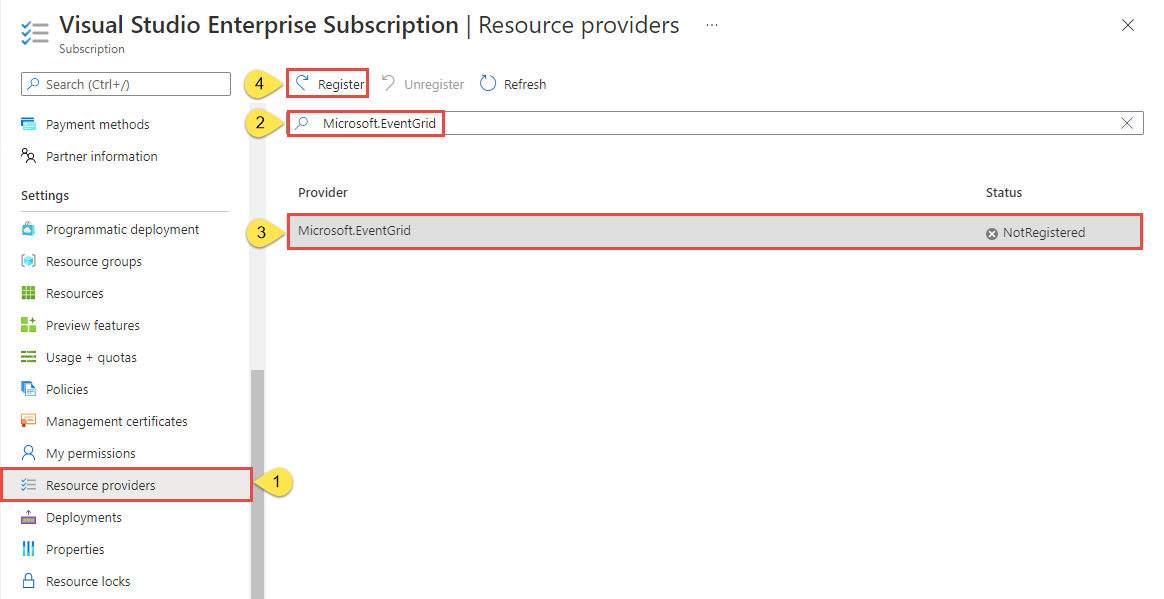
In the Azure portal, do the following steps:
On the left menu, select Subscriptions.
Select the subscription you want to use for Event Grid from the subscription list.
On the Subscription page, select Resource providers under Settings on the left menu.
Search for Microsoft.EventGrid, and confirm that the Status is Not Registered.
Select Microsoft.EventGrid in the provider list.
Select Register on the command bar.
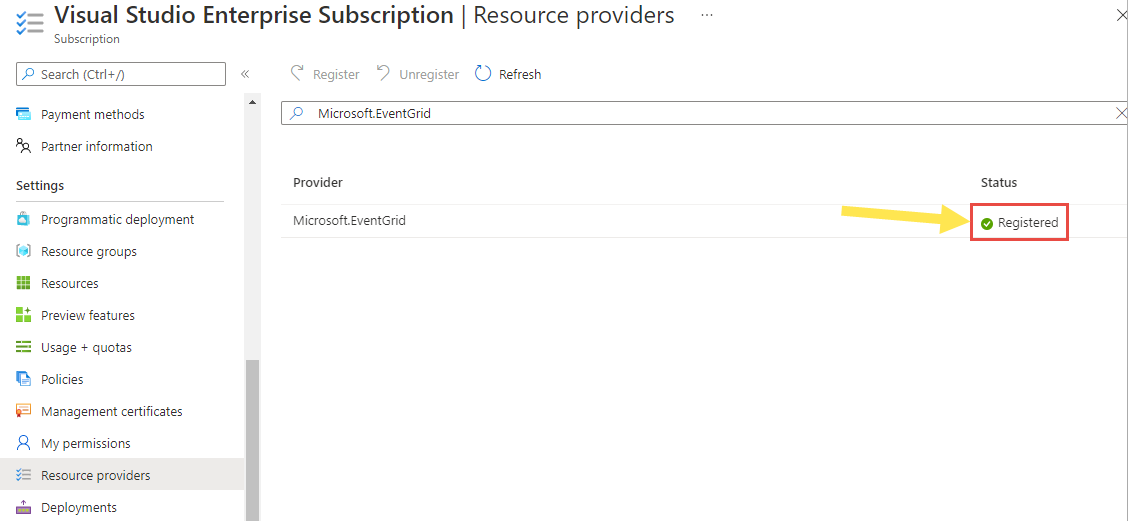
Refresh to make sure the status of Microsoft.EventGrid is changed to Registered.
Subscribe to the Blob storage
You subscribe to a topic to tell Event Grid which events you want to track, and where to send the events.
If you closed the Storage account page, navigate to your Azure Storage account that you created earlier. On the left menu, select All resources and select your storage account.
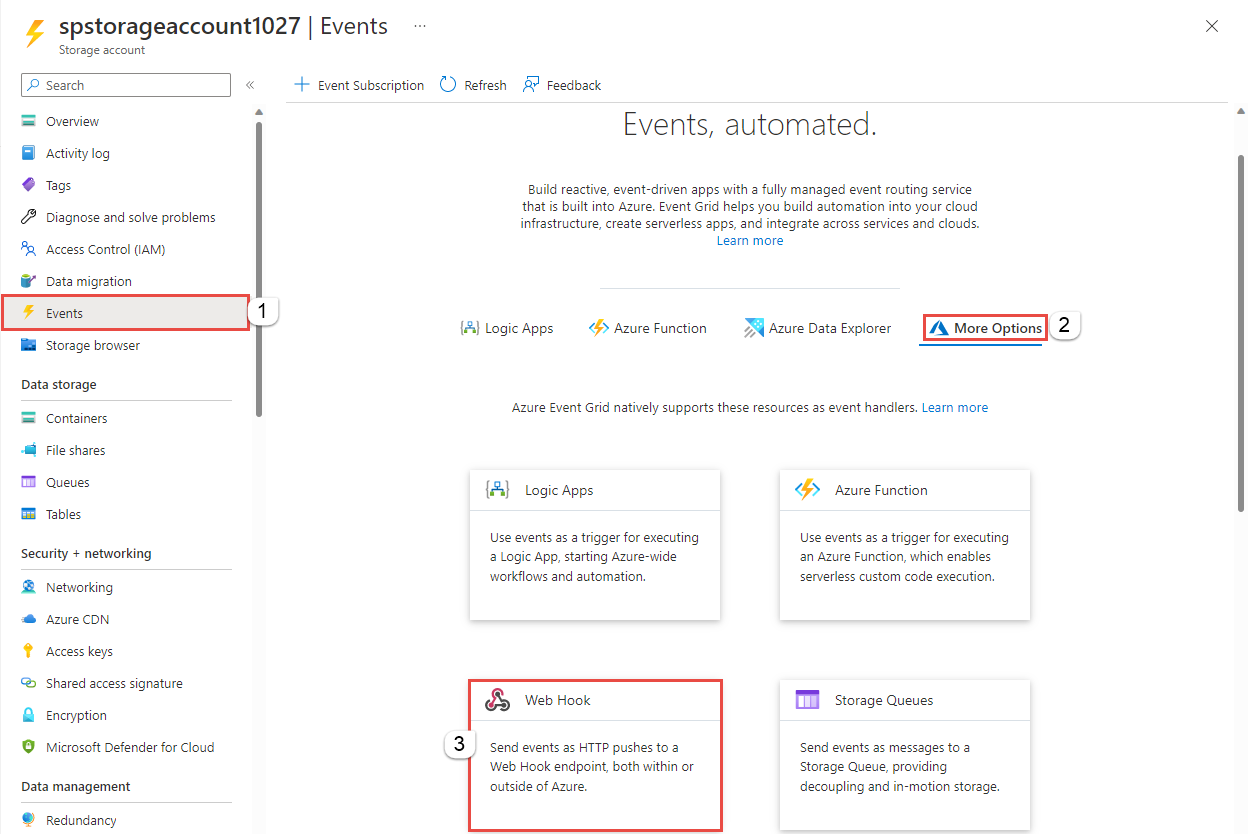
On the Storage account page, select Events on the left menu.
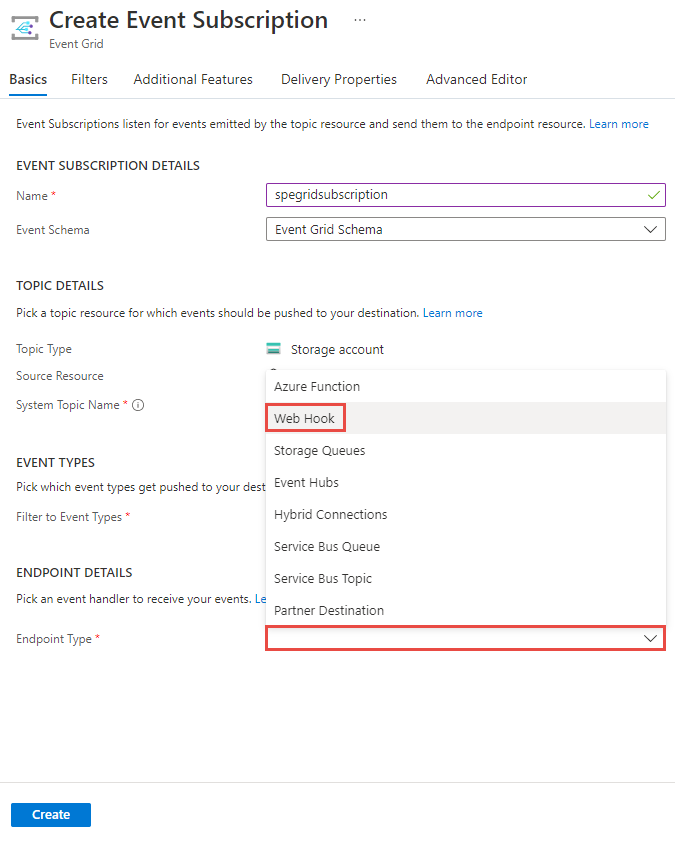
Select More Options, and Web Hook. You're sending events to your viewer app using a web hook for the endpoint.
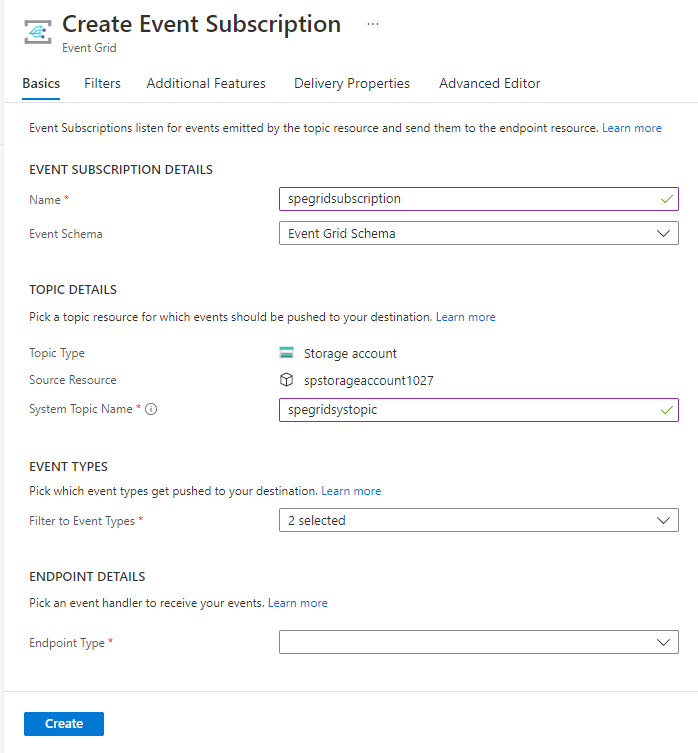
On the Create Event Subscription page, do the following steps:
Enter a name for the event subscription.
Enter a name for the system topic. To learn about system topics, see Overview of system topics.
Select Web Hook for Endpoint type.
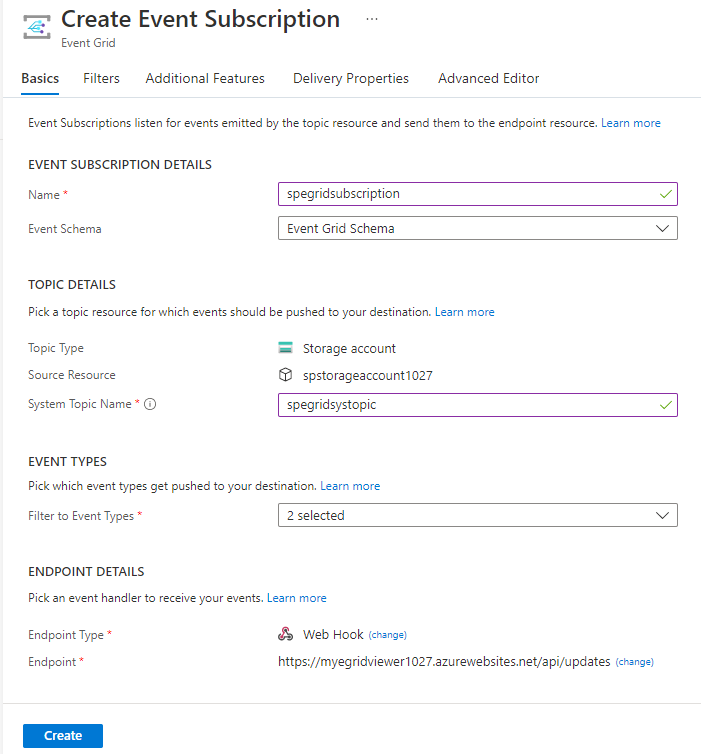
For Endpoint, choose Select an endpoint, and enter the URL of your web app and add
api/updatesto the home page URL (for example:https://spegridsite.azurewebsites.net/api/updates), and then select Confirm Selection.
Now, on the Create Event Subscription page, select Create to create the event subscription.
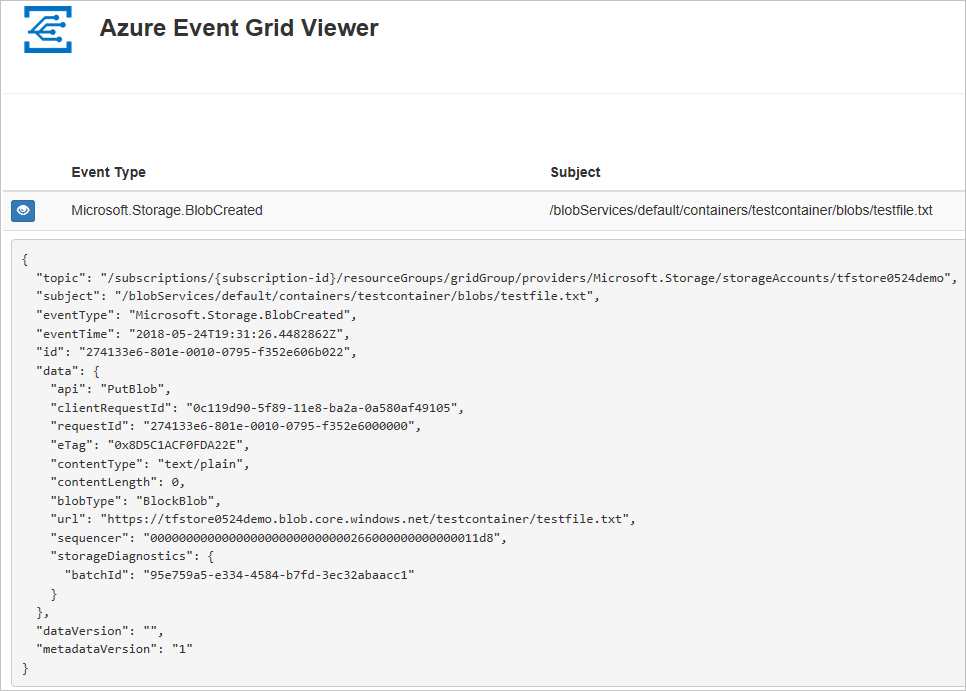
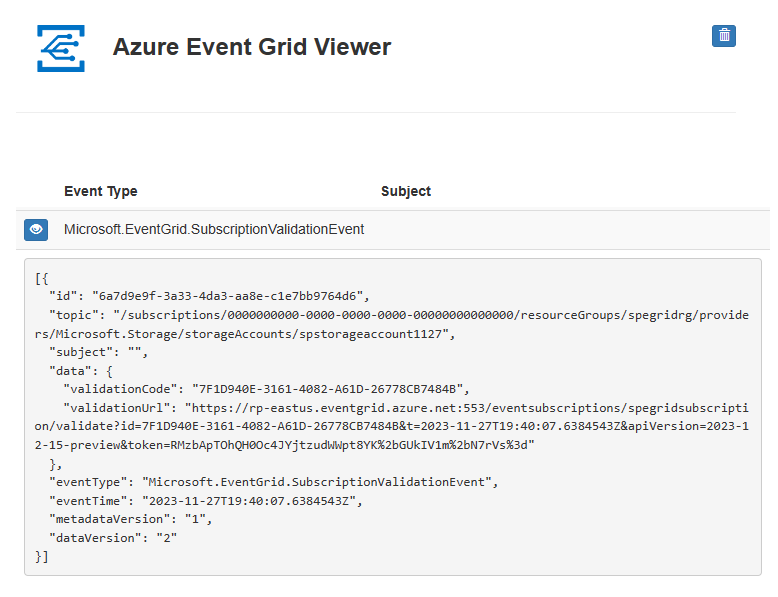
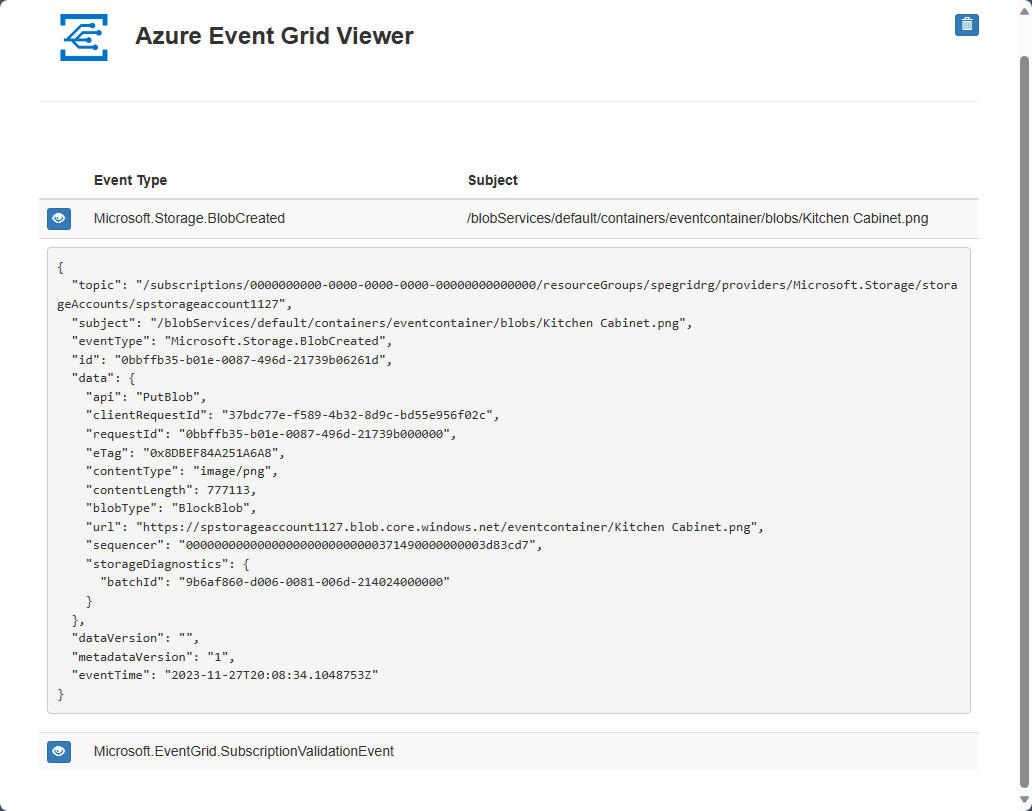
View your web app again, and notice that a subscription validation event has been sent to it. Select the eye icon to expand the event data. Event Grid sends the validation event so the endpoint can verify that it wants to receive event data. The web app includes code to validate the subscription.

Now, let's trigger an event to see how Event Grid distributes the message to your endpoint.
Send an event to your endpoint
You trigger an event for the Blob storage by uploading a file. The file doesn't need any specific content.
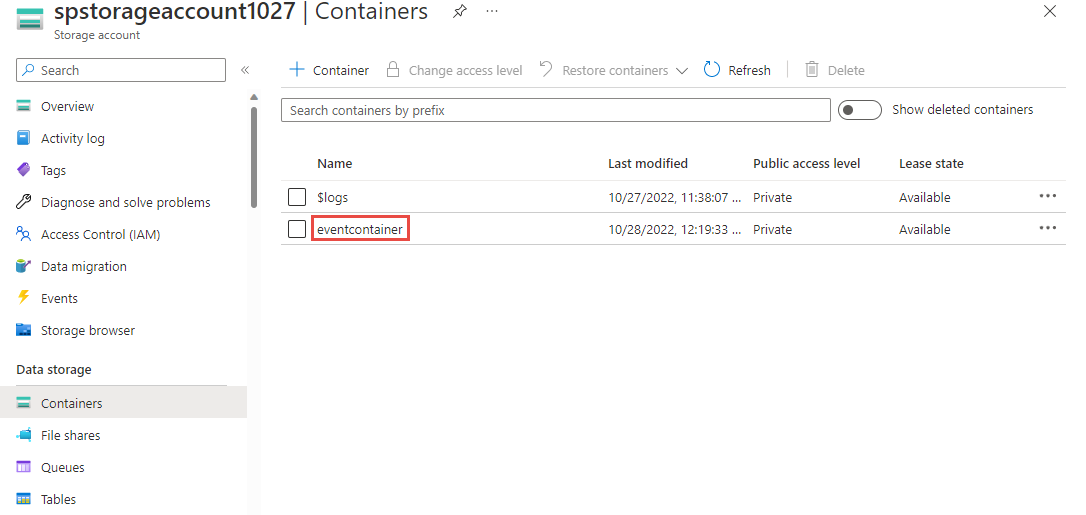
In the Azure portal, navigate to your Blob storage account, and select Containers on the let menu.
Select + Container. Give your container a name, and use any access level, and select Create.
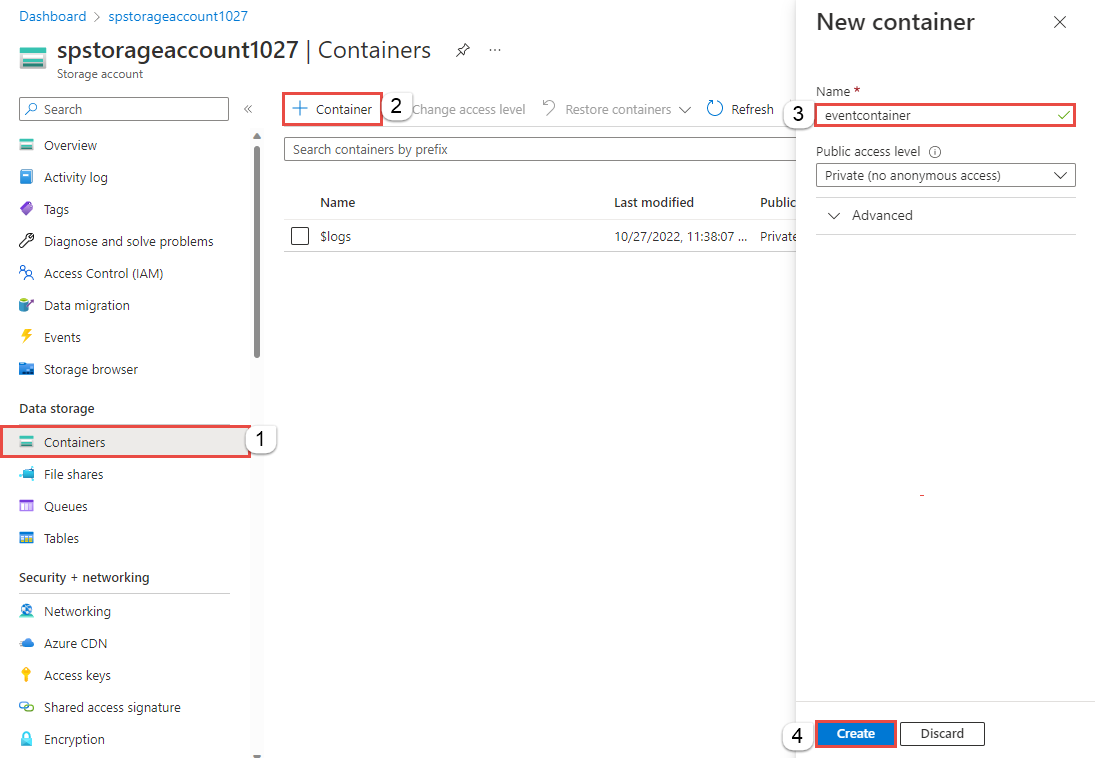
Select your new container.
To upload a file, select Upload. On the Upload blob page, browse and select a file that you want to upload for testing, and then select Upload on that page.

Browse to your test file and upload it.
You've triggered the event, and Event Grid sent the message to the endpoint you configured when subscribing. The message is in the JSON format and it contains an array with one or more events. In the following example, the JSON message contains an array with one event. View your web app and notice that a blob created event was received.

Clean up resources
If you plan to continue working with this event, don't clean up the resources created in this article. Otherwise, delete the resources you created in this article.
Select the resource group, and select Delete resource group.
Next steps
Now that you know how to create custom topics and event subscriptions, learn more about what Event Grid can help you do:
Feedback
Coming soon: Throughout 2024 we will be phasing out GitHub Issues as the feedback mechanism for content and replacing it with a new feedback system. For more information see: https://aka.ms/ContentUserFeedback.
Submit and view feedback for