Use SSH tunneling to access Apache Ambari web UI, JobHistory, NameNode, Apache Oozie, and other UIs
HDInsight clusters provide access to the Apache Ambari web UI over the Internet. Some features require an SSH tunnel. For example, the Apache Oozie web UI can't be accessed over the internet without an SSH tunnel.
Why use an SSH tunnel
Several of the menus in Ambari only work through an SSH tunnel. These menus rely on web sites and services running on other node types, such as worker nodes.
The following Web UIs require an SSH tunnel:
- JobHistory
- NameNode
- Thread Stacks
- Oozie web UI
- HBase Master and Logs UI
Services installed with Script Actions that expose a web service will require an SSH tunnel. Hue installed with Script Action requires an SSH tunnel to access the web UI.
Important
If you have direct access to HDInsight through a virtual network, you do not need to use SSH tunnels. For an example of directly accessing HDInsight through a virtual network, see the Connect HDInsight to your on-premises network document.
What is an SSH tunnel
Secure Shell (SSH) tunneling connects a port on your local machine to a head node on HDInsight. Traffic sent to the local port is routed through an SSH connection to the head node. The request is resolved as if it originated on the head node. The response is then routed back through the tunnel to your workstation.
Prerequisites
An SSH client. For more information, see Connect to HDInsight (Apache Hadoop) using SSH.
A web browser that can be configured to use a SOCKS5 proxy.
Warning
The SOCKS proxy support built into Windows Internet settings does not support SOCKS5, and does not work with the steps in this document. The following browsers rely on Windows proxy settings, and do not currently work with the steps in this document:
- Microsoft Edge
- Microsoft Internet Explorer
Google Chrome also relies on the Windows proxy settings. However, you can install extensions that support SOCKS5. We recommend FoxyProxy Standard.
Create a tunnel using the SSH command
Use the following command to create an SSH tunnel using the ssh command. Replace sshuser with an SSH user for your HDInsight cluster, and replace CLUSTERNAME with the name of your HDInsight cluster:
ssh -C2qTnNf -D 9876 sshuser@CLUSTERNAME-ssh.azurehdinsight.net
This command creates a connection that routes traffic to local port 9876 to the cluster over SSH. The options are:
| Option | Description |
|---|---|
| D 9876 | The local port that routes traffic through the tunnel. |
| C | Compress all data, because web traffic is mostly text. |
| 2 | Force SSH to try protocol version 2 only. |
| q | Quiet mode. |
| T | Disable pseudo-tty allocation, since you're just forwarding a port. |
| n | Prevent reading of STDIN, since you're just forwarding a port. |
| N | Do not execute a remote command, since you're just forwarding a port. |
| f | Run in the background. |
Once the command finishes, traffic sent to port 9876 on the local computer is routed to the cluster head node.
Create a tunnel using PuTTY
PuTTY is a graphical SSH client for Windows. If you aren't familiar with PuTTY, see the PuTTY documentation. Use the following steps to create an SSH tunnel using PuTTY:
Create or load a session
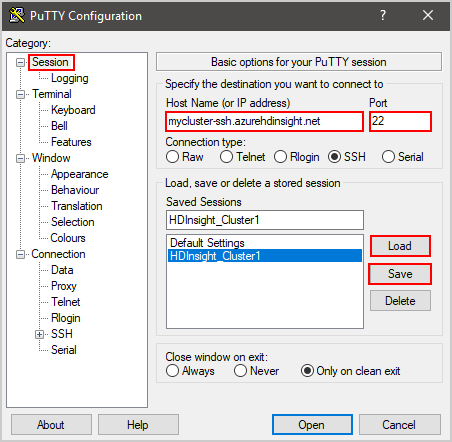
Open PuTTY and ensure Session is selected on the left menu. If you've already saved a session, select the session name from the Saved Sessions list and select Load.
If you don't already have a saved session, enter your connection information:
Property Value Host Name (or IP address) The SSH address for the HDInsight cluster. For example, mycluster-ssh.azurehdinsight.net. Port 22 Connection Type SSH Select Save
In the Category section to the left of the dialog, expand Connection, expand SSH, and then select Tunnels.
Provide the following information on the Options controlling SSH port forwarding form:
Property Value Source port The port on the client that you wish to forward. For example, 9876. Destination The SSH address for the HDInsight cluster. For example, mycluster-ssh.azurehdinsight.net. Dynamic Enables dynamic SOCKS proxy routing. 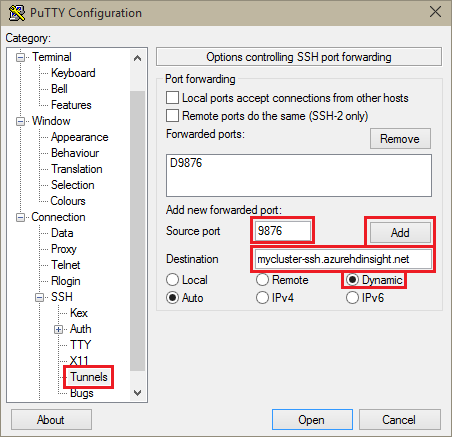
Select Add to add the settings, and then select Open to open an SSH connection.
When prompted, sign in to the server.
Use the tunnel from your browser
Important
The steps in this section use the Mozilla FireFox browser, as it provides the same proxy settings across all platforms. Other modern browsers, such as Google Chrome, may require an extension such as FoxyProxy to work with the tunnel.
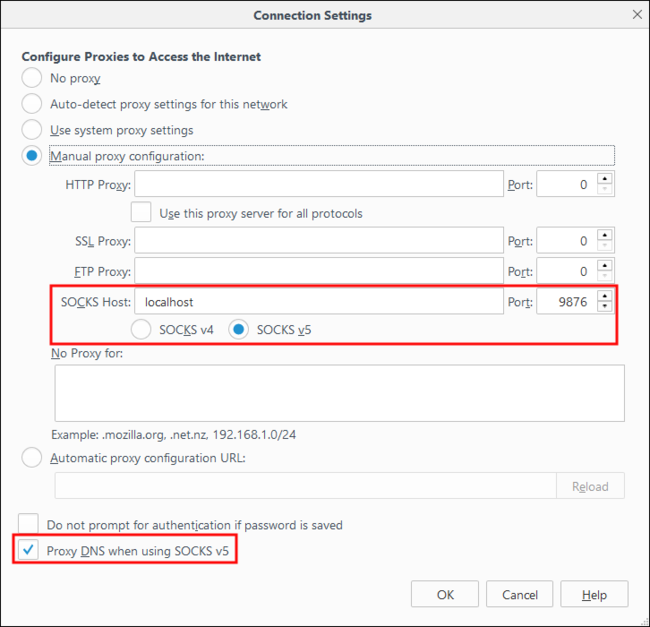
Configure the browser to use localhost and the port you used when creating the tunnel as a SOCKS v5 proxy. Here's what the Firefox settings look like. If you used a different port than 9876, change the port to the one you used:
Note
Selecting Remote DNS resolves Domain Name System (DNS) requests by using the HDInsight cluster. This setting resolves DNS using the head node of the cluster.
Verify that the tunnel works by visiting a site such as https://www.whatismyip.com/. The IP returned should be one used by the Microsoft Azure datacenter.
Verify with Ambari web UI
Once the cluster has been established, use the following steps to verify that you can access service web UIs from the Ambari Web:
In your browser, go to
http://headnodehost:8080. Theheadnodehostaddress is sent over the tunnel to the cluster and resolve to the head node that Ambari is running on. When prompted, enter the admin user name (admin) and password for your cluster. You may be prompted a second time by the Ambari web UI. If so, reenter the information.Note
When using the
http://headnodehost:8080address to connect to the cluster, you are connecting through the tunnel. Communication is secured using the SSH tunnel instead of HTTPS. To connect over the internet using HTTPS, usehttps://clustername.azurehdinsight.net, whereclusternameis the name of the cluster.From the Ambari Web UI, select HDFS from the list on the left of the page.

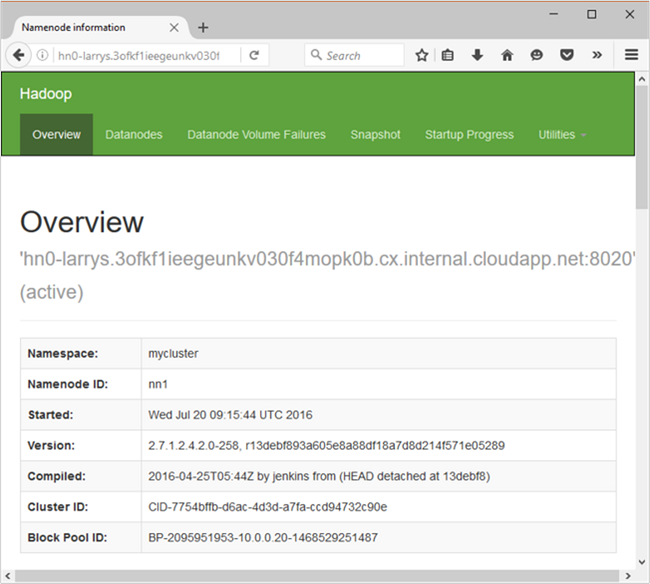
When the HDFS service information is displayed, select Quick Links. A list of the cluster head nodes appears. Select one of the head nodes, and then select NameNode UI.

Note
When you select Quick Links, you may get a wait indicator. This condition can occur if you have a slow internet connection. Wait a minute or two for the data to be received from the server, then try the list again.
Some entries in the Quick Links menu may be cut off by the right side of the screen. If so, expand the menu using your mouse and use the right arrow key to scroll the screen to the right to see the rest of the menu.
A page similar to the following image is displayed:
Note
Notice the URL for this page; it should be similar to
http://hn*.randomcharacters.cx.internal.cloudapp.net:8088/cluster. This URI is using the internal fully qualified domain name (FQDN) of the node, and is only accessible when using an SSH tunnel.
Next steps
Now that you've learned how to create and use an SSH tunnel, see the following document for other ways to use Ambari:
Feedback
Coming soon: Throughout 2024 we will be phasing out GitHub Issues as the feedback mechanism for content and replacing it with a new feedback system. For more information see: https://aka.ms/ContentUserFeedback.
Submit and view feedback for