Get started with device twins (Node.js)
Device twins are JSON documents that store device state information, including metadata, configurations, and conditions. IoT Hub persists a device twin for each device that connects to it.
Note
The features described in this article are available only in the standard tier of IoT Hub. For more information about the basic and standard/free IoT Hub tiers, see Choose the right IoT Hub tier for your solution.
Use device twins to:
Store device metadata from your solution back end.
Report current state information such as available capabilities and conditions, for example, the connectivity method used, from your device app.
Synchronize the state of long-running workflows, such as firmware and configuration updates, between a device app and a back-end app.
Query your device metadata, configuration, or state.
Device twins are designed for synchronization and for querying device configurations and conditions. For more information about device twins, including when to use device twins, see Understand device twins.
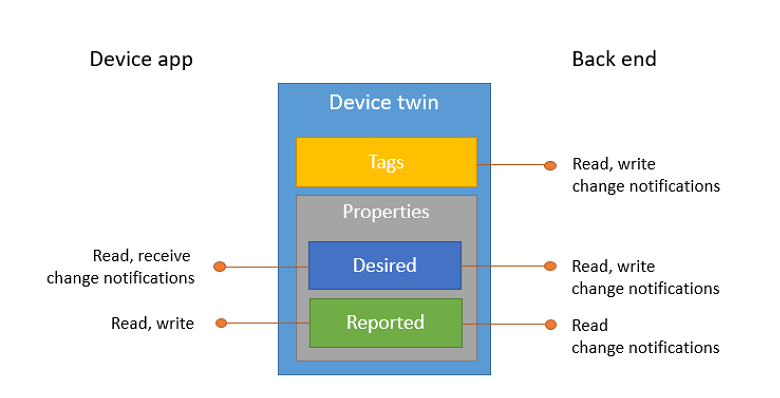
IoT hubs store device twins, which contain the following elements:
Tags. Device metadata accessible only by the solution back end.
Desired properties. JSON objects modifiable by the solution back end and observable by the device app.
Reported properties. JSON objects modifiable by the device app and readable by the solution back end.
Tags and properties can't contain arrays, but can contain nested objects.
The following illustration shows device twin organization:
Additionally, the solution back end can query device twins based on all the above data. For more information about device twins, see Understand device twins. For more information about querying, see IoT Hub query language.
This article shows you how to:
Use a simulated device app to report its connectivity channel as a reported property on the device twin.
Query devices from your back-end app using filters on the tags and properties previously created.
In this article, you create two Node.js console apps:
AddTagsAndQuery.js: a back-end app that adds tags and queries device twins.
TwinSimulatedDevice.js: a simulated device app that connects to your IoT hub and reports its connectivity condition.
Note
See Azure IoT SDKs for more information about the SDK tools available to build both device and back-end apps.
Prerequisites
To complete this article, you need:
An IoT hub. Create one with the CLI or the Azure portal.
A registered device. Register one in the Azure portal.
Node.js version 10.0.x or later.
Make sure that port 8883 is open in your firewall. The device sample in this article uses MQTT protocol, which communicates over port 8883. This port may be blocked in some corporate and educational network environments. For more information and ways to work around this issue, see Connecting to IoT Hub (MQTT).
Get the IoT hub connection string
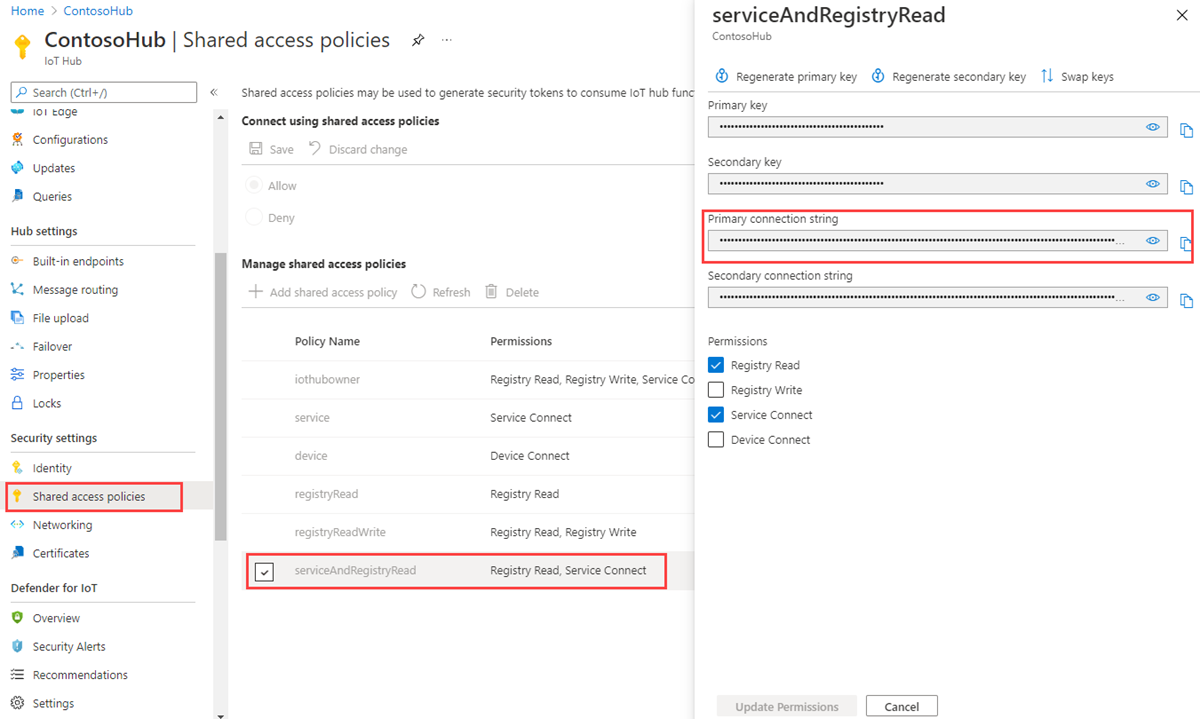
In this article, you create a back-end service that adds desired properties to a device twin and then queries the identity registry to find all devices with reported properties that have been updated accordingly. Your service needs the service connect permission to modify desired properties of a device twin, and it needs the registry read permission to query the identity registry. There is no default shared access policy that contains only these two permissions, so you need to create one.
To create a shared access policy that grants service connect and registry read permissions and get a connection string for this policy, follow these steps:
In the Azure portal, select Resource groups. Select the resource group where your hub is located, and then select your hub from the list of resources.
On the left-side pane of your hub, select Shared access policies.
From the top menu above the list of policies, select Add shared policy access policy.
In the Add shared access policy pane on the right, enter a descriptive name for your policy, such as serviceAndRegistryRead. Under Permissions, select Registry Read and Service Connect, and then select Add.

Select your new policy from the list of policies.
Select the copy icon for the Primary connection string and save the value.


For more information about IoT Hub shared access policies and permissions, see Access control and permissions.
Create a device app that updates reported properties
In this section, you create a Node.js console app that connects to your hub as myDeviceId, and then updates its device twin's reported properties to confirm that it's connected using a cellular network.
Create a new empty folder called reportconnectivity. In the reportconnectivity folder, create a new package.json file using the following command at your command prompt. The
--yesparameter accepts all the defaults.npm init --yesAt your command prompt in the reportconnectivity folder, run the following command to install the azure-iot-device, and azure-iot-device-mqtt packages:
npm install azure-iot-device azure-iot-device-mqtt --saveUsing a text editor, create a new ReportConnectivity.js file in the reportconnectivity folder.
Add the following code to the ReportConnectivity.js file. Replace
{device connection string}with the device connection string you saw when you registered a device in the IoT Hub:'use strict'; var Client = require('azure-iot-device').Client; var Protocol = require('azure-iot-device-mqtt').Mqtt; var connectionString = '{device connection string}'; var client = Client.fromConnectionString(connectionString, Protocol); client.open(function(err) { if (err) { console.error('could not open IotHub client'); } else { console.log('client opened'); client.getTwin(function(err, twin) { if (err) { console.error('could not get twin'); } else { var patch = { connectivity: { type: 'cellular' } }; twin.properties.reported.update(patch, function(err) { if (err) { console.error('could not update twin'); } else { console.log('twin state reported'); process.exit(); } }); } }); } });The Client object exposes all the methods you require to interact with device twins from the device. The previous code, after it initializes the Client object, retrieves the device twin for myDeviceId and updates its reported property with the connectivity information.
Run the device app
node ReportConnectivity.jsYou should see the message
twin state reported.Now that the device reported its connectivity information, it should appear in both queries. Go back in the addtagsandqueryapp folder and run the queries again:
node AddTagsAndQuery.jsThis time myDeviceId should appear in both query results.

Create a service app that updates desired properties and queries twins
In this section, you create a Node.js console app that adds location metadata to the device twin associated with myDeviceId. The app queries IoT hub for devices located in the US and then queries devices that report a cellular network connection.
Create a new empty folder called addtagsandqueryapp. In the addtagsandqueryapp folder, create a new package.json file using the following command at your command prompt. The
--yesparameter accepts all the defaults.npm init --yesAt your command prompt in the addtagsandqueryapp folder, run the following command to install the azure-iothub package:
npm install azure-iothub --saveUsing a text editor, create a new AddTagsAndQuery.js file in the addtagsandqueryapp folder.
Add the following code to the AddTagsAndQuery.js file. Replace
{iot hub connection string}with the IoT Hub connection string you copied in Get the IoT hub connection string.'use strict'; var iothub = require('azure-iothub'); var connectionString = '{iot hub connection string}'; var registry = iothub.Registry.fromConnectionString(connectionString); registry.getTwin('myDeviceId', function(err, twin){ if (err) { console.error(err.constructor.name + ': ' + err.message); } else { var patch = { tags: { location: { region: 'US', plant: 'Redmond43' } } }; twin.update(patch, function(err) { if (err) { console.error('Could not update twin: ' + err.constructor.name + ': ' + err.message); } else { console.log(twin.deviceId + ' twin updated successfully'); queryTwins(); } }); } });The Registry object exposes all the methods required to interact with device twins from the service. The previous code first initializes the Registry object, then retrieves the device twin for myDeviceId, and finally updates its tags with the desired location information.
After updating the tags it calls the queryTwins function.
Add the following code at the end of AddTagsAndQuery.js to implement the queryTwins function:
     var queryTwins = function() {
         var query = registry.createQuery("SELECT * FROM devices WHERE tags.location.plant = 'Redmond43'", 100);
         query.nextAsTwin(function(err, results) {
             if (err) {
                 console.error('Failed to fetch the results: ' + err.message);
             } else {
                 console.log("Devices in Redmond43: " + results.map(function(twin) {return twin.deviceId}).join(','));
             }
         });

         query = registry.createQuery("SELECT * FROM devices WHERE tags.location.plant = 'Redmond43' AND properties.reported.connectivity.type = 'cellular'", 100);
         query.nextAsTwin(function(err, results) {
             if (err) {
                 console.error('Failed to fetch the results: ' + err.message);
             } else {
                 console.log("Devices in Redmond43 using cellular network: " + results.map(function(twin) {return twin.deviceId}).join(','));
             }
         });
     };
The previous code executes two queries: the first selects only the device twins of devices located in the Redmond43 plant, and the second refines the query to select only the devices that are also connected through cellular network.
When the code creates the query object, it specifies the maximum number of returned documents in the second parameter. The query object contains a hasMoreResults boolean property that you can use to invoke the nextAsTwin methods multiple times to retrieve all results. A method called next is available for results that are not device twins, for example, the results of aggregation queries.
Run the application with:
node AddTagsAndQuery.jsYou should see one device in the results for the query asking for all devices located in Redmond43 and none for the query that restricts the results to devices that use a cellular network.

In this article, you:
- Added device metadata as tags from a back-end app
- Reported device connectivity information in the device twin
- Queried the device twin information, using SQL-like IoT Hub query language
Next steps
To learn how to:
Send telemetry from devices, see Quickstart: Send telemetry from an IoT Plug and Play device to Azure IoT Hub
Configure devices using device twin's desired properties, see Tutorial: Configure your devices from a back-end service
Control devices interactively, such as turning on a fan from a user-controlled app, see Quickstart: Control a device connected to an IoT hub
Feedback
Coming soon: Throughout 2024 we will be phasing out GitHub Issues as the feedback mechanism for content and replacing it with a new feedback system. For more information see: https://aka.ms/ContentUserFeedback.
Submit and view feedback for