Run actions based on group status by using scopes in Azure Logic Apps
Applies to: Azure Logic Apps (Consumption)
To run actions only after another group of actions succeed or fail, group those actions inside a scope. This structure is useful when you want to organize actions as a logical group, evaluate that group's status, and perform actions that are based on the scope's status. After all the actions in a scope finish running, the scope also gets its own status. For example, you can use scopes when you want to implement exception and error handling.
To check a scope's status, you can use the same criteria that you use to determine a logic apps' run status, such as Succeeded, Failed, Cancelled, and so on. By default, when all the scope's actions succeed, the scope's status is marked as Succeeded. But when any action in the scope fails or is canceled, the scope's status is marked Failed. For limits on scopes, see Limits and config.
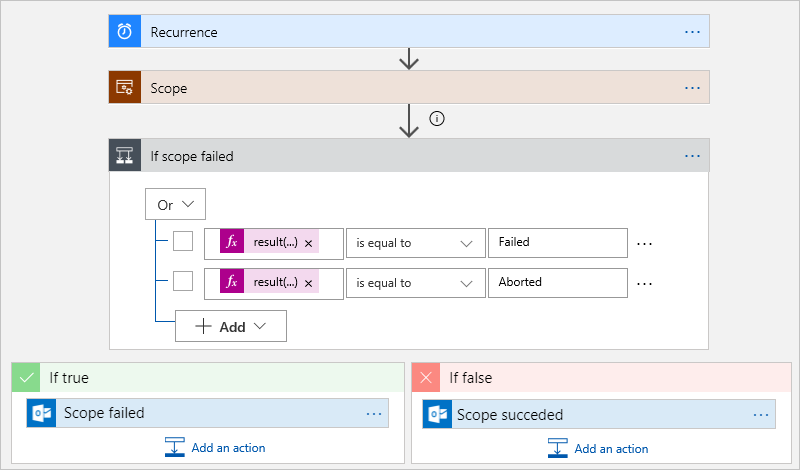
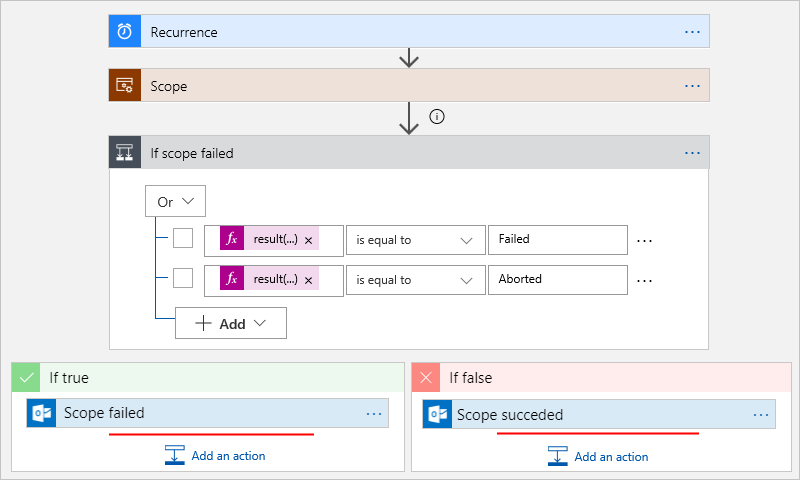
For example, here is a high-level logic app that uses a scope to run specific actions and a condition to check the scope's status. If any actions in the scope fail or end unexpectedly, the scope is marked Failed or Aborted respectively, and the logic app sends a "Scope failed" message. If all the scoped actions succeed, the logic app sends a "Scope succeeded" message.
Prerequisites
To follow the example in this article, you need these items:
An Azure subscription. If you don't have a subscription, sign up for a free Azure account.
An email account from any email provider supported by Logic Apps. This example uses Outlook.com. If you use a different provider, the general flow stays the same, but your UI appears different.
A Bing Maps key. To get this key, see Get a Bing Maps key.
Basic knowledge about logic apps
Create sample logic app
First, create this sample logic app so that you can add a scope later:
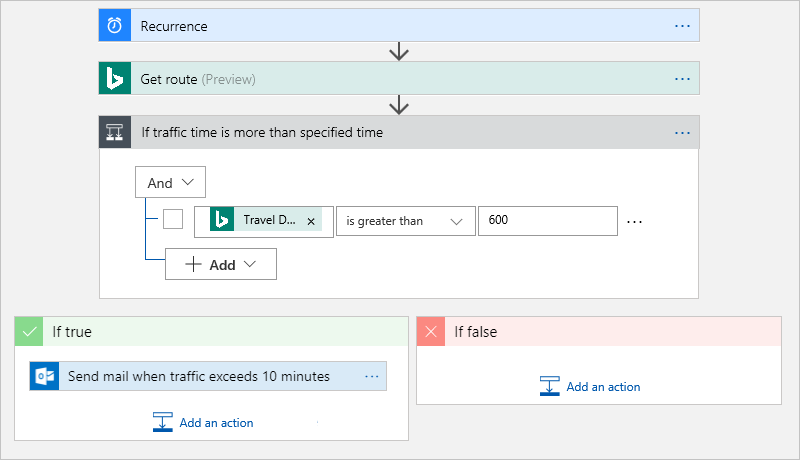
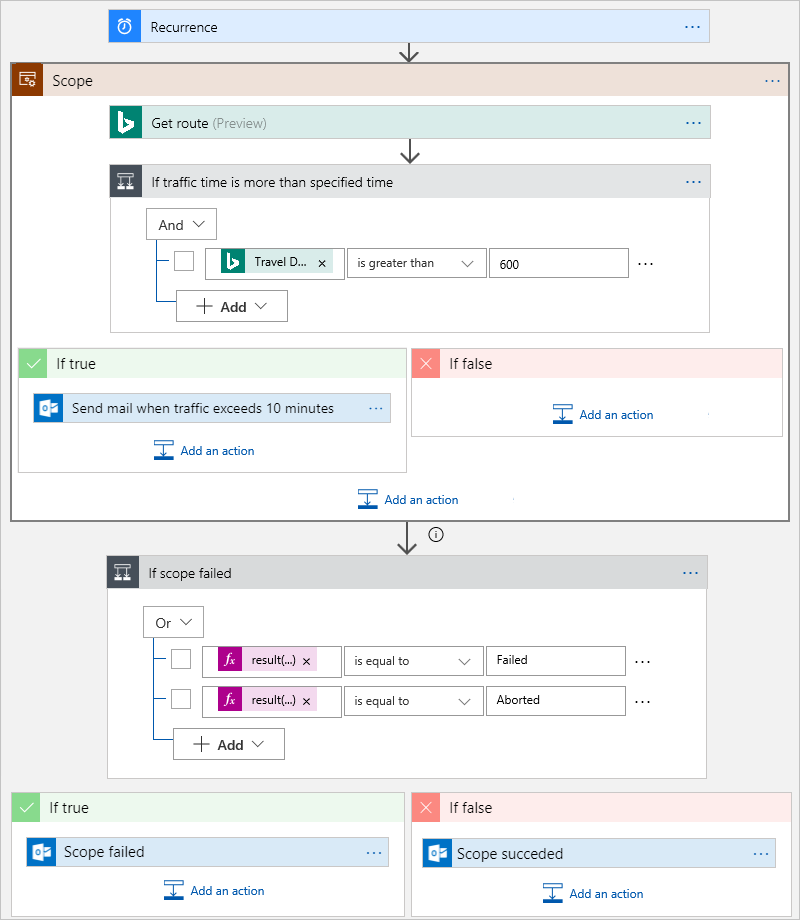
- A Schedule - Recurrence trigger that checks the Bing Maps service at an interval that you specify
- A Bing Maps - Get route action that checks the travel time between two locations
- A condition action that checks whether the travel time exceeds your specified travel time
- An action that sends you email that current travel time exceeds your specified time
You can save your logic app at any time, so save your work often.
Sign in to the Azure portal, if you haven't already. Create a blank logic app.
Add the Schedule - Recurrence trigger with these settings: Interval = "1" and Frequency = "Minute"

Tip
To visually simplify your view and hide each action's details in the designer, collapse each action's shape as you progress through these steps.
Add the Bing Maps - Get route action.
If you don't already have a Bing Maps connection, you're asked to create a connection.
Setting Value Description Connection Name BingMapsConnection Provide a name for your connection. API Key <your-Bing-Maps-key> Enter the Bing Maps key that you previously received. Set up your Get route action as shown the table below this image:
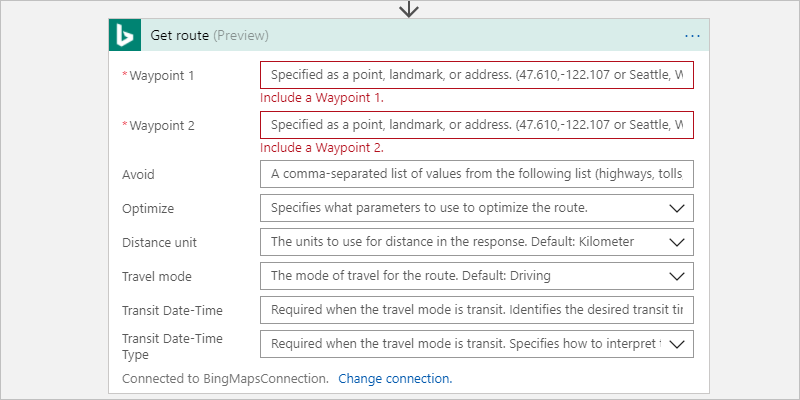
For more information about these parameters, see Calculate a route.
Setting Value Description Waypoint 1 <start> Enter your route's origin. Waypoint 2 <end> Enter your route's destination. Avoid None Enter items to avoid on your route, such as highways, tolls, and so on. For possible values, see Calculate a route. Optimize timeWithTraffic Select a parameter to optimize your route, such as distance, time with current traffic information, and so on. This example uses this value: "timeWithTraffic" Distance unit <your-preference> Enter the unit of distance to calculate your route. This example uses this value: "Mile" Travel mode Driving Enter the mode of travel for your route. This example uses this value "Driving" Transit Date-Time None Applies to transit mode only. Transit Date-Type Type None Applies to transit mode only.
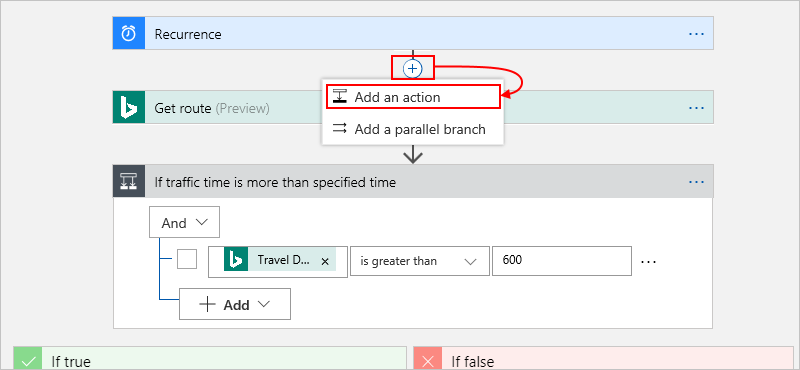
Add a condition that checks whether the current travel time with traffic exceeds a specified time. For this example, follow these steps:
Rename the condition with this description: If traffic time is more than specified time
In the leftmost column, click inside the Choose a value box so the dynamic content list appears. From that list, select the Travel Duration Traffic field, which is in seconds.
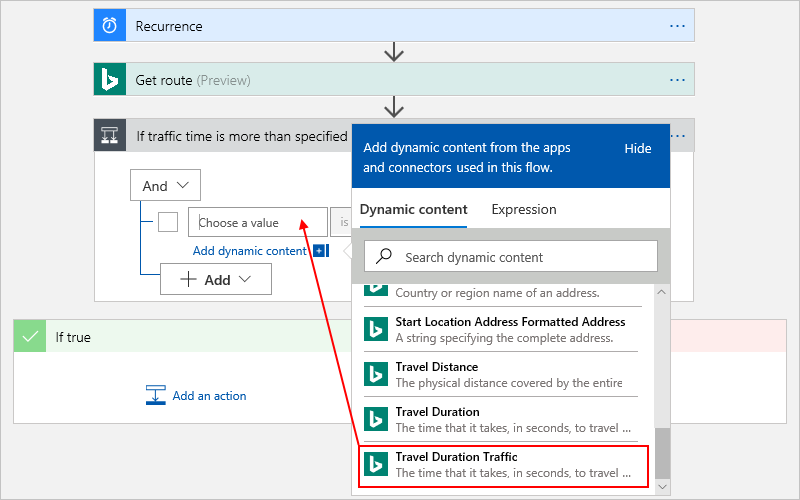
In the middle box, select this operator: is greater than
In the rightmost column, enter this comparison value, which is in seconds and equivalent to 10 minutes: 600
When you're done, your condition looks like this example:

In the If true branch, add a "send email" action for your email provider. Set up this action by following the steps under this image:
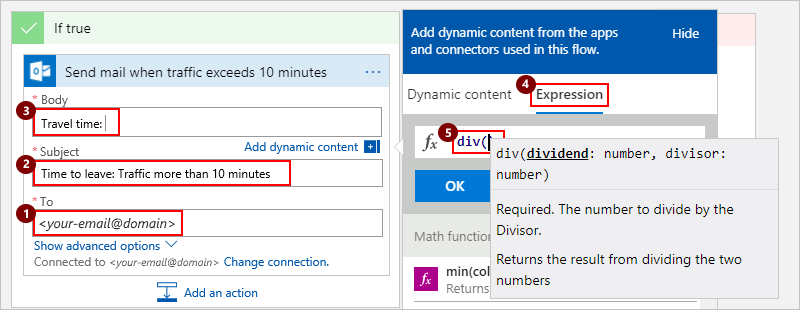
In the To field, enter your email address for testing purposes.
In the Subject field, enter this text:
Time to leave: Traffic more than 10 minutes- In the Body field, enter this text with a trailing space:
Travel time:While your cursor appears in the Body field, the dynamic content list stays open so that you can select any parameters that are available at this point.
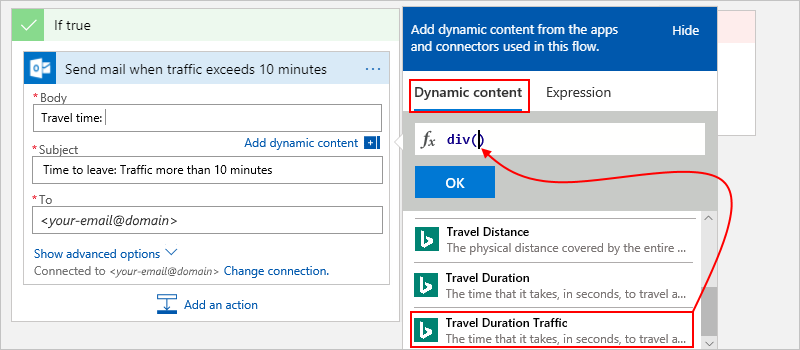
In the dynamic content list, choose Expression.
Find and select the div() function. Put your cursor in inside the function's parentheses.
While your cursor is inside the function's parentheses, choose Dynamic content so that the dynamic content list appears.
From the Get route section, select the Traffic Duration Traffic field.
After the field resolves to JSON format, add a comma (
,) followed by the number60so that you convert the value in Traffic Duration Traffic from seconds to minutes.div(body('Get_route')?['travelDurationTraffic'],60)Your expression now looks like this example:
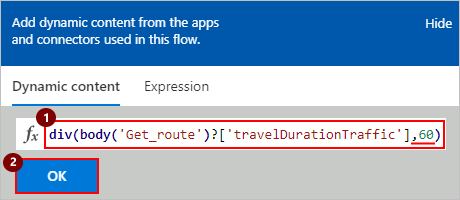
When you're done, choose OK.
After the expression resolves, add this text with a leading space:
minutesYour Body field now looks like this example:

Save your logic app.
Next, add a scope so that you can group specific actions and evaluate their status.
Add a scope
If you haven't already, open your logic app in Logic App Designer.
Add a scope at the workflow location that you want. For example, to add a scope between existing steps in the logic app workflow, follow these steps:
Move your pointer over the arrow where you want to add the scope. Choose the plus sign (+) > Add an action.
In the search box, enter "scope" as your filter. Select the Scope action.
Add steps to scope
Now add the steps or drag existing steps that you want to run inside the scope. For this example, drag these actions into the scope:
- Get route
- If traffic time is more than specified time, which includes both the true and false branches
Your logic app now looks like this example:

Under the scope, add a condition that checks the scope's status. Rename the condition with this description: If scope failed
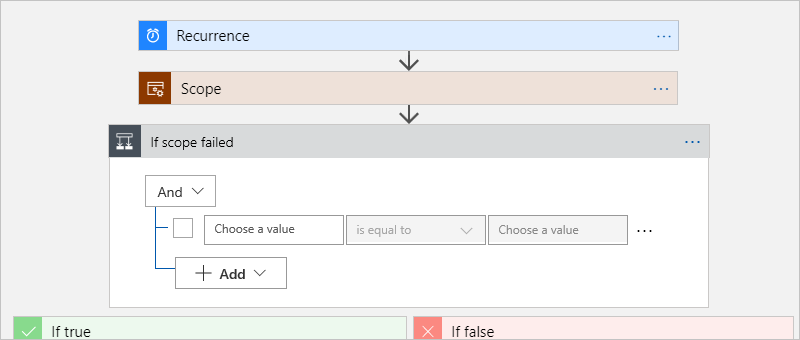
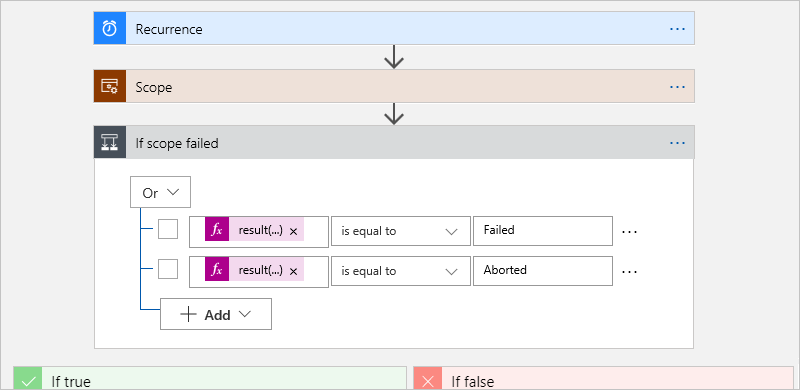
In the condition, add these expressions that check whether the scope's status is equal to "Failed" or "Aborted".
To add another row, choose Add.
In each row, click inside the left box so the dynamic content list appears. From the dynamic content list, choose Expression. In the edit box, enter this expression, and then choose OK:
result('Scope')[0]['status']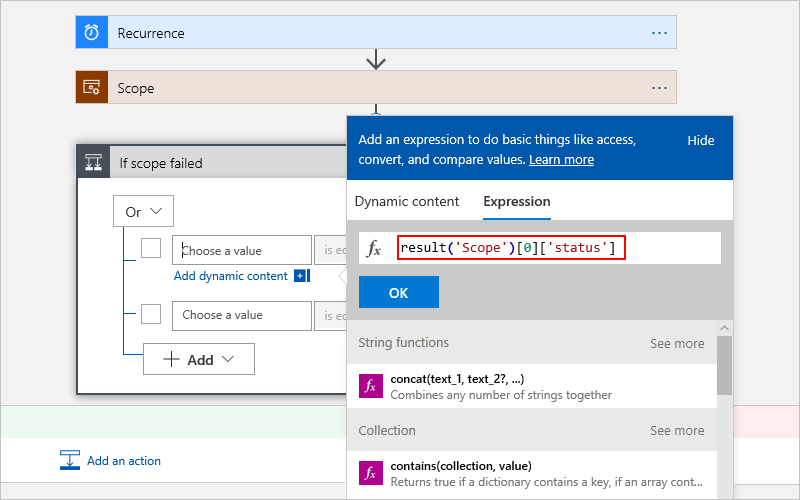
For both rows, select is equal to as the operator.
For the comparison values, in the first row, enter
Failed. In the second row, enterAborted.When you're done, your condition looks like this example:
Now, set the condition's
runAfterproperty so the condition checks the scope status and runs the matching action that you define in later steps.On the If scope failed condition, choose the ellipsis (...) button, and then choose Configure run after.
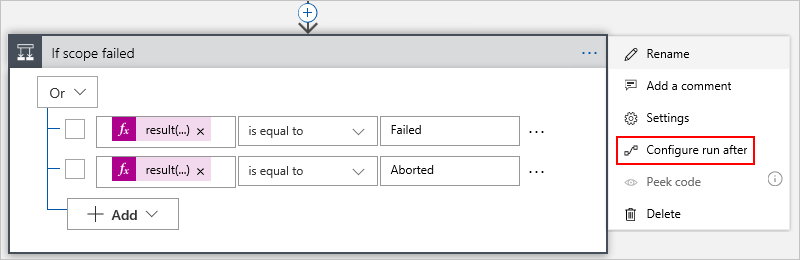
Select all these scope statuses: is successful, has failed, is skipped, and has timed out
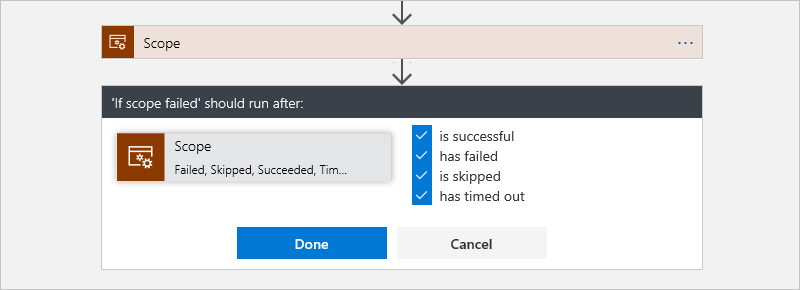
When you're finished, choose Done. The condition now shows an "information" icon.
In the If true and If false branches, add the actions that you want to perform based on each scope status, for example, send an email or message.
Save your logic app.
Your finished logic app now looks like this example:
Test your work
On the designer toolbar, choose Run. If all the scoped actions succeed, you get a "Scope succeeded" message. If any scoped actions don't succeed, you get a "Scope failed" message.
JSON definition
If you're working in code view, you can define a scope structure in your logic app's JSON definition instead. For example, here is the JSON definition for trigger and actions in the previous logic app:
"triggers": {
  "Recurrence": {
    "type": "Recurrence",
    "recurrence": {
       "frequency": "Minute",
       "interval": 1
    }
  }
}
"actions": {
  "If_scope_failed": {
    "type": "If",
    "actions": {
      "Scope_failed": {
        "type": "ApiConnection",
        "inputs": {
          "body": {
            "Body": "Scope failed. Scope status: @{result('Scope')[0]['status']}",
            "Subject": "Scope failed",
            "To": "<your-email@domain.com>"
          },
          "host": {
            "connection": {
              "name": "@parameters('$connections')['outlook']['connectionId']"
            }
          },
          "method": "post",
          "path": "/Mail"
        },
        "runAfter": {}
      }
    },
    "else": {
      "actions": {
        "Scope_succeded": {
          "type": "ApiConnection",
          "inputs": {
            "body": {
              "Body": "Scope succeeded. Scope status: @{result('Scope')[0]['status']}",
              "Subject": "Scope succeeded",
              "To": "<your-email@domain.com>"
            },
            "host": {
              "connection": {
               "name": "@parameters('$connections')['outlook']['connectionId']"
              }
            },
            "method": "post",
            "path": "/Mail"
          },
          "runAfter": {}
        }
      }
    },
    "expression": {
      "or": [
         {
            "equals": [
              "@result('Scope')[0]['status']",
              "Failed"
            ]
         },
         {
            "equals": [
               "@result('Scope')[0]['status']",
               "Aborted"
            ]
         }
      ]
    },
    "runAfter": {
      "Scope": [
        "Failed",
        "Skipped",
        "Succeeded",
        "TimedOut"
      ]
    }
  },
  "Scope": {
    "type": "Scope",
    "actions": {
      "Get_route": {
        "type": "ApiConnection",
        "inputs": {
          "host": {
            "connection": {
              "name": "@parameters('$connections')['bingmaps']['connectionId']"
            }
          },
          "method": "get",
          "path": "/REST/V1/Routes/Driving",
          "queries": {
            "distanceUnit": "Mile",
            "optimize": "timeWithTraffic",
            "travelMode": "Driving",
            "wp.0": "<start>",
            "wp.1": "<end>"
          }
        },
        "runAfter": {}
      },
      "If_traffic_time_is_more_than_specified_time": {
        "type": "If",
        "actions": {
          "Send_mail_when_traffic_exceeds_10_minutes": {
            "type": "ApiConnection",
            "inputs": {
              "body": {
                 "Body": "Travel time:@{div(body('Get_route')?['travelDurationTraffic'],60)} minutes",
                 "Subject": "Time to leave: Traffic more than 10 minutes",
                 "To": "<your-email@domain.com>"
              },
              "host": {
                "connection": {
                   "name": "@parameters('$connections')['outlook']['connectionId']"
                }
              },
              "method": "post",
              "path": "/Mail"
            },
            "runAfter": {}
          }
        },
        "expression": {
          "and" : [
            {
               "greater": [
                  "@body('Get_route')?['travelDurationTraffic']",
                  600
               ]
            }
          ]
        },
        "runAfter": {
          "Get_route": [
            "Succeeded"
          ]
        }
      }
    },
    "runAfter": {}
  }
},
Get support
- For questions, visit the Microsoft Q&A question page for Azure Logic Apps.
- To submit or vote on features and suggestions, visit the Azure Logic Apps user feedback site.
Next steps
Feedback
Coming soon: Throughout 2024 we will be phasing out GitHub Issues as the feedback mechanism for content and replacing it with a new feedback system. For more information see: https://aka.ms/ContentUserFeedback.
Submit and view feedback for