Access a compute instance terminal in your workspace
Access the terminal of a compute instance in your workspace to:
- Use files from Git and version files. These files are stored in your workspace file system, not restricted to a single compute instance.
- Install packages on the compute instance.
- Create extra kernels on the compute instance.
Prerequisites
- An Azure subscription. If you don't have an Azure subscription, create a free account before you begin.
- A Machine Learning workspace. See Create workspace resources.
Access a terminal
To access the terminal:
Open your workspace in Azure Machine Learning studio.
On the left side, select Notebooks.
Select the Open terminal image.
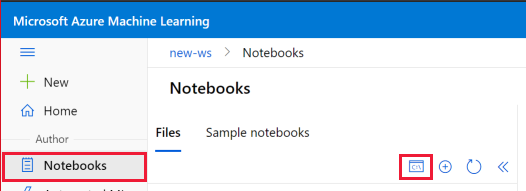
When a compute instance is running, the terminal window for that compute instance appears.
When no compute instance is running, use the Compute section on the right to start or create a compute instance.

In addition to the steps above, you can also access the terminal from:
- RStudio or Posit Workbench (formerly RStudio Workbench) (See Add custom applications such as RStudio or Posit Workbench)): Select the Terminal tab on top left.
- Jupyter Lab: Select the Terminal tile under the Other heading in the Launcher tab.
- Jupyter: Select New>Terminal on top right in the Files tab.
- SSH to the machine, if you enabled SSH access when the compute instance was created.
Copy and paste in the terminal
- Windows:
Ctrl-Insertto copy and useCtrl-Shift-vorShift-Insertto paste.- Mac OS:
Cmd-cto copy andCmd-vto paste.- FireFox/IE may not support clipboard permissions properly.
Use files from Git and version files
Access all Git operations from the terminal. All Git files and folders will be stored in your workspace file system. This storage allows you to use these files from any compute instance in your workspace.
Note
Add your files and folders anywhere under the ~/cloudfiles/code/Users folder so they will be visible in all your Jupyter environments.
To integrate Git with your Azure Machine Learning workspace, see Git integration for Azure Machine Learning.
Install packages
Install packages from a terminal window. Install packages into the kernel that you want to use to run your notebooks. The default kernel is python310-sdkv2.
Or you can install packages directly in Jupyter Notebook, RStudio, or Posit Workbench (formerly RStudio Workbench):
- RStudio or Posit Workbench(see Add custom applications such as RStudio or Posit Workbench): Use the Packages tab on the bottom right, or the Console tab on the top left.
- Python: Add install code and execute in a Jupyter Notebook cell.
Note
For package management within a Python notebook, use %pip or %conda magic functions to automatically install packages into the currently-running kernel, rather than !pip or !conda which refers to all packages (including packages outside the currently-running kernel)
Add new kernels
Warning
While customizing the compute instance, make sure you do not delete conda environments or jupyter kernels that you didn't create. Doing so may damage Jupyter/JupyterLab functionality.
To add a new Jupyter kernel to the compute instance:
Use the terminal window to create a new environment. For example, the code below creates
newenv:conda create --name newenvActivate the environment. For example, after creating
newenv:conda activate newenvInstall pip and ipykernel package to the new environment and create a kernel for that conda env
conda install pip
conda install ipykernel
python -m ipykernel install --user --name newenv --display-name "Python (newenv)"
Any of the available Jupyter Kernels can be installed.
To add a new R kernel to the compute instance:
Use the terminal window to create a new environment. For example, the code below creates
r_env:conda create -n r_env r-essentials r-baseActivate the environment. For example, after creating
r_env:conda activate r_envRun R in the new environment:
RAt the R prompt, run
IRkernel:IRkernel::installspec(name = 'irenv', displayname = 'New R Env')Quit the R session.
q()
It will take a few minutes before the new R kernel is ready to use. If you get an error saying it is invalid, wait and then try again.
For more information about conda, see Using R language with Anaconda. For more information about IRkernel, see Native R kernel for Jupyter.
Remove added kernels
Warning
While customizing the compute instance, make sure you do not delete conda environments or jupyter kernels that you didn't create.
To remove an added Jupyter kernel from the compute instance, you must remove the kernelspec, and (optionally) the conda environment. You can also choose to keep the conda environment. You must remove the kernelspec, or your kernel will still be selectable and cause unexpected behavior.
To remove the kernelspec:
Use the terminal window to list and find the kernelspec:
jupyter kernelspec listRemove the kernelspec, replacing UNWANTED_KERNEL with the kernel you'd like to remove:
jupyter kernelspec uninstall UNWANTED_KERNEL
To also remove the conda environment:
Use the terminal window to list and find the conda environment:
conda env listRemove the conda environment, replacing ENV_NAME with the conda environment you'd like to remove:
conda env remove -n ENV_NAME
Upon refresh, the kernel list in your notebooks view should reflect the changes you have made.
Manage terminal sessions
Terminal sessions can stay active if terminal tabs are not properly closed. Too many active terminal sessions can impact the performance of your compute instance.
Select Manage active sessions in the terminal toolbar to see a list of all active terminal sessions and shut down the sessions you no longer need.
Learn more about how to manage sessions running on your compute at Managing notebook and terminal sessions.
Warning
Make sure you close any sessions you no longer need to preserve your compute instance's resources and optimize your performance.
Feedback
Coming soon: Throughout 2024 we will be phasing out GitHub Issues as the feedback mechanism for content and replacing it with a new feedback system. For more information see: https://aka.ms/ContentUserFeedback.
Submit and view feedback for