Connect to and manage HDFS in Microsoft Purview
This article outlines how to register Hadoop Distributed File System (HDFS), and how to authenticate and interact with HDFS in Microsoft Purview. For more information about Microsoft Purview, read the introductory article.
Supported capabilities
| Metadata Extraction | Full Scan | Incremental Scan | Scoped Scan | Classification | Labeling | Access Policy | Lineage | Data Sharing | Live view |
|---|---|---|---|---|---|---|---|---|---|
| Yes | Yes | Yes | Yes | Yes | No | No | No | No | No |
When scanning HDFS source, Microsoft Purview supports extracting technical metadata including HDFS:
- Namenode
- Folders
- Files
- Resource sets
When setting up scan, you can choose to scan the entire HDFS or selective folders. Learn about the supported file format here.
The connector uses webhdfs protocol to connect to HDFS and retrieve metadata. MapR Hadoop distribution is not supported.
Prerequisites
An Azure account with an active subscription. Create an account for free.
An active Microsoft Purview account.
You need Data Source Administrator and Data Reader permissions to register a source and manage it in the Microsoft Purview governance portal. For more information about permissions, see Access control in Microsoft Purview.
Set up the latest self-hosted integration runtime. For more information, see the create and configure a self-hosted integration runtime guide. The minimal supported Self-hosted Integration Runtime version is 5.20.8235.2.
- Ensure Visual C++ Redistributable (version Visual Studio 2012 Update 4 or newer) is installed on the self-hosted integration runtime machine. If you don't have this update installed, you can download it here.
- Ensure JRE or OpenJDK is installed on the self-hosted integration runtime machine for parsing Parquet and ORC files. Learn more from here.
- To set up your environment to enable Kerberos authentication, see the Use Kerberos authentication for the HDFS connector section.
Register
This section describes how to register HDFS in Microsoft Purview using the Microsoft Purview governance portal.
Steps to register
To register a new HDFS source in your data catalog, follow these steps:
- Navigate to your Microsoft Purview account in the Microsoft Purview governance portal.
- Select Data Map on the left navigation.
- Select Register
- On Register sources, select HDFS. Select Continue.
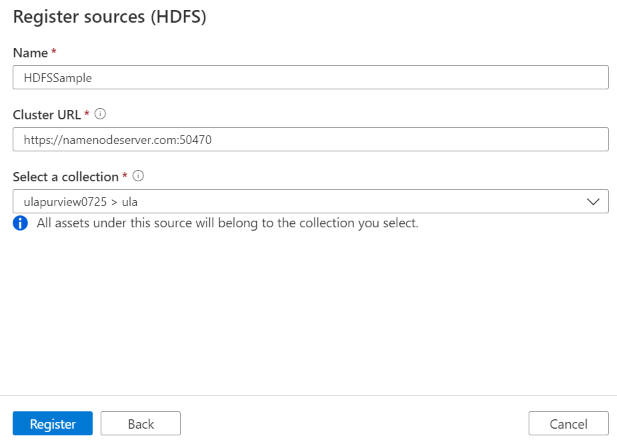
On the Register sources (HDFS) screen, follow these steps:
Enter a Name that the data source will be listed within the Catalog.
Enter the Cluster URL of the HDFS NameNode in the form of
https://<namenode>:<port>orhttp://<namenode>:<port>, e.g.https://namenodeserver.com:50470orhttp://namenodeserver.com:50070.Select a collection from the list.
Finish to register the data source.
Scan
Follow the steps below to scan HDFS to automatically identify assets. For more information about scanning in general, see our introduction to scans and ingestion.
Authentication for a scan
The supported authentication type for an HDFS source is Kerberos authentication.
Create and run scan
To create and run a new scan, follow these steps:
Make sure a self-hosted integration runtime is set up. If it isn't set up, use the steps mentioned here to create a self-hosted integration runtime.
Navigate to Sources.
Select the registered HDFS source.
Select + New scan.
On "Scan source_name"" page, provide the below details:
Name: The name of the scan
Connect via integration runtime: Select the configured self-hosted integration runtime. See setup requirements in Prerequisites section.
Credential: Select the credential to connect to your data source. Make sure to:
- Select Kerberos Authentication while creating a credential.
- Provide the user name in the format of
<username>@<domain>.comin the User name input field. Learn more from Use Kerberos authentication for the HDFS connector. - Store the user password used to connect to HDFS in the secret key.
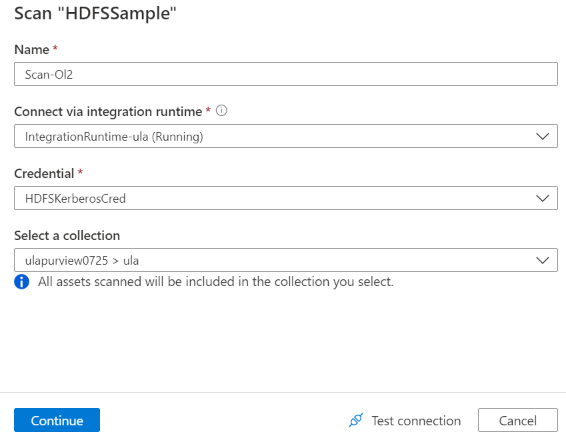
Select Test connection.
Select Continue.
On "Scope your scan" page, select the path(s) that you want to scan.
On "Select a scan rule set" page, select the scan rule set you want to use for schema extraction and classification. You can choose between the system default, existing custom rule sets, or create a new rule set inline. Learn more from Create a scan rule set.
On "Set a scan trigger" page, choose your scan trigger. You can set up a schedule or ran the scan once.
Review your scan and select Save and Run.
View your scans and scan runs
To view existing scans:
- Go to the Microsoft Purview portal. On the left pane, select Data map.
- Select the data source. You can view a list of existing scans on that data source under Recent scans, or you can view all scans on the Scans tab.
- Select the scan that has results you want to view. The pane shows you all the previous scan runs, along with the status and metrics for each scan run.
- Select the run ID to check the scan run details.
Manage your scans
To edit, cancel, or delete a scan:
Go to the Microsoft Purview portal. On the left pane, select Data Map.
Select the data source. You can view a list of existing scans on that data source under Recent scans, or you can view all scans on the Scans tab.
Select the scan that you want to manage. You can then:
- Edit the scan by selecting Edit scan.
- Cancel an in-progress scan by selecting Cancel scan run.
- Delete your scan by selecting Delete scan.
Note
- Deleting your scan does not delete catalog assets created from previous scans.
Use Kerberos authentication for the HDFS connector
There are two options for setting up the on-premises environment to use Kerberos authentication for the HDFS connector. You can choose the one that better fits your situation.
- Option 1: Join a self-hosted integration runtime machine in the Kerberos realm
- Option 2: Enable mutual trust between the Windows domain and the Kerberos realm
For either option, make sure you turn on webhdfs for Hadoop cluster:
Create the HTTP principal and keytab for webhdfs.
Important
The HTTP Kerberos principal must start with "HTTP/" according to Kerberos HTTP SPNEGO specification. Learn more from here.
Kadmin> addprinc -randkey HTTP/<namenode hostname>@<REALM.COM>
Kadmin> ktadd -k /etc/security/keytab/spnego.service.keytab HTTP/<namenode hostname>@<REALM.COM>
HDFS configuration options: add the following three properties in
hdfs-site.xml.<property> <name>dfs.webhdfs.enabled</name> <value>true</value> </property> <property> <name>dfs.web.authentication.kerberos.principal</name> <value>HTTP/_HOST@<REALM.COM></value> </property> <property> <name>dfs.web.authentication.kerberos.keytab</name> <value>/etc/security/keytab/spnego.service.keytab</value> </property>
Option 1: Join a self-hosted integration runtime machine in the Kerberos realm
Requirements
- The self-hosted integration runtime machine needs to join the Kerberos realm and can’t join any Windows domain.
How to configure
On the KDC server:
Create a principal, and specify the password.
Important
The username should not contain the hostname.
Kadmin> addprinc <username>@<REALM.COM>
On the self-hosted integration runtime machine:
Run the Ksetup utility to configure the Kerberos Key Distribution Center (KDC) server and realm.
The machine must be configured as a member of a workgroup, because a Kerberos realm is different from a Windows domain. You can achieve this configuration by setting the Kerberos realm and adding a KDC server by running the following commands. Replace REALM.COM with your own realm name.
C:> Ksetup /setdomain REALM.COM
C:> Ksetup /addkdc REALM.COM <your_kdc_server_address>
After you run these commands, restart the machine.
Verify the configuration with the
Ksetupcommand. The output should be like:C:> Ksetup default realm = REALM.COM (external) REALM.com: kdc = <your_kdc_server_address>
In your Purview account:
- Configure a credential with Kerberos authentication type with your Kerberos principal name and password to scan the HDFS. For configuration details, check the credential setting part in Scan section.
Option 2: Enable mutual trust between the Windows domain and the Kerberos realm
Requirements
- The self-hosted integration runtime machine must join a Windows domain.
- You need permission to update the domain controller's settings.
How to configure
Note
Replace REALM.COM and AD.COM in the following tutorial with your own realm name and domain controller.
On the KDC server:
Edit the KDC configuration in the krb5.conf file to let KDC trust the Windows domain by referring to the following configuration template. By default, the configuration is located at /etc/krb5.conf.
[logging]
 default = FILE:/var/log/krb5libs.log
 kdc = FILE:/var/log/krb5kdc.log
 admin_server = FILE:/var/log/kadmind.log

[libdefaults]
 default_realm = REALM.COM
 dns_lookup_realm = false
 dns_lookup_kdc = false
 ticket_lifetime = 24h
 renew_lifetime = 7d
 forwardable = true

[realms]
 REALM.COM = {
  kdc = node.REALM.COM
  admin_server = node.REALM.COM
 }
AD.COM = {
 kdc = windc.ad.com
 admin_server = windc.ad.com
}

[domain_realm]
 .REALM.COM = REALM.COM
 REALM.COM = REALM.COM
 .ad.com = AD.COM
 ad.com = AD.COM

[capaths]
 AD.COM = {
  REALM.COM = .
 }
After you configure the file, restart the KDC service.
Prepare a principal named krbtgt/REALM.COM@AD.COM in the KDC server with the following command:
Kadmin> addprinc krbtgt/REALM.COM@AD.COMIn the hadoop.security.auth_to_local HDFS service configuration file, add
RULE:[1:$1@$0](.*\@AD.COM)s/\@.*//.
On the domain controller:
Run the following
Ksetupcommands to add a realm entry:C:> Ksetup /addkdc REALM.COM <your_kdc_server_address> C:> ksetup /addhosttorealmmap HDFS-service-FQDN REALM.COMEstablish trust from the Windows domain to the Kerberos realm. [password] is the password for the principal krbtgt/REALM.COM@AD.COM.
C:> netdom trust REALM.COM /Domain: AD.COM /add /realm /password:[password]Select the encryption algorithm that's used in Kerberos.
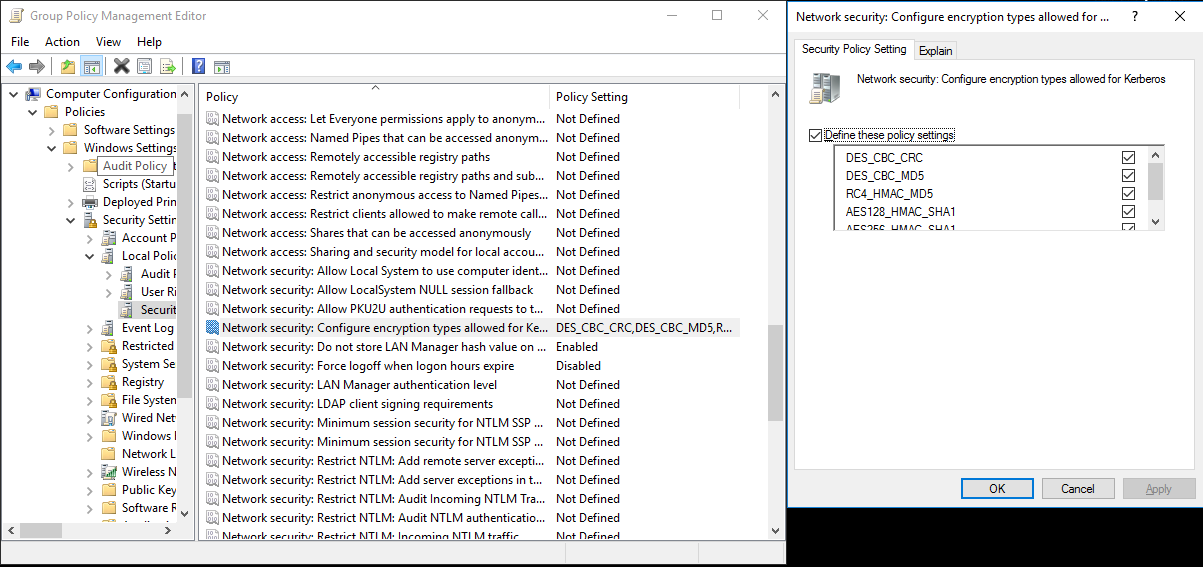
Select Server Manager > Group Policy Management > Domain > Group Policy Objects > Default or Active Domain Policy, and then select Edit.
On the Group Policy Management Editor pane, select Computer Configuration > Policies > Windows Settings > Security Settings > Local Policies > Security Options, and then configure Network security: Configure Encryption types allowed for Kerberos.
Select the encryption algorithm you want to use when you connect to the KDC server. You can select all the options.
Use the
Ksetupcommand to specify the encryption algorithm to be used on the specified realm.C:> ksetup /SetEncTypeAttr REALM.COM DES-CBC-CRC DES-CBC-MD5 RC4-HMAC-MD5 AES128-CTS-HMAC-SHA1-96 AES256-CTS-HMAC-SHA1-96
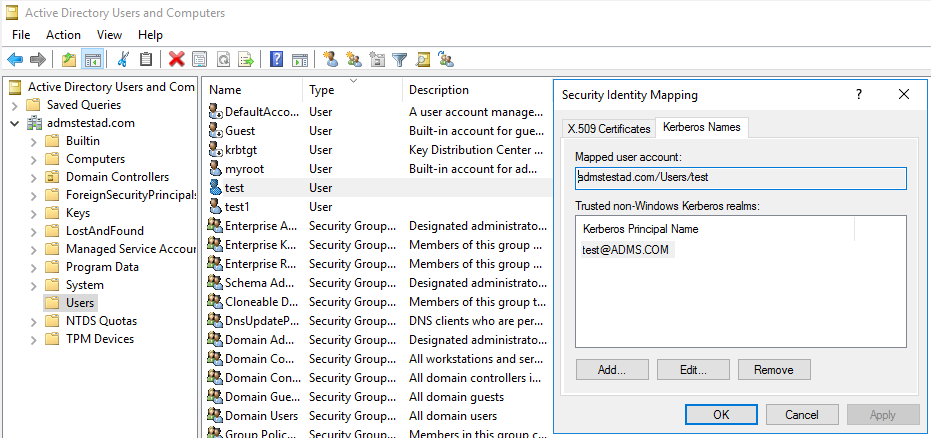
Create the mapping between the domain account and the Kerberos principal, so that you can use the Kerberos principal in the Windows domain.
Select Administrative tools > Active Directory Users and Computers.
Configure advanced features by selecting View > Advanced Features.
On the Advanced Features pane, right-click the account to which you want to create mappings and, on the Name Mappings pane, select the Kerberos Names tab.
Add a principal from the realm.
On the self-hosted integration runtime machine:
Run the following
Ksetupcommands to add a realm entry.C:> Ksetup /addkdc REALM.COM <your_kdc_server_address> C:> ksetup /addhosttorealmmap HDFS-service-FQDN REALM.COM
In your Purview account:
- Configure a credential with Kerberos authentication type with your Kerberos principal name and password to scan the HDFS. For configuration details, check the credential setting part in Scan section.
Known limitations
Currently, HDFS connector doesn't support custom resource set pattern rule for advanced resource set, the built-in resource set patterns will be applied.
Sensitivity label is not yet supported.
Next steps
Now that you've registered your source, follow the below guides to learn more about Microsoft Purview and your data.
Feedback
Coming soon: Throughout 2024 we will be phasing out GitHub Issues as the feedback mechanism for content and replacing it with a new feedback system. For more information see: https://aka.ms/ContentUserFeedback.
Submit and view feedback for