Quickstart: Azure Queue Storage client library for JavaScript
Get started with the Azure Queue Storage client library for JavaScript. Azure Queue Storage is a service for storing large numbers of messages for later retrieval and processing. Follow these steps to install the package and try out example code for basic tasks.
API reference documentation | Library source code | Package (npm) | Samples
Use the Azure Queue Storage client library for JavaScript to:
- Create a queue
- Add messages to a queue
- Peek at messages in a queue
- Update a message in a queue
- Get the queue length
- Receive messages from a queue
- Delete messages from a queue
- Delete a queue
Prerequisites
- Azure subscription - create one for free
- Azure Storage account - create a storage account
- Current Node.js for your operating system.
Setting up
This section walks you through preparing a project to work with the Azure Queue Storage client library for JavaScript.
Create the project
Create a Node.js application named queues-quickstart.
In a console window (such as cmd, PowerShell, or Bash), create a new directory for the project:
mkdir queues-quickstartSwitch to the newly created
queues-quickstartdirectory:cd queues-quickstartCreate a package.json file:
npm init -yOpen the project in Visual Studio Code:
code .
Install the packages
From the project directory, install the following packages using the npm install command.
Install the Azure Queue Storage npm package:
npm install @azure/storage-queueInstall the Azure Identity npm package to support passwordless connections:
npm install @azure/identityInstall other dependencies used in this quickstart:
npm install uuid dotenv
Set up the app framework
From the project directory:
Open a new text file in your code editor
Add
requirecalls to load Azure and Node.js modulesCreate the structure for the program, including basic exception handling
Here's the code:
const { QueueClient } = require("@azure/storage-queue");
const { DefaultAzureCredential } = require('@azure/identity');
const { v1: uuidv1 } = require("uuid");

async function main() {
    console.log("Azure Queue Storage client library - JavaScript quickstart sample");

    // Quickstart code goes here
}

main().then(() => console.log("\nDone")).catch((ex) => console.log(ex.message));
Save the new file as
index.jsin thequeues-quickstartdirectory.
Authenticate to Azure
Application requests to most Azure services must be authorized. Using the DefaultAzureCredential class provided by the Azure Identity client library is the recommended approach for implementing passwordless connections to Azure services in your code.
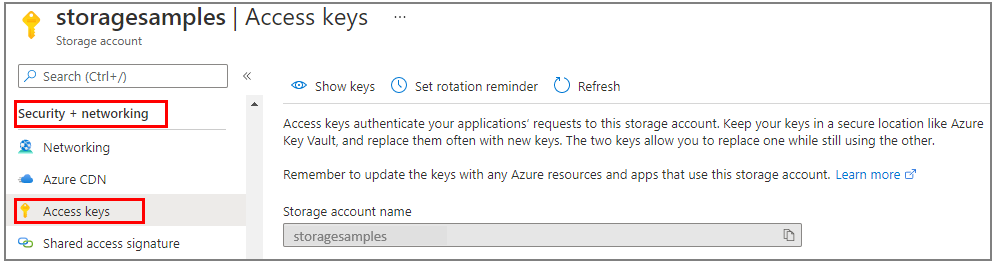
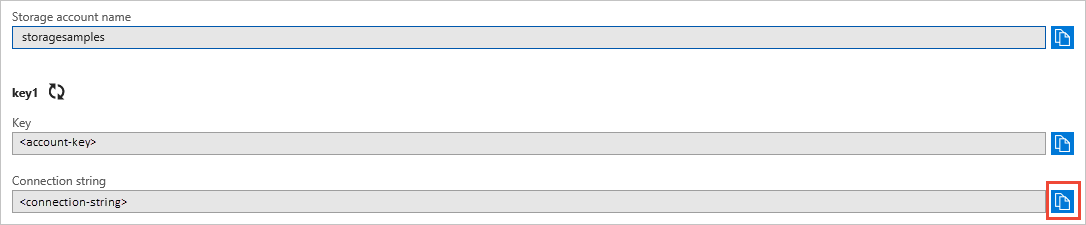
You can also authorize requests to Azure services using passwords, connection strings, or other credentials directly. However, this approach should be used with caution. Developers must be diligent to never expose these secrets in an unsecure location. Anyone who gains access to the password or secret key is able to authenticate. DefaultAzureCredential offers improved management and security benefits over the account key to allow passwordless authentication. Both options are demonstrated in the following example.
DefaultAzureCredential is a class provided by the Azure Identity client library for JavaScript. To learn more about DefaultAzureCredential, see the DefaultAzureCredential overview. DefaultAzureCredential supports multiple authentication methods and determines which method should be used at runtime. This approach enables your app to use different authentication methods in different environments (local vs. production) without implementing environment-specific code.
For example, your app can authenticate using your Azure CLI sign-in credentials when developing locally, and then use a managed identity once it has been deployed to Azure. No code changes are required for this transition.
When developing locally, make sure that the user account that is accessing the queue data has the correct permissions. You'll need Storage Queue Data Contributor to read and write queue data. To assign yourself this role, you'll need to be assigned the User Access Administrator role, or another role that includes the Microsoft.Authorization/roleAssignments/write action. You can assign Azure RBAC roles to a user using the Azure portal, Azure CLI, or Azure PowerShell. You can learn more about the available scopes for role assignments on the scope overview page.
In this scenario, you'll assign permissions to your user account, scoped to the storage account, to follow the Principle of Least Privilege. This practice gives users only the minimum permissions needed and creates more secure production environments.
The following example will assign the Storage Queue Data Contributor role to your user account, which provides both read and write access to queue data in your storage account.
Important
In most cases it will take a minute or two for the role assignment to propagate in Azure, but in rare cases it may take up to eight minutes. If you receive authentication errors when you first run your code, wait a few moments and try again.
In the Azure portal, locate your storage account using the main search bar or left navigation.
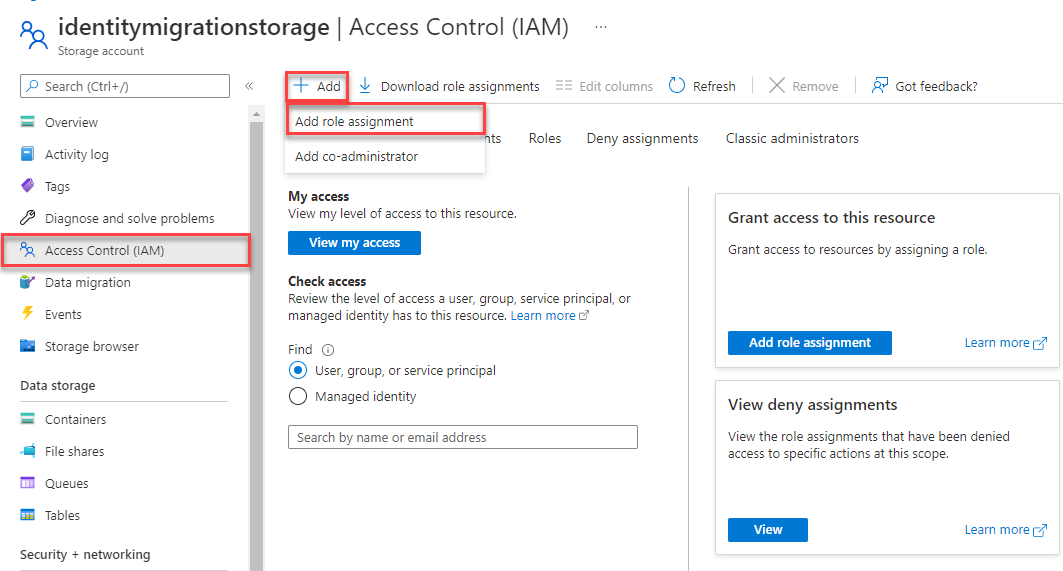
On the storage account overview page, select Access control (IAM) from the left-hand menu.
On the Access control (IAM) page, select the Role assignments tab.
Select + Add from the top menu and then Add role assignment from the resulting drop-down menu.
Use the search box to filter the results to the desired role. For this example, search for Storage Queue Data Contributor and select the matching result and then choose Next.
Under Assign access to, select User, group, or service principal, and then choose + Select members.
In the dialog, search for your Microsoft Entra username (usually your user@domain email address) and then choose Select at the bottom of the dialog.
Select Review + assign to go to the final page, and then Review + assign again to complete the process.
Object model
Azure Queue Storage is a service for storing large numbers of messages. A queue message can be up to 64 KB in size. A queue may contain millions of messages, up to the total capacity limit of a storage account. Queues are commonly used to create a backlog of work to process asynchronously. Queue Storage offers three types of resources:
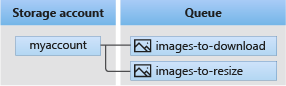
- Storage account: All access to Azure Storage is done through a storage account. For more information about storage accounts, see Storage account overview
- Queue: A queue contains a set of messages. All messages must be in a queue. Note that the queue name must be all lowercase. For information on naming queues, see Naming Queues and Metadata.
- Message: A message, in any format, of up to 64 KB. A message can remain in the queue for a maximum of 7 days. For version 2017-07-29 or later, the maximum time-to-live can be any positive number, or -1 indicating that the message doesn't expire. If this parameter is omitted, the default time-to-live is seven days.
The following diagram shows the relationship between these resources.
Use the following JavaScript classes to interact with these resources:
QueueServiceClient: AQueueServiceClientinstance represents a connection to a given storage account in the Azure Storage Queue service. This client allows you to manage the all queues in your storage account.QueueClient: AQueueClientinstance represents a single queue in a storage account. This client allows you to manage and manipulate an individual queue and its messages.
Code examples
These example code snippets show you how to do the following actions with the Azure Queue Storage client library for JavaScript:
- Authorize access and create a client object
- Create a queue
- Add messages to a queue
- Peek at messages in a queue
- Update a message in a queue
- Get the queue length
- Receive messages from a queue
- Delete messages from a queue
- Delete a queue
Authorize access and create a client object
Make sure you're authenticated with the same Microsoft Entra account you assigned the role to. You can authenticate via Azure CLI, Visual Studio Code, or Azure PowerShell.
Sign-in to Azure through the Azure CLI using the following command:
az login
Once authenticated, you can create and authorize a QueueClient object using DefaultAzureCredential to access queue data in the storage account. DefaultAzureCredential automatically discovers and uses the account you signed in with in the previous step.
To authorize using DefaultAzureCredential, make sure you've added the @azure/identity package, as described in Install the packages. Also, be sure to load the @azure/identity module in the index.js file:
const { DefaultAzureCredential } = require('@azure/identity');
Decide on a name for the queue and create an instance of the QueueClient class, using DefaultAzureCredential for authorization. We use this client object to create and interact with the queue resource in the storage account.
Important
Queue names may only contain lowercase letters, numbers, and hyphens, and must begin with a letter or a number. Each hyphen must be preceded and followed by a non-hyphen character. The name must also be between 3 and 63 characters long. For more information about naming queues, see Naming queues and metadata.
Add the following code inside the main method, and make sure to replace the <storage-account-name> placeholder value:
// Create a unique name for the queue
const queueName = "quickstart" + uuidv1();

// Instantiate a QueueClient which will be used to create and interact with a queue
// TODO: replace <storage-account-name> with the actual name
const queueClient = new QueueClient(`https://<storage-account-name>.queue.core.windows.net/${queueName}`, new DefaultAzureCredential());
Note
Messages sent using the QueueClient class must be in a format that can be included in an XML request with UTF-8 encoding. To include markup in the message, the contents of the message must either be XML-escaped or Base64-encoded.
Queues messages are stored as strings. If you need to send a different data type, you must serialize that data type into a string when sending the message and deserialize the string format when reading the message.
To convert JSON to a string format and back again in Node.js, use the following helper functions:
function jsonToBase64(jsonObj) {
    const jsonString = JSON.stringify(jsonObj)
    return  Buffer.from(jsonString).toString('base64')
}
function encodeBase64ToJson(base64String) {
    const jsonString = Buffer.from(base64String,'base64').toString()
    return JSON.parse(jsonString)
}
Create a queue
Using the QueueClient object, call the create method to create the queue in your storage account.
Add this code to the end of the main method:
console.log("\nCreating queue...");
console.log("\t", queueName);

// Create the queue
const createQueueResponse = await queueClient.create();
console.log("Queue created, requestId:", createQueueResponse.requestId);
Add messages to a queue
The following code snippet adds messages to queue by calling the sendMessage method. It also saves the QueueSendMessageResponse returned from the third sendMessage call. The returned sendMessageResponse is used to update the message content later in the program.
Add this code to the end of the main function:
console.log("\nAdding messages to the queue...");

// Send several messages to the queue
await queueClient.sendMessage("First message");
await queueClient.sendMessage("Second message");
const sendMessageResponse = await queueClient.sendMessage("Third message");

console.log("Messages added, requestId:", sendMessageResponse.requestId);
Peek at messages in a queue
Peek at the messages in the queue by calling the peekMessages method. This method retrieves one or more messages from the front of the queue but doesn't alter the visibility of the message. By default, peekMessages peeks at a single message.
Add this code to the end of the main function:
console.log("\nPeek at the messages in the queue...");

// Peek at messages in the queue
const peekedMessages = await queueClient.peekMessages({ numberOfMessages : 5 });

for (i = 0; i < peekedMessages.peekedMessageItems.length; i++) {
    // Display the peeked message
    console.log("\t", peekedMessages.peekedMessageItems[i].messageText);
}
Update a message in a queue
Update the contents of a message by calling the updateMessage method. This method can change a message's visibility timeout and contents. The message content must be a UTF-8 encoded string that is up to 64 KB in size. Along with the new content, pass in messageId and popReceipt from the response that was saved earlier in the code. The sendMessageResponse properties identify which message to update.
console.log("\nUpdating the third message in the queue...");

// Update a message using the response saved when calling sendMessage earlier
updateMessageResponse = await queueClient.updateMessage(
    sendMessageResponse.messageId,
    sendMessageResponse.popReceipt,
    "Third message has been updated"
);

console.log("Message updated, requestId:", updateMessageResponse.requestId);
Get the queue length
The getProperties method returns metadata about the queue, including the approximate number of messages waiting in the queue.
const properties = await queueClient.getProperties();
console.log("Approximate queue length: ", properties.approximateMessagesCount);
Receive messages from a queue
Download previously added messages by calling the receiveMessages method. In the numberOfMessages field, pass in the maximum number of messages to receive for this call.
Add this code to the end of the main function:
console.log("\nReceiving messages from the queue...");

// Get messages from the queue
const receivedMessagesResponse = await queueClient.receiveMessages({ numberOfMessages : 5 });

console.log("Messages received, requestId:", receivedMessagesResponse.requestId);
When calling the receiveMessages method, you can optionally specify values in QueueReceiveMessageOptions to customize message retrieval. You can specify a value for numberOfMessages, which is the number of messages to retrieve from the queue. The default is 1 message and the maximum is 32 messages. You can also specify a value for visibilityTimeout, which hides the messages from other operations for the timeout period. The default is 30 seconds.
Delete messages from a queue
You can delete messages from the queue after they're received and processed. In this case, processing is just displaying the message on the console.
Delete messages by calling the deleteMessage method. Any messages not explicitly deleted eventually become visible in the queue again for another chance to process them.
Add this code to the end of the main function:
// 'Process' and delete messages from the queue
for (i = 0; i < receivedMessagesResponse.receivedMessageItems.length; i++) {
    receivedMessage = receivedMessagesResponse.receivedMessageItems[i];

    // 'Process' the message
    console.log("\tProcessing:", receivedMessage.messageText);

    // Delete the message
    const deleteMessageResponse = await queueClient.deleteMessage(
        receivedMessage.messageId,
        receivedMessage.popReceipt
    );
    console.log("\tMessage deleted, requestId:", deleteMessageResponse.requestId);
}
Delete a queue
The following code cleans up the resources the app created by deleting the queue using the delete method.
Add this code to the end of the main function and save the file:
// Delete the queue
console.log("\nDeleting queue...");
const deleteQueueResponse = await queueClient.delete();
console.log("Queue deleted, requestId:", deleteQueueResponse.requestId);
Run the code
This app creates and adds three messages to an Azure queue. The code lists the messages in the queue, then retrieves and deletes them, before finally deleting the queue.
In your console window, navigate to the directory containing the index.js file, then use the following node command to run the app.
node index.js
The output of the app is similar to the following example:
Azure Queue Storage client library - JavaScript quickstart sample

Creating queue...
         quickstart<UUID>
Queue created, requestId: 5c0bc94c-6003-011b-7c11-b13d06000000

Adding messages to the queue...
Messages added, requestId: a0390321-8003-001e-0311-b18f2c000000

Peek at the messages in the queue...
         First message
         Second message
         Third message

Updating the third message in the queue...
Message updated, requestId: cb172c9a-5003-001c-2911-b18dd6000000

Receiving messages from the queue...
Messages received, requestId: a039036f-8003-001e-4811-b18f2c000000
        Processing: First message
        Message deleted, requestId: 4a65b82b-d003-00a7-5411-b16c22000000
        Processing: Second message
        Message deleted, requestId: 4f0b2958-c003-0030-2a11-b10feb000000
        Processing: Third message has been updated
        Message deleted, requestId: 6c978fcb-5003-00b6-2711-b15b39000000

Deleting queue...
Queue deleted, requestId: 5c0bca05-6003-011b-1e11-b13d06000000

Done
Step through the code in your debugger and check your Azure portal throughout the process. Check your storage account to verify messages in the queue are created and deleted.
Next steps
In this quickstart, you learned how to create a queue and add messages to it using JavaScript code. Then you learned to peek, retrieve, and delete messages. Finally, you learned how to delete a message queue.
For tutorials, samples, quick starts and other documentation, visit:
- To learn more, see the Azure Queue Storage client library for JavaScript.
- For more Azure Queue Storage sample apps, see Azure Queue Storage client library for JavaScript - samples.
Feedback
Coming soon: Throughout 2024 we will be phasing out GitHub Issues as the feedback mechanism for content and replacing it with a new feedback system. For more information see: https://aka.ms/ContentUserFeedback.
Submit and view feedback for