Use the Azure portal to enable server-side encryption with customer-managed keys for managed disks
Applies to: ✔️ Linux VMs ✔️ Windows VMs ✔️
Azure Disk Storage allows you to manage your own keys when using server-side encryption (SSE) for managed disks, if you choose. For conceptual information on SSE with customer managed keys, and other managed disk encryption types, see the Customer-managed keys section of our disk encryption article: Customer-managed keys
Restrictions
For now, customer-managed keys have the following restrictions:
- If this feature is enabled for a disk with incremental snapshots, it can't be disabled on that disk or its snapshots. To work around this, copy all the data to an entirely different managed disk that isn't using customer-managed keys. You can do that with either the Azure CLI or the Azure PowerShell module.
- Only software and HSM RSA keys of sizes 2,048-bit, 3,072-bit and 4,096-bit are supported, no other keys or sizes.
- HSM keys require the premium tier of Azure Key vaults.
- For Ultra Disks and Premium SSD v2 disks only:
- Snapshots created from disks that are encrypted with server-side encryption and customer-managed keys must be encrypted with the same customer-managed keys.
- User-assigned managed identities aren't supported for Ultra Disks and Premium SSD v2 disks encrypted with customer-managed keys.
- Most resources related to your customer-managed keys (disk encryption sets, VMs, disks, and snapshots) must be in the same subscription and region.
- Azure Key Vaults may be used from a different subscription but must be in the same region as your disk encryption set. As a preview, you can use Azure Key Vaults from different Microsoft Entra tenants.
- Disks encrypted with customer-managed keys can only move to another resource group if the VM they are attached to is deallocated.
- Disks, snapshots, and images encrypted with customer-managed keys can't be moved between subscriptions.
- Managed disks currently or previously encrypted using Azure Disk Encryption can't be encrypted using customer-managed keys.
- Can only create up to 5000 disk encryption sets per region per subscription.
- For information about using customer-managed keys with shared image galleries, see Preview: Use customer-managed keys for encrypting images.
The following sections cover how to enable and use customer-managed keys for managed disks:
Setting up customer-managed keys for your disks requires you to create resources in a particular order, if you're doing it for the first time. First, you'll need to create and set up an Azure Key Vault.
Set up your Azure Key Vault
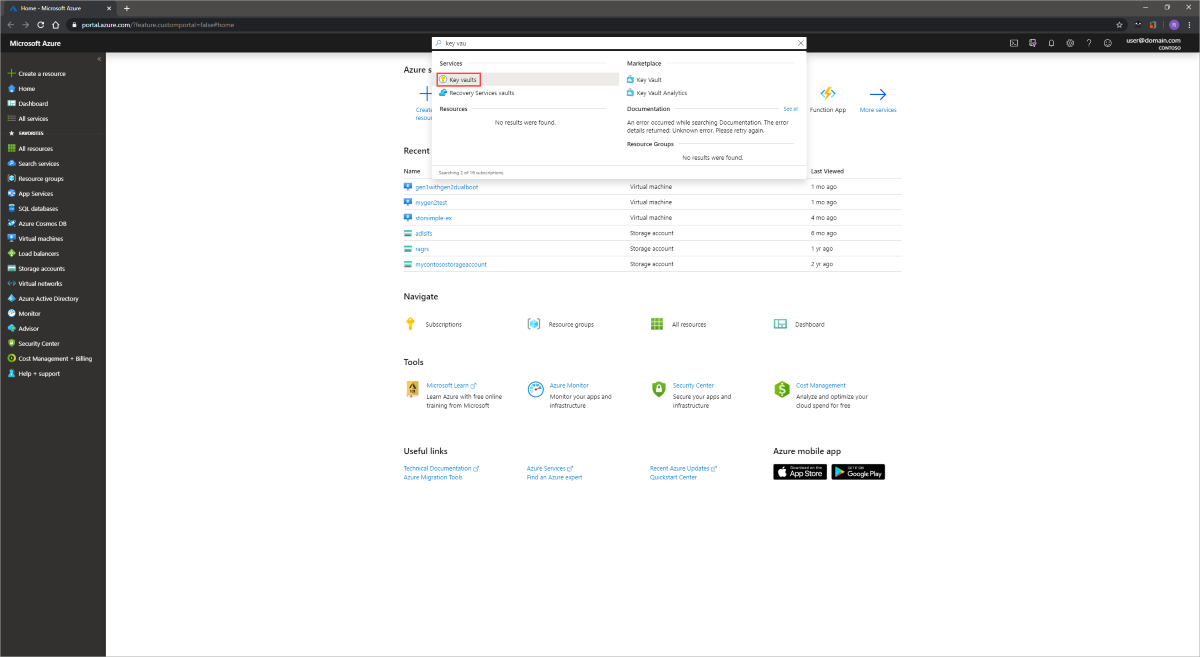
Sign in to the Azure portal.
Search for and select Key Vaults.
Important
Your disk encryption set, VM, disks, and snapshots must all be in the same region and subscription for deployment to succeed. Azure Key Vaults may be used from a different subscription but must be in the same region and tenant as your disk encryption set.
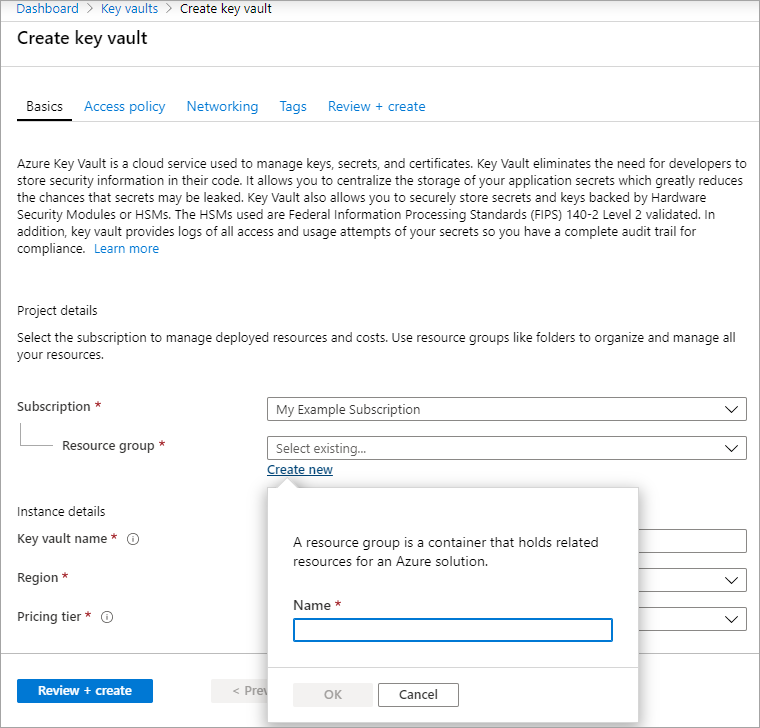
Select +Create to create a new Key Vault.
Create a new resource group.
Enter a key vault name, select a region, and select a pricing tier.
Note
When creating the Key Vault instance, you must enable soft delete and purge protection. Soft delete ensures that the Key Vault holds a deleted key for a given retention period (90 day default). Purge protection ensures that a deleted key cannot be permanently deleted until the retention period lapses. These settings protect you from losing data due to accidental deletion. These settings are mandatory when using a Key Vault for encrypting managed disks.
Select Review + Create, verify your choices, then select Create.
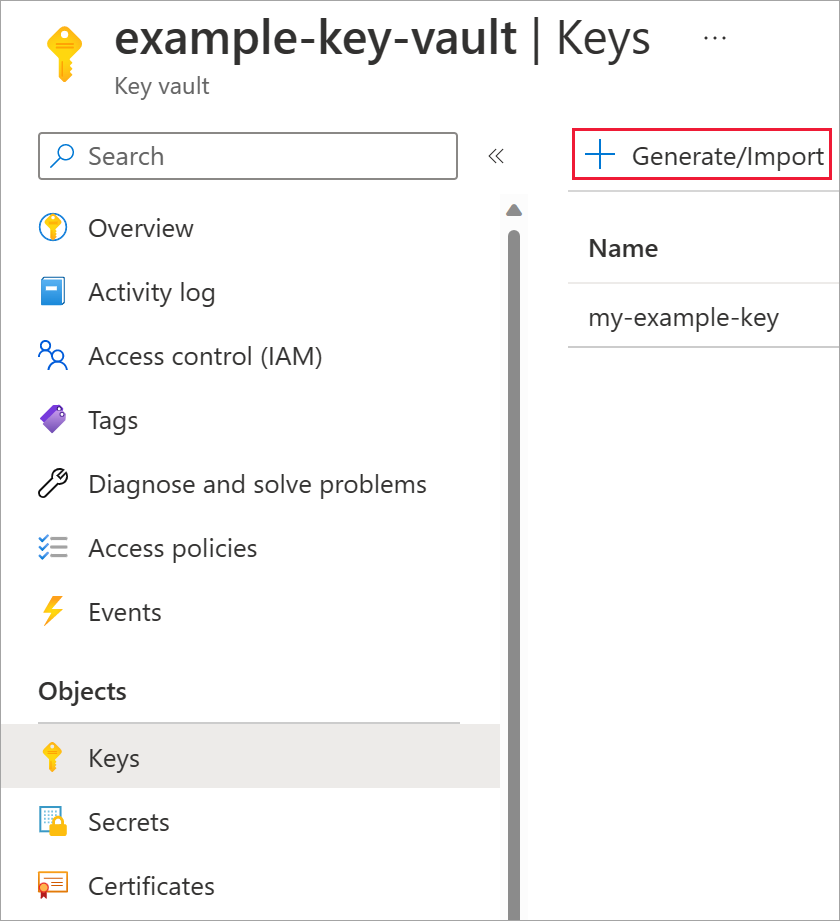
Once your key vault finishes deploying, select it.
Select Keys under Objects.
Select Generate/Import.
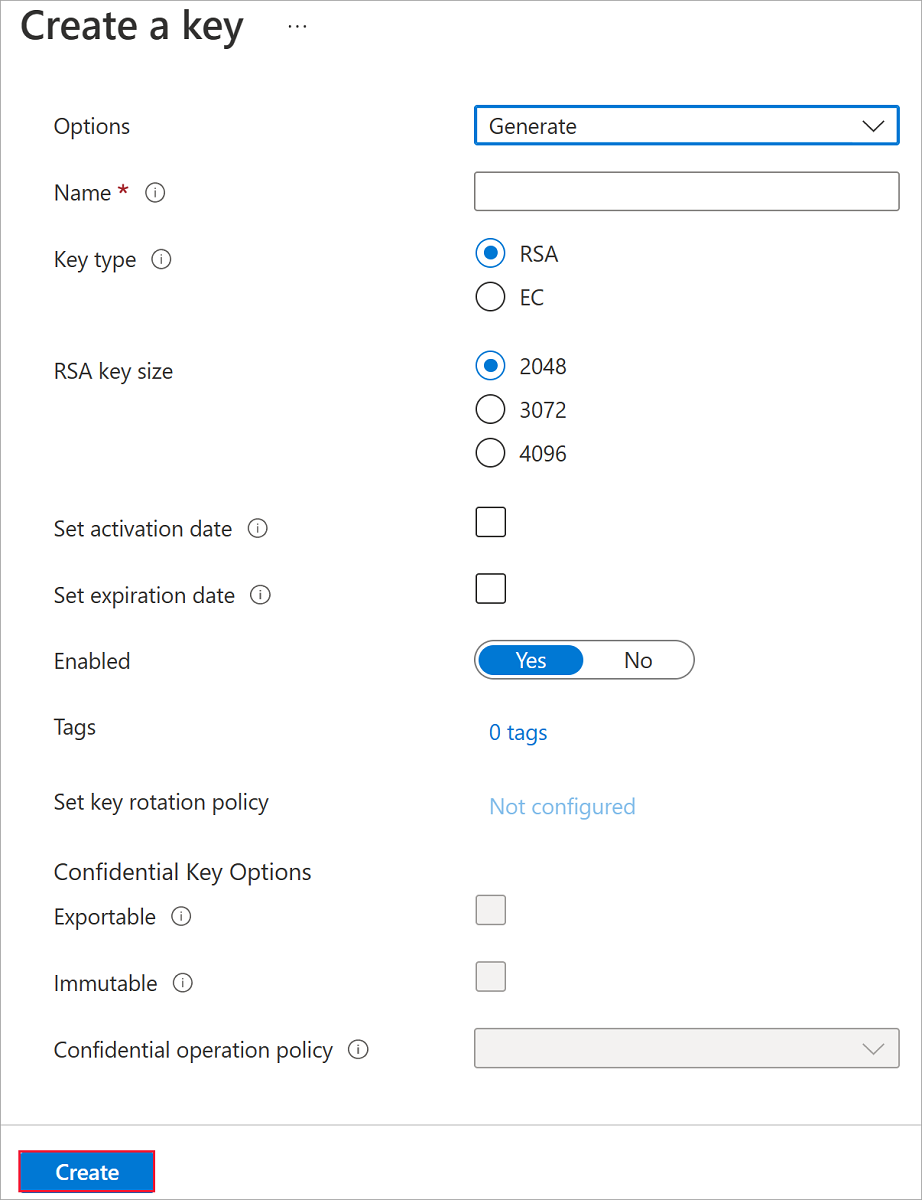
Leave both Key Type set to RSA and RSA Key Size set to 2048.
Fill in the remaining selections as you like and then select Create.


Add an Azure RBAC role
Now that you've created the Azure key vault and a key, you must add an Azure RBAC role, so you can use your Azure key vault with your disk encryption set.
- Select Access control (IAM) and add a role.
- Add either the Key Vault Administrator, Owner, or Contributor roles.
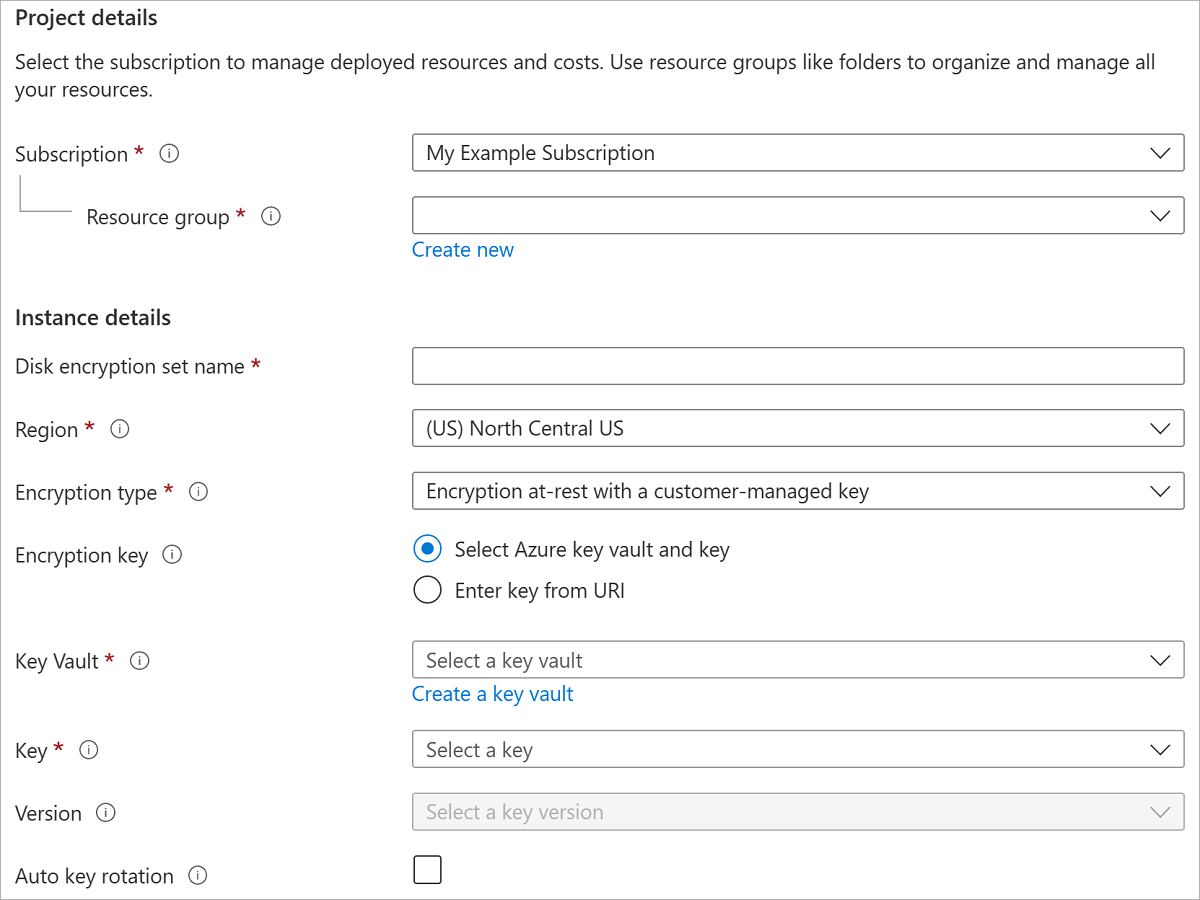
Set up your disk encryption set
Search for Disk Encryption Sets and select it.
On the Disk Encryption Sets pane, select +Create.
Select your resource group, name your encryption set, and select the same region as your key vault.
For Encryption type, select Encryption at-rest with a customer-managed key.
Note
Once you create a disk encryption set with a particular encryption type, it cannot be changed. If you want to use a different encryption type, you must create a new disk encryption set.
Make sure Select Azure key vault and key is selected.
Select the key vault and key you created previously, and the version.
If you want to enable automatic rotation of customer managed keys, select Auto key rotation.
Select Review + Create and then Create.
Navigate to the disk encryption set once it's deployed, and select the displayed alert.

This will grant your key vault permissions to the disk encryption set.


Deploy a VM
Now that you've created and set up your key vault and the disk encryption set, you can deploy a VM using the encryption. The VM deployment process is similar to the standard deployment process, the only differences are that you need to deploy the VM in the same region as your other resources and you opt to use a customer managed key.
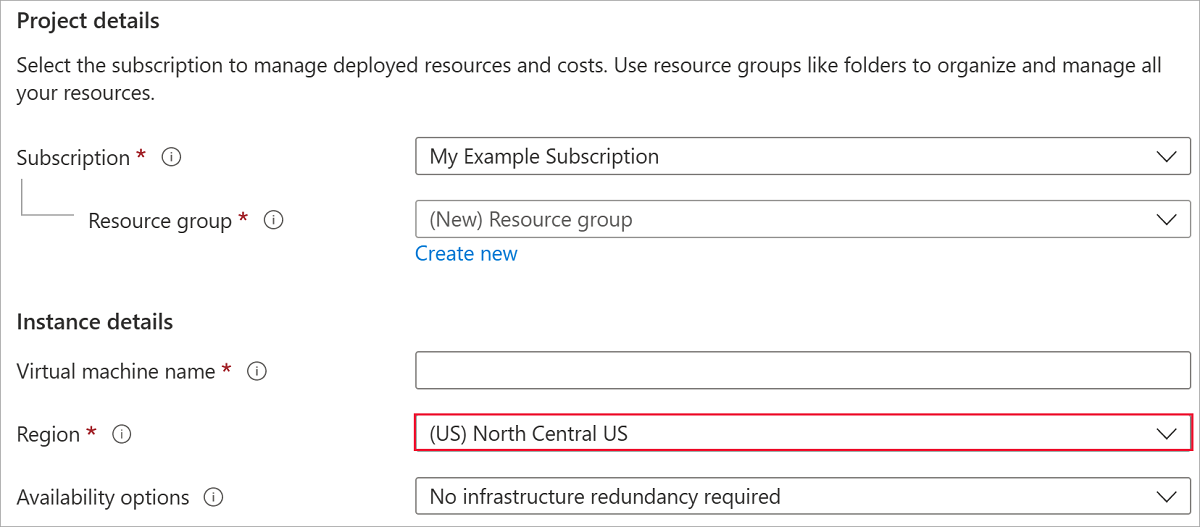
Search for Virtual Machines and select + Create to create a VM.
On the Basic pane, select the same region as your disk encryption set and Azure Key Vault.
Fill in the other values on the Basic pane as you like.
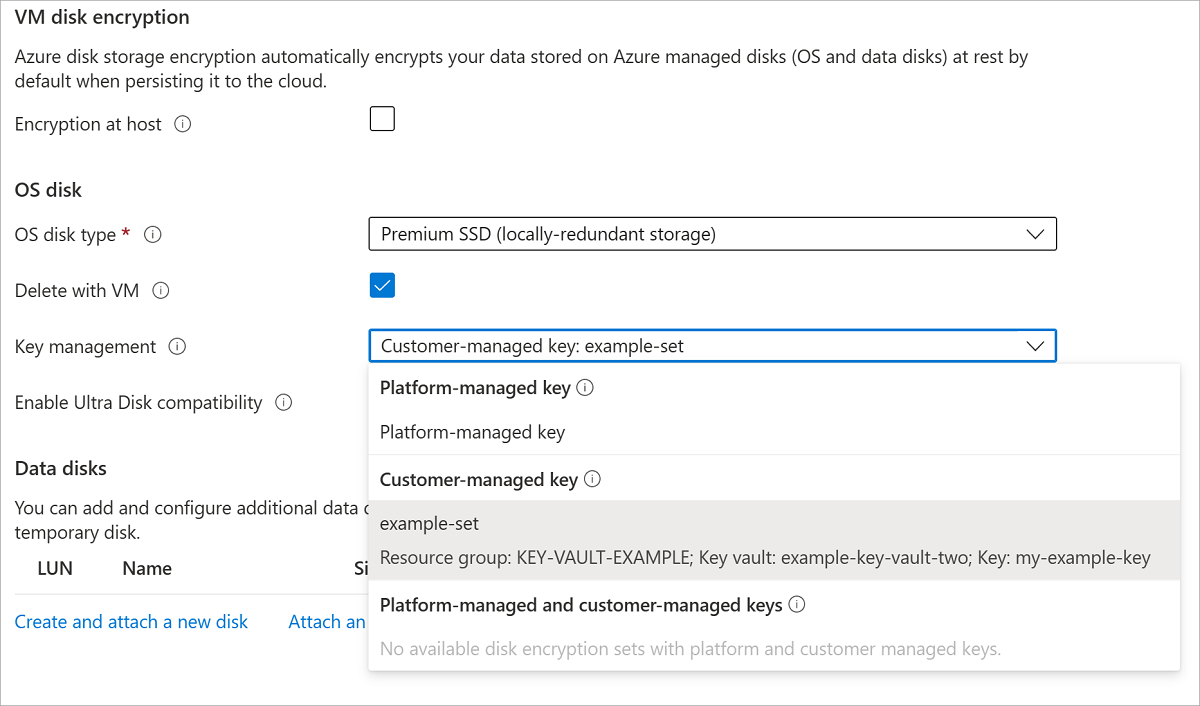
On the Disks pane, for Key management select your disk encryption set, key vault, and key in the drop-down.
Make the remaining selections as you like.


Enable on an existing disk
Caution
Enabling disk encryption on any disks attached to a VM requires you to stop the VM.
Navigate to a VM that is in the same region as one of your disk encryption sets.
Open the VM and select Stop.

After the VM has finished stopping, select Disks, and then select the disk you want to encrypt.
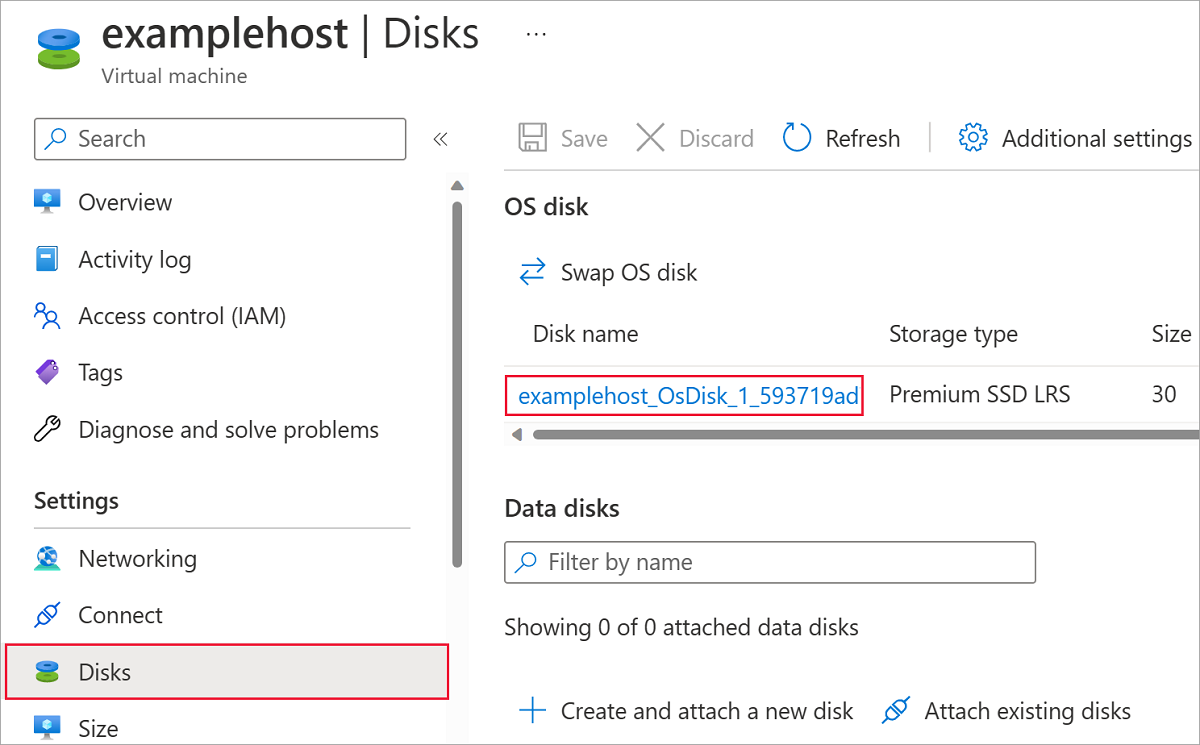
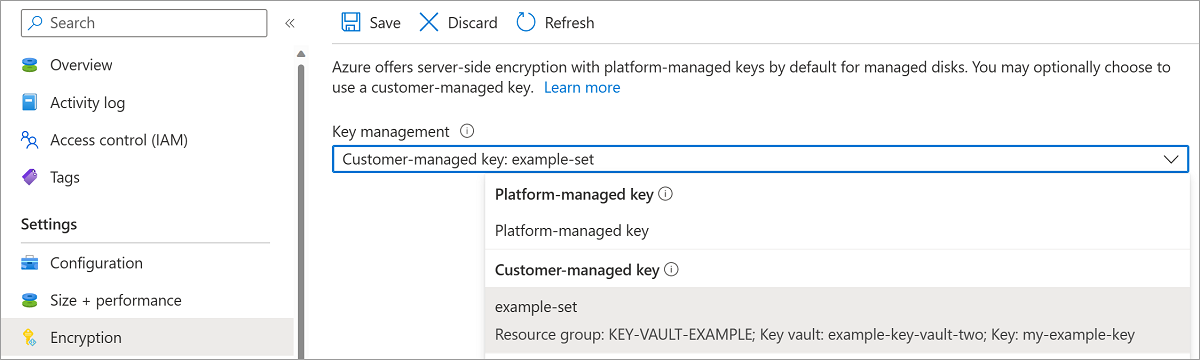
Select Encryption and under Key management select your key vault and key in the drop-down list, under Customer-managed key.
Select Save.
Repeat this process for any other disks attached to the VM you'd like to encrypt.
When your disks finish switching over to customer-managed keys, if there are no other attached disks you'd like to encrypt, start your VM.


Important
Customer-managed keys rely on managed identities for Azure resources, a feature of Microsoft Entra ID. When you configure customer-managed keys, a managed identity is automatically assigned to your resources under the covers. If you subsequently move the subscription, resource group, or managed disk from one Microsoft Entra directory to another, the managed identity associated with the managed disks is not transferred to the new tenant, so customer-managed keys may no longer work. For more information, see Transferring a subscription between Microsoft Entra directories.
Enable automatic key rotation on an existing disk encryption set
- Navigate to the disk encryption set that you want to enable automatic key rotation on.
- Under Settings, select Key.
- Select Auto key rotation and select Save.
Next steps
- Explore the Azure Resource Manager templates for creating encrypted disks with customer-managed keys
- What is Azure Key Vault?
- Replicate machines with customer-managed keys enabled disks
- Set up disaster recovery of VMware VMs to Azure with PowerShell
- Set up disaster recovery to Azure for Hyper-V VMs using PowerShell and Azure Resource Manager
- See Create a managed disk from a snapshot with CLI for a code sample.
Feedback
Coming soon: Throughout 2024 we will be phasing out GitHub Issues as the feedback mechanism for content and replacing it with a new feedback system. For more information see: https://aka.ms/ContentUserFeedback.
Submit and view feedback for