Pick for production, assembly, or jobs in advanced warehouse configurations
How you pick components for production, jobs, or assembly orders depend on how your warehouse is set up as a location. Learn more at Setting Up Warehouse Management.
In an advanced warehouse configuration for the outbound flow (pick), turn on the Require Pick and Require Shipment toggles on the Location Card page for the location.
When the location is set up to require warehouse pick processing and warehouse shipment processing, use warehouse pick documents to create and process pick information before you post the usage or consumption of components.
You can't create a warehouse pick document from scratch. Picks are part of a workflow where a person who is processing an order creates them in a push fashion, or the warehouse employee creates them in a pull fashion:
- In a push fashion, where you use the Create Pick action in the Production Order, Assembly Order, Project Card page. Select the lines to pick and prepare the picks by specifying, for example, which bins to take from and place in, and how many units to handle. Bins can be predefined for the warehouse location or resource.
- In a pull fashion, where you release Production Order, Assembly Order, Project Card to warehouse making the items available for picking. Then, on the Pick Worksheet page, warehouse employees can use the Get Warehouse Documents action to pull their assigned picks.
To pick or move components for source documents in a pull fashion, you must release the source document to make it ready for picking. Release source documents for internal operations in the following ways.
| Source Document | Release Method |
|---|---|
| Production Order | Change the order status to Released or create a released production order right away. |
| Assembly Order | Change status to Released. |
| Jobs | Change status to Open or create job with status Open right away. |
Production
Use Warehouse Pick documents for picking production components in the flow to production.
For a location that uses bins to move items to open shop floor bins, you can use the following methods:
- For a location that uses directed put-away and pick, follow the steps in the Move Items in advanced warehouse configurations article.
- For other locations, follow the steps in the Move Items Internally in Basic Warehouse Configurations article.
Assembly
Use Warehouse Pick documents to move assembly components to the assembly area.
Business Central supports assemble-to-stock and assemble-to-order types of assembly flows. To learn more about assemble-to-order in the outbound warehouse flow, go to Handling Assemble-to-Order Items in Warehouse Shipments.
Project management
Use Warehouse Pick documents to pick job components in the flow to project management.
Note
The ability to pick components for project planning lines was added to Business Central in 2022 release wave 2. To start using the capability, an administrator must turn on Feature Update: Enable inventory and warehouse pick from Jobs on the Feature Management page.
Jobs don't support advanced configurations where the Directed pick and Put-away toggle is turned on.
Check whether items are available for picking
Increase efficiency in your warehouse with accurate, real-time information about factors that can affect available quantities. For example:
- Inventory levels
- Locations
- Processing stages
- Quarantined items
- Reservations
You can access information about item availability from the following source documents:
- Sales orders
- Production orders
- Assembly orders
- Jobs
The information also respects other factors that affect availability. For example, dedicated bins, locked bins, and items that aren't available for picking. For example, items might be reserved, or pending put-away or shipment operations. The Pick Summary page lets you review the items that Business Central didn’t include in pick documents and take the necessary actions.
Note
This capability requires that you turn on the Directed Put-away and Pick toggle for the locations you use in your picking process.
Set up previews
To get details on what's being picked and what isn't, turn on the Show Summary (Directed Put-away and Pick) toggle on the Whse.-Source - Create Document or Whse.-Shipment - Create Pick request pages.
Determine the quantity you can pick
On lines on the Create Warehouse Pick Summary page, the Qty. to Handle (Base) field shows which, and how many, items Business Central tried to pick. The Summary FactBox provides more details.
For simple investigations, the Pickable Qty. might give you enough information. The field shows how many items are available. If the pickable quantity is less than expected, explore the bin content.
The Pickable Qty. is the maximum quantity that Business Central can consider for picking. This quantity consists of items in pickable bins. The quantity excludes quantities that are in blocked or dedicated bins, or items that are being picked in warehouse pick documents. If the item you want to pick requires item tracking, blocked lot or serial numbers stored in pickable bins are excluded from the pickable quantity.
If the pickable quantity differs from the quantity in pickable bins, there might be a problem. Explore the bin content to find blocked bins or quantities in active documents.
The Quantity in Warehouse field shows the total quantity you'll find in your warehouse if you do a physical count. You can drill down to the warehouse ledger entries from this field. If the field shows a quantity that's less than the quantity in the Quantity in Pickable Bins, there's a misalignment between warehouse and inventory quantities. In that case, use the Calculate Warehouse Adjustment action on the Item Journal page, and then create the warehouse pick again.
The following image illustrates the maximum quantity considered for picking.
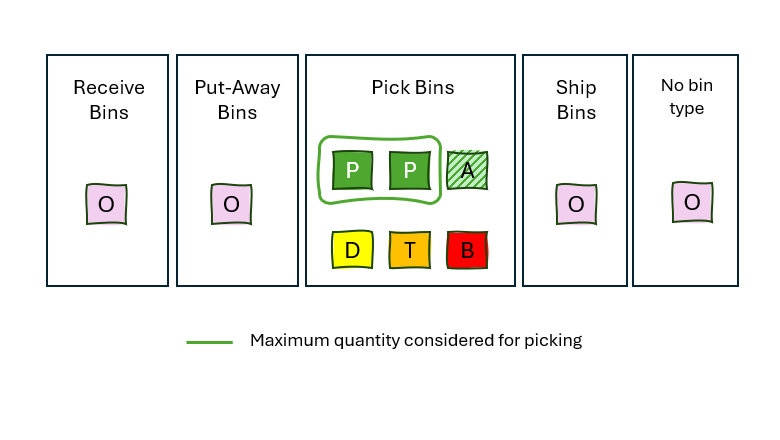
Legend
| Letter | Description |
|---|---|
| P | Bins with content of type Pick |
| D | Bins with content of type Pick marked as Dedicated bins |
| A | Bins with content of type Pick in the active documents (like another pick) |
| T | Bins with content of type Pick with items with blocked tracking |
| B | Bins with content of type Pick with blocked outbound movement |
| O | Other bins |
Reservations
If there are reservations for the item being picked, then calculation continues. The idea is that reserved demand has higher priority than non-reserved, which means that picking for non-reserved demand shouldn't prevent picking for reserved demand later.
To verify that your quantity can cover a demand, compare the Pickable Qty. value on the Summary FactBox with the value in the Qty. to Handle (Base) field on the lines.
You can find reservations in the Total Reserved Qty. in Warehouse field. Reserved quantities that are already picked and are ready for shipment, usage, or consumption, don't affect availability. The Reserved Qty. in Pick/Ship Bins field shows this quantity.
The Avail. Qty. Excluding Shipment Bin field shows the quantity that's available, excluding quantities for which the following is true:
- They're already picked for shipments.
- They're in blocked item lots or serial numbers.
- They're in blocked bins.
These quantities might be available, but you might not be able to pick them yet. They could still be in the receipt, storage, or quality-assurance areas. You can move them to the picking area by processing a put-away or movement worksheet.
The difference between Avail. Qty. Excluding Shipment Bin and reserved quantity in warehouse is the quantity available for picking without impacting reserved stock.
Other details
If items require item tracking, you can also find the quantity in blocked lots or serial numbers, which causes the following reductions:
- The pickable quantity
- Available quantity, excluding the shipment bin
- The reserved quantity in warehouse
If you pick the same item for multiple source documents or lines, which is also the case when you pick serial numbers, information about picks for other lines also displays because it reduces the pickable quantity.
To create pick documents in bulk with the pick worksheet
Choose the
 icon, enter Pick Worksheet, and then choose the related link.
Choose the Get Warehouse Documents action.
The list shows the released production, jobs, assembly orders that have been forwarded to the pick function. The orders include those for which pick instructions have already been created. Documents with pick lines that have been picked and registered aren't shown on this list.
Select the orders for which you want to prepare a pick.
Note
If you select a document that already has instructions for all its lines, Business Central informs you that there is nothing to handle. To combine the already created warehouse pick instructions into one pick instruction, delete the individual warehouse picks first.
Fill in the Sorting Method field to sort the lines the way you prefer.
Note
The way the lines are sorted in the worksheet doesn't automatically carry through to the pick instruction. However, the same sorting tools are available, along with bin ranking. You can easily recreate the order of the lines you plan in the worksheet when you create the pick instructions or by sorting in the pick instructions.
Fill in the Qty. to Handle field. Choose the Autofill Qty.to Handle action, or fill in the fields manually.
The page shows the quantities available in cross-dock bins, which is useful for planning work assignments in cross-docking situations. Business Central will always propose a pick from a cross-dock bin first.
If needed, edit the lines manually. You can also delete some of the lines to make the pick more efficient. For example, if there are multiple lines with items that are in cross-dock bins, you might create a pick for all of the lines. The cross-docked items are picked with the other items on the source document, and the cross-dock bins have space for more incoming items.
Note
The lines are only deleted from this worksheet, not from the pick selection list.
Choose the Create Pick action. The Create Pick page opens, where you can add more information to the pick.
Specify how to combine pick lines in the pick documents by selecting one of the following options.
Option Description Per Whse. Document Creates separate pick documents for worksheet lines with the same warehouse source document. Per Cust./Vend./Loc. Creates separate pick documents for each customer (jobs) Per Item Creates separate pick documents for each item in the pick worksheet. Per From Zone Creates separate pick documents for each zone that you take the items from. Per Bin Creates separate pick documents for each bin that you take the items from. Per Due Date Creates separate pick documents for source documents that have the same due date. Specify how to create the pick documents by selecting from the following options.
Option Description Max. No. of Pick Lines Creates pick documents that have no more than the specified number of lines in each document. Max. No. of Pick Source Docs. Creates pick documents that cover up to the specified number of source documents. Assigned User ID Creates pick documents only for worksheet lines that are assigned to the selected warehouse employee. Sorting Method for Pick Lines Select from the available options to sort lines in the created pick document. Set Breakbulk Filter Hides intermediate breakbulk pick lines when a larger unit of measure is converted to a smaller unit of measure and picked. Don't Fill Qty. to Handle Leaves the Qty. to Handle field empty on the created pick lines. Print Pick Prints the pick documents when they're created. You can also print from the created pick documents. Choose the OK button.
To pick items for a productions order, assembly order, job
Choose the
icon, enter Picks, and then choose the related link.If you need to work on a particular pick, select the pick from the list or filter the list to find the picks that have been assigned to you. Open the pick card.
If the Assigned User ID field is empty, enter your ID to identify yourself, if needed.
Pick the items.
If the warehouse is set up to use bins, the items’ default bins are used to suggest where to take the items from. The instructions contain at least two separate lines for Take and Place actions.
Operation areas such as production shop floors might have a default bin for the components they require. If so, the default bin code is added to the warehouse pick document to indicate where to put the items. For more information, see the tooltips for the To-Production Bin Code, the To-Assembly Bin Code, the To-Job Bin Code fields.
If the warehouse is set up to use directed put-away and pick, the bin rankings are used to calculate the best bins to pick from. Those bins are suggested on the pick lines. The instructions contain at least two separate lines for Take and Place actions.
- The first line, with Take in the Action Type field, indicates where the items are located in the picking area. If you're shipping a large number of items on one shipment line, you might have to pick the items in several bins, so there's a Take line for each bin.
- The next line, with Place in the Action Type field, shows where you must place the items in the warehouse. You can't change the zone and bin on this line.
Note
If you must pick or place the items for one line in more than one bin, for example because the designated bin is full, use the Split Line action on the Lines FastTab. The action creates a line for the remaining quantity to handle.
After you pick and place the items in the production, assembly or job area or bin, choose the Register Pick action.
You can now bring the items to the respective area and post the usage or consumption of the picked components by posting consumption journal, assembly order, or project journal. The following articles provide more information:
Flushing production components in an advanced warehouse configuration
Flushing methods affect the flow of components in production. Learn more at Flush Components According to Operation Output. Depending on the selected flushing method, you can pick components for production om the following ways:
- Use a Warehouse Pick document to record the pick for items that use the Manual flushing method. You need to register consumption separately. Learn more at Batch Post Production Consumption.
- Use a Warehouse Pick document to record the pick for items that use the Pick + Forward, Pick + Backward flushing method. Consumption of the components happens automatically either when you change the status of the production order or by starting or ending an operation. All required components must be available. Otherwise, posting flushed consumption stop for that component.
- Use a Warehouse Movement document without a reference to a source document or other ways to record the movement of components that use the Forward or Backward flushing method. Components are automatically consumed either when you change of status of the production order or start or end an operation. All required components must be available. Otherwise, posting flushed consumption stops for that component. Learn more at Move Items.
Example
You have a production order for 15 PCS of item SP-SCM1004. Some of the items on the component list must be flushed manually in a consumption journal. Other items can be picked and flushed automatically using the Pick + Backward flushing method.
The following steps describe the actions that different people take and the related response:
The shop floor supervisor releases the production order. Items with Forward flushing method and no routing link are deducted from the open shop floor bin.
The shop floor supervisor chooses the Create Warehouse Pick action on the production order. A warehouse pick document is created pick for items with Manual, Pick + Backward, and Pick + Forward flushing methods. These items are placed in the To-Production bin.
The warehouse manager assigns the picks to a warehouse employee.
The warehouse employee picks the items from the appropriate bins and places them in the To-Production bin or in the bin specified on the warehouse pick. The bin might be a work centre or machine centre bin.
The warehouse employee registers the pick. The quantity is transferred from the pick bin to the consumption bin. The Qty. Picked field on the component list for all picked items is updated.
Note
Only the quantity picked can be consumed.
The machine operator informs the production manager that the end items are finished.
The shop floor supervisor uses the consumption journal or production journal to post the consumption of component items that use either Manual flushing method.
The shop floor supervisor uses the output journal or production journal to post the output. The quantity of component items that use Pick + Forward or Pick + Backward flushing methods with routing links is deducted from the To-Production bin.
The production manager changes the status of the production order to Finished. The quantity of component items that use Backward flushing method is deducted from the open shop floor bin, and the quantity of component items that use Pick + Backward flushing method and no routing link is deducted from the To-Production bin.
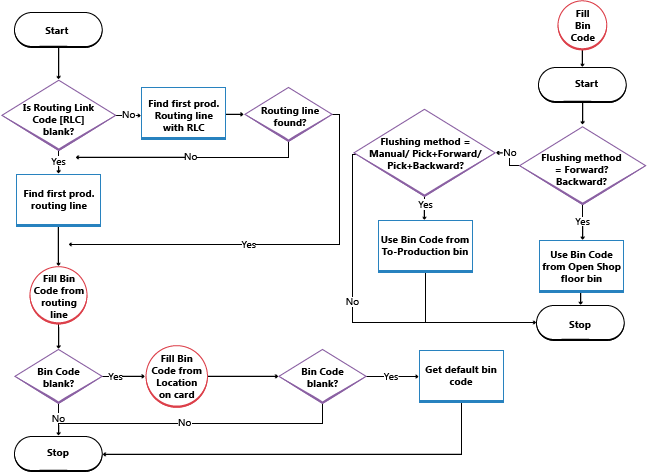
The following illustration shows when the Bin Code field on the component list is filled according to your location or machine/work centre setup.
See also
Feedback
Coming soon: Throughout 2024 we will be phasing out GitHub Issues as the feedback mechanism for content and replacing it with a new feedback system. For more information see: https://aka.ms/ContentUserFeedback.
Submit and view feedback for