Automatically select the best time to send an email message
Important
This article only applies to outbound marketing.
By analyzing historical data, the automated scheduler selects the best time to send an email message, within a time window that is unique to each contact.
The time window the automated schedule selects is based on the time that each contact arrives at the email tile. The time window is unique to each contact. The time window is bounded by one of the following (whichever is sooner):
- The scheduled end time of the customer journey.
- The expiration time of the email, if configured.
- Seven days into the future.
The feature has two main components:
- Auto scheduler for customer journeys: Enables customer journeys to schedule message deliveries to each individual contact automatically based on the best time to email calculated by the AI for that contact.
- Detailed email interaction results: Provides informative heat-map graphs that summarize the email-interaction trends for each individual contact. The following insights are provided here:
- Email open times: Shows how often the contact opened one of your emails for each hour of the day on each day of the week. This can indicate the days and times when the contact is usually using their email client.
- Email reaction times: Shows how quickly the contact opened a message in relation to the hour of the day and day of the week it was delivered.
- Best time to email: Displays a matrix that indicates which times on which days of the week are probably best for sending a message to the current contact. For each contact, the AI analyzes their reaction-time and open-time results and combines them with data collected for similar contacts to generate the overall recommendations.
Note
Before you can use automated scheduling, your admin must enable and configure it. If you don't see the features described in this topic, then please ask your admin to enable automated scheduling for your site. More information: Enable and configure artificial intelligence features
Important
The automated scheduler is only available in the Email tile.
Create a customer journey that automatically sends messages at the optimal time
Normally, customer journeys process all contacts in a target segment at once and deliver messages according to the run schedule without regard to each contact's interaction history. With automated scheduling, however, you can use AI to apply delivery times optimized for each individual recipient. This can often improve your open rates.
To create a journey that uses optimized delivery times:
Go to Outbound marketing > Marketing execution > Customer journeys and then either create or open a journey.
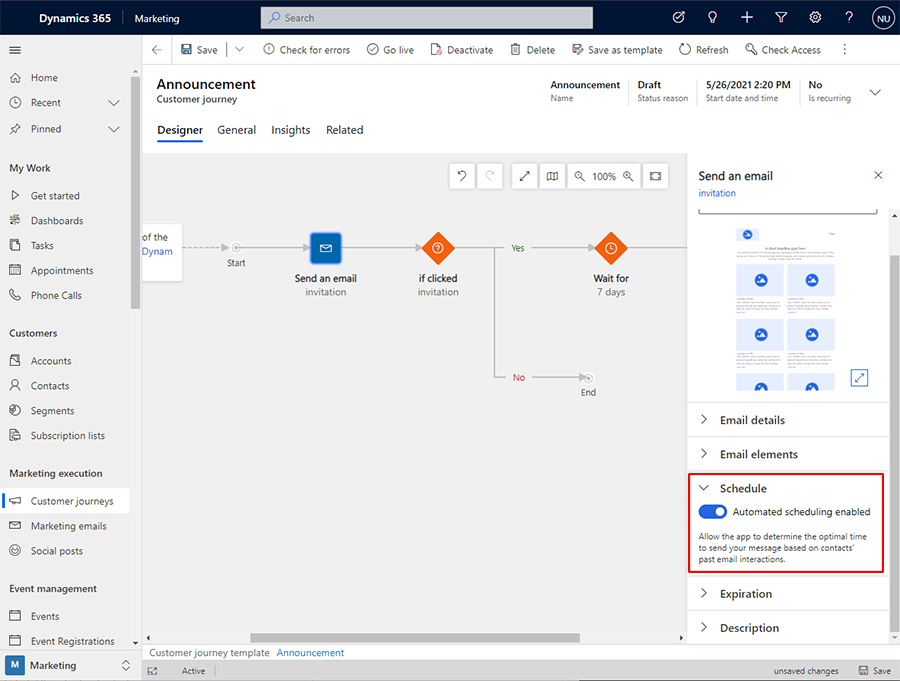
Design your journey as usual but turn on the Automated scheduling for each email tile where you want to use automated scheduling. To activate automated scheduled, select the email tile, go to Schedule, and flip the toggle for Automated scheduling enabled.

Repeat the previous step for each email in your journey where you want to use automated scheduling.
Note
Automated scheduling establishes a time window around the specified date and time, and then holds each contact until an optimal time arrives.
View email interaction details and delivery recommendations for a contact
To see information about when a specific contact tends to open your messages, how long it takes them to open them, and advice for the best time to send to them:
Go to Outbound marketing > Customers > Contacts to open your list of contacts.
Find and select the contact you want to analyze.
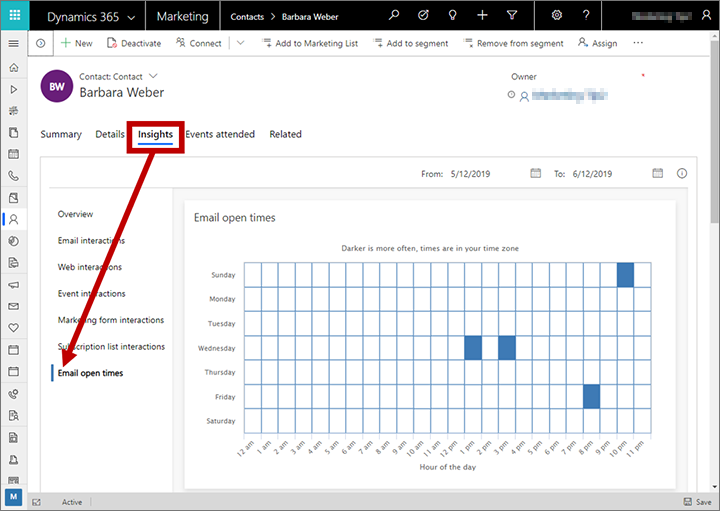
Open the Insights tab and then select Email open times from the tab navigator. This page includes three graphs that summarize how and when this contact interacts with your emails, plus a graph that shows the best time to email to this contact based on those results.

Read the Email open times graph as follows:
- The x-axis indicates the hours of day.
- The y-axis indicates the days of the week.
- Colored squares at each day/time intersection indicate how often the contact opened a message at that day and time. The darker the square, the more often the contact opened a message at that time.
Read the Email reaction time graph as follows:
- The x-axis indicates the hours of day.
- The y-axis indicates the days of the week.
- Colored squares at each day/time intersection indicate how long the contact typically takes to open a message delivered at that day and time. The darker the square, the faster the contact tends to open messages delivered at that day and time.
Read the Best time to email matrix as follows:
- The x-axis indicates the hours of day.
- The y-axis indicates the days of the week.
- Colored squares at each day/time intersection indicate the days and times that the AI thinks are best for delivering to this contact. The darkest squares indicate the days and times that the AI thinks are best for delivering to this contact, and the lightest squares are worst. Most day/time combinations are in between, but the darker the better.
When you choose to auto-schedule email delivery, the system will use these results to decide when to deliver to each contact.