Use retention labels to manage the lifecycle of documents stored in SharePoint
This article describes how you can manage the lifecycle of documents that are stored in SharePoint by using automatically applied retention labels and event-based retention.
The auto-apply functionality can use SharePoint metadata for document classification. The example in this article is for product-related documents, but the same concepts can be used for other scenarios. For example, in the oil and gas industry, you could use it to manage the lifecycle of documents about physical assets such as oil platforms, well logs, or production licenses. In the financial services industry, you could manage bank account, mortgage, or insurance contract documents. In the public sector, you could manage construction permits or tax forms.
This article looks at the information architecture and definition of the retention labels, classifies documents by auto-applying the labels, then generates the events that start the retention period.
Tip
If you're not an E5 customer, use the 90-day Microsoft Purview solutions trial to explore how additional Purview capabilities can help your organization manage data security and compliance needs. Start now at the Microsoft Purview compliance portal trials hub. Learn details about signing up and trial terms.
Information architecture
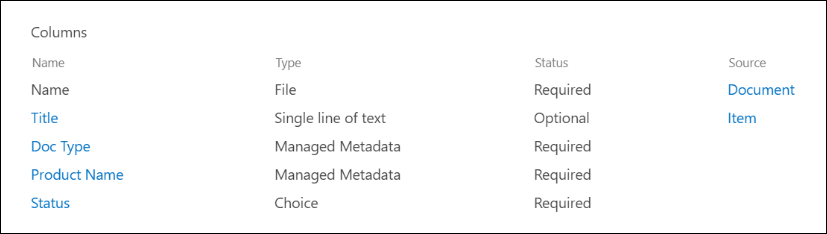
Our scenario is a manufacturing company that uses SharePoint to store all the documents about the products that the company develops. These documents include product specifications, agreements with suppliers, and user manuals. When these documents are stored in SharePoint through Enterprise Content Management policies, document metadata is defined to classify them. Each document has the following metadata properties:
Doc Type (product specification, agreement, or user manual)
Product Name (Spinning Widget, Flying Widget, Crawling Widget)
Status (draft or final)
This metadata forms a base content type called Production Document for all the documents.
Note
The Doc Type and Status properties are used later in this scenario to classify and auto-apply retention labels.
We might have several content types that represent different types of documents. This scenario focuses on the product documentation.
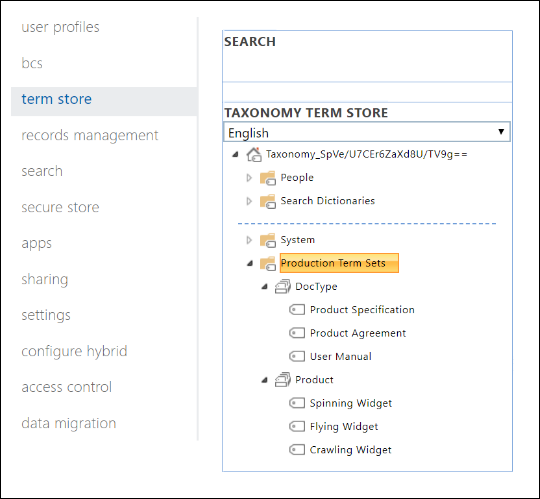
Here we use the Managed Metadata service and the Term Store to create a term set for Doc Type and for Product Name. For each term set, we create a term for each value. The outcome looks like this in Term Store for our SharePoint organization:
Content Type can be created and published by using the Content Type Hub. You can also create and publish a content type by using site provisioning tools, such as the PnP provisioning framework or site design JSON schema.
Each product has a dedicated SharePoint site that contains one document library that has the right content types enabled. All documents are stored in this document library.

Note
In this article we focus on documents and use a site, but the manufacturing company in this scenario could instead use a Microsoft Team per product to support collaboration activties such as persistent chat and using the Files tab in Teams for document management.
A view of the document library for the Spinning Widget product:

With the basic information architecture in place for document management, next look at the retention and disposal strategy for the documents that use the metadata and how they're classified.
Retention and disposition
The manufacturing company's compliance and data governance policies dictate how data is preserved and disposed of. Product-related documents must be kept for as long as the product is manufactured and retained for a period of time afterwards. The retention time period differs for product specifications, agreements, and user manuals. The following table indicates the retention and disposition requirements:
| Document type | Retention | Disposition Requirements |
|---|---|---|
| Product specifications | 5 years after production stops | Delete |
| Product agreements | 10 years after production stops | Review |
| User manuals | 5 years after production stops | Delete |
| All other types of documents | Don't actively retain | Delete when document is older than 3 years. A document is considered older than 3 years if not modified within the last 3 years. |
The Microsoft Purview portal or the Microsoft Purview compliance portal is used to create the following retention labels:
Product Specification
Product Agreement
User Manual
In this article, we show how to create and auto-apply the Product Specification retention label. To implement the complete scenario, also create and auto-apply retention labels for the other two document types.
Settings for the Product Specification retention label
The file plan for the Product Specification retention label:
Name: Product Specification
Description for users: Retain for 5 years after production stops.
Description for admins: Retain for 5 years after production stops, auto delete, event-based retention, event type is Product Cessation.
Retention action: Retain and delete.
Retention duration: 5 years (1,825 days).
Record label: Configure the retention label to mark items as a record, which means users can't modify or delete the labeled documents.
File plan descriptors: To simplify the scenario, no optional file descriptors are provided.
The following example shows a summary of the label settings when you create the Product Specification retention label in the Microsoft Purview portal or the Microsoft Purview compliance portal. You can create the Product Cessation event type before you create the retention label, or during the retention label creation process.

Note
If you're recreating this scenario in a test enviornment, set the retention duration to a shorter period of time to avoid a five-year wait for document deletion.
Create an event type when you create a retention label
On the Define the retention period page of the retention label workflow, after Start the retention period based on, select Create new event type:

On the Name your event type page, enter Product Cessation and an optional description. Then select Next, Submit, and Done.
Back on the Define the retention period page, for Start the retention period based on, use the dropdown box to select the Product Cessation event type that you created.
Tip
For more detailed steps, see Create a label whose retention period is based on an event.
The next section shows how to auto-apply the retention label to product specification content.
Auto-apply retention labels to documents
We're going to use Keyword Query Language (KQL) to auto-apply the retention labels that we created. KQL is the language used to build search queries. In KQL, you can search by using keywords or managed properties. For more information, see Keyword Query Language (KQL) syntax reference.
We need to configure the search schema to tell Microsoft 365 to "apply the Product Specification retention label to all documents that have a Status of Final and a Doc Type of Product Specification." Recall that Status and Doc Type are the site columns that we defined for the Product Documentation content type in the Information architecture section.
When SharePoint indexes content, it automatically generates crawled properties for each site column. For this scenario, we're interested in the Doc Type and Status properties. We need documents in the library that are the right content type and have the site columns filled in for search to create the crawled properties.
In the SharePoint admin center, open the Search configuration, and select Manage Search Schema to view and configure the crawled properties.

Run a search for status using the Crawled properties filter. This shows results that include "status" in the property name field:
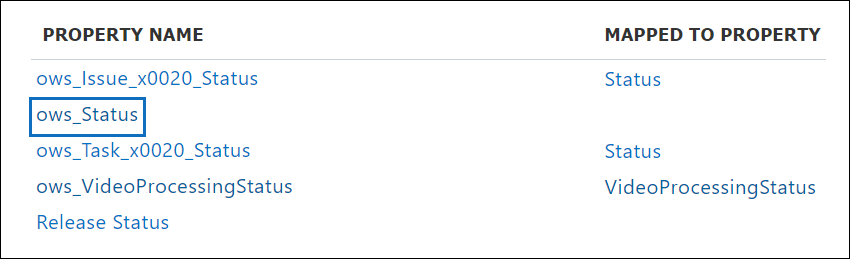
The previous example shows the ows__Status property (notice the double underscore). This property maps to the Status property of the Production Document content type that is used in this scenario.
Run a search for ows_doc using the Crawled properties filter. This shows results that include "ows_doc" in the property name field:

The above example shows the ows_Doc_x0020_Type property. This property maps to the Doc Type property of the Production Document content type that is used in this scenario.
Tip
To identify the name of a crawled property for this scenario:
- Go to the document library that contains the production documents.
- Go to the library settings.
- For Columns, select the name of the column (for example, Status or Doc Type) to open the site column page.
- The Field parameter in the URL for that page contains the name of the field. This field name, prefixed with "ows_", is the name of the crawled property. For example, the URL
https://tenantname.sharepoint.com/sites/SpinningWidget/_layouts/15/FldEdit.aspx?List=%7BC38C2F45-3BD6-4C3B-AA3B-EF5DF6B3D172%7D&Field=_Statuscorresponds to the ows__Status crawled property.
If the crawled properties you're looking for don't appear in the Manage Search Schema section in SharePoint admin center:
The documents might not be indexed yet. You can force a reindex of the library by going to Document library settings > Advanced Settings.
If the document library is in a modern site, make sure that the SharePoint admin is also a site collection admin.
For more information about crawled and managed properties, see Automatically created managed properties in SharePoint Server.
Map crawled properties to predefined managed properties
KQL can't use crawled properties in search queries. It has to use a managed property. In a typical search scenario, create a managed property and map it to the crawled property. For auto-applying retention labels, you can only specify predefined managed properties in KQL (not custom managed properties). The system has a set of predefined (default) managed properties for string RefinableString00 to RefinableString199 that can be used. The default managed properties are typically used for defining search refiners. For a complete list, see Default unused managed properties.
For the KQL query to automatically apply the correct retention label to production document content, map the crawled properties ows_Doc_x0020_Type and ows__Status to two refinable managed properties.
In the scenario, RefinableString00 and RefinableString01 aren't being used. You can determine their use by looking at Managed Properties in Manage Search Schema in the SharePoint admin center:

The Mapped Crawled Properties column in the previous example is empty for the managed property that isn't in use.
To map the ows_Doc_x0020_Type crawled property, follow these steps:
Run a search for RefinableString00 using the Managed property filter.
In the results list, select the RefinableString00 link, then navigate to the Mappings to crawled properties section.
Select Add a Mapping, and then run a search for ows_Doc_x0020_Type in the Search for a crawled property name box within the Crawled property selection window.
In the results list, select ows_Doc_x0020_Type and then select OK. The following example shows the new mapping in the Mapped Crawled Properties section:

Save the mapping.

Repeat these steps to map RefinableString01 and ows__Status.
The following example shows the results of two managed properties mapped to the two crawled properties:

Setup can be verified by running an enterprise search. In a browser, go to https://<your_tenant>.sharepoint.com/search. Search for RefinableString00:"Product Specification". This search returns all documents that have a Product Specification of Doc Type.
Next, search for RefinableString00:"Product Specification" AND RefinableString01:Final. This returns all documents that have Product Specification of Doc Type and a Status of Final.
Create auto-apply label policies
After the KQL query is verified to return the expected documents, create an auto-apply label policy that uses a KQL query to automatically apply the Product Specification retention label to the appropriate documents.
For this configuration, you can use either the Microsoft Purview portal or the Microsoft Purview compliance portal.
Depending on the portal you're using, navigate to one of the following locations:
Sign in to the Microsoft Purview portal > Records management > Policies > Label policies > Retention labels
Sign in to the Microsoft Purview compliance portal > Records management > Label policies
Select Auto-apply a label. In the auto-labeling policy configuration, on the Name your auto-labeling policy page, enter a name such as Auto-apply Product Specification label, and an optional description. Then select Next.
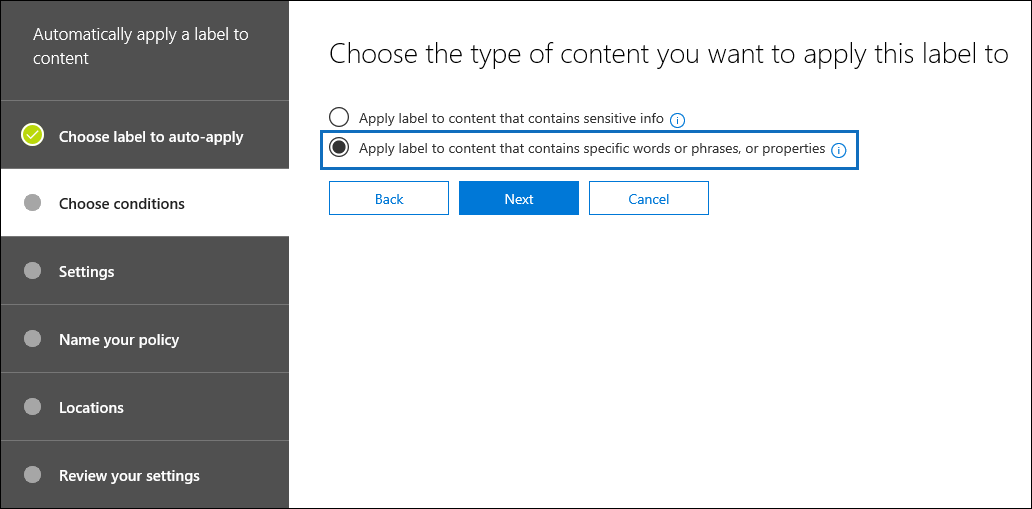
On the Choose the type of content you want to apply this label to page, select Apply label to content that contains specific words or phrases, or properties, then select Next.
This option lets us provide the same KQL search query that we tested in the previous section. The query returns all Product Specification documents that have a status of Final. When the same query is used in the auto-apply label policy, the Product Specification retention label is automatically applied to documents that match it.
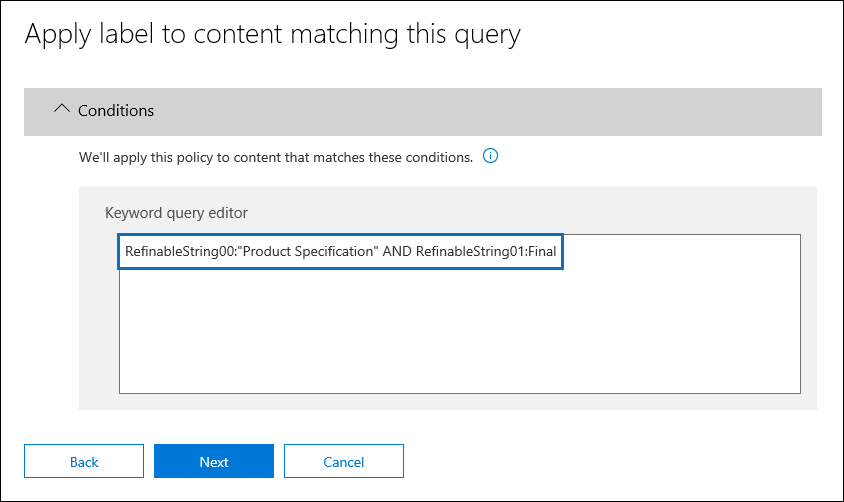
On the Apply label to content matching this query page, type RefinableString00:"Product Specification" AND RefinableString01:Final, then select Next.
For this scenario, choose Static on the Choose the type of retention policy to create page.
Note
For a production environment, we recommend adaptive scopes because they automatically update the locations included in the policy by using attributes and properties.
On the Choose where to automatically apply the label page, select the content locations that you want to apply the policy to. For this scenario, apply the policy only to SharePoint classic and communication sites. Toggle all other locations to Off:

Tip
Instead of applying the policy to all SharePoint sites, you can apply the policy to individual sites by selecting Edit for the Included column and adding the site URLs.
On the Choose a label to auto-apply page, select the Product Specification label.
For this scenario, keep the default of Turn on policy on the Decide whether to test or run your policy page.
Review your settings to confirm accuracy before submitting:

Select Submit to create the auto-apply label policy.

Verify that the retention label was automatically applied
After you've allowed sufficient time for the retention labels to be auto-applied, use activity explorer in the Microsoft Purview portal or the Microsoft Purview compliance portal to verify that the auto-apply label policy applied retention labels to the product documents.
Within SharePoint, the properties of the documents in the Document Library show when a label is applied in the document details pane.

When retention labels mark items as a record, they prevent users from deleting those items. Users see an error message if they attempt to delete the document and the delete action is blocked:

Generate the event that triggers the retention period
In this scenario, an event defines when a product reaches the end of production. For product specification documents, the five-year retention period begins when the "end of production" event is triggered. This event triggers the start of the retention period defined in the retention label.
Events can be created in the Microsoft Purview portal or the Microsoft Purview compliance portal. Choose the event type, set the correct asset IDs, and enter a date for the event. For more information, see Start retention when an event occurs.
You can also create and manage events using Microsoft Graph Records Management APIs.
More about asset IDs
As explained in the Start retention when an event occurs article, it's important to understand the relationship between event types, retention labels, events, and asset IDs. The asset ID is a document property in SharePoint and OneDrive. It helps identify the documents that have a retention period triggered by the event. By default, SharePoint has an Asset ID property that can be used for event-driven retention:
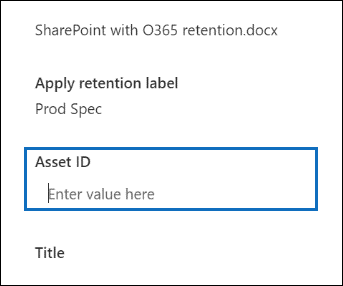
The following example shows the Asset ID managed property is ComplianceAssetId.

This scenario used the default Asset ID property. Other properties can also be used. If an Asset ID or keywords for an event aren't specified, the retention period is triggered for all the content that has a label of that event type.
Using advanced search in SharePoint
In the Asset Id example, there's another managed property related to retention labels called ComplianceTag that's mapped to a crawled property. The ComplianceAssetId managed property is also mapped to a crawled property. These managed properties can be used in advanced search to retrieve all documents that have a retention label applied.
Feedback
Coming soon: Throughout 2024 we will be phasing out GitHub Issues as the feedback mechanism for content and replacing it with a new feedback system. For more information see: https://aka.ms/ContentUserFeedback.
Submit and view feedback for