Deploy frontline static teams at scale with PowerShell for frontline workers
Overview
Does your organization use a large number of teams to drive communication and collaboration among your frontline workforce? This article is for you if you need to create and manage teams at scale.
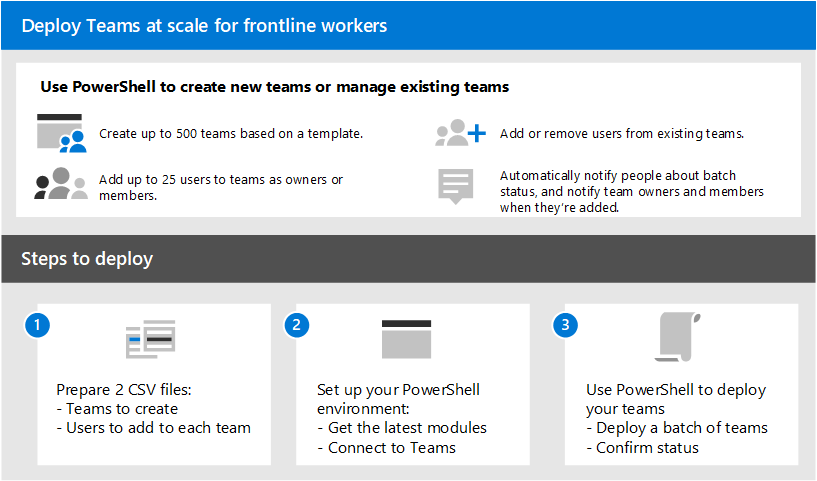
You can use PowerShell to deploy up to 500 teams and add up to 25 users per team at a time. You can also add and remove users from existing teams at scale. Use this solution to meet your organization's scale needs and significantly reduce deployment time.
Deploying Teams at scale enables you to:
- Create teams using pre-built templates or your own custom templates.
- Add users to teams as owners or members.
- Manage teams at scale by adding or removing users from existing teams.
- Stay notified through email, including completion, status, and errors (if any). You can choose to notify up to five people about the status of each batch of teams you deploy. Team owners and members are automatically notified when they're added to a team.
This article walks you through how to deploy Teams at scale.
Set up and deploy your teams
Important
Team owners must have a Teams license. Before you use these steps to deploy your teams, make sure that all teams owners have a license.
Follow these steps to deploy up to 500 teams at a time.
Step 1: Prepare your CSV files
You'll need to create two CSV files for each batch of teams that you deploy:
A CSV file that defines the teams you're creating. This file must have a title line, and must contain these required columns, in the following order, starting with the first column:
Column name Description Team Name The name of the team. Existing Team ID If you're adding or removing users from an existing team, specify the team ID of the team. Visibility Whether the team is public (anyone in your organization can join) or private (users need approval from the team owners to join). Options are Public and Private. Team Template ID If you're creating a team from a pre-built or custom template, specify the team template ID. See Get started with team templates in the Teams admin center for a list pre-built team templates and IDs. If you want to use the standard default team template, leave this blank. A CSV file that maps the users you're adding to each team. This file must have a title line, and must contain these required columns, in the following order, starting with the first column:
Column name Description User Full Name The display name of the user. User UPN or ID The user principal name (UPN) or ID of the user. For example, averyh@contoso.com. Team Name The name of the team. ActionType Whether you're adding or removing the user from the team. Options are AddMemberandRemoveMember.Owner or Member Whether the user is a team owner or team member. Options are OwnerandMember.
Examples
Use the following examples to help you create your CSV files. Here, we've named the files, Teams.csv and Users.csv.
Teams.csv
| Team Name | Existing Team ID | Visibility | Team Template ID |
|---|---|---|---|
| Contoso Store 1 | Public | com.microsoft.teams.template.retailStore | |
| Contoso Store 2 | Public | com.microsoft.teams.template.retailStore | |
| Contoso Store 3 | Public | com.microsoft.teams.template.retailStore | |
| Contoso Store 4 | Public | com.microsoft.teams.template.retailStore | |
| Contoso Store 5 | Public | com.microsoft.teams.template.ManageAProject | |
| Contoso Store 6 | Public | com.microsoft.teams.template.ManageAProject | |
| Contoso Store 7 | Public | ||
| Contoso Store 8 | Private | com.microsoft.teams.template.OnboardEmployees | |
| Contoso Store 9 | Private | com.microsoft.teams.template.OnboardEmployees | |
| Contoso Store 10 | Private | com.microsoft.teams.template.OnboardEmployees |
Users.csv
| User Full Name | User UPN or ID | Team Name | ActionType | Owner or Member |
|---|---|---|---|---|
| Avery Howard | averyh@contoso.com | Contoso Store 1 | AddMember |
Owner |
| Casey Jensen | caseyj@contoso.com | Contoso Store 2 | AddMember |
Owner |
| Jessie Irwin | jessiei@contoso.com | Contoso Store 3 | AddMember |
Owner |
| Manjeet Bhatia | manjeetb@contoso.com | Contoso Store 4 | AddMember |
Owner |
| Mikaela Lee | mikaelal@contoso.com | Contoso Store 5 | AddMember |
Owner |
| Morgan Conners | morganc@contoso.com | Contoso Store 6 | AddMember |
Member |
| Oscar Ward | oscarw@contoso.com | Contoso Store 7 | AddMember |
Member |
| Rene Pelletier | renep@contoso.com | Contoso Store 8 | AddMember |
Member |
| Sydney Mattos | sydneym@contoso.com | Contoso Store 9 | AddMember |
Member |
| Violet Martinez | violetm@contoso.com | Contoso Store 10 | AddMember |
Member |
Step 2: Set up your environment
Follow these steps to install and connect to the latest version of the Teams PowerShell module.
Install PowerShell version 7 or later. For step-by-step guidance, see Installing PowerShell on Windows.
Run PowerShell in administrator mode.
Run the following to uninstall any previously installed Teams PowerShell module.
Uninstall-module -Name MicrosoftTeams -Force -AllversionsIf you get an error message, you're already set. Go to the next step.
Download and install the latest version of the Teams PowerShell module. You must be running version 4.7.0 (preview) or a later version.
Run the following to connect to Teams.
Connect-MicrosoftTeamsWhen you're prompted, sign in using your admin credentials.
Run the following to get a list the commands in the Teams PowerShell module.
Get-Command -Module MicrosoftTeamsVerify that
New-CsBatchTeamsDeploymentandGet-CsBatchTeamsDeploymentStatusare listed.
Step 3: Deploy your teams
Now that you've created your CSV files and set up your environment, you're ready to deploy your teams.
You use the New-CsBatchTeamsDeployment cmdlet to submit a batch of teams to create. An orchestration ID is generated for each batch. You can then use the Get-CsBatchTeamsDeploymentStatus cmdlet to track the progress and status of each batch.
Run the following to deploy a batch of teams. In this command, you specify the path to your CSV files and the email addresses of up to five recipients to notify about this deployment.
New-CsBatchTeamsDeployment -TeamsFilePath "Your CSV file path" -UsersFilePath "Your CSV file path" -UsersToNotify "Email addresses"The recipients will receive email notifications about deployment status. The email contains the orchestration ID for the batch you submitted and any errors that may have occurred.
For example:
New-CsBatchTeamsDeployment -TeamsFilePath "C:\dscale\Teams.csv" -UsersFilePath "C:\dscale\Users.csv" -UsersToNotify "adminteams@contoso.com,adelev@contoso.com"Run the following to check the status of the batch you submitted.
Get-CsBatchTeamsDeploymentStatus -OrchestrationId "OrchestrationId"
Get analytics on frontline teams usage
The Teams usage report in Teams admin center gives you an overview of usage activity in Teams. You can use the report to view usage details for your frontline teams, including active users, active channels, total organized meetings, last activity date, and other information.
In the left navigation of the Teams admin center, choose Analytics & reports > Usage reports.
On the View reports tab, under Report, select Teams usage.
Under Date range, select a date range of 7 days, 30 days, 90 days, or 180 days. Then, choose Run report.
In the upper-right corner, select Export to Excel > Export table as CSV.
Filter the spreadsheet based on your frontline team IDs.
Note
Your frontline team IDs are listed in the PowerShell output when you deploy your teams.
Related articles
Feedback
Coming soon: Throughout 2024 we will be phasing out GitHub Issues as the feedback mechanism for content and replacing it with a new feedback system. For more information see: https://aka.ms/ContentUserFeedback.
Submit and view feedback for