Learn how to read the line items in your Partner Center reconciliation files
Appropriate roles: Billing admin | Global admin
Partner Center allows you to download reconciliation files for a detailed view of each charge in a billing period.
You can see the charges for each customer's subscriptions, and the events that affect them (such as adding more licenses to a subscription in the middle of a term).
For information about how to read your invoice, see Read your bill.
Understand reconciliation file fields
Here are the reconciliation files and what they show:
| Reconciliation file field | Shows |
|---|---|
| Legacy license-based | Costs and quantities of legacy Office and Dynamics products for a billing period |
| Legacy usage-based | Costs and usage of legacy Azure products for a billing period |
| New commerce daily rated usage | Daily usage and charges for new commerce (Azure plan) usage-based products for a billing period |
| New commerce reconciliation | Aggregated costs, quantities, and usage for all new commerce products for a billing period |
Understand charge types in reconciliation files
To learn about the different types of charges in reconciliation files (displayed in the ChargeType column), refer to Reconciliation file charge types.
Fix formatting issues
Occasionally, a reconciliation file might have formatting issues. For example, this issue might occur if the en-us locale isn't used.
To fix any formatting issues in your reconciliation files:
- Open the reconciliation file (in .csv format) in Microsoft Excel.
- Select the first column in the file.
- Open the "Convert Text to Columns Wizard".
- On the ribbon, select Data, then select Text to Columns.
- In the wizard, select Delimited file type, and then select Next.
- In the Delimiters field, select Comma. (If Tab is already selected, you can leave this option selected.) Then, select Next.
- In the Column data format field, select Date:MDY, and then select Next.
- In the Column data format field, select Text for all amount columns, and then select Finish.
Download reconciliation files programmatically
Reconciliation files can be large and are sometimes difficult to download from the portal. To download large reconciliation files programmatically, use Get invoice line items.
Where do I download the file asynchronously?
To enhance the download experience and improve efficiency, Partner Center downloads new commerce reconciliation files asynchronously. To download a file:
Sign in to Partner Center and select Billing workspace.
Go to the Billing history and select Recurring and one-time purchases (billing currency) tab, or go to the Billing overview (NCE).
Choose the reconciliation file you want to download.
You see a notification at the top of the screen. It tells you that the file is being prepared and should be ready on the Reports (NCE) page soon. Processing the data may take some time, depending on the amount of data.
The status tells you how far along your request is. It says "Progressing" or "Checking" when our system is working on it. Before you ask for a new report, search the ones we already generated to avoid repeating work.
Statuses and their meanings:
- Queued: Request submitted
- Processing: The system is collecting data for the report
- Checking: Verifying if the data is ready
- Completed: Report is available for download
- Failed: An error occurred while generating the report
- No data found: The system couldn't find any data for the report
If your file exceeds the row limit in Excel
If you can download a reconciliation file but can't open it in Microsoft Excel, that probably means the file contains more rows than Excel allows. If that happens, you can:
Open a reconciliation file in Excel Power Query
Download the reconciliation file from Partner Center.
Open a new blank workbook in Microsoft Excel.
Navigate to Data tab, then select Get Data > From File > From Text/CSV, and import the CSV (Comma Separated Value) reconciliation file.
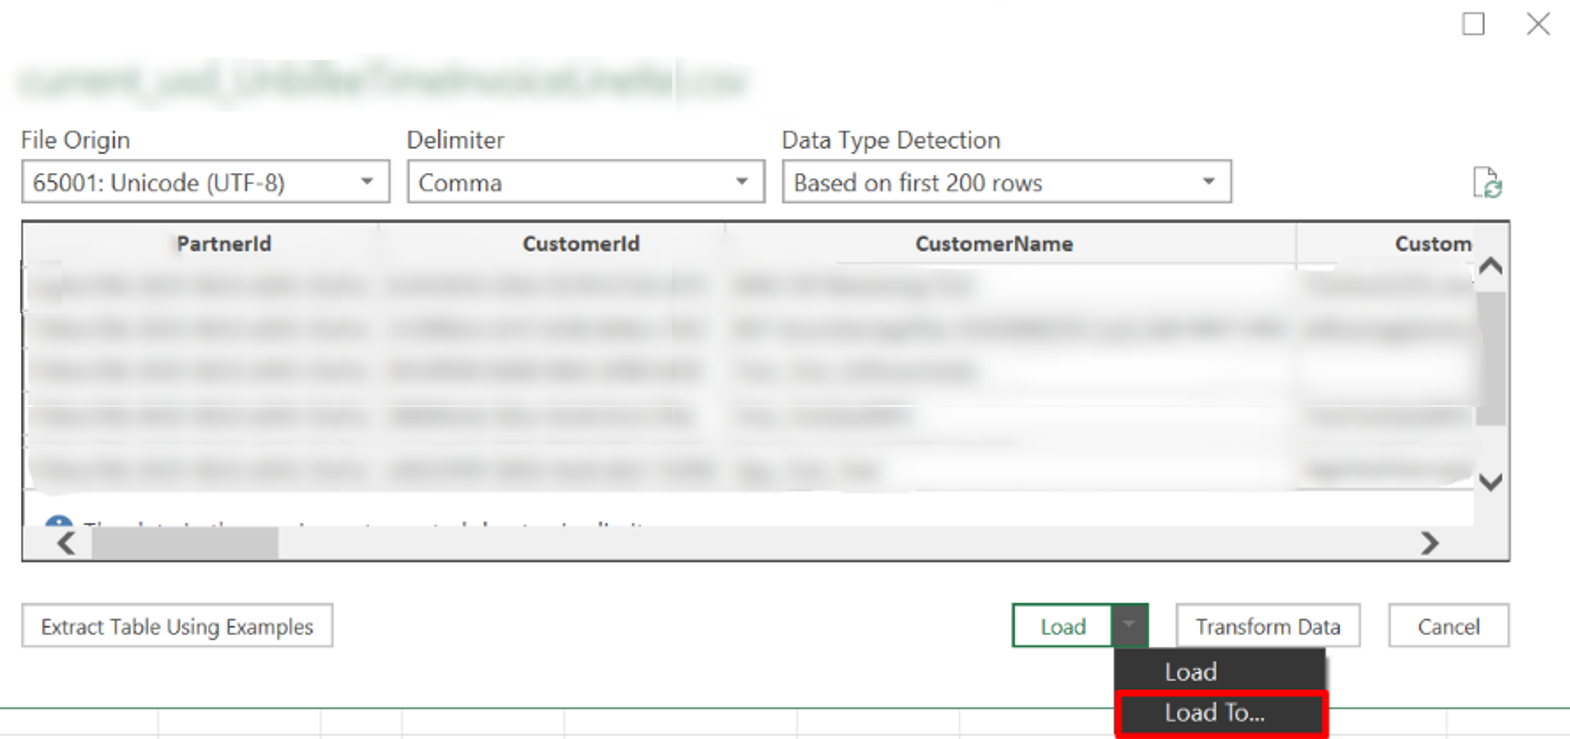
After a while, you can see a window with the file preview.
In that window, select the Load dropdown menu > Load To.
In the Import Data dialog box, select the options as indicated in the following screenshot.
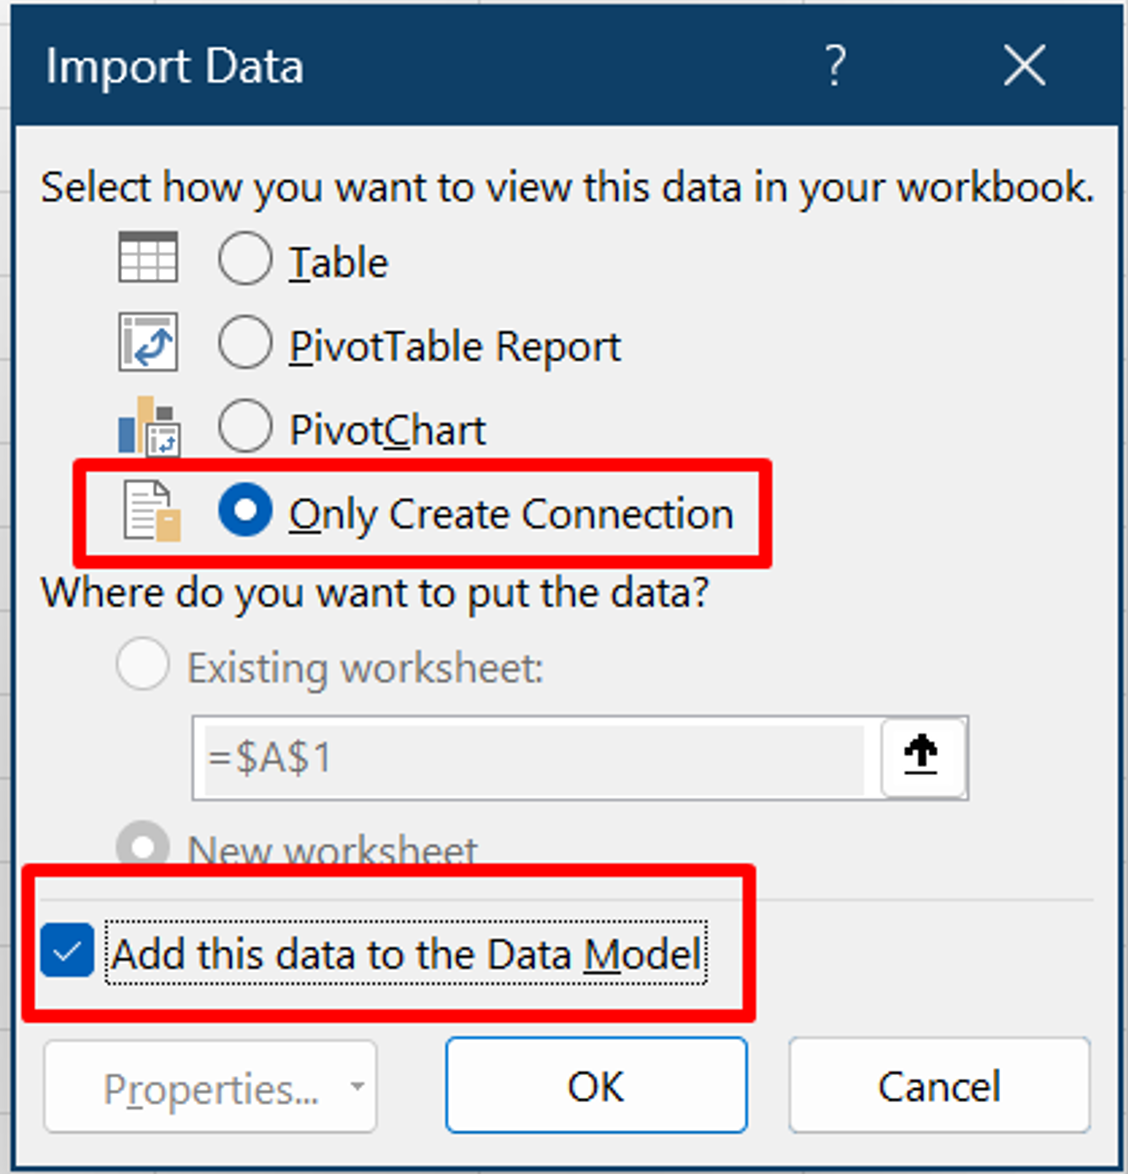
Select OK, and wait for the loading process to complete.
On the right side, you can see the name of the file and the number of rows. Double-click this area to open the Power Query Editor.

Now, when you scroll down, you can notice that the new rows are added dynamically.
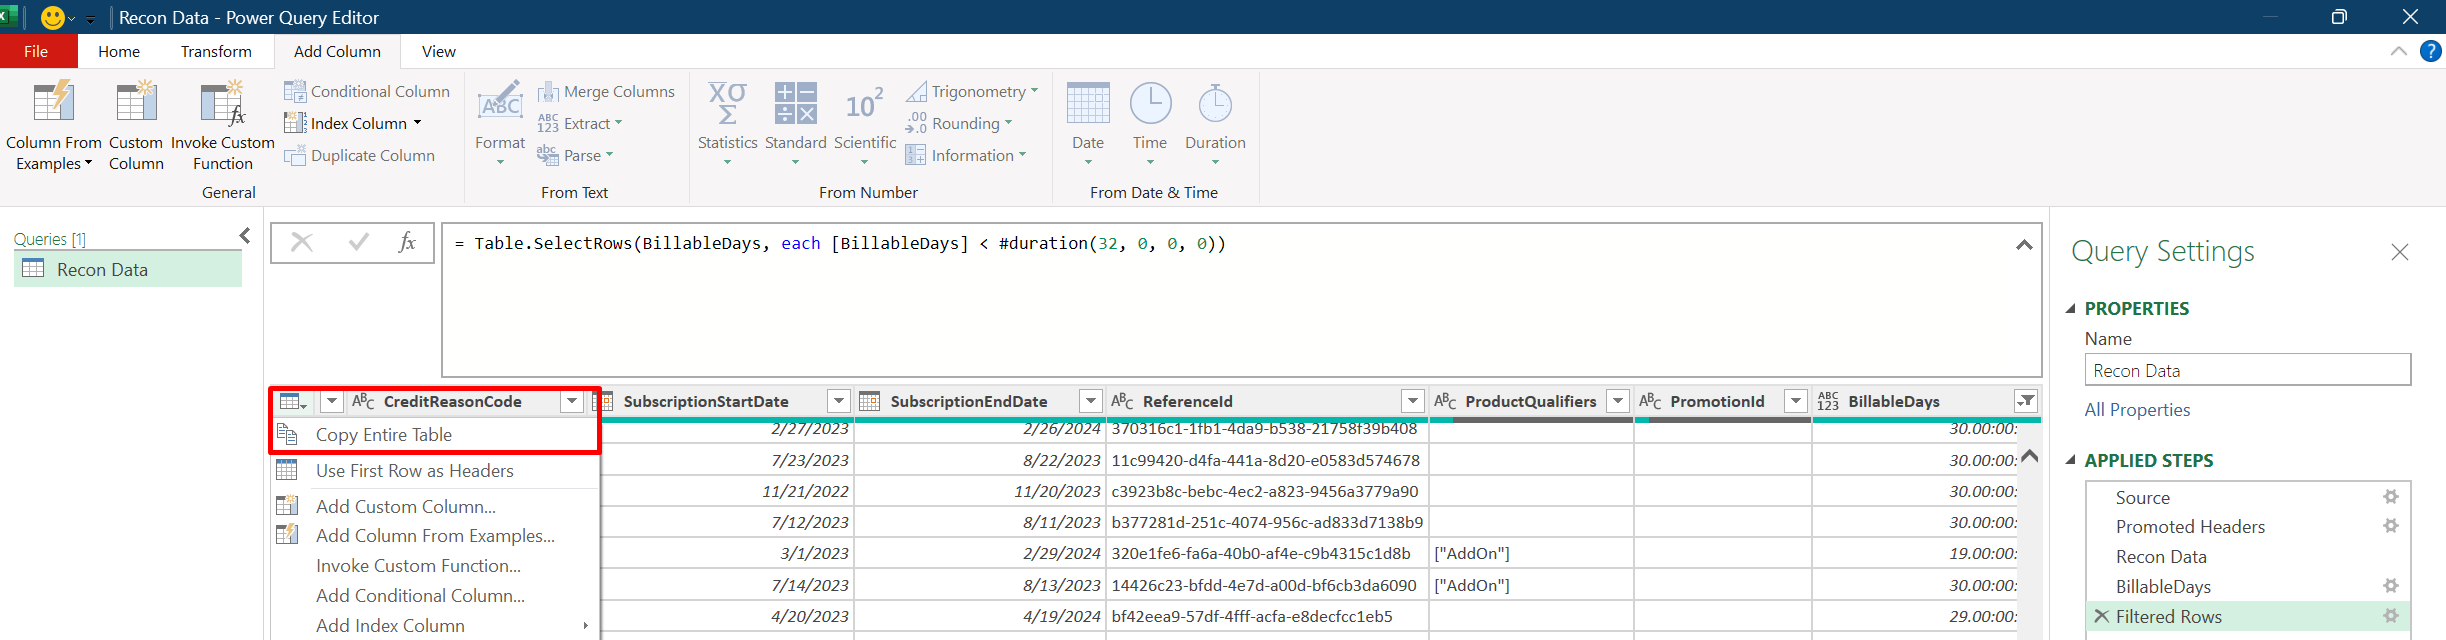
To search for specific transactions, use the filter option as shown in the following screenshot. You can also aggregate transactions or do mathematical calculations using the "Group By" or "Statistics" features.
For instance, to find the number of billable days in the charge cycle, you can use the Custom Column feature to calculate the duration between the charge start and end dates. Additionally, Power Query offers many features that allow various computations.
After applying the required filters in the Power Query, you can transfer the limited transaction data to Excel by following these steps.


Open a reconciliation file in Power BI
To open a reconciliation file in Power BI, use the following steps:
- Download the reconciliation file as you normally would.
- Download, install, and open an instance of Microsoft Power BI.
- On the Power BI Home tab, select Get data.
- In the list of Common data sources, select Text/CSV.
- When prompted, open your reconciliation file.
Negative amount displayed
If you see a negative amount for some transactions in your reconciliation line items, it's likely because:
- You changed your subscription, such as canceling, upgrading, or changing licenses.
- You received credit for a service level agreement (SLA) violation, Azure usage, or price adjustments.
The ChargeType attribute in the reconciliation data explains more.
How is the total cost calculated for new commerce license-based purchases?
To calculate costs, always use the EffectiveUnitPrice, not the UnitPrice. The EffectiveUnitPrice depends on these factors:
- Discounts like promotions or tiered pricing, and adjustments like partner earned credit.
- The number of days you pay for, which is counted from when a billing event occurs until the end of the charge cycle.
- The exchange rate.
The subscription's UnitPrice remains the same during the billing term. A change in the price may appear in the reconciliation data, but it doesn’t affect the cost calculation.
Use EffectiveUnitPrice to confirm the cost and invoice your customers.
Why does my invoice reconciliation data show a recurring charge for a product for which there are no daily charges?
Some products, like Azure savings plans or reservations, have a fixed price that you pay monthly, annually, or one time for limited units. You don't see daily usage charges for these products, only the recurring charges on your invoice reconciliation line items.
Here's what you need to know:
- The fixed price you agreed to pay for the product is still due every month, even if you don't use it. This fixed price is the recurring charge on your invoice reconciliation line item.
- You pay no extra charges until you exceed the limit.
- You pay extra at a pay-as-you-go rate for any usage over the limit you agreed to.
You see recurring charges for Azure savings plans or reservations on your invoice data even if you don't use them. You need to pay extra charges at pay-as-you-go rate for any usage beyond the agreed limit.
To check the costs, see how an Azure reservation or savings plan linked to an Azure subscription.
How do you find the Azure subscription ID for a product?
To find out your Azure subscription ID for each Azure resource, follow these steps:
Tip
To distinguish products bought with different or same Azure subscriptions, use resource groups or tags. By doing so, you can tell which subscription is used for each product, even if they share a name.
Pay-as-you-go product
- To identify your Azure subscription, link the
SubscriptionIDon your invoice reconciliation line item with theSubscriptionIDon your daily rated usage line item. TheEntitlementIDof the same line of your daily rated usage is your Azure subscription ID.
Azure reservation
- Link the
ReservationOrderIdof your invoice reconciliation and theAdditionalInfoof the daily rated usage line item. TheEntitlementIDof the same line of your daily rated usage is your Azure subscription ID.
Azure savings plan
- Link the
ReservationOrderIdof your invoice reconciliation line item to theBenefitOrderIdof the daily rated usage line item. TheEntitlementIDof the same line of your daily rated usage is your Azure subscription ID.
How do you find Azure credits in the invoice reconciliation and daily rated usage files?
Azure credits only cover first-party Azure products, with some exceptions. To find out how much credit a customer has, check the invoice reconciliation and daily rated usage data.
Invoice reconciliation
SubtotalandTotalshow a negative amount for credit line items.- Use customerCredit as the
ChargeTypefor credit line items. TheCreditReasonCodeindicates the credit type, such as "Azure Credit". - To reconcile credits, group transactions by these fields:
ProductID,SKUID,AvailabilityID,OrderDate, and eitherCustomerNameorCustomerID. Add up theTotalto get the credit amount. - Charge and credit line items should have the same
BillableQuantity.
Daily rated usage
- To filter the line items, use the customer tenant ID, the
CreditType, and 100 as theCrditPercentagevalue. - To find the credit amount, sum up the
BillingPreTaxTotal.
Note
You can't see some Azure credits in the daily rated usage data. Check the invoice reconciliation data for the credit information.
How do you reconcile telco pay-as-you-go charges?
Follow these steps to track your telco product charges on a daily and monthly basis:
- Daily rated usage reconciliation: Here, you can see how many minutes you call and pay every day. Your daily charges are under
BillingPreTaxTotal. Your call minutes are in "NumMin" underAdditionalInfo.
Note
Quantity in the daily rated usage data doesn't show exact call minutes.
| CustomerName | ProductId | SkuId | ProductName | UsageDate | ChargeType | UnitPrice | Quantity | UnitType | BillingPreTaxTotal | BillingCurrency | AdditionalInfo | EffectiveUnitPrice |
|---|---|---|---|---|---|---|---|---|---|---|---|---|
| Constoso | CFQ7TTC0JL2N | 1 | Microsoft 365 International Calling Plan - Outbound US | 9/17/2021 | New | 1 | 0.1524 | Per Call | 0.15 | USD | { "NumMin": 0.2} | 0.984251969 |
| Constoso | CFQ7TTC0JL2S | 1 | Microsoft 365 Audio Conferencing - Outbound US | 9/18/2021 | New | 1 | 6.6275 | Per Call | 6.623381835 | USD | { "NumMin": 24.1} | 0.999378625 |
| Constoso | CFQ7TTC0JL2S | 1 | Microsoft 365 Audio Conferencing - Outbound US | 9/21/2021 | New | 1 | 2.97 | Per Call | 2.968154515 | USD | { "NumMin": 10.8} | 0.999378625 |
| Constoso | CFQ7TTC0JL2S | 1 | Microsoft 365 Audio Conferencing - Outbound US | 9/22/2021 | New | 1 | 0.0585 | Per Call | 0.05846365 | USD | { "NumMin": 0.3} | 0.999378625 |
| Constoso | CFQ7TTC0JL2S | 1 | Microsoft 365 Audio Conferencing - Outbound US | 9/23/2021 | New | 1 | 0.4485 | Per Call | 0.447924684 | USD | { "NumMin": 2.3} | 0.998717244 |
| Constoso | CFQ7TTC0JL2S | 1 | Microsoft 365 Audio Conferencing - Outbound US | 9/24/2021 | New | 1 | 0.0975 | Per Call | 0.097374931 | USD | { "NumMin": 0.5} | 0.998717244 |
| Constoso | CFQ7TTC0JL2S | 1 | Microsoft 365 Audio Conferencing - Outbound US | 9/29/2021 | New | 1 | 0.156 | Per Call | 0.15579989 | USD | { "NumMin": 0.8} | 0.998717244 |
| Constoso | CFQ7TTC0JL2S | 1 | Microsoft 365 International Calling Plan - Outbound US | 9/29/2021 | New | 1 | 0.2114 | Per Call | 0.211128825 | USD | { "NumMin": 1.4} | 0.998717244 |
| Constoso | CFQ7TTC0JL2S | 1 | Microsoft 365 Audio Conferencing - Outbound US | 9/30/2021 | New | 1 | 0.178 | Per Call | 0.177771669 | USD | { "NumMin": 8.9} | 0.998717244 |
| Total | 10.89 | 49.3 |
- Monthly invoice reconciliation: To see your call minutes and costs per call, look at
BillableQuantityandTotal.
| CustomerName | ProductId | SkuId | ProductName | ChargeType | UnitPrice | Quantity | Subtotal | TaxTotal | Total | Currency | ChargeStartDate | ChargeEndDate | EffectiveUnitPrice | BillableQuantity |
|---|---|---|---|---|---|---|---|---|---|---|---|---|---|---|
| Contoso | CFQ7TTC0JL2N | 1 | Microsoft 365 International Calling Plan - Outbound US | new | 0.381 | 1 | 0.36 | 0 | 0.36 | USD | 9/1/2021 | 9/30/2021 | 0.381 | 1.6 |
| Contoso | CFQ7TTC0JL2S | 1 | Microsoft 365 Audio Conferencing - Outbound US | new | 0.352836167 | 1 | 10.53 | 0 | 10.53 | USD | 9/1/2021 | 9/30/2021 | 0.352836167 | 47.7 |
| Total | 10.89 | 49.3 |
If you exceed your free talk time, you pay extra for each minute. To reconcile the charges and call minutes between your daily usage and monthly invoice, use the ProductId and SKUId.
You can check your charges and minutes by call type: domestic, international, or toll-free. Your bill shows the total amount and the subtotal before tax. The subtotal matches the sum of BillingPreTaxTotal and the BillableQuantity matches the sum of "NumMin."
What do different prefixes for Reservation Order ID mean?
The prefix indicates where you bought your Azure reservations.
- PCTest: Purchases in Partner Center for testing purposes
- RIOderId: Purchases in Partner Center for real customers
- No prefix: Purchases through Microsoft Cost Management
Next steps
Feedback
Coming soon: Throughout 2024 we will be phasing out GitHub Issues as the feedback mechanism for content and replacing it with a new feedback system. For more information see: https://aka.ms/ContentUserFeedback.
Submit and view feedback for