Return a list of results
Important
Power Virtual Agents capabilities and features are now part of Microsoft Copilot Studio following significant investments in generative AI and enhanced integrations across Microsoft Copilot.
Some articles and screenshots may refer to Power Virtual Agents while we update documentation and training content.
It's common to ask a copilot to look for data in an external system and return a list of results. To do that, Microsoft Copilot Studio can call a Power Automate flow to:
- authenticate and connect to an external solution
- run a query based on the user's inputs
- format the results
- return the results to the copilot
In this example, you'll use the Dataverse connector in Power Automate to search for accounts. Then you'll return a list of results that includes the account name, city, and account number to Microsoft Copilot Studio.
Prerequisites
- Understand how to create a flow from the Microsoft Copilot Studio authoring canvas
- Add input and output variables
- Configure Dataverse search for your environment
Set up a Dataverse Account table
The Account table is a standard table that's included automatically in Power Platform environments. However, it doesn't come with account data. Before your copilot can search for accounts, you'll need to populate the Account table.
If you already have an Account table with data, skip this step and move on to Create a topic. However, you'll need to use different search terms when you test your copilot in later steps.
Go to the Power Apps portal.
In the side pane, under Dataverse, select Tables.
Select the Account table, and then on the table properties page, select Edit.
Add the following rows to the table:
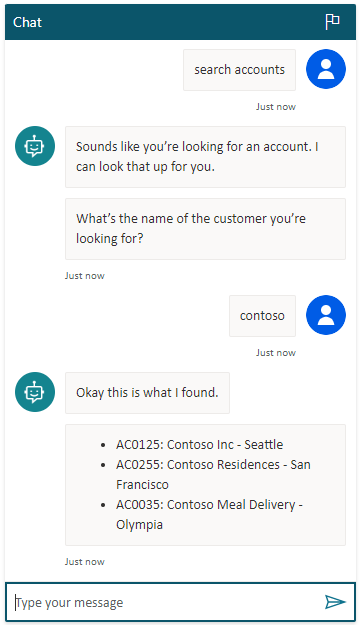
Address 1: City Account Name Account Number Seattle Contoso Inc AC0125 San Francisco Contoso Residences AC0255 Olympia Contoso Meal Delivery AC0035
Create a topic
Go to the Topics page for your copilot.
Create a topic called Account Search.
Add the following trigger phrases:
- I'm looking for a customer
- I'm looking for an account
- search account
- search customer
Add a Message node and enter the message Sounds like you're looking for an account. I can look that up for you..
Add a Question node and enter the message What's the name of the customer you're looking for?.
For Identify, select Organization.
User's entire response will also work. However, selecting the Organization entity takes advantage of the copilot's language understanding capabilities to extract the organization name from the response.
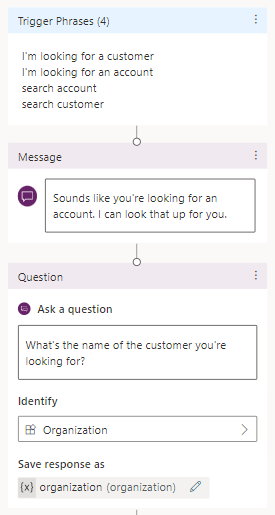
For Save response as, rename the variable to organization.
Create a flow
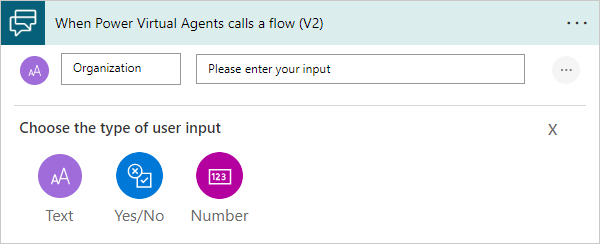
On the authoring canvas, select Add node (+). Select Call an action, and then select Create a flow.
In the Power Automate portal, name the flow Search Account.
Add a Text input named Organization.
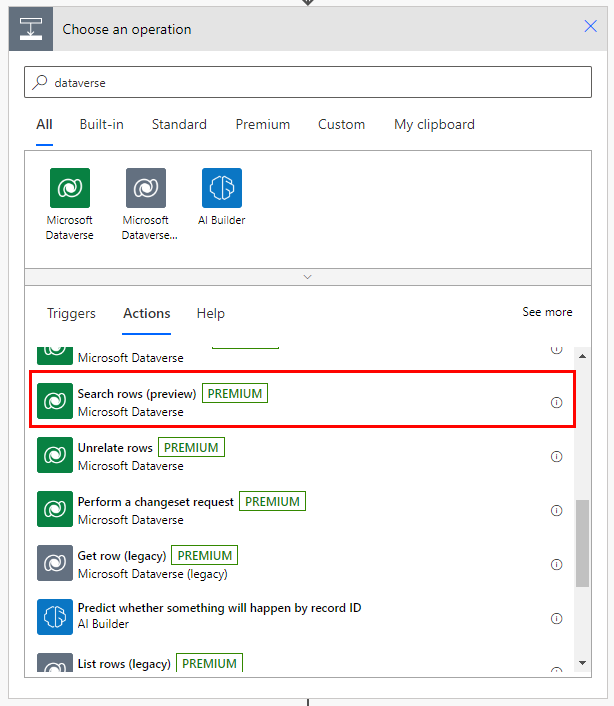
Select Insert a new step (+) and select Add an action.
Select the Microsoft Dataverse connector, and then select the Search rows action.
This action uses fuzzy matching to find relevant accounts in your Dataverse Account table.
For Search term, select the Organization variable.
Select Show advanced options and set the following items as given:
- Table filter Item:
account - Sort by Item - 1:
@search.score desc - Sort by Item - 2:
name asc
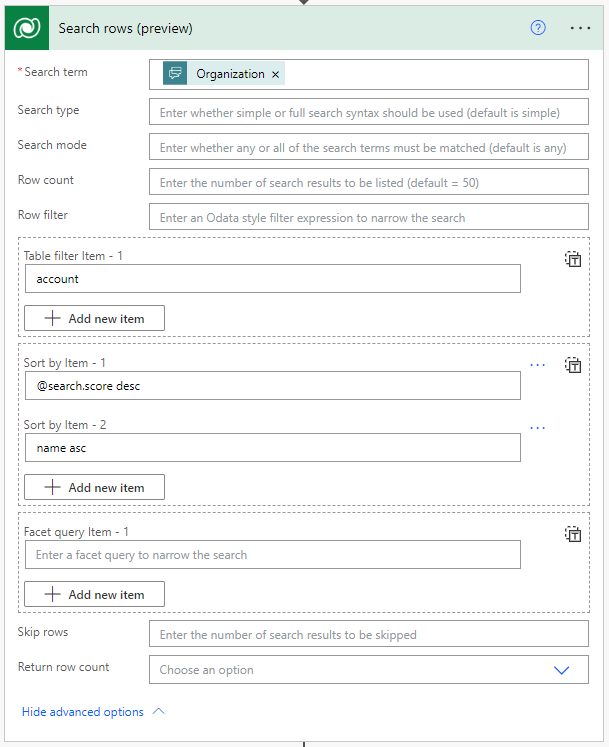
- Table filter Item:
Format results
The Search rows action returns the List of rows variable, which contains JSON data. Before you can use the data, you'll need to analyze it with the Parse JSON action.
Select Insert a new step (+) and select Add an action.
Select the Data Operation connector, and then select the Parse JSON action.
In the Content box, under Search rows, select the List of rows variable.
Copy the following JSON schema and paste it in the Schema box:
{
    "type": "array",
    "items": {
        "type": "object",
        "properties": {
            "@@search.score": {
                "type": "number"
            },
            "name": {
                "type": "string"
            },
            "address1_city": {
                "type": "string"
            },
            "accountnumber": {
                "type": "string"
            }
        },
        "required": [
            "name"
        ]
    }
}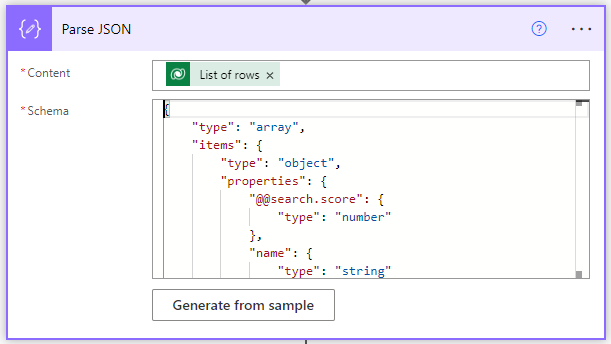
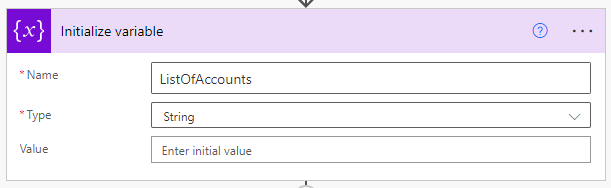
Select Insert a new step (+) and select Add an action. Select the Variable connector, and then select the Initialize Variable action.
For Name, enter ListOfAccounts. For Type, select String.
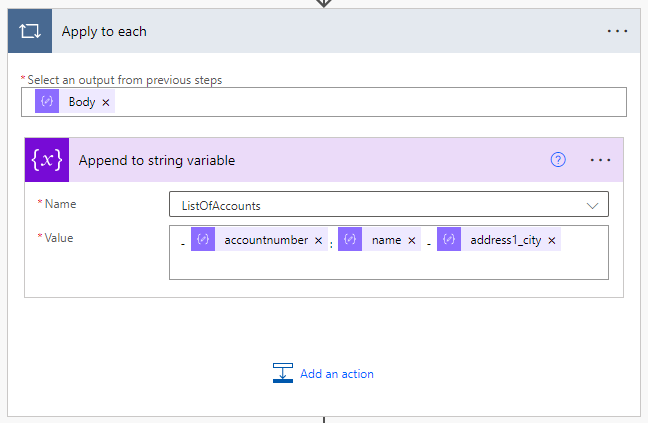
Select Insert a new step (+) and select Add an action. Select the Control connector, and then select the Apply to each action.
Select the Select an output from previous steps box to open the Dynamic content menu. Search for body, and then under Parse JSON, select the Body variable.
Select Insert a new step (+) and select Add an action. Select the Variable connector, and then select the Append to string variable action.
For Name, select ListOfAccounts. Copy the following text and paste it in the Value box:
- @{items('Apply_to_each')['accountnumber']}: @{items('Apply_to_each')['name']} - @{items('Apply_to_each')['address1_city']}Add a line break after the snippet to make each result appear on its own line.
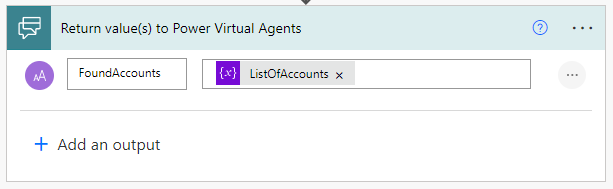
In the Return value(s) to Microsoft Copilot Studio action, add a Text output. For Name, enter FoundAccounts. For Value, select ListOfAccounts.
Select Save.
Call the flow from Microsoft Copilot Studio
On the Microsoft Copilot Studio authoring canvas, select Add node (+), and then select Call an action.
Select the flow you created earlier, Search Account.
For Organization gets value from, select the organization variable.
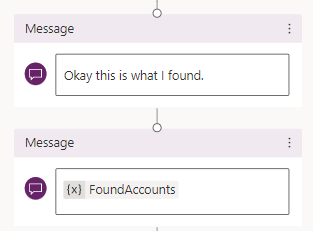
Add a Message node and enter the message Okay, this is what I found.
Add a second Message node. Select Insert variable, and then select FoundAccounts.
Select Save.
Test your copilot in the Test copilot pane.
Feedback
Coming soon: Throughout 2024 we will be phasing out GitHub Issues as the feedback mechanism for content and replacing it with a new feedback system. For more information see: https://aka.ms/ContentUserFeedback.
Submit and view feedback for