Exercise - Explore input and output binding types
In this exercise, we create a function that runs when it receives an HTTP request, and responds to each request by returning a message.
See the following high-level illustration of what we're going to build.

The parameter req is the trigger binding, and the parameter res is the output binding. It might help to think of these parameters as abbreviations for "request" and "response."

The parameter Request is the trigger binding, and the parameter Response is the output binding.
Create a function app
Let's create a function app that we can use throughout this module. A function app lets you group functions as a logical unit for easier management, deployment, and sharing of resources.
Sign in to the Azure portal using the account that you used to activate the sandbox.
On the resource menu or from the Home page, select Create a resource. The Create a resource pane appears.
In the Create a resource menu, select Compute, and in the results list select Function App. You might need to search for Function App in the Search services and marketplace window.
Select Create. The Create Function App pane appears.
On the Basics tab, enter the following values for each setting.
Setting Value Description Project Details Subscription Concierge Subscription The Azure subscription that you want to use for this exercise. Resource Group From the dropdown list, select [sandbox resource group name] The resource group for the sandbox. Instance Details Function App name Enter a globally unique name This name identifies your new function app. Valid characters are a-z,0-9, and-.Do you want to deploy code or container image? Code Option to publish code files or a Docker container. Runtime stack From the dropdown list, select Node.js The sample code in this module is written in JavaScript. Version Accept default The default value is sufficient for this exercise. Region From the dropdown list, select a location Select the region nearest to you. Accept the defaults for all other options. Select Review + create to validate your settings, and then select Create to provision and deploy the function app.
Deployment can take some time. In the global controls next to your account name, select the Notifications icon, and watch for a Deployment succeeded message.
When your function deployment is complete, select Go to resource. The Overview pane for your function app appears.
Sign in to the Azure portal using the same account that you used to activate the sandbox.
On the resource menu or from the Home page, select Create a resource. The Create a resource pane appears.
In the Create a resource menu, select Compute, and then search for and select Function App. You might need to search for Function App in the Search services and marketplace window.
Select Create. The Create Function App pane appears.
On the Basics tab, enter the following values for each setting.
Setting Value Description Project Details Subscription Concierge Subscription The Azure subscription that you want to use for this exercise. Resource Group From the dropdown list, select [sandbox resource group name] The resource group for the sandbox. Instance Details Function App name Enter a globally unique name This name identifies your new function app. Valid characters are a-z,0-9, and-.Do you want to deploy code or container image? Code Option to publish code files or a Docker container. Runtime stack From the dropdown list, select PowerShell Core The sample code for this module is written in PowerShell. Version Accept default The default value is sufficient for this exercise. Region From the dropdown list, select a location Select the region nearest to you. Accept the defaults for all other options. Select Review + create to validate your input, and then select Create to provision and deploy the function app.
Deployment can take some time. In the global controls next to your account name, select the Notifications icon, and watch for a Deployment succeeded message.
When your function deployment is complete, select Go to resource. The Overview pane for your function app appears.
Tip
If you're having trouble finding your function app in the Azure portal, learn how to add function apps to your favorites in the Azure portal.
Create a function
Now that we have a function app, it's time to create a function. Each function is activated by a trigger. In this module, we define an HTTP trigger by using a predefined template.
Select the Create in Azure portal button in the Functions tab on the Overview page.
The Create function pane appears.
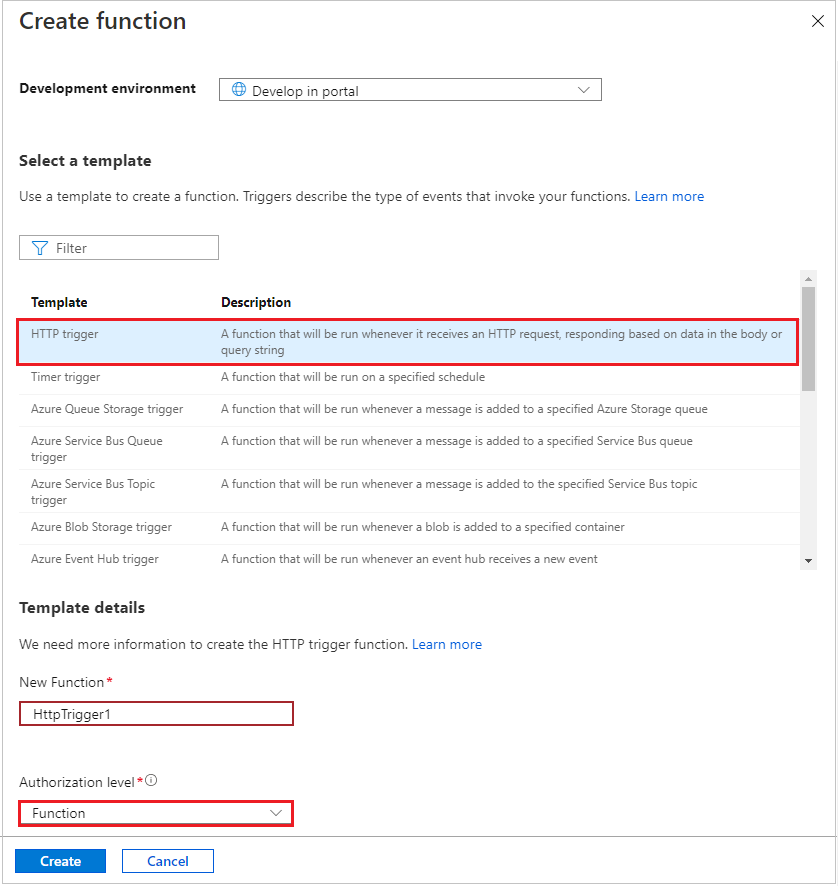
In the Select a template section, select the HTTP trigger template.
In the Template details section, confirm the following settings.
In the New Function text box, accept the default name HttpTrigger1. Azure automatically creates unique names for the functions you create. You can choose a different name, but remember to use meaningful names.
In the Authorization level text box, accept the default value Function. Authorization level determines what keys need to be present on the request in order for it to run. Function authorization level requires a function-specific key, which we can find once it's created.
Select Create. When the trigger function has propagated to your function app, the Functions pane for your Function App appears, listing HttpTrigger1.
In the command bar, select Get Function Url. The Get Function Url dialog box appears.
In the dropdown list, select default (function key), select the Copy to clipboard icon at the end of the URL, and then select OK to close the dialog.
In the address bar of a new browser tab, paste the function URL you copied. Press Enter to run the request in your browser. The response might take a couple of minutes as the function app initializes. If you receive a timeout error, refresh to resend the request.
When the function responds, you should see output similar to the following example displayed in your browser.
This HTTP triggered function executed successfully. Pass a name in the query string or in the request body for a personalized response.Add the following query string
&name=Joeto the end of the URL. Your resulting URL should resemble the following example:https://example.azurewebsites.net/api/HttpTrigger1?code=AbCdEfGhIjKlMnOpQrStUvWxYz==&name=JoePress Enter to run the request in your browser. When the function responds, you should see output similar to the following example displayed in your browser.
Hello, Joe. This HTTP triggered function executed successfully.As you can see from this exercise so far, you must define a trigger when you create a function. Each function has a single trigger. In this example, we're using an HTTP trigger, which means our function starts when it receives an HTTP request. The default implementation from the template, shown in JavaScript in the following screenshot, returns the value of the parameter name that was in the query string or body of the request. If no query string was provided, the function responds with a message that asks whomever is calling to supply a name value.
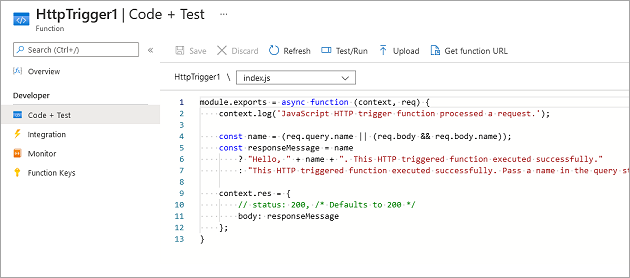
In the Azure portal, in the Function menu, select Code + Test.
The Code + Test pane for your function appears, and displays the contents of your index.js file. The default JavaScript code for your function should resemble the following example.
module.exports = async function (context, req) {
    context.log('JavaScript HTTP trigger function processed a request.');

    const name = (req.query.name || (req.body && req.body.name));
    const responseMessage = name
        ? "Hello, " + name + ". This HTTP triggered function executed successfully."
        : "This HTTP triggered function executed successfully. Pass a name in the query string or in the request body for a personalized response.";

    context.res = {
        // status: 200, /* Defaults to 200 */
        body: responseMessage
    };
}
Let's look briefly at the function's other file--the function.json config file. Access this file by selecting function.json from the dropdown list in the filepath above the code block. The configuration data is shown in the following JSON listing.
{
    "bindings": [
    {
        "authLevel": "function",
        "type": "httpTrigger",
        "direction": "in",
        "name": "req",
        "methods": [
        "get",
        "post"
        ]
    },
    {
        "type": "http",
        "direction": "out",
        "name": "res"
    }
  ]
}
This function has a trigger binding named req of type
httpTrigger, and an output binding named res of typehttp.

In the preceding code for our function, we saw that we accessed the payload of the incoming HTTP request through the req parameter. Similarly, we sent an HTTP response by setting our res parameter. Bindings really do take care of some of the burdensome work for us!
Now that we have a function app, let's create a function. Each function is activated by a trigger. In this module, we create an HTTP trigger by using a template.
Select the Create in Azure portal button in the Functions tab on the Overview page.
The Create function pane appears.
In the Select a template section, select the HTTP trigger template.
In the Template details section, confirm the following settings.
In the New Function text box, accept the default name HttpTrigger1. Azure automatically provides a unique name when you create a function. You can choose a different name, but remember to use meaningful names.
In the Authorization level text box, accept the default value Function. Authorization level determines what keys need to be present on the request in order for it to run. Function requires a function-specific key.
Select Create. The HttpTrigger1 pane for your Function appears.
In the command bar, select Get Function Url. The Get Function Url dialog box appears.
Select default (function key) from the dropdown list, then select the Copy to clipboard icon at the end of the URL, and then select OK to close the dialog box.
In the address bar of a new browser tab, paste the function URL you copied. Press Enter to run the request in your browser. The response might take a couple of minutes as the function app initializes. If you receive a timeout error, refresh to resend the request.
When the function responds, you should see output similar to the following example displayed in your browser.
This HTTP triggered function executed successfully. Pass a name in the query string or in the request body for a personalized response.Add query string
&name=Joeto the end of the URL. Your resulting URL should resemble the following example:https://example.azurewebsites.net/api/HttpTrigger1?code=AbCdEfGhIjKlMnOpQrStUvWxYz==&name=JoePress Enter to run the request in your browser. When the function responds, you should see output similar to the following example displayed in your browser.
Hello, Joe. This HTTP triggered function executed successfully.As you can see from this exercise so far, you must define a trigger when you create a function. Each function has a single trigger. In this example, we're using an HTTP trigger, which means our function starts when it receives an HTTP request. The default implementation from the template, shown in PowerShell in the following screenshot, uses the
Push-OutputBindingcmdlet to respond with the value of the parameter name that was part of the query string or body of the request. If no string was provided, the function responds with a message that prompts whomever is calling to supply a name value.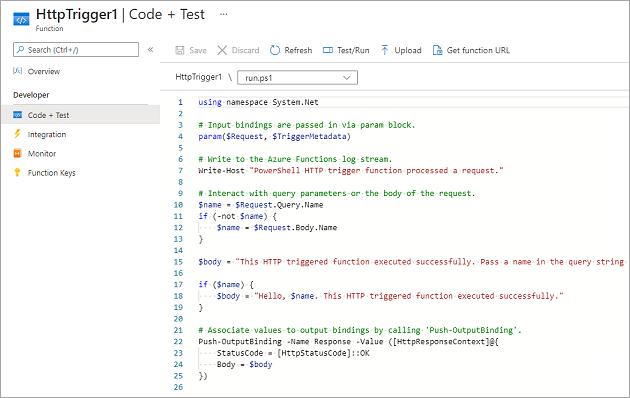
In the Function menu, select Code + Test. The Code + Test pane for your function appears, and displays the contents of your run.ps1 file.
The default PowerShell code for your function should resemble the following example.
using namespace System.Net

# Input bindings are passed in via param block.
param($Request, $TriggerMetadata)

# Write to the Azure Functions log stream.
Write-Host "PowerShell HTTP trigger function processed a request."

# Interact with query parameters or the body of the request.
$name = $Request.Query.Name
if (-not $name) {
    $name = $Request.Body.Name
}

$body = "This HTTP triggered function executed successfully. Pass a name in the query string or in the request body for a personalized response."

if ($name) {
    $body = "Hello, $name. This HTTP triggered function executed successfully."
}

# Associate values to output bindings by calling 'Push-OutputBinding'.
Push-OutputBinding -Name Response -Value ([HttpResponseContext]@{
    StatusCode = [HttpStatusCode]::OK
    Body = $body
})
Let's look briefly at the function's other file, the function.json config file. Open this file by selecting function.json from the filepath's dropdown list. The configuration data is shown in the following JSON listing.
{
  "bindings": [
    {
      "authLevel": "function",
      "type": "httpTrigger",
      "direction": "in",
      "name": "Request",
      "methods": [
        "get",
        "post"
      ]
    },
    {
      "type": "http",
      "direction": "out",
      "name": "Response"
    }
  ]
}
As you can see, this function has a trigger binding named Request of type
httpTrigger, and an output binding named Response of typehttp. In the preceding code for our function, we saw how we accessed the payload of the incoming HTTP request through the Request parameter. Similarly, we sent an HTTP response simply by setting the Response parameter. Bindings really do take care of some of the burdensome work for us.

#lightbox)
Explore binding types
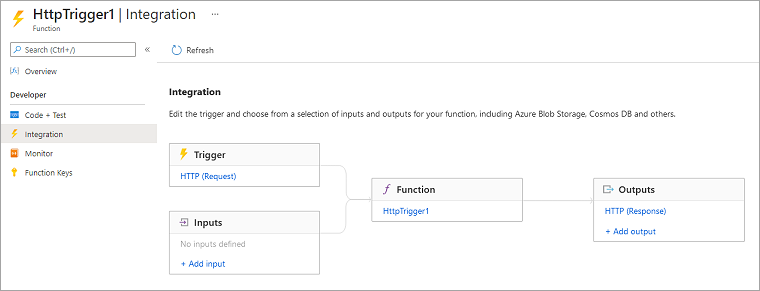
In the Function menu, select Integration. The Integration pane for your function appears.
Notice that we've already defined a trigger and an output binding, as shown in the following image. The integration view adjusts to the best fit for the width and height of your screen. The same information can display horizontally, if your screen is wide enough.
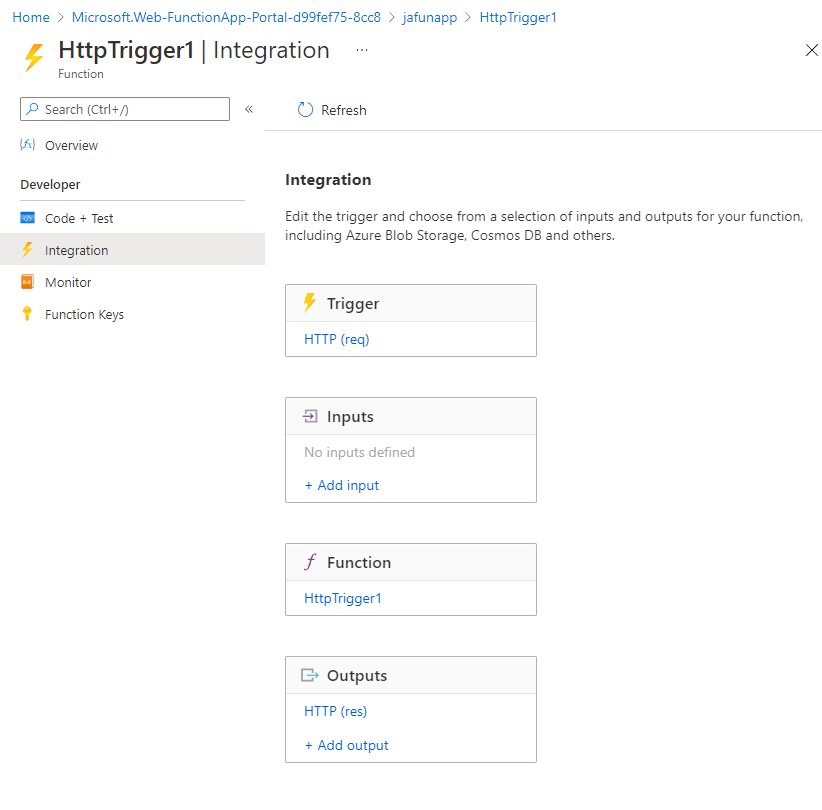
You can see that we can't add more than one trigger. To change a trigger for a function, you need to delete the trigger and create a new one. However, the Inputs and Outputs sections enable you to add more than one binding, so the request can accept more than one input value and return more than one output value.
In the Inputs box, select Add input. The Create Input pane appears. Select the dropdown list for Binding Type to view a list of all possible input binding types.
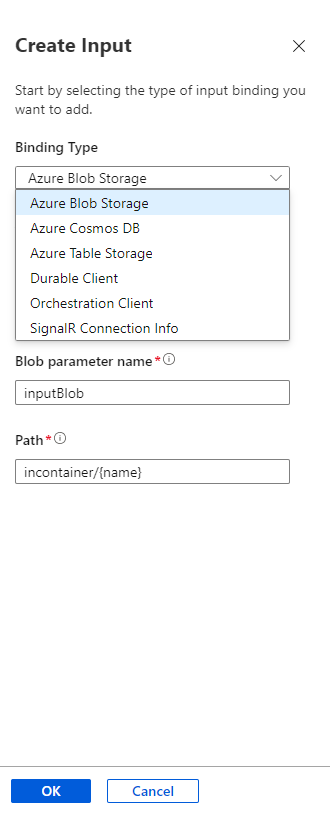
Take a moment to consider how you might use each of these input bindings in a solution.
Later in this module, we add input bindings, but for now, select Cancel to dismiss this pane.
In the Outputs box, select Add output. The Create Output pane appears. Select the dropdown list for Binding Type to view a list of all possible output binding types.
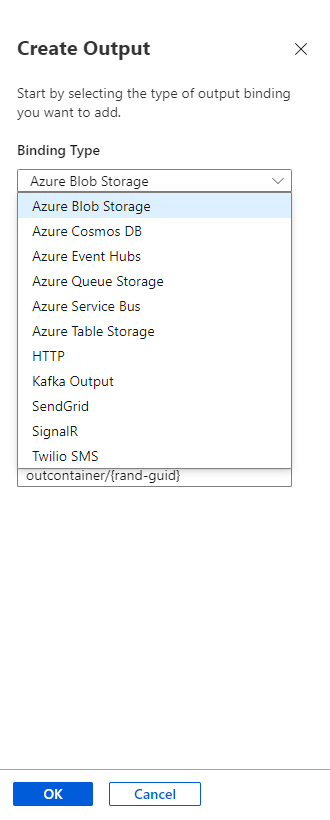
As you can see, there are several output binding types. Later in this module, we add output bindings but, for now, select Cancel to dismiss this pane.

In the Function menu, select Integration. The Integration pane for your function appears.
Notice that we've already defined a trigger and an output binding, as shown in the following image. The integration view adjusts to the best fit for the width and height of your screen. The same information can display vertically, if your screen isn't wide enough.
You can see that we can't add more than one trigger. To change the trigger for a function, you need to delete the trigger and create a new one. However, the Inputs and Outputs sections enable you to add multiple bindings, so the function can accept more than one input value and return more than one output value.
In the Inputs box, select Add input. The Create Input pane appears. Select the dropdown list for Binding Type to view a list of all possible input binding types.
Take a moment to consider how you might use each of these input bindings in a solution. There are many possibilities to choose from.
Later in this module, we add input bindings, but for now, select Cancel to dismiss this pane.
In the Outputs box, select Add output. The Create Output pane appears. Select the dropdown list for Binding Type to view a list of all possible output binding types.
As you can see, there are several output binding types. Later in this module, we add output bindings but, for now, select Cancel to dismiss this pane.

So far, we've learned how to create a function app and add a function to it. We've seen a simple function in action--one that runs when an HTTP request is made. We've also explored the Azure portal and the types of input and output bindings that are available to functions. In the next unit, we'll use an input binding to read text from a database.