Exercise - Read data with input bindings
Imagine that you want to create a bookmark lookup service. Initially, your service is read-only. If users want to find an entry, they send a request with the ID of the entry, and our function returns the URL. The following flowchart illustrates the logical flow.

When a user sends a request with text, the find bookmark function tries to find an entry in your database that contains a bookmark with the text as a key or ID. The system returns a result that indicates whether you found the entry.
When the Azure function receives a request with a bookmark ID, it first checks whether the request is valid. If it isn't, an error response is generated. If the request is valid, the function checks whether the bookmark ID exists in the Azure Cosmos DB database. If it doesn't exist, an error response is generated. If the bookmark ID is found, a success response is generated.
You need to store the data somewhere. In the previous flowchart, the data store is an Azure Cosmos DB instance. But, how do you connect to a database from a function and read data? In the world of functions, you configure an input binding for that job. Configuring an input binding through the Azure portal is straightforward. As you see shortly, you don't have to write code or open a storage connection. The Azure Functions runtime and bindings take care of those tasks for you.
Create an Azure Cosmos DB account
Note
This exercise is not intended to be a tutorial on Azure Cosmos DB. If you're interested in learning more, see the complete learning path about Azure Cosmos DB at the end of this module.
Create a database account
A database account is a container for managing one or more databases. Before we can create a database, we need to create a database account.
In the Azure portal resource menu, or from the Home page, select Create a resource. The Create a resource pane appears.
In the Create a resource menu, select Databases, and then search for and select Azure Cosmos DB. The Which API best suits your workload? pane appears.
In the Azure Cosmos DB for NoSQL option, select Create so that we can create a Cosmos DB trigger and input/output bindings. The Create Azure Cosmos DB Account - Azure Cosmos DB for NoSQL pane appears.
On the Basics tab, enter the following values for each setting.
Setting Value Description Project Details Subscription Concierge Subscription The Azure subscription that works with the resources in the sandbox. Resource Group From the dropdown list, select [sandbox resource group name] The resource group for your sandbox. Instance Details Account Name globally unique nameEnter a unique but identifiable name for your Azure Cosmos DB account; documents.azure.comis appended to the name that you provide.3 - 50 lowercase characters, numbers, or hyphens (-).Location regionSelect the region nearest to you. Accept the default values for the remaining settings, and select Review + create to validate your input. A Validation Success notification appears.
Select Create to provision and deploy a database account.
Deployment can take some time. Wait for a Deployment succeeded message in the Notifications hub before proceeding.
Select Go to resource to go to the database account in the portal. The Quick start pane for your Azure Cosmos DB account appears.
Next, we add a container and then add a database to the Azure Cosmos DB account.
Add a container
In an Azure Cosmos DB, a container is used to store various user-generated entities, also called items. We create a container called Bookmarks.
Let's use the Data Explorer tool to create a database and container.
In your Azure Cosmos DB account menu, select Data Explorer. The Data Explorer pane for your Cosmos DB account appears.
Select the New Container box. The New Container pane appears. You might need to scroll to see it.
Enter the following values for each setting.
Setting Value Description Database id Select Create new, and enter func-io-learn-db for the Database id Database names can be 1 to 255 characters long, and can't contain /, \, #, ?, or a trailing space.
You can enter whatever you want, but we're using func-io-learn-db in this module.Database Max RU/s 4000 Accept the default throughput of 4000 request units per second (RU/s). To reduce latency, you can scale up the performance later. Container id Bookmarks Container IDs have the same character requirements as database names. We're using Bookmarks in this module. Partition key /id The partition key specifies how the documents in Azure Cosmos DB collections are distributed across logical data partitions. We use the Partition key setting as a convenience here because we're not concerned with database performance in this module. To learn more about Azure Cosmos DB partition key strategies, explore the Microsoft Learn Azure Cosmos DB modules. Accept the defaults for all the other settings.
Scroll to the bottom of the pane and select OK. Allow a few minutes for the database and container to be built.
When complete, the Data Explorer displays func-io-learn-db in DATA under NOSQL API.
Select func-io-learn-db to expand it. Notice that your func-io-learn-db database contains several child members, including Scale and Bookmarks.
Expand the Bookmarks container, and notice that it's prepopulated with several child members.
In the next task, you add some data, also known as items, to your Bookmarks container.
Add test data
You want to add data to your Bookmarks container. Use Data Explorer to store a URL and ID for each item.
Expand the func-io-learn-db database and the Bookmarks container, and then select Items. The Items tab appears.
In the command bar, select New Item.
Replace the default code of the new item with the following JSON code.
{
    "id": "docs",
    "url": "https://learn.microsoft.com/azure"
}
In the command bar, select Save.
Notice that more properties than the two lines we added appear. They all begin with an underline
(_rid, _self, _etag, _attachments, _ts). These properties, described in the following table, are system generated to help manage the items that you add to the container.Property Description _ridResource ID is a unique identifier that is also hierarchical per the resource stack on the resource model. It's used internally for placement and navigation of the item resource. _selfUnique addressable URI for the resource. _etagRequired for optimistic concurrency control. _attachmentsAddressable path for the attachments resource. _tsTimestamp of the last update of this resource. Let's add a few more items into the Bookmarks container. In the command bar, select New Item. Create four more items with the following content. Add the items by selecting New Item, and then selecting Save after copying and pasting each new item. Notice how each item is added to the list of items.
{
    "id": "portal",
    "url": "https://portal.azure.com"
}
{ "id": "learn", "url": "https://learn.microsoft.com/training" }{ "id": "marketplace", "url": "https://azuremarketplace.microsoft.com/marketplace/apps" }{ "id": "blog", "url": "https://azure.microsoft.com/blog" }When you've finished entering the bookmark data, your container should look like the following image.
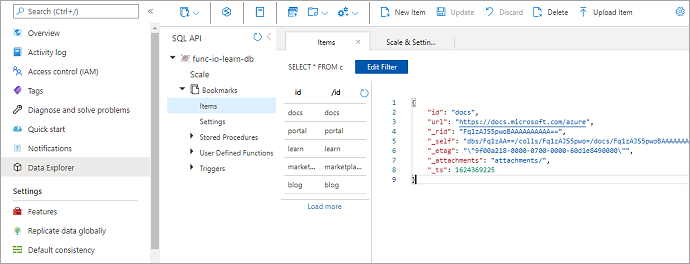

Your Bookmarks container has five items. In this scenario, if a request arrives with "id=docs", it looks up that ID in your Bookmarks container, and returns the URL https://learn.microsoft.com/azure. Let's make an Azure function that looks up values in your Bookmarks container.
Create your function
Go to the function app that you created in the preceding unit. In the resource menu, select Home, and in the Recent resources section, you should see your function app (Type equals Function App). Select your function app. The Function App pane appears.
In the Functions tab on the Overview page, you should have one function, HttpTrigger1.
Let's create another function. Select Create on the Functions tab. The Create function pane appears, listing templates for supported triggers.
In the Select a template section, select HTTP trigger.
Accept all default settings, and select Create to create your function.
The Overview pane for the HttpTrigger2 function appears.
Verify the function
You can verify what we've done so far by testing the new function.
In the command bar, select Get Function Url. The Get Function Url dialog box appears.
Select default (function key) from the dropdown list, then select the Copy to clipboard icon, and select OK.
Paste the function URL you copied into the address bar of a new browser tab. Append the query string value
&name=<your name>to the end of the URL, replacing<your name>with your name, and then press Enter. The Azure function should return a personalized response in the browser.
Now that we have our skeletal function working, let's turn our attention to reading data from your Azure Cosmos DB, or in our scenario, from your Bookmarks container.
Add an Azure Cosmos DB input binding
To read data from the database, you need to define an input binding. As you see here, you can configure a binding that can talk to your database in just a few steps.
In the Azure portal, in the HttpTrigger2 Function menu on the left, select Integration. The Integration pane for your Function appears.
You used a template that created an HTTP trigger request with an HTTP output binding. Let's add an Azure Cosmos DB input binding.
In the Inputs box, select Add input. The Create Input pane appears.
From the Binding Type dropdown list, select Azure Cosmos DB.
In the Azure Cosmos DB details section, under the Cosmos DB account connection setting, select the New link. The New Cosmos DB connection dialog box appears.
If a message appears prompting you to install the Microsoft.Azure.WebJobs.Extensions.CosmosDB extension, select Install and wait for it to finish.
By default, Azure recognizes the Azure Cosmos DB account you created earlier. Select OK to set up a connection to your database. A new connection to the database account is configured and appears in the Cosmos DB account connection field.
We want to look up a bookmark with a specific ID, so let's tie the ID that we receive in the query string to the binding.
Let's complete the settings in the Create Input pane. Enter the following values for each setting. To learn more about the purpose of each setting, select the information icon on that field.
Setting Value Description Document parameter name bookmarkThe name used to identify this binding in your code. Database name func-io-learn-dbThe database to work with. This value is the database name we set. Collection Name BookmarksThe collection we read the data from. This setting was defined. Document ID idAdd the Document ID that we defined when we created the Bookmarks Azure Cosmos DB container. Partition key /idAdd the partition key that you defined when you created the Bookmarks Azure Cosmos DB collection. The key entered here (specified in input binding format <key>) must match the one in the collection.SQL Query (optional) Leave blank You're only retrieving one document at a time based on the ID. So, filtering with the Document ID setting is a better than using a SQL Query in this instance. You could craft a SQL Query to return one entry ( SELECT * from b where b.ID = id). That query would indeed return a document, but it would return it in a document collection. Your code would have to manipulate a collection unnecessarily. Use the SQL Query approach when you want to get multiple documents.To clarify why we're using these settings, we want to look up a bookmark with a specific ID, so we tied the Document ID that our function receives in the query string to the input binding. This syntax is known as a binding expression. The function is triggered by an HTTP request that uses a query string to specify the ID to look up. Because IDs are unique in our collection, the binding returns either 0 (not found) or 1 (found) documents.
To save this input binding configuration, select OK.
Update the function implementation
Now that your binding is defined, you can use it in your function. You need to make two changes to implement the binding that you created:
Modify your function's language-specific implementation code. It needs to determine whether a document was found in the database that matches the ID that is passed to the function.
Modify your function's JSON implementation code to accept a parameter that is passed in the query string.
Modify your function's JavaScript implementation code
In the Function menu for your HttpTrigger2 function, select Code + Test. The Code + Test pane appears for your HttpTrigger2 function.
Replace all code in the index.js file with the following code.
module.exports = function (context, req) {

    var bookmark = context.bindings.bookmark

    if(bookmark){
        context.res = {
        body: { "url": bookmark.url },
        headers: {
            'Content-Type': 'application/json'
        }
        };
    }
    else {
        context.res = {
            status: 404,
            body : "No bookmarks found",
            headers: {
            'Content-Type': 'application/json'
            }
        };
    }

    context.done();
};
In the command bar, select Save. Select Filesystem Logs in the drop-down at the top center of the logs pane (which displays App Insights Logs by default). The Logs pane appears, showing you have
Connected!
Let's examine what this code is doing.
An incoming HTTP request triggers the function, and an
idquery parameter is passed to the Azure Cosmos DB input binding.If the database finds a document that matches this ID, the
bookmarkparameter is set to the located document.In this example, the code constructs a response that contains the URL value that is found in the corresponding document of the database.
If no document is found matching this key, the request would respond with a payload and status code that tells the user the bad news.
Modify your function's JSON implementation code
Select function.json from the dropdown list in your
<functionapp> \ HttpTrigger2 \path.Modify the values for
idandpartitionKeyso that they accept a parameter of{id}. Your function.json code should resemble the following example, whereyour-databaseis replaced with the name of your Cosmos DB database.{ "bindings": [ { "authLevel": "function", "type": "httpTrigger", "direction": "in", "name": "req", "methods": [ "get", "post" ] }, { "type": "http", "direction": "out", "name": "res" }, { "name": "bookmark", "direction": "in", "type": "cosmosDB", "connection": "your-database_DOCUMENTDB", "databaseName": "func-io-learn-db", "containerName": "Bookmarks", "id": "{id}", "partitionKey": "{id}" } ] }In the command bar, select Save.
Modify your function's PowerShell implementation code
In the Function menu for your HttpTrigger2 function, select Code + Test. The Code + Test pane appears for your HttpTrigger2 function, displaying the
run.ps1file.Replace all code in the
run.ps1file with following code.using namespace System.Net param($Request, $bookmark, $TriggerMetadata) if ($bookmark) { $status = [HttpStatusCode]::OK $body = @{ url = $bookmark.url } } else { $status = [HttpStatusCode]::NotFound $body = "No bookmarks found" } Push-OutputBinding -Name Response -Value ([HttpResponseContext]@{ StatusCode = $status Body = $body })In the command bar, select Save. Select Filesystem Logs in the drop-down at the top center of the logs pane (which displays App Insights Logs by default). The Logs pane appears, showing you have
Connected!
Let's examine what this code is doing.
An incoming HTTP request triggers the function, and an
idquery parameter is passed to the Azure Cosmos DB input binding.If the database finds a document that matches this ID, the
bookmarkparameter is set to the located document.In this example, the code constructs a response that contains the URL value that is found in the corresponding document of the database.
If no document is found matching this key, the request would respond with a payload and status code that tells the user the bad news.
Modify your function's JSON implementation code
Select function.json from the dropdown list in your
<functionapp> \ HttpTrigger2 \path.Modify the values for
idandpartitionKeyso that they accept a parameter of{id}. Your function.json code should resemble the following example, whereyour-databaseis replaced with the name of your Cosmos DB database.{ "bindings": [ { "authLevel": "function", "type": "httpTrigger", "direction": "in", "name": "Request", "methods": [ "get", "post" ] }, { "type": "http", "direction": "out", "name": "Response" }, { "type": "cosmosDB", "name": "bookmark", "databaseName": "func-io-learn-db", "containerName": "Bookmarks", "connection": "your-database_DOCUMENTDB", "direction": "in", "id": "{id}", "partitionKey": "{id}" } ] }In the command bar, select Save.
Try it out
You should already be on the Code + Test pane for your HttpTrigger2 function.
In the command bar, select Get function URL. The Get function URL dialog box appears.
From the Key dropdown list, select default under Function key, and then select the Copy to clipboard icon at the end of the URL.
Paste the function key you copied into the address bar of a new browser tab, and then add the query string value
&id=docsto the end of the URL. The resulting URL should resemble the following example:https://example.azurewebsites.net/api/HttpTrigger2?code=AbCdEfGhIjKlMnOpQrStUvWxYz==&id=docsPress Enter to run the request. The response returned by your function should be similar to the following example.
{
  "url": "https://learn.microsoft.com/azure"
}
Replace
&id=docswith&id=missing, press Enter, and observe the response. We defined five bookmarks, and created a meaningful error response if the requested bookmark doesn't exist.
In this unit, you created your first input binding manually to read from an Azure Cosmos DB database. The amount of code you wrote to search our database and read data was minimal, thanks to bindings. You did most of your work configuring the binding declaratively, and the platform took care of the rest.
In the next unit, you'll add more data to our bookmarks collection through an Azure Cosmos DB output binding.