Exercise - Run load tests in Azure Pipelines
In this section, you'll run the test plan that you created in the release pipeline. The test plan uses Apache JMeter to run load tests.
Here's how you run the tests:
- Fetch and check out a Git branch that implements the tests.
- Modify your pipeline to install JMeter, run the test plan, transform the results to JUnit, and publish the results to Azure Pipelines.
- Push your branch to GitHub, watch the tests run in Azure Pipelines, and then examine the results.
Fetch the branch from GitHub
In this section, you'll fetch the jmeter branch from GitHub and check out, or switch to, that branch.
This branch contains the Space Game project that you worked with in previous modules. It also contains an Azure Pipelines configuration to start with.
In Visual Studio Code, open the integrated terminal.
To download a branch named
jmeterfrom the Microsoft repository and switch to that branch, run the followinggit fetchandgit checkoutcommands:git fetch upstream jmeter git checkout -B jmeter upstream/jmeterRecall that upstream refers to the Microsoft GitHub repository. Your project's Git configuration understands the upstream remote because you set up that relationship when you forked the project from the Microsoft repository and cloned it locally.
Shortly, you'll push this branch up to your GitHub repository, known as
origin.Optionally, in Visual Studio Code, open the azure-pipelines.yml file. Review the initial configuration.
The configuration resembles the ones that you created in previous modules in this learning path. It builds only the application's Release configuration. For brevity, it omits the triggers, manual approvals, and tests that you set up in previous modules.
Note
A more robust configuration might specify the branches that participate in the build process. For example, to help verify code quality, you might run unit tests each time you push up a change on any branch. You might also deploy the application to an environment that performs more exhaustive testing. But you do this deployment only when you have a pull request, when you have a release candidate, or when you merge code to main.
For more information, see Implement a code workflow in your build pipeline by using Git and GitHub and Build pipeline triggers.
Optionally, in Visual Studio Code, you can check out the JMeter test plan file, LoadTest.jmx, and the XLST transform, JMeter2JUnit.xsl. The XLST file transforms the JMeter output to JUnit so that Azure Pipelines can visualize the results.
Add variables to Azure Pipelines
The team's original test plan provides a hard-coded value for the hostname of the Space Game website that runs in the staging environment.
To make the test plan more flexible, your version uses a JMeter property. Think of a property as a variable that you can set from the command line.
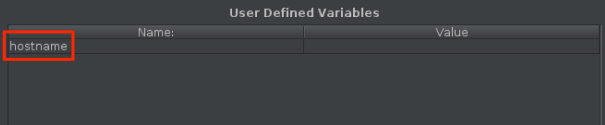
Here's how the hostname variable is defined in JMeter:
Here's how the hostname variable uses the __P function to read the hostname variable.
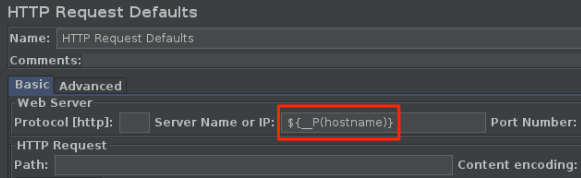
The corresponding test plan file, LoadTest.jmx, specifies this variable and uses it to set the hostname.
When you run JMeter from the command line, you use the -J argument to set the hostname property. Here's an example:
apache-jmeter-5.4.3/bin/./jmeter -n -t LoadTest.jmx -o Results.xml -Jhostname=tailspin-space-game-web-staging-1234.azurewebsites.net
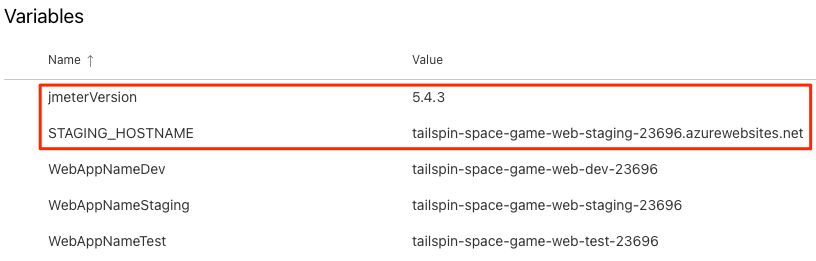
Here, you set the STAGING_HOSTNAME variable in Azure Pipelines. This variable points to your site's hostname that runs on App Service in your staging environment. You also set the jmeterVersion to specify the version of JMeter to install.
When the agent runs, these variables are automatically exported to the agent as environment variables, so your pipeline configuration can run JMeter this way:
apache-jmeter-5.4.3/bin/./jmeter -n -t LoadTest.jmx -o Results.xml -Jhostname=$(STAGING_HOSTNAME)
Let's add the pipeline variables now, before you update your pipeline configuration. To do so:
In Azure DevOps, go to your Space Game - web - Nonfunctional tests project.
Under Pipelines, select Library.
Select the Release variable group.
Under Variables, select + Add.
For the name of your variable, enter STAGING_HOSTNAME. For its value, enter the URL of the App Service instance that corresponds to your staging environment, such as tailspin-space-game-web-staging-1234.azurewebsites.net.
Important
Don't include the
http://orhttps://protocol prefix in your value. JMeter provides the protocol when the tests run.Add a second variable named jmeterVersion. For its value, specify 5.4.3.
Note
This is the version of JMeter that we last used to test this module. To get the latest version, see Download Apache JMeter.
To save your variable to the pipeline, select Save near the top of the page.
Your variable group resembles the one shown in the following image:
Modify the pipeline configuration
In this section, you'll modify the pipeline to run your load tests during the Staging stage.
In Visual Studio Code, open the azure-pipelines.yml file. Then modify the file as follows:
Tip
You can replace the entire file or just update the part that's highlighted.
trigger:
- '*'

variables:
  buildConfiguration: 'Release'

stages:
- stage: 'Build'
  displayName: 'Build the web application'
  jobs:
  - job: 'Build'
    displayName: 'Build job'
    pool:
      vmImage: 'ubuntu-20.04'
      demands:
      - npm

    variables:
      wwwrootDir: 'Tailspin.SpaceGame.Web/wwwroot'
      dotnetSdkVersion: '6.x'

    steps:
    - task: UseDotNet@2
      displayName: 'Use .NET SDK $(dotnetSdkVersion)'
      inputs:
        version: '$(dotnetSdkVersion)'

    - task: Npm@1
      displayName: 'Run npm install'
      inputs:
        verbose: false

    - script: './node_modules/.bin/node-sass $(wwwrootDir) --output $(wwwrootDir)'
      displayName: 'Compile Sass assets'

    - task: gulp@1
      displayName: 'Run gulp tasks'

    - script: 'echo "$(Build.DefinitionName), $(Build.BuildId), $(Build.BuildNumber)" > buildinfo.txt'
      displayName: 'Write build info'
      workingDirectory: $(wwwrootDir)

    - task: DotNetCoreCLI@2
      displayName: 'Restore project dependencies'
      inputs:
        command: 'restore'
        projects: '**/*.csproj'

    - task: DotNetCoreCLI@2
      displayName: 'Build the project - $(buildConfiguration)'
      inputs:
        command: 'build'
        arguments: '--no-restore --configuration $(buildConfiguration)'
        projects: '**/*.csproj'

    - task: DotNetCoreCLI@2
      displayName: 'Publish the project - $(buildConfiguration)'
      inputs:
        command: 'publish'
        projects: '**/*.csproj'
        publishWebProjects: false
        arguments: '--no-build --configuration $(buildConfiguration) --output $(Build.ArtifactStagingDirectory)/$(buildConfiguration)'
        zipAfterPublish: true

    - publish: '$(Build.ArtifactStagingDirectory)'
      artifact: drop

- stage: 'Dev'
  displayName: 'Deploy to the dev environment'
  dependsOn: Build
  jobs:
  - deployment: Deploy
    pool:
      vmImage: 'ubuntu-20.04'
    environment: dev
    variables:
    - group: Release
    strategy:
      runOnce:
        deploy:
          steps:
          - download: current
            artifact: drop
          - task: AzureWebApp@1
            displayName: 'Azure App Service Deploy: website'
            inputs:
              azureSubscription: 'Resource Manager - Tailspin - Space Game'
              appName: '$(WebAppNameDev)'
              package: '$(Pipeline.Workspace)/drop/$(buildConfiguration)/*.zip'

- stage: 'Test'
  displayName: 'Deploy to the test environment'
  dependsOn: Dev
  jobs:
  - deployment: Deploy
    pool:
      vmImage: 'ubuntu-20.04'
    environment: test
    variables:
    - group: 'Release'
    strategy:
      runOnce:
        deploy:
          steps:
          - download: current
            artifact: drop
          - task: AzureWebApp@1
            displayName: 'Azure App Service Deploy: website'
            inputs:
              azureSubscription: 'Resource Manager - Tailspin - Space Game'
              appName: '$(WebAppNameTest)'
              package: '$(Pipeline.Workspace)/drop/$(buildConfiguration)/*.zip'

- stage: 'Staging'
  displayName: 'Deploy to the staging environment'
  dependsOn: Test
  jobs:
  - deployment: Deploy
    pool:
      vmImage: 'ubuntu-20.04'
    environment: staging
    variables:
    - group: 'Release'
    strategy:
      runOnce:
        deploy:
          steps:
          - download: current
            artifact: drop
          - task: AzureWebApp@1
            displayName: 'Azure App Service Deploy: website'
            inputs:
              azureSubscription: 'Resource Manager - Tailspin - Space Game'
              appName: '$(WebAppNameStaging)'
              package: '$(Pipeline.Workspace)/drop/$(buildConfiguration)/*.zip'
  - job: RunLoadTests
    dependsOn: Deploy
    displayName: 'Run load tests'
    pool:
      vmImage: 'ubuntu-20.04'
    variables:
    - group: Release
    steps:
    - script: |
        wget -c archive.apache.org/dist/jmeter/binaries/apache-jmeter-$(jmeterVersion).tgz
        tar -xzf apache-jmeter-$(jmeterVersion).tgz
      displayName: 'Install Apache JMeter'
    - script: apache-jmeter-$(jmeterVersion)/bin/./jmeter -n -t LoadTest.jmx -o Results.xml -Jhostname=$(STAGING_HOSTNAME)
      displayName: 'Run Load tests'
    - script: |
        sudo apt-get update
        sudo apt-get install xsltproc
        xsltproc JMeter2JUnit.xsl Results.xml > JUnit.xml
      displayName: 'Transform JMeter output to JUnit'
    - task: PublishTestResults@2
      inputs:
        testResultsFormat: JUnit
        testResultsFiles: JUnit.xml
Here's a summary of the changes:
- The
RunLoadTestsjob does load testing from a Linux agent. - The
RunLoadTestsjob depends on theDeployjob to ensure that the jobs are run in the correct order. You need to deploy the website to App Service before you can run the load tests. If you don't specify this dependency, jobs within the stage can run in any order or run in parallel. - The first
scripttask downloads and installs JMeter. ThejmeterVersionpipeline variable specifies the version of JMeter to install. - The second
scripttask runs JMeter. The-Jargument sets thehostnameproperty in JMeter by reading theSTAGING_HOSTNAMEvariable from the pipeline. - The third
scripttask installs xsltproc, an XSLT processor, and transforms the JMeter output to JUnit. - The
PublishTestResults@2task publishes the resulting JUnit report, JUnit.xml, to the pipeline. Azure Pipelines can help you visualize the test results.
- The
In the integrated terminal, add azure-pipelines.yml to the index, commit the changes, and push the branch up to GitHub.
git add azure-pipelines.yml
git commit -m "Run load tests with Apache JMeter"
git push origin jmeter
Watch Azure Pipelines run the tests
Here, you'll watch the pipeline run. You'll see the load tests run during Staging.
In Azure Pipelines, go to the build and trace it as it runs.
During Staging, you see the load tests run after the website is deployed.
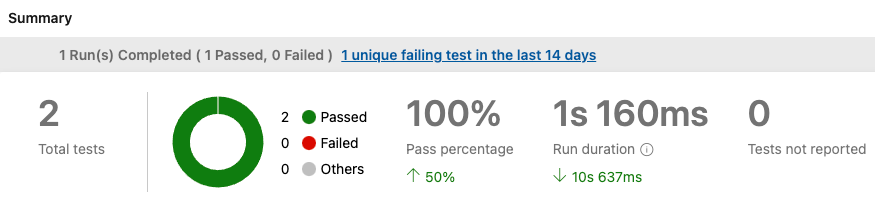
After the build finishes, go to the summary page.
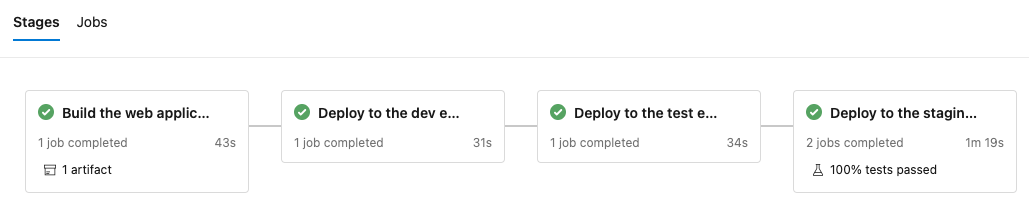
You see that the deployment and the load tests finished successfully.
Near the top of the page, note the summary.
You see that the build artifact for the Space Game website is published just like always. Also note the Tests and coverage section, which shows that the load tests have passed.

Select the test summary to see the full report.
The report shows that both tests have passed.
If any test were to fail, you'd see detailed results of the failure. From those results, you could investigate the source of the failure.
Recall that the XSLT file produces a JUnit file called JUnit.xml. The JUnit file answers these two questions:
- Is the average request time less than one second?
- Do fewer than 10 percent of requests take more than one second to complete?
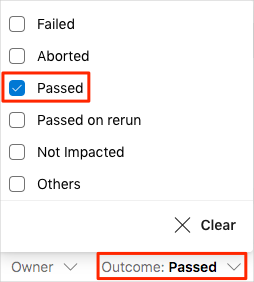
The report proves that these requirements are met. To see more details, select the Outcome arrow in the report. Then make sure that only Passed is selected.
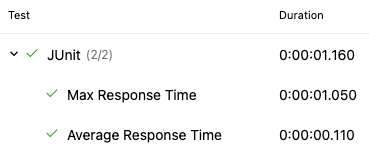
You see that the Average Response Time and Max Response Time test cases both succeeded.
Note
You're using the B1 App Service plan, which runs on the Basic tier. This plan is intended for apps that have low traffic requirements, such as apps in a test environment. Because of this plan, the performance of your website might be less than you expect. In practice, you'd choose a plan for the staging environment that more closely matches your production environment. For example, the Standard and Premium plans are for production workloads. These run on dedicated virtual machine instances.