Quickstart: Create a client using the Azure Web PubSub client SDK (preview)
Get started with the Azure Web PubSub client SDK for .NET or JavaScript to create a Web PubSub client that:
- connects to a Web PubSub service instance
- subscribes a Web PubSub group.
- publishes a message to the Web PubSub group.
API reference documentation | Library source code | Package (JavaScript npm) | Samples
API reference documentation | Library source code | Package (NuGet) | Samples
Note
The client SDK is still in preview version. The interface may change in later versions.
Prerequisites
- An Azure account with an active subscription. Create an account for free.
- A file editor such as Visual Studio Code.
Setting up
Create an Azure Web PubSub service instance
- In the Azure portal Home page, select Create a resource.
- In the Search the Marketplace box, enter Web PubSub.
- Select Web PubSub from the results.
- Select Create.
- Create a new resource group
- Select Create new.
- Enter the name and select OK.
- Enter a Resource Name for the service instance.
- Select Pricing tier. You can choose Free for testing.
- Select Create, then Create again to confirm the new service instance.
- Once deployment is complete, select Go to resource.
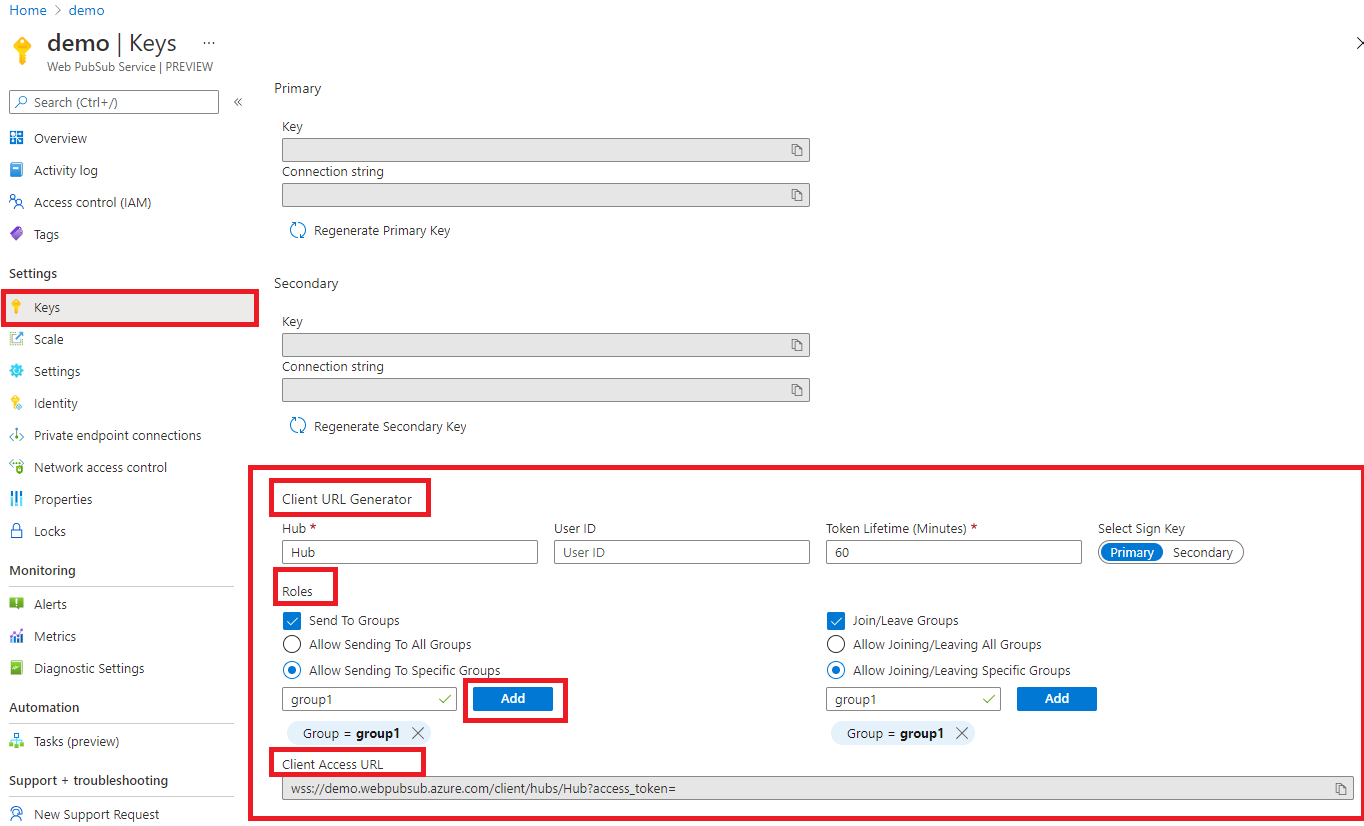
Generate the client URL
A client uses a Client Access URL to connect and authenticate with the service, which follows a pattern of wss://<service_name>.webpubsub.azure.com/client/hubs/<hub_name>?access_token=<token>.
To give the client permission to send messages to and join a specific group, you must generate a Client Access URL with the Send To Groups and Join/Leave Groups permissions.
- In the Azure portal, go to your Web PubSub service resource page.
- Select Keys from the menu.
- In the Client URL Generator section:
- Select Send To Groups
- Select Allow Sending To Specific Groups.
- Enter group1 in the Group Name field and select Add.
- Select Join/Leave Groups.
- Select Allow Joining/Leaving Specific Groups.
- Enter group1 in the Group Name field and select Add.
- Copy and save the Client Access URL for use later in this article.
Install programming language
This quickstart uses the Azure Web PubSub client SDK for JavaScript or C#. Open a terminal window and install the dependencies for the language you're using.
Install Node.js
Install the package
Install the Azure Web PubSub client SDK for the language you're using.
The SDK is available as an npm module.
Open a terminal window and install the Web PubSub client SDK using the following command.
npm install @azure/web-pubsub-client
Note that the SDK is available as an npm module.
Code examples
Create and connect to the Web PubSub service
This code example creates a Web PubSub client that connects to the Web PubSub service instance. A client uses a Client Access URL to connect and authenticate with the service. It's best practice to not hard code the Client Access URL in your code. In the production world, we usually set up an app server to return this URL on demand. Generate Client Access URL describes the practice in detail.
For this example, you can use the Client Access URL you generated in the portal.
In the terminal window, create a new directory for your project and change to that directory.
mkdir webpubsub-client
cd webpubsub-client
Create a file with name index.js and enter following code:
const { WebPubSubClient } = require("@azure/web-pubsub-client");
// Instantiates the client object. env.process.env.WebPubSubClientURL
// env.process.env.WebPubSubClientURL is the Client Access URL from Azure portal
const client = new WebPubSubClient(env.process.env.WebPubSubClientURL);
Subscribe to a group
To receive message from a group, you need to subscribe to the group and add a callback to handle messages you receive from the group. The following code subscribes the client to a group called group1.
Add this following code to the index.js file:
// callback to group messages.
client.on("group-message", (e) => {
  console.log(`Received message: ${e.message.data}`);
});

// before joining group, the client needs to start
client.start();

// join a group to subscribe message from the group
client.joinGroup("group1");
Publish a message to a group
After your client has subscribed to the group, it can send messages to and receive the message from the group.
Add the following code to the index.js file:
client.sendToGroup("group1", "Hello World", "text");
Run the code
Run the client in your terminal. To verify the client is sending and receiving messages, you can open a second terminal and start the client from the same directory. You can see the message you sent from the second client in the first client's terminal window.
To start the client go the terminal and run the following command. Replace the <Client Access URL> with the client access URL you copied from the portal.
export WebPubSubClientURL="<Client Access URL>"
node index.js
Clean up resources
To delete the resources you created in this quickstart, you can delete the resource group you created. Go to the Azure portal, select your resource group, and select Delete resource group.
Next steps
To learn more the Web PubSub service client SDKs, see the following resources:
Feedback
Coming soon: Throughout 2024 we will be phasing out GitHub Issues as the feedback mechanism for content and replacing it with a new feedback system. For more information see: https://aka.ms/ContentUserFeedback.
Submit and view feedback for