Quickstart: Deploy a container instance in Azure using an ARM template
Use Azure Container Instances to run serverless Docker containers in Azure with simplicity and speed. Deploy an application to a container instance on-demand when you don't need a full container orchestration platform like Azure Kubernetes Service. In this quickstart, you use an Azure Resource Manager template (ARM template) to deploy an isolated Docker container and make its web application available with a public IP address.
An Azure Resource Manager template is a JavaScript Object Notation (JSON) file that defines the infrastructure and configuration for your project. The template uses declarative syntax. You describe your intended deployment without writing the sequence of programming commands to create the deployment.
If your environment meets the prerequisites and you're familiar with using ARM templates, select the Deploy to Azure button. The template will open in the Azure portal.

Prerequisites
If you don't have an Azure subscription, create a free account before you begin.
Review the template
The template used in this quickstart is from Azure Quickstart Templates.
{
  "$schema": "https://schema.management.azure.com/schemas/2019-04-01/deploymentTemplate.json#",
  "contentVersion": "1.0.0.0",
  "metadata": {
    "_generator": {
      "name": "bicep",
      "version": "0.26.54.24096",
      "templateHash": "15999594271314721416"
    }
  },
  "parameters": {
    "name": {
      "type": "string",
      "defaultValue": "acilinuxpublicipcontainergroup",
      "metadata": {
        "description": "Name for the container group"
      }
    },
    "location": {
      "type": "string",
      "defaultValue": "[resourceGroup().location]",
      "metadata": {
        "description": "Location for all resources."
      }
    },
    "image": {
      "type": "string",
      "defaultValue": "mcr.microsoft.com/azuredocs/aci-helloworld",
      "metadata": {
        "description": "Container image to deploy. Should be of the form repoName/imagename:tag for images stored in public Docker Hub, or a fully qualified URI for other registries. Images from private registries require additional registry credentials."
      }
    },
    "port": {
      "type": "int",
      "defaultValue": 80,
      "metadata": {
        "description": "Port to open on the container and the public IP address."
      }
    },
    "cpuCores": {
      "type": "int",
      "defaultValue": 1,
      "metadata": {
        "description": "The number of CPU cores to allocate to the container."
      }
    },
    "memoryInGb": {
      "type": "int",
      "defaultValue": 2,
      "metadata": {
        "description": "The amount of memory to allocate to the container in gigabytes."
      }
    },
    "restartPolicy": {
      "type": "string",
      "defaultValue": "Always",
      "allowedValues": [
        "Always",
        "Never",
        "OnFailure"
      ],
      "metadata": {
        "description": "The behavior of Azure runtime if container has stopped."
      }
    }
  },
  "resources": [
    {
      "type": "Microsoft.ContainerInstance/containerGroups",
      "apiVersion": "2023-05-01",
      "name": "[parameters('name')]",
      "location": "[parameters('location')]",
      "properties": {
        "containers": [
          {
            "name": "[parameters('name')]",
            "properties": {
              "image": "[parameters('image')]",
              "ports": [
                {
                  "port": "[parameters('port')]",
                  "protocol": "TCP"
                }
              ],
              "resources": {
                "requests": {
                  "cpu": "[parameters('cpuCores')]",
                  "memoryInGB": "[parameters('memoryInGb')]"
                }
              }
            }
          }
        ],
        "osType": "Linux",
        "restartPolicy": "[parameters('restartPolicy')]",
        "ipAddress": {
          "type": "Public",
          "ports": [
            {
              "port": "[parameters('port')]",
              "protocol": "TCP"
            }
          ]
        }
      }
    }
  ],
  "outputs": {
    "name": {
      "type": "string",
      "value": "[parameters('name')]"
    },
    "resourceGroupName": {
      "type": "string",
      "value": "[resourceGroup().name]"
    },
    "resourceId": {
      "type": "string",
      "value": "[resourceId('Microsoft.ContainerInstance/containerGroups', parameters('name'))]"
    },
    "containerIPv4Address": {
      "type": "string",
      "value": "[reference(resourceId('Microsoft.ContainerInstance/containerGroups', parameters('name')), '2023-05-01').ipAddress.ip]"
    },
    "location": {
      "type": "string",
      "value": "[parameters('location')]"
    }
  }
}
The following resource is defined in the template:
- Microsoft.ContainerInstance/containerGroups: create an Azure container group. This template defines a group consisting of a single container instance.
More Azure Container Instances template samples can be found in the quickstart template gallery.
Deploy the template
Select the following image to sign in to Azure and open a template. The template creates a registry and a replica in another location.
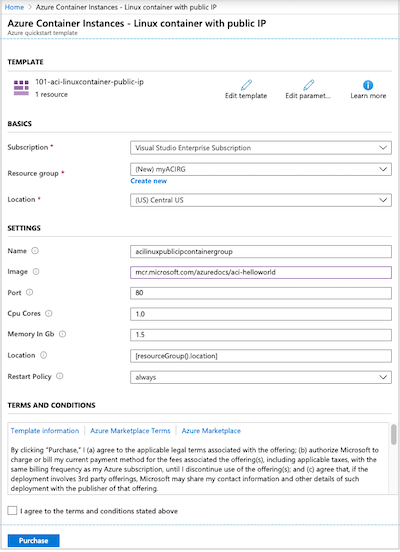
Select or enter the following values.
- Subscription: select an Azure subscription.
- Resource group: select Create new, enter a unique name for the resource group, and then select OK.
- Location: select a location for the resource group. Example: Central US.
- Name: accept the generated name for the instance, or enter a name.
- Image: accept the default image name. This sample Linux image packages a small web app written in Node.js that serves a static HTML page.
Accept default values for the remaining properties.
Review the terms and conditions. If you agree, select I agree to the terms and conditions stated above.
After the instance has been created successfully, you get a notification:

The Azure portal is used to deploy the template. In addition to the Azure portal, you can use the Azure PowerShell, Azure CLI, and REST API. To learn other deployment methods, see Deploy templates.
Review deployed resources
Use the Azure portal or a tool such as the Azure CLI to review the properties of the container instance.
In the portal, search for Container Instances, and select the container instance you created.
On the Overview page, note the Status of the instance and its IP address.
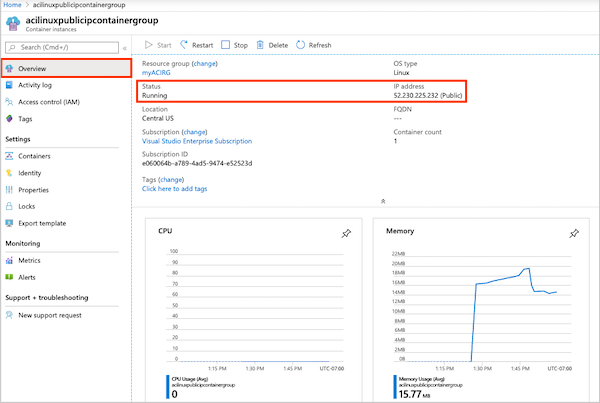
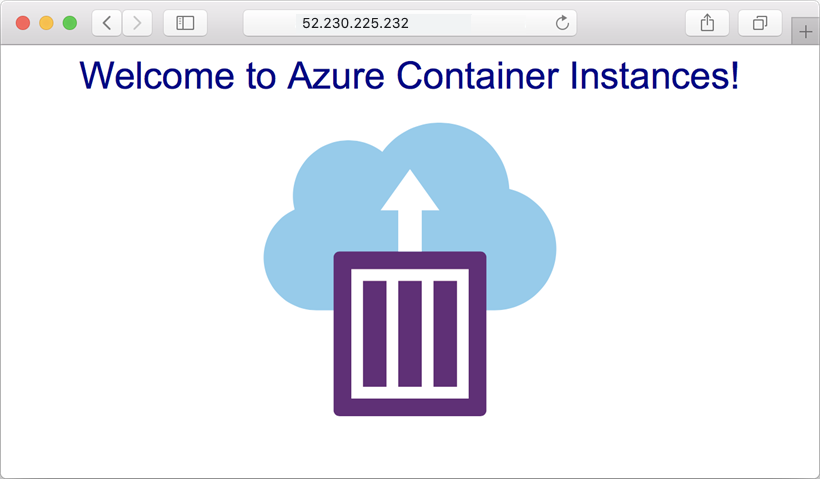
Once its status is Running, navigate to the IP address in your browser.
View container logs
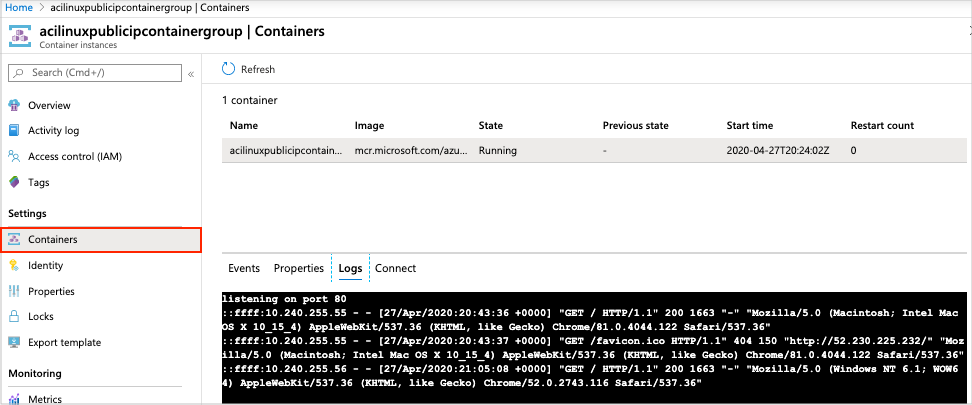
Viewing the logs for a container instance is helpful when troubleshooting issues with your container or the application it runs.
To view the container's logs, under Settings, select Containers > Logs. You should see the HTTP GET request generated when you viewed the application in your browser.
Clean up resources
When you're done with the container, on the Overview page for the container instance, select Delete. When prompted, confirm the deletion.
Next steps
In this quickstart, you created an Azure container instance from a public Microsoft image. If you'd like to build a container image and deploy it from a private Azure container registry, continue to the Azure Container Instances tutorial.
For a step-by-step tutorial that guides you through the process of creating a template, see:
Feedback
Coming soon: Throughout 2024 we will be phasing out GitHub Issues as the feedback mechanism for content and replacing it with a new feedback system. For more information see: https://aka.ms/ContentUserFeedback.
Submit and view feedback for