Use Azure Data Lake Tools for Visual Studio Code
Important
New Azure Data Lake Analytics accounts can no longer be created unless your subscription has been enabled. If you need your subscription to be enabled contact support and provide your business scenario.
If you are already using Azure Data Lake Analytics, you'll need to create a migration plan to Azure Synapse Analytics for your organization by February 29th, 2024.
In this article, learn how you can use Azure Data Lake Tools for Visual Studio Code (VS Code) to create, test, and run U-SQL scripts. The information is also covered in the following video:
Prerequisites
Azure Data Lake Tools for VS Code supports Windows, Linux, and macOS. U-SQL local run and local debug works only in Windows.
For macOS and Linux:
Install Azure Data Lake Tools
After you install the prerequisites, you can install Azure Data Lake Tools for VS Code.
To install Azure Data Lake Tools
Open Visual Studio Code.
Select Extensions in the left pane. Enter Azure Data Lake Tools in the search box.
Select Install next to Azure Data Lake Tools.
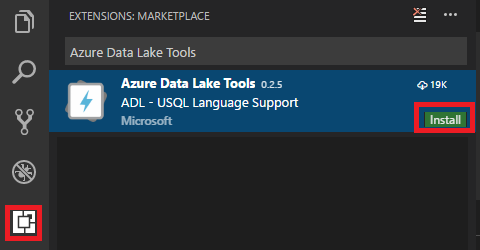
After a few seconds, the Install button changes to Reload.
Select Reload to activate the Azure Data Lake Tools extension.
Select Reload Window to confirm. You can see Azure Data Lake Tools in the Extensions pane.
Activate Azure Data Lake Tools
Create a .usql file or open an existing .usql file to activate the extension.
Work with U-SQL
To work with U-SQL, you need open either a U-SQL file or a folder.
To open the sample script
Open the command palette (Ctrl+Shift+P) and enter ADL: Open Sample Script. It opens another instance of this sample. You can also edit, configure, and submit a script on this instance.
To open a folder for your U-SQL project
From Visual Studio Code, select the File menu, and then select Open Folder.
Specify a folder, and then select Select Folder.
Select the File menu, and then select New. An Untitled-1 file is added to the project.
Enter the following code in the Untitled-1 file:
@departments  =
    SELECT * FROM
        (VALUES
            (31,    "Sales"),
            (33,    "Engineering"),
            (34,    "Clerical"),
            (35,    "Marketing")
        ) AS
              D( DepID, DepName );
OUTPUT @departments TO "/Output/departments.csv" USING Outputters.Csv();
The script creates a departments.csv file with some data included in the /output folder.
Save the file as myUSQL.usql in the opened folder.
To compile a U-SQL script
- Select Ctrl+Shift+P to open the command palette.
- Enter ADL: Compile Script. The compile results appear in the Output window. You can also right-click a script file, and then select ADL: Compile Script to compile a U-SQL job. The compilation result appears in the Output pane.
To submit a U-SQL script
- Select Ctrl+Shift+P to open the command palette.
- Enter ADL: Submit Job. You can also right-click a script file, and then select ADL: Submit Job.
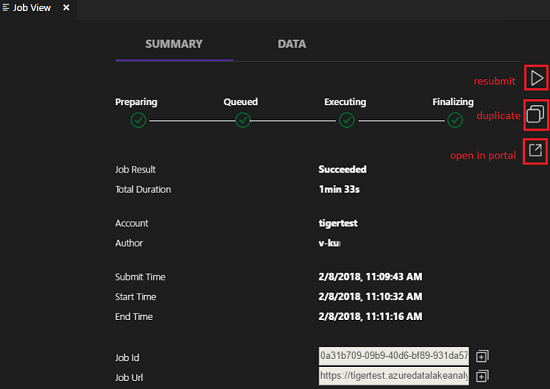
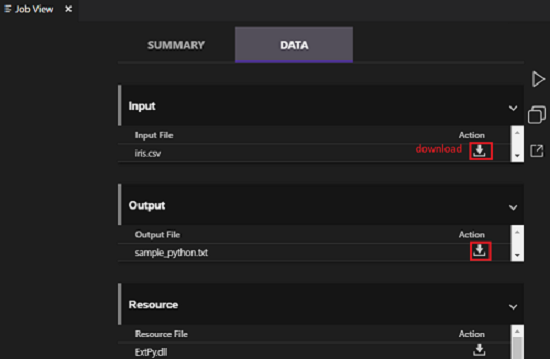
After you submit a U-SQL job, the submission logs appear in the Output window in VS Code. The job view appears in the right pane. If the submission is successful, the job URL appears too. You can open the job URL in a web browser to track the real-time job status.
On the job view's SUMMARY tab, you can see the job details. Main functions include resubmit a script, duplicate a script, and open in the portal. On the job view's DATA tab, you can refer to the input files, output files, and resource files. Files can be downloaded to the local computer.
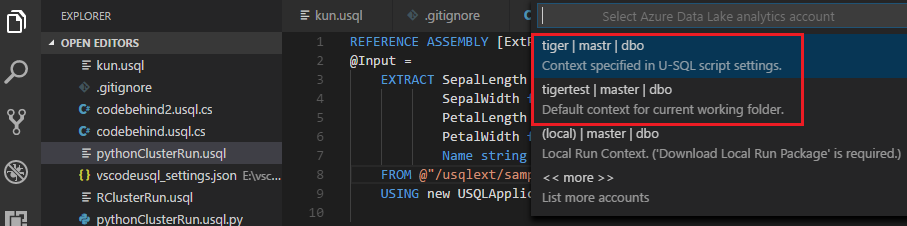
To set the default context
You can set the default context to apply this setting to all script files if you have not set parameters for files individually.
Select Ctrl+Shift+P to open the command palette.
Enter ADL: Set Default Context. Or right-click the script editor and select ADL: Set Default Context.
Choose the account, database, and schema that you want. The setting is saved to the xxx_settings.json configuration file.
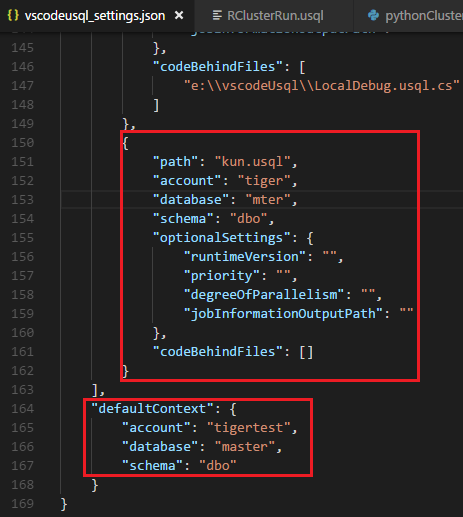
To set script parameters
Select Ctrl+Shift+P to open the command palette.
Enter ADL: Set Script Parameters.
The xxx_settings.json file is opened with the following properties:
- account: An Azure Data Lake Analytics account under your Azure subscription that's needed to compile and run U-SQL jobs. You need configure the computer account before you compile and run U-SQL jobs.
- database: A database under your account. The default is master.
- schema: A schema under your database. The default is dbo.
- optionalSettings:
- priority: The priority range is from 1 to 1000, with 1 as the highest priority. The default value is 1000.
- degreeOfParallelism: The parallelism range is from 1 to 150. The default value is the maximum parallelism allowed in your Azure Data Lake Analytics account.
Note
After you save the configuration, the account, database, and schema information appear on the status bar at the lower-left corner of the corresponding .usql file if you don’t have a default context set up.
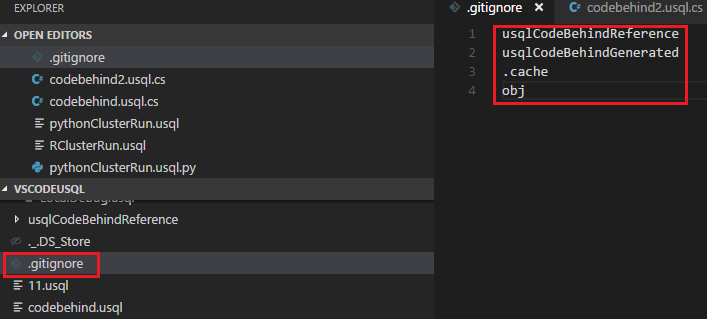
To set Git ignore
Select Ctrl+Shift+P to open the command palette.
Enter ADL: Set Git Ignore.
- If you don’t have a .gitIgnore file in your VS Code working folder, a file named .gitIgnore is created in your folder. Four items (usqlCodeBehindReference, usqlCodeBehindGenerated, .cache, obj) are added in the file by default. You can make more updates if needed.
- If you already have a .gitIgnore file in your VS Code working folder, the tool adds four items (usqlCodeBehindReference, usqlCodeBehindGenerated, .cache, obj) in your .gitIgnore file if the four items weren't included in the file.
Work with code-behind files: C Sharp, Python, and R
Azure Data Lake Tools supports multiple custom codes. For instructions, see Develop U-SQL with Python, R, and C Sharp for Azure Data Lake Analytics in VS Code.
Work with assemblies
For information on developing assemblies, see Develop U-SQL assemblies for Azure Data Lake Analytics jobs.
You can use Data Lake Tools to register custom code assemblies in the Data Lake Analytics catalog.
To register an assembly
You can register the assembly through the ADL: Register Assembly or ADL: Register Assembly (Advanced) command.
To register through the ADL: Register Assembly command
- Select Ctrl+Shift+P to open the command palette.
- Enter ADL: Register Assembly.
- Specify the local assembly path.
- Select a Data Lake Analytics account.
- Select a database.
The portal is opened in a browser and displays the assembly registration process.
A more convenient way to trigger the ADL: Register Assembly command is to right-click the .dll file in File Explorer.
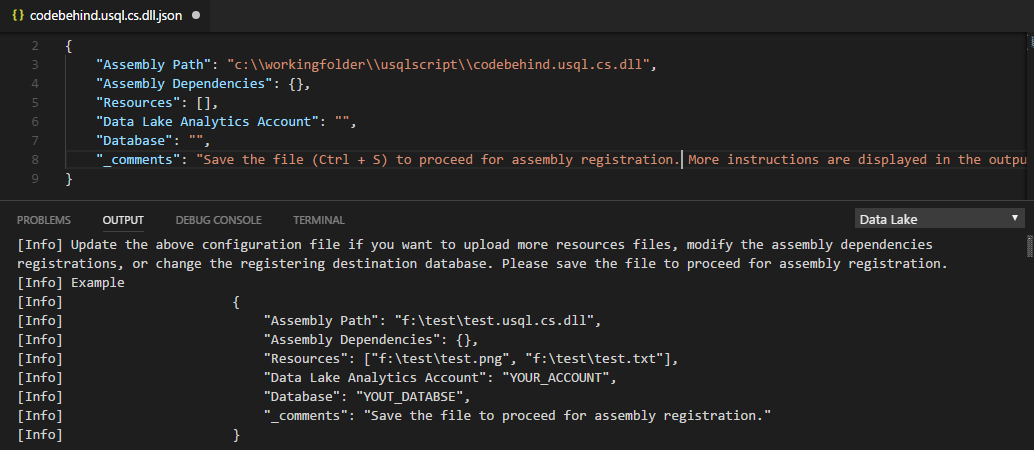
To register through the ADL: Register Assembly (Advanced) command
Select Ctrl+Shift+P to open the command palette.
Enter ADL: Register Assembly (Advanced).
Specify the local assembly path.
The JSON file is displayed. Review and edit the assembly dependencies and resource parameters, if needed. Instructions are displayed in the Output window. To proceed to the assembly registration, save (Ctrl+S) the JSON file.
Note
- Azure Data Lake Tools autodetects whether the DLL has any assembly dependencies. The dependencies are displayed in the JSON file after they're detected.
- You can upload your DLL resources (for example, .txt, .png, and .csv) as part of the assembly registration.
Another way to trigger the ADL: Register Assembly (Advanced) command is to right-click the .dll file in File Explorer.
The following U-SQL code demonstrates how to call an assembly. In the sample, the assembly name is test.
REFERENCE ASSEMBLY [test];
@a =
    EXTRACT
        Iid int,
    Starts DateTime,
    Region string,
    Query string,
    DwellTime int,
    Results string,
    ClickedUrls string
    FROM @"Sample/SearchLog.txt"
    USING Extractors.Tsv();
@d =
    SELECT DISTINCT Region
    FROM @a;
@d1 =
    PROCESS @d
    PRODUCE
        Region string,
    Mkt string
    USING new USQLApplication_codebehind.MyProcessor();
OUTPUT @d1
    TO @"Sample/SearchLogtest.txt"
    USING Outputters.Tsv();
Use U-SQL local run and local debug for Windows users
U-SQL local run tests your local data and validates your script locally before your code is published to Data Lake Analytics. You can use the local debug feature to complete the following tasks before your code is submitted to Data Lake Analytics:
- Debug your C# code-behind.
- Step through the code.
- Validate your script locally.
The local run and local debug feature only works in Windows environments, and isn't supported on macOS and Linux-based operating systems.
For instructions on local run and local debug, see U-SQL local run and local debug with Visual Studio Code.
Connect to Azure
Before you can compile and run U-SQL scripts in Data Lake Analytics, you must connect to your Azure account.
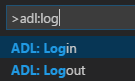
To connect to Azure by using a command
Select Ctrl+Shift+P to open the command palette.
Enter ADL: Login. The sign in information appears on the lower right.
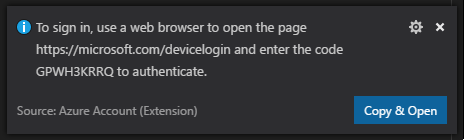
Select Copy & Open to open the login webpage. Paste the code into the box, and then select Continue.
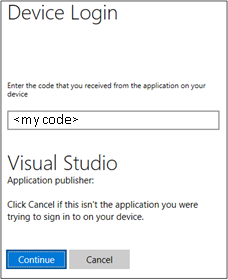
Follow the instructions to sign in from the webpage. When you're connected, your Azure account name appears on the status bar in the lower-left corner of the VS Code window.
Note
- Data Lake Tools automatically signs you in the next time if you don't sign out.
- If your account has two factors enabled, we recommend that you use phone authentication rather than using a PIN.
To sign out, enter the command ADL: Logout.
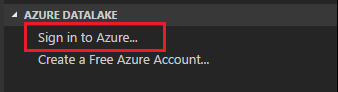
To connect to Azure from the explorer
Expand AZURE DATALAKE, select Sign in to Azure, and then follow step 3 and step 4 of To connect to Azure by using a command.
You can't sign out from the explorer. To sign out, see To connect to Azure by using a command.
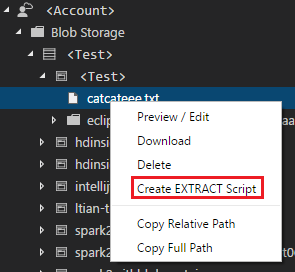
Create an extraction script
You can create an extraction script for .csv, .tsv, and .txt files by using the command ADL: Create EXTRACT Script or from the Azure Data Lake explorer.
To create an extraction script by using a command
- Select Ctrl+Shift+P to open the command palette, and enter ADL: Create EXTRACT Script.
- Specify the full path for an Azure Storage file, and select the Enter key.
- Select one account.
- For a .txt file, select a delimiter to extract the file.
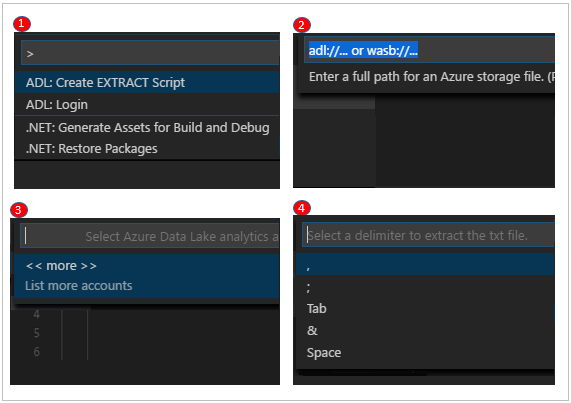
The extraction script is generated based on your entries. For a script that can't detect the columns, choose one from the two options. If not, only one script will be generated.

To create an extraction script from the explorer
Another way to create the extraction script is through the right-click (shortcut) menu on the .csv, .tsv, or .txt file in Azure Data Lake Store or Azure Blob storage.