Call Azure Functions from workflows in Azure Logic Apps
Applies to: Azure Logic Apps (Consumption + Standard)
To run code that performs a specific job in your logic app workflow, you don't have to build a complete app or infrastructure. Instead, you can create and call an Azure function. Azure Functions provides serverless computing in the cloud and the capability to perform the following tasks:
- Extend your workflow's behavior by running functions created using Node.js or C#.
- Perform calculations in your workflow.
- Apply advanced formatting or compute fields in your workflow.
This how-to guide shows how to call an existing Azure function from your Consumption or Standard workflow. To run code without using Azure Functions, see the following documentation:
Limitations
Only Consumption workflows support authenticating Azure function calls using a managed identity with Microsoft Entra authentication. Standard workflows aren't currently supported in the section about how to enable authentication for function calls.
Azure Logic Apps doesn't support using Azure Functions with deployment slots enabled. Although this scenario might sometimes work, this behavior is unpredictable and might result in authorization problems when your workflow tries call the Azure function.
Prerequisites
Azure account and subscription. If you don't have a subscription, sign up for a free Azure account.
An Azure function app resource, which contains one or more Azure functions.
Your function app resource and logic app resource must use the same Azure subscription.
Your function app resource must use either .NET or Node.js as the runtime stack.
When you add a new function to your function app, you can select either C# or JavaScript.
The Azure function that you want to call. You can create this function using the following tools:
Your function must use the HTTP trigger template.
The HTTP trigger template can accept content that has
application/jsontype from your logic app workflow. When you add a function to your workflow, the designer shows custom functions that are created from this template within your Azure subscription.Your function code must include the response and payload that you want returned to your workflow after your function completes. The
contextobject refers to the message that your workflow sends through the Azure Functions action parameter named Request Body later in this guide.This guide uses the following sample function, which is named FabrikamAzureFunction:
module.exports = function (context, data) {

   var input = data;

   // Function processing logic
   // Function response for later use
   context.res = {
      body: {
        content:"Thank you for your feedback: " + input
      }
   };
   context.done();
}
To access the
contextobject's properties from inside your function, use the following syntax:context.body.<property-name>For example, to reference the
contentproperty in thecontextobject, use the following syntax:context.body.contentThis code also includes an
inputvariable, which stores the value from thedataparameter so that your function can perform operations on that value. Within JavaScript functions, thedatavariable is also a shortcut forcontext.body.Note
The
bodyproperty here applies to thecontextobject and isn't the same as the Body token in an action's output, which you might also pass to your function.Your function can't use custom routes unless you defined an OpenAPI definition (Swagger file).
When you have an OpenAPI definition for your function, the workflow designer gives you a richer experience when you work with function parameters. Before your workflow can find and access functions that have OpenAPI definitions, set up your function app by following these steps.
A Consumption or Standard logic app workflow that starts with any trigger.
The examples in this guide use the Office 365 Outlook trigger named When a new email arrives.
To create and call an Azure function that calls another workflow, make sure that secondary workflow starts with a trigger that provides a callable endpoint.
For example, you can start the workflow with the general HTTP or Request trigger, or you can use a service-based trigger, such as Azure Queues or Event Grid. Inside your function, send an HTTP POST request to the trigger's URL and include the payload that you want your secondary workflow to process. For more information, see Call, trigger, or nest logic app workflows.
Tips for working with Azure functions
Generate an OpenAPI definition or Swagger file for your function
For a richer experience when you work with function parameters in the workflow designer, generate an OpenAPI definition or Swagger file for your function. To set up your function app so that your workflow can find and use functions that have Swagger descriptions, follow these steps:
In the Azure portal, open your function app. Make sure that the function app is actively running.
On your function app, set up Cross-Origin Resource Sharing (CORS) so that all origins are permitted by following these steps:
On the function app menu, under API, select CORS.
Under Allowed Origins, add the asterisk (
*) wildcard character, but remove all the other origins in the list, and select Save.

Access property values inside HTTP requests
Webhook-based functions can accept HTTP requests as inputs and pass those requests to other functions. For example, although Azure Logic Apps has functions that convert DateTime values, this basic sample JavaScript function shows how you can access a property inside an HTTP request object that's passed to the function and perform operations on that property value. To access properties inside objects, this example uses the dot (.) operator:
function convertToDateString(request, response){
   var data = request.body;
   response = {
      body: data.date.ToDateString();
   }
}
Here's what happens inside this function:
The function creates a
datavariable, and then assigns thebodyobject, which is inside therequestobject, to the variable. The function uses the dot (.) operator to reference thebodyobject inside therequestobject:var data = request.body;The function can now access the
dateproperty through thedatavariable, and convert the property value from DateTime type to DateString type by calling theToDateString()function. The function also returns the result through thebodyproperty in the function's response:body: data.date.ToDateString();
After you create your function in Azure, follow the steps to add an Azure function to your workflow.
Add a function to your workflow (Consumption + Standard workflows)
To call an Azure function from your workflow, you can add that functions like any other action in the designer.
In the Azure portal, open your Consumption logic app workflow in the designer.
In the designer, follow these general steps to add the Azure Functions action named Choose an Azure function.
In the Create Connection pane, follow these steps:
Provide a Connection Name for the connection to your function app.
From the function apps list, select your function app.
From the functions list, select the function, and then select Add Action, for example:

In the selected function's action box, follow these steps:
For Request Body, provide your function's input, which must be formatted as a JavaScript Object Notation (JSON) object. This input is the context object payload or message that your workflow sends to your function.
To select tokens that represent outputs from previous steps, select inside the Request Body box, and then select the option to open the dynamic content list (lightning icon).
To create an expression, select inside the Request Body box, and then select option to open the expression editor (formula icon).
The following example specifies a JSON object with the
contentattribute and a token representing the From output from the email trigger as the Request Body value:
Here, the context object isn't cast as a string, so the object's content gets added directly to the JSON payload. Here's the complete example:

If you provide a context object other than a JSON token that passes a string, a JSON object, or a JSON array, you get an error. However, you can cast the context object as a string by enclosing the token in quotation marks (""), for example, if you wanted to use the Received Time token:

To specify other details such as the method to use, request headers, query parameters, or authentication, open the Advanced parameters list, and select the parameters that you want. For authentication, your options differ based on your selected function. For more information, review Enable authentication for functions.


Enable authentication for Azure function calls (Consumption workflows only)
Your Consumption workflow can use a managed identity to authenticate an Azure function call and access resources protected by Microsoft Entra ID. The managed identity can authenticate access without you having to sign in and provide credentials or secrets. Azure manages this identity for you and helps secure your credentials because you don't have to provide or rotate secrets. You can set up the system-assigned identity or a manually created, user-assigned identity at the logic app resource level. The Azure function that's called from your workflow can use the same managed identity for authentication.
Note
Only Consumption workflows support authentication for an Azure function call using a managed identity and Microsoft Entra authentication. Standard workflows currently don't include this support when you use the action to call an Azure function.
For more information, see the following documentation:
To set up your function app and function so they can use your Consumption logic app's managed identity, follow these high-level steps:
Set up your function for anonymous authentication (Consumption workflows only)
For your function to use your Consumption logic app's managed identity, you must set your function's authentication level to anonymous. Otherwise, your workflow throws a BadRequest error.
In the Azure portal, find and select your function app.
The following steps use an example function app named FabrikamFunctionApp.
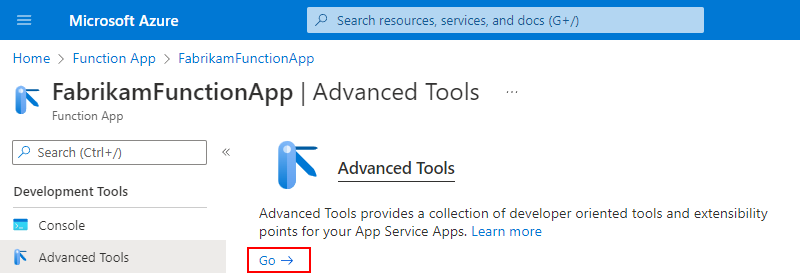
On the function app resource menu, under Development tools, select Advanced Tools > Go.
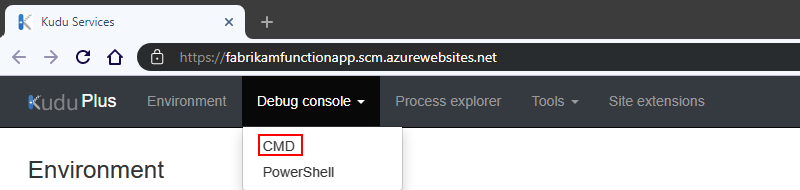
After the Kudu Plus page opens, on the Kudu website's title bar, from the Debug Console menu, select CMD.
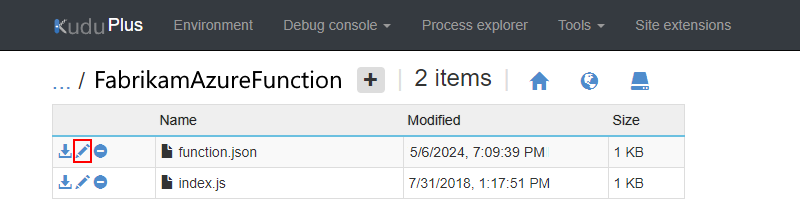
After the next page appears, from the folder list, select site > wwwroot > your-function.
The following steps use an example function named FabrikamAzureFunction.

Open the function.json file for editing.
In the bindings object, check whether the authLevel property exists. If the property exists, set the property value to
anonymous. Otherwise, add that property, and set the value.
When you're done, save your settings. Continue to the next section.


Find the required values to set up Microsoft Entra authentication (Consumption workflows only)
Before you can set up your function app to use the managed identity and Microsoft Entra authentication, you need to find and save the following values by following the steps in this section.
Find the tenant ID for your Microsoft Entra tenant
Either run the PowerShell command named Get-AzureAccount, or in the Azure portal, follow these steps:
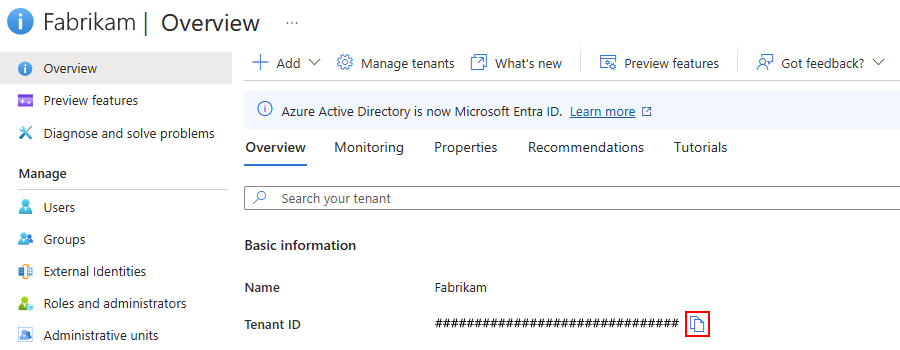
In the Azure portal, open your Microsoft Entra tenant.
This guide uses Fabrikam as the example tenant.
On the tenant menu, select Overview.
Copy and save your tenant ID for later use, for example:

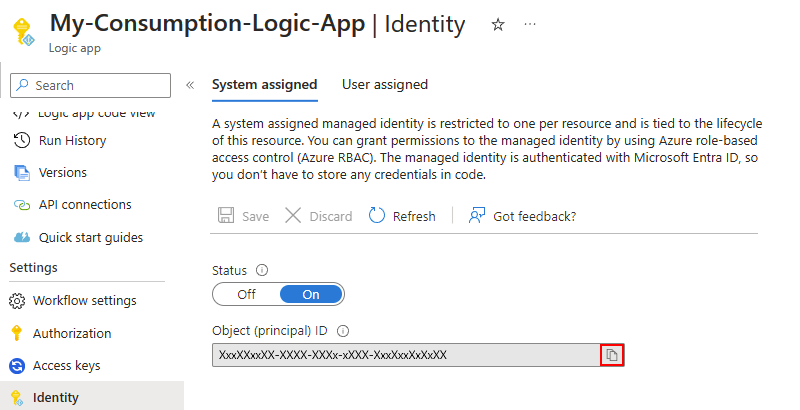
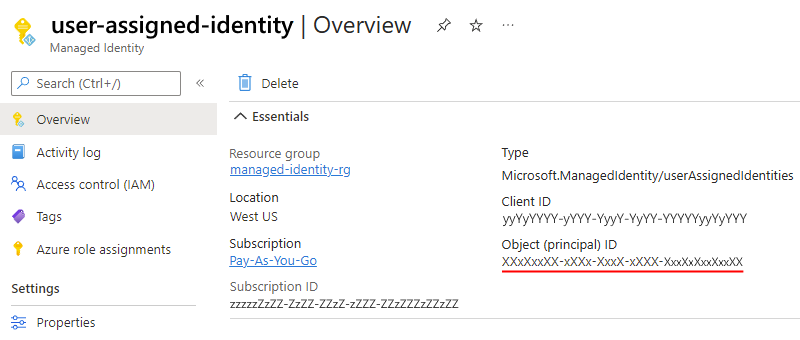
Find the object ID for your managed identity
After you enable the managed identity for your Consumption logic app resource, find the object for your managed identity. You'll use this ID to find the associated Enterprise application in your Entra tenant.
On the logic app menu, under Settings, select Identity, and then select either System assigned or User assigned.
System assigned
Copy the identity's Object (principal) ID:
User assigned
Select the identity:

Copy the identity's Object (principal) ID:


Find the application ID for the Azure Enterprise application associated with your managed identity
When you enable a managed identity on your logic app resource, Azure automatically creates an associated Azure Enterprise application that has the same name. You now need to find the associated Enterprise application and copy its Application ID. Later, you use this application ID to add an identity provider for your function app by creating an app registration.
In the Azure portal, find and open your Entra tenant.
On the tenant menu, under Manage, select Enterprise applications.
On the All applications page, in the search box, enter the object ID for your managed identity. From the results, find the matching enterprise application, and copy the Application ID:

Now, use the copied application ID to add an identity provider to your function app.

Add identity provider for your function app (Consumption workflows only)
Now that you have the tenant ID and the application ID, you can set up your function app to use Microsoft Entra authentication by adding an identity provider and creating an app registration.
In the Azure portal, open your function app.
On the function app menu, under Settings, select Authentication, and then select Add identity provider.

On the Add an identity provider pane, under Basics, from the Identity provider list, select Microsoft.
Under App registration, for App registration type, select Provide the details of an existing app registration, and enter the values that you previously saved.
Property Required Value Description Application (client) ID Yes <application-ID> The unique identifier to use for this app registration. For this example, use the application ID that you copied for the Enterprise application associated with your managed identity. Client secret Optional, but recommended <client-secret> The secret value that the app uses to prove its identity when requesting a token. The client secret is created and stored in your app's configuration as a slot-sticky application setting named MICROSOFT_PROVIDER_AUTHENTICATION_SECRET.
- Make sure to regularly rotate secrets and store them securely. For example, manage your secrets in Azure Key Vault where you can use a managed identity to retrieve the key without exposing the value to an unauthorized user. You can update this setting to use Key Vault references.
- If you provide a client secret value, sign-in operations use the hybrid flow, returning both access and refresh tokens.
- If you don't provide a client secret, sign-in operations use the OAuth 2.0 implicit grant flow. This method directly returns only an ID token or access token. These tokens are sent by the provider and stored in the EasyAuth token store.
Important: Due to security risks, the implicit grant flow is no longer a suitable authentication method. Instead, use either authorization code flow with Proof Key for Code Exchange (PKCE) or single-page application (SPA) authorization codes.Issuer URL No <authentication-endpoint-URL>/<Entra-tenant-ID>/v2.0 This URL redirects users to the correct Microsoft Entra tenant and downloads the appropriate metadata to determine the appropriate token signing keys and token issuer claim value. For apps that use Azure AD v1, omit /v2.0 from the URL.
For this scenario, use the following URL:https://sts.windows.net/<Entra-tenant-ID>Allowed token audiences No <application-ID-URI> The application ID URI (resource ID) for the function app. For a cloud or server app where you want to allow authentication tokens from a web app, add the application ID URI for the web app. The configured client ID is always implicitly considered as an allowed audience.
For this scenario, the value ishttps://management.azure.com. Later, you can use the same URI in the Audience property when you set up your function action in your workflow to use the managed identity.
Important: The application ID URI (resource ID) must exactly match the value that Microsoft Entra ID expects, including any required trailing slashes.At this point, your version looks similar to this example:

If you're setting up your function app with an identity provider for the first time, the App Service authentication settings section also appears. These options determine how your function app responds to unauthenticated requests. The default selection redirects all requests to log in with the new identity provider. You can customize this behavior now or adjust these settings later from the main Authentication page by selecting Edit next to Authentication settings. To learn more about these options, review Authentication flow - Authentication and authorization in Azure App Service and Azure Functions.
Otherwise, you can continue with the next step.
To finish creating the app registration, select Add.
When you're done, the Authentication page now lists the identity provider and the app registration's application (client) ID. Your function app can now use this app registration for authentication.
Copy the app registration's App (client) ID to use later in the Azure Functions action's Audience property for your workflow.

Return to the designer and follow the steps to authenticate access with the managed identity by using the built-in Azure Functions action.


