Set up a text labeling project and export labels
In Azure Machine Learning, learn how to create and run data labeling projects to label text data. Specify either a single label or multiple labels to apply to each text item.
You can also use the data labeling tool in Azure Machine Learning to create an image labeling project.
Text labeling capabilities
Azure Machine Learning data labeling is a tool you can use to create, manage, and monitor data labeling projects. Use it to:
- Coordinate data, labels, and team members to efficiently manage labeling tasks.
- Track progress and maintain the queue of incomplete labeling tasks.
- Start and stop the project, and control the labeling progress.
- Review and export the labeled data as an Azure Machine Learning dataset.
Important
The text data you work with in the Azure Machine Learning data labeling tool must be available in an Azure Blob Storage datastore. If you don't have an existing datastore, you can upload your data files to a new datastore when you create a project.
These data formats are available for text data:
- .txt: Each file represents one item to be labeled.
- .csv or .tsv: Each row represents one item that's presented to the labeler. You decide which columns the labeler can see when they label the row.
Prerequisites
You use these items to set up text labeling in Azure Machine Learning:
- The data that you want to label, either in local files or in Azure Blob Storage.
- The set of labels that you want to apply.
- The instructions for labeling.
- An Azure subscription. If you don't have an Azure subscription, create a free account before you begin.
- An Azure Machine Learning workspace. See Create an Azure Machine Learning workspace.
Create a text labeling project
Labeling projects are administered in Azure Machine Learning. Use the Data Labeling page in Machine Learning to manage your projects.
If your data is already in Azure Blob Storage, make sure that it's available as a datastore before you create the labeling project.
To create a project, select Add project.
For Project name, enter a name for the project.
You can't reuse the project name, even if you delete the project.
To create a text labeling project, for Media type, select Text.
For Labeling task type, select an option for your scenario:
- To apply only a single label to each piece of text from a set of labels, select Text Classification Multi-class.
- To apply one or more labels to each piece of text from a set of labels, select Text Classification Multi-label.
- To apply labels to individual text words or to multiple text words in each entry, select Text Named Entity Recognition.
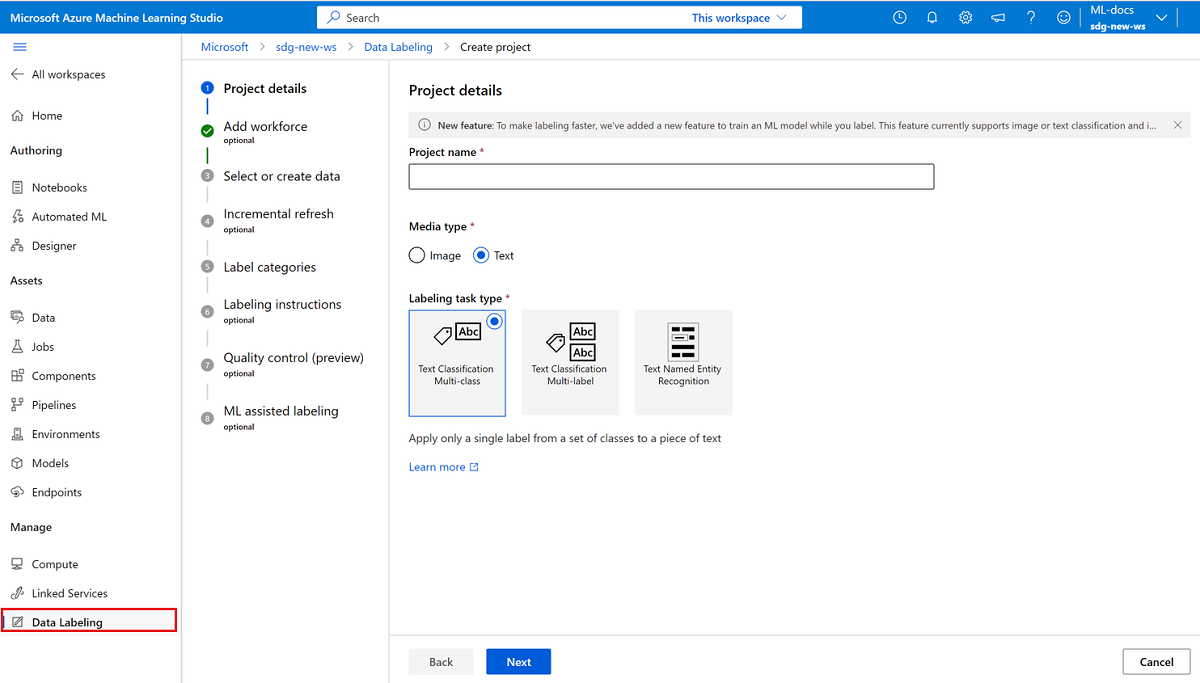
Select Next to continue.
Add workforce (optional)
Select Use a vendor labeling company from Azure Marketplace only if you've engaged a data labeling company from Azure Marketplace. Then select the vendor. If your vendor doesn't appear in the list, clear this option.
Make sure that you first contact the vendor and sign a contract. For more information, see Work with a data labeling vendor company (preview).
Select Next to continue.
Select or create a dataset
If you already created a dataset that contains your data, select it in the Select an existing dataset dropdown. You can also select Create a dataset to use an existing Azure datastore or to upload local files.
Note
A project can't contain more than 500,000 files. If your dataset exceeds this file count, only the first 500,000 files are loaded.
Create a dataset from an Azure datastore
In many cases, you can upload local files. However, Azure Storage Explorer provides a faster and more robust way to transfer a large amount of data. We recommend Storage Explorer as the default way to move files.
To create a dataset from data that's already stored in Blob Storage:
- Select Create.
- For Name, enter a name for your dataset. Optionally, enter a description.
- Choose the Dataset type:
- If you're using a .csv or .tsv file and each row contains a response, select Tabular.
- If you're using separate .txt files for each response, select File.
- Select Next.
- Select From Azure storage, and then select Next.
- Select the datastore, and then select Next.
- If your data is in a subfolder within Blob Storage, choose Browse to select the path.
- To include all the files in the subfolders of the selected path, append
/**to the path. - To include all the data in the current container and its subfolders, append
**/*.*to the path.
- To include all the files in the subfolders of the selected path, append
- Select Create.
- Select the data asset you created.
Create a dataset from uploaded data
To directly upload your data:
- Select Create.
- For Name, enter a name for your dataset. Optionally, enter a description.
- Choose the Dataset type:
- If you're using a .csv or .tsv file and each row contains a response, select Tabular.
- If you're using separate .txt files for each response, select File.
- Select Next.
- Select From local files, and then select Next.
- (Optional) Select a datastore. The default uploads to the default blob store (workspaceblobstore) for your Machine Learning workspace.
- Select Next.
- Select Upload > Upload files or Upload > Upload folder to select the local files or folders to upload.
- Find your files or folder in the browser window, and then select Open.
- Continue to select Upload until you specify all of your files and folders.
- Optionally select the Overwrite if already exists checkbox. Verify the list of files and folders.
- Select Next.
- Confirm the details. Select Back to modify the settings, or select Create to create the dataset.
- Finally, select the data asset you created.
Configure incremental refresh
If you plan to add new data files to your dataset, use incremental refresh to add the files to your project.
When Enable incremental refresh at regular intervals is set, the dataset is checked periodically for new files to be added to a project based on the labeling completion rate. The check for new data stops when the project contains the maximum 500,000 files.
Select Enable incremental refresh at regular intervals when you want your project to continually monitor for new data in the datastore.
Clear the selection if you don't want new files in the datastore to automatically be added to your project.
Important
Don't create a new version for the dataset you want to update. If you do, the updates won't be seen because the data labeling project is pinned to the initial version. Instead, use Azure Storage Explorer to modify your data in the appropriate folder in Blob Storage.
Also, don't remove data. Removing data from the dataset your project uses causes an error in the project.
After the project is created, use the Details tab to change incremental refresh, view the time stamp for the last refresh, and request an immediate refresh of data.
Note
Projects that use tabular (.csv or .tsv) dataset input can use incremental refresh. But incremental refresh only adds new tabular files. The refresh doesn't recognize changes to existing tabular files.
Specify label categories
On the Label categories page, specify a set of classes to categorize your data.
Your labelers' accuracy and speed are affected by their ability to choose among classes. For instance, instead of spelling out the full genus and species for plants or animals, use a field code or abbreviate the genus.
You can use either a flat list or create groups of labels.
To create a flat list, select Add label category to create each label.
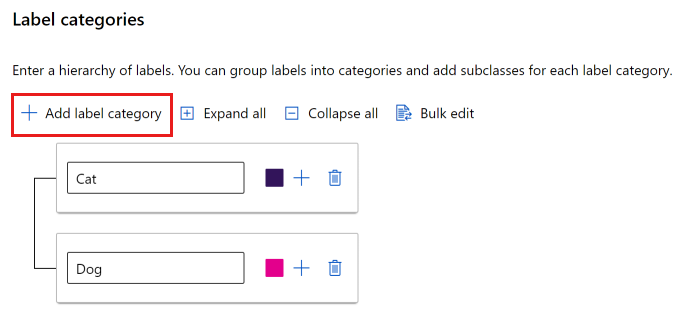
To create labels in different groups, select Add label category to create the top-level labels. Then select the plus sign (+) under each top level to create the next level of labels for that category. You can create up to six levels for any grouping.
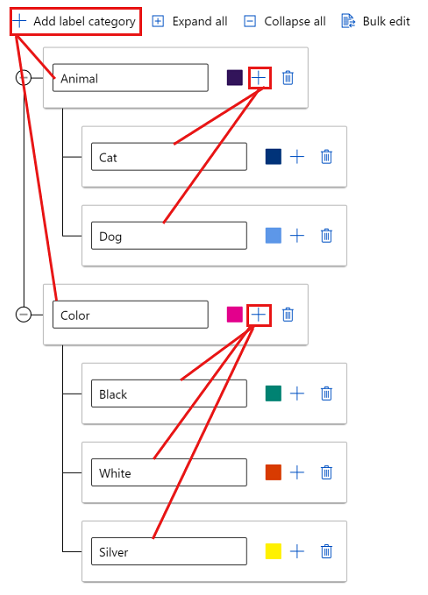
You can select labels at any level during the tagging process. For example, the labels Animal, Animal/Cat, Animal/Dog, Color, Color/Black, Color/White, and Color/Silver are all available choices for a label. In a multi-label project, there's no requirement to pick one of each category. If that is your intent, make sure to include this information in your instructions.
Describe the text labeling task
It's important to clearly explain the labeling task. On the Labeling instructions page, you can add a link to an external site that has labeling instructions, or you can provide instructions in the edit box on the page. Keep the instructions task-oriented and appropriate to the audience. Consider these questions:
- What are the labels labelers will see, and how will they choose among them? Is there a reference text to refer to?
- What should they do if no label seems appropriate?
- What should they do if multiple labels seem appropriate?
- What confidence threshold should they apply to a label? Do you want the labeler's best guess if they aren't certain?
- What should they do with partially occluded or overlapping objects of interest?
- What should they do if an object of interest is clipped by the edge of the image?
- What should they do if they think they made a mistake after they submit a label?
- What should they do if they discover image quality issues, including poor lighting conditions, reflections, loss of focus, undesired background included, abnormal camera angles, and so on?
- What should they do if multiple reviewers have different opinions about applying a label?
Note
Labelers can select the first nine labels by using number keys 1 through 9.
Quality control (preview)
To get more accurate labels, use the Quality control page to send each item to multiple labelers.
Important
Consensus labeling is currently in public preview.
The preview version is provided without a service level agreement, and it's not recommended for production workloads. Certain features might not be supported or might have constrained capabilities.
For more information, see Supplemental Terms of Use for Microsoft Azure Previews.
To have each item sent to multiple labelers, select Enable consensus labeling (preview). Then set values for Minimum labelers and Maximum labelers to specify how many labelers to use. Make sure that you have as many labelers available as your maximum number. You can't change these settings after the project has started.
If a consensus is reached from the minimum number of labelers, the item is labeled. If a consensus isn't reached, the item is sent to more labelers. If there's no consensus after the item goes to the maximum number of labelers, its status is Needs Review, and the project owner is responsible for labeling the item.
Use ML-assisted data labeling
To accelerate labeling tasks, the ML assisted labeling page can trigger automatic machine learning models. Machine learning (ML)-assisted labeling can handle both file (.txt) and tabular (.csv) text data inputs.
To use ML-assisted labeling:
- Select Enable ML assisted labeling.
- Select the Dataset language for the project. This list shows all languages that the TextDNNLanguages Class supports.
- Specify a compute target to use. If you don't have a compute target in your workspace, this step creates a compute cluster and adds it to your workspace. The cluster is created with a minimum of zero nodes, and it costs nothing when not in use.
More information about ML-assisted labeling
At the start of your labeling project, the items are shuffled into a random order to reduce potential bias. However, the trained model reflects any biases present in the dataset. For example, if 80 percent of your items are of a single class, then approximately 80 percent of the data that's used to train the model lands in that class.
To train the text DNN model that ML-assisted labeling uses, the input text per training example is limited to approximately the first 128 words in the document. For tabular input, all text columns are concatenated before this limit is applied. This practical limit allows the model training to complete in a reasonable amount of time. The actual text in a document (for file input) or set of text columns (for tabular input) can exceed 128 words. The limit pertains only to what the model internally uses during the training process.
The number of labeled items that's required to start assisted labeling isn't a fixed number. This number can vary significantly from one labeling project to another. The variance depends on many factors, including the number of label classes and the label distribution.
When you use consensus labeling, the consensus label is used for training.
Because the final labels still rely on input from the labeler, this technology is sometimes called human-in-the-loop labeling.
Note
ML-assisted data labeling doesn't support default storage accounts that are secured behind a virtual network. You must use a non-default storage account for ML-assisted data labeling. The non-default storage account can be secured behind the virtual network.
Pre-labeling
After you submit enough labels for training, the trained model is used to predict tags. The labeler now sees pages that show predicted labels already present on each item. The task then involves reviewing these predictions and correcting any mislabeled items before page submission.
After you train the machine learning model on your manually labeled data, the model is evaluated on a test set of manually labeled items. The evaluation helps determine the model's accuracy at different confidence thresholds. The evaluation process sets a confidence threshold beyond which the model is accurate enough to show pre-labels. The model is then evaluated against unlabeled data. Items that have predictions that are more confident than the threshold are used for pre-labeling.
Initialize the text labeling project
After the labeling project is initialized, some aspects of the project are immutable. You can't change the task type or dataset. You can modify labels and the URL for the task description. Carefully review the settings before you create the project. After you submit the project, you return to the Data Labeling overview page, which shows the project as Initializing.
Note
This page might not automatically refresh. After a pause, manually refresh the page to see the project's status as Created.
Troubleshooting
For problems creating a project or accessing data, see Troubleshoot data labeling.
Next steps
Feedback
Coming soon: Throughout 2024 we will be phasing out GitHub Issues as the feedback mechanism for content and replacing it with a new feedback system. For more information see: https://aka.ms/ContentUserFeedback.
Submit and view feedback for