Interactive Data Wrangling with Apache Spark in Azure Machine Learning
Data wrangling becomes one of the most important steps in machine learning projects. The Azure Machine Learning integration, with Azure Synapse Analytics, provides access to an Apache Spark pool - backed by Azure Synapse - for interactive data wrangling using Azure Machine Learning Notebooks.
In this article, you'll learn how to perform data wrangling using
- Serverless Spark compute
- Attached Synapse Spark pool
Prerequisites
- An Azure subscription; if you don't have an Azure subscription, create a free account before you begin.
- An Azure Machine Learning workspace. See Create workspace resources.
- An Azure Data Lake Storage (ADLS) Gen 2 storage account. See Create an Azure Data Lake Storage (ADLS) Gen 2 storage account.
- (Optional): An Azure Key Vault. See Create an Azure Key Vault.
- (Optional): A Service Principal. See Create a Service Principal.
- (Optional): An attached Synapse Spark pool in the Azure Machine Learning workspace.
Before you start your data wrangling tasks, learn about the process of storing secrets
- Azure Blob storage account access key
- Shared Access Signature (SAS) token
- Azure Data Lake Storage (ADLS) Gen 2 service principal information
in the Azure Key Vault. You also need to know how to handle role assignments in the Azure storage accounts. The following sections review these concepts. Then, we'll explore the details of interactive data wrangling using the Spark pools in Azure Machine Learning Notebooks.
Tip
To learn about Azure storage account role assignment configuration, or if you access data in your storage accounts using user identity passthrough, see Add role assignments in Azure storage accounts.
Interactive Data Wrangling with Apache Spark
Azure Machine Learning offers serverless Spark compute, and attached Synapse Spark pool, for interactive data wrangling with Apache Spark in Azure Machine Learning Notebooks. The serverless Spark compute doesn't require creation of resources in the Azure Synapse workspace. Instead, a fully managed serverless Spark compute becomes directly available in the Azure Machine Learning Notebooks. Using a serverless Spark compute is the easiest approach to access a Spark cluster in Azure Machine Learning.
Serverless Spark compute in Azure Machine Learning Notebooks
A serverless Spark compute is available in Azure Machine Learning Notebooks by default. To access it in a notebook, select Serverless Spark Compute under Azure Machine Learning Serverless Spark from the Compute selection menu.
The Notebooks UI also provides options for Spark session configuration, for the serverless Spark compute. To configure a Spark session:
- Select Configure session at the top of the screen.
- Select Apache Spark version from the dropdown menu.
Important
Azure Synapse Runtime for Apache Spark: Announcements
- Azure Synapse Runtime for Apache Spark 3.2:
- EOLA Announcement Date: July 8, 2023
- End of Support Date: July 8, 2024. After this date, the runtime will be disabled.
- For continued support and optimal performance, we advise that you migrate to Apache Spark 3.3.
- Azure Synapse Runtime for Apache Spark 3.2:
- Select Instance type from the dropdown menu. The following instance types are currently supported:
Standard_E4s_v3Standard_E8s_v3Standard_E16s_v3Standard_E32s_v3Standard_E64s_v3
- Input a Spark Session timeout value, in minutes.
- Select whether to Dynamically allocate executors
- Select the number of Executors for the Spark session.
- Select Executor size from the dropdown menu.
- Select Driver size from the dropdown menu.
- To use a Conda file to configure a Spark session, check the Upload conda file checkbox. Then, select Browse, and choose the Conda file with the Spark session configuration you want.
- Add Configuration settings properties, input values in the Property and Value textboxes, and select Add.
- Select Apply.
- Select Stop session in the Configure new session? pop-up.
The session configuration changes persist and become available to another notebook session that is started using the serverless Spark compute.
Tip
If you use session-level Conda packages, you can improve the Spark session cold start time if you set the configuration variable spark.hadoop.aml.enable_cache to true. A session cold start with session level Conda packages typically takes 10 to 15 minutes when the session starts for the first time. However, subsequent session cold starts with the configuration variable set to true typically take three to five minutes.
Import and wrangle data from Azure Data Lake Storage (ADLS) Gen 2
You can access and wrangle data stored in Azure Data Lake Storage (ADLS) Gen 2 storage accounts with abfss:// data URIs following one of the two data access mechanisms:
- User identity passthrough
- Service principal-based data access
Tip
Data wrangling with a serverless Spark compute, and user identity passthrough to access data in an Azure Data Lake Storage (ADLS) Gen 2 storage account, requires the smallest number of configuration steps.
To start interactive data wrangling with the user identity passthrough:
Verify that the user identity has Contributor and Storage Blob Data Contributor role assignments in the Azure Data Lake Storage (ADLS) Gen 2 storage account.
To use the serverless Spark compute, select Serverless Spark Compute under Azure Machine Learning Serverless Spark from the Compute selection menu.
To use an attached Synapse Spark pool, select an attached Synapse Spark pool under Synapse Spark pools from the Compute selection menu.
This Titanic data wrangling code sample shows use of a data URI in format
abfss://<FILE_SYSTEM_NAME>@<STORAGE_ACCOUNT_NAME>.dfs.core.windows.net/<PATH_TO_DATA>withpyspark.pandasandpyspark.ml.feature.Imputer.import pyspark.pandas as pd from pyspark.ml.feature import Imputer df = pd.read_csv( "abfss://<FILE_SYSTEM_NAME>@<STORAGE_ACCOUNT_NAME>.dfs.core.windows.net/data/titanic.csv", index_col="PassengerId", ) imputer = Imputer(inputCols=["Age"], outputCol="Age").setStrategy( "mean" ) # Replace missing values in Age column with the mean value df.fillna( value={"Cabin": "None"}, inplace=True ) # Fill Cabin column with value "None" if missing df.dropna(inplace=True) # Drop the rows which still have any missing value df.to_csv( "abfss://<FILE_SYSTEM_NAME>@<STORAGE_ACCOUNT_NAME>.dfs.core.windows.net/data/wrangled", index_col="PassengerId", )Note
This Python code sample uses
pyspark.pandas. Only the Spark runtime version 3.2 or later supports this.
To wrangle data by access through a service principal:
Verify that the service principal has Contributor and Storage Blob Data Contributor role assignments in the Azure Data Lake Storage (ADLS) Gen 2 storage account.
Create Azure Key Vault secrets for the service principal tenant ID, client ID and client secret values.
Select Serverless Spark compute under Azure Machine Learning Serverless Spark from the Compute selection menu, or select an attached Synapse Spark pool under Synapse Spark pools from the Compute selection menu.
To set the service principal tenant ID, client ID and client secret in the configuration, and execute the following code sample.
The
get_secret()call in the code depends on name of the Azure Key Vault, and the names of the Azure Key Vault secrets created for the service principal tenant ID, client ID and client secret. Set these corresponding property name/values in the configuration:- Client ID property:
fs.azure.account.oauth2.client.id.<STORAGE_ACCOUNT_NAME>.dfs.core.windows.net - Client secret property:
fs.azure.account.oauth2.client.secret.<STORAGE_ACCOUNT_NAME>.dfs.core.windows.net - Tenant ID property:
fs.azure.account.oauth2.client.endpoint.<STORAGE_ACCOUNT_NAME>.dfs.core.windows.net - Tenant ID value:
https://login.microsoftonline.com/<TENANT_ID>/oauth2/token
from pyspark.sql import SparkSession sc = SparkSession.builder.getOrCreate() token_library = sc._jvm.com.microsoft.azure.synapse.tokenlibrary.TokenLibrary # Set up service principal tenant ID, client ID and secret from Azure Key Vault client_id = token_library.getSecret("<KEY_VAULT_NAME>", "<CLIENT_ID_SECRET_NAME>") tenant_id = token_library.getSecret("<KEY_VAULT_NAME>", "<TENANT_ID_SECRET_NAME>") client_secret = token_library.getSecret("<KEY_VAULT_NAME>", "<CLIENT_SECRET_NAME>") # Set up service principal which has access of the data sc._jsc.hadoopConfiguration().set( "fs.azure.account.auth.type.<STORAGE_ACCOUNT_NAME>.dfs.core.windows.net", "OAuth" ) sc._jsc.hadoopConfiguration().set( "fs.azure.account.oauth.provider.type.<STORAGE_ACCOUNT_NAME>.dfs.core.windows.net", "org.apache.hadoop.fs.azurebfs.oauth2.ClientCredsTokenProvider", ) sc._jsc.hadoopConfiguration().set( "fs.azure.account.oauth2.client.id.<STORAGE_ACCOUNT_NAME>.dfs.core.windows.net", client_id, ) sc._jsc.hadoopConfiguration().set( "fs.azure.account.oauth2.client.secret.<STORAGE_ACCOUNT_NAME>.dfs.core.windows.net", client_secret, ) sc._jsc.hadoopConfiguration().set( "fs.azure.account.oauth2.client.endpoint.<STORAGE_ACCOUNT_NAME>.dfs.core.windows.net", "https://login.microsoftonline.com/" + tenant_id + "/oauth2/token", )- Client ID property:
Import and wrangle data using data URI in format
abfss://<FILE_SYSTEM_NAME>@<STORAGE_ACCOUNT_NAME>.dfs.core.windows.net/<PATH_TO_DATA>as shown in the code sample, using the Titanic data.
Import and wrangle data from Azure Blob storage
You can access Azure Blob storage data with either the storage account access key or a shared access signature (SAS) token. You should store these credentials in the Azure Key Vault as a secret, and set them as properties in the session configuration.
To start interactive data wrangling:
At the Azure Machine Learning studio left panel, select Notebooks.
Select Serverless Spark compute under Azure Machine Learning Serverless Spark from the Compute selection menu, or select an attached Synapse Spark pool under Synapse Spark pools from the Compute selection menu.
To configure the storage account access key or a shared access signature (SAS) token for data access in Azure Machine Learning Notebooks:
For the access key, set property
fs.azure.account.key.<STORAGE_ACCOUNT_NAME>.blob.core.windows.netas shown in this code snippet:from pyspark.sql import SparkSession sc = SparkSession.builder.getOrCreate() token_library = sc._jvm.com.microsoft.azure.synapse.tokenlibrary.TokenLibrary access_key = token_library.getSecret("<KEY_VAULT_NAME>", "<ACCESS_KEY_SECRET_NAME>") sc._jsc.hadoopConfiguration().set( "fs.azure.account.key.<STORAGE_ACCOUNT_NAME>.blob.core.windows.net", access_key )For the SAS token, set property
fs.azure.sas.<BLOB_CONTAINER_NAME>.<STORAGE_ACCOUNT_NAME>.blob.core.windows.netas shown in this code snippet:from pyspark.sql import SparkSession sc = SparkSession.builder.getOrCreate() token_library = sc._jvm.com.microsoft.azure.synapse.tokenlibrary.TokenLibrary sas_token = token_library.getSecret("<KEY_VAULT_NAME>", "<SAS_TOKEN_SECRET_NAME>") sc._jsc.hadoopConfiguration().set( "fs.azure.sas.<BLOB_CONTAINER_NAME>.<STORAGE_ACCOUNT_NAME>.blob.core.windows.net", sas_token, )Note
The
get_secret()calls in the above code snippets require the name of the Azure Key Vault, and the names of the secrets created for the Azure Blob storage account access key or SAS token
Execute the data wrangling code in the same notebook. Format the data URI as
wasbs://<BLOB_CONTAINER_NAME>@<STORAGE_ACCOUNT_NAME>.blob.core.windows.net/<PATH_TO_DATA>, similar to what this code snippet shows:import pyspark.pandas as pd from pyspark.ml.feature import Imputer df = pd.read_csv( "wasbs://<BLOB_CONTAINER_NAME>@<STORAGE_ACCOUNT_NAME>.blob.core.windows.net/data/titanic.csv", index_col="PassengerId", ) imputer = Imputer(inputCols=["Age"], outputCol="Age").setStrategy( "mean" ) # Replace missing values in Age column with the mean value df.fillna( value={"Cabin": "None"}, inplace=True ) # Fill Cabin column with value "None" if missing df.dropna(inplace=True) # Drop the rows which still have any missing value df.to_csv( "wasbs://<BLOB_CONTAINER_NAME>@<STORAGE_ACCOUNT_NAME>.blob.core.windows.net/data/wrangled", index_col="PassengerId", )Note
This Python code sample uses
pyspark.pandas. Only the Spark runtime version 3.2 or later supports this.
Import and wrangle data from Azure Machine Learning Datastore
To access data from Azure Machine Learning Datastore, define a path to data on the datastore with URI format azureml://datastores/<DATASTORE_NAME>/paths/<PATH_TO_DATA>. To wrangle data from an Azure Machine Learning Datastore in a Notebooks session interactively:
Select Serverless Spark compute under Azure Machine Learning Serverless Spark from the Compute selection menu, or select an attached Synapse Spark pool under Synapse Spark pools from the Compute selection menu.
This code sample shows how to read and wrangle Titanic data from an Azure Machine Learning Datastore, using
azureml://datastore URI,pyspark.pandasandpyspark.ml.feature.Imputer.import pyspark.pandas as pd from pyspark.ml.feature import Imputer df = pd.read_csv( "azureml://datastores/workspaceblobstore/paths/data/titanic.csv", index_col="PassengerId", ) imputer = Imputer(inputCols=["Age"], outputCol="Age").setStrategy( "mean" ) # Replace missing values in Age column with the mean value df.fillna( value={"Cabin": "None"}, inplace=True ) # Fill Cabin column with value "None" if missing df.dropna(inplace=True) # Drop the rows which still have any missing value df.to_csv( "azureml://datastores/workspaceblobstore/paths/data/wrangled", index_col="PassengerId", )Note
This Python code sample uses
pyspark.pandas. Only the Spark runtime version 3.2 or later supports this.
The Azure Machine Learning datastores can access data using Azure storage account credentials
- access key
- SAS token
- service principal
or provide credential-less data access. Depending on the datastore type and the underlying Azure storage account type, select an appropriate authentication mechanism to ensure data access. This table summarizes the authentication mechanisms to access data in the Azure Machine Learning datastores:
| Storage account type | Credential-less data access | Data access mechanism | Role assignments |
|---|---|---|---|
| Azure Blob | No | Access key or SAS token | No role assignments needed |
| Azure Blob | Yes | User identity passthrough* | User identity should have appropriate role assignments in the Azure Blob storage account |
| Azure Data Lake Storage (ADLS) Gen 2 | No | Service principal | Service principal should have appropriate role assignments in the Azure Data Lake Storage (ADLS) Gen 2 storage account |
| Azure Data Lake Storage (ADLS) Gen 2 | Yes | User identity passthrough | User identity should have appropriate role assignments in the Azure Data Lake Storage (ADLS) Gen 2 storage account |
* User identity passthrough works for credential-less datastores that point to Azure Blob storage accounts, only if soft delete is not enabled.
Accessing data on the default file share
The default file share is mounted to both serverless Spark compute and attached Synapse Spark pools.
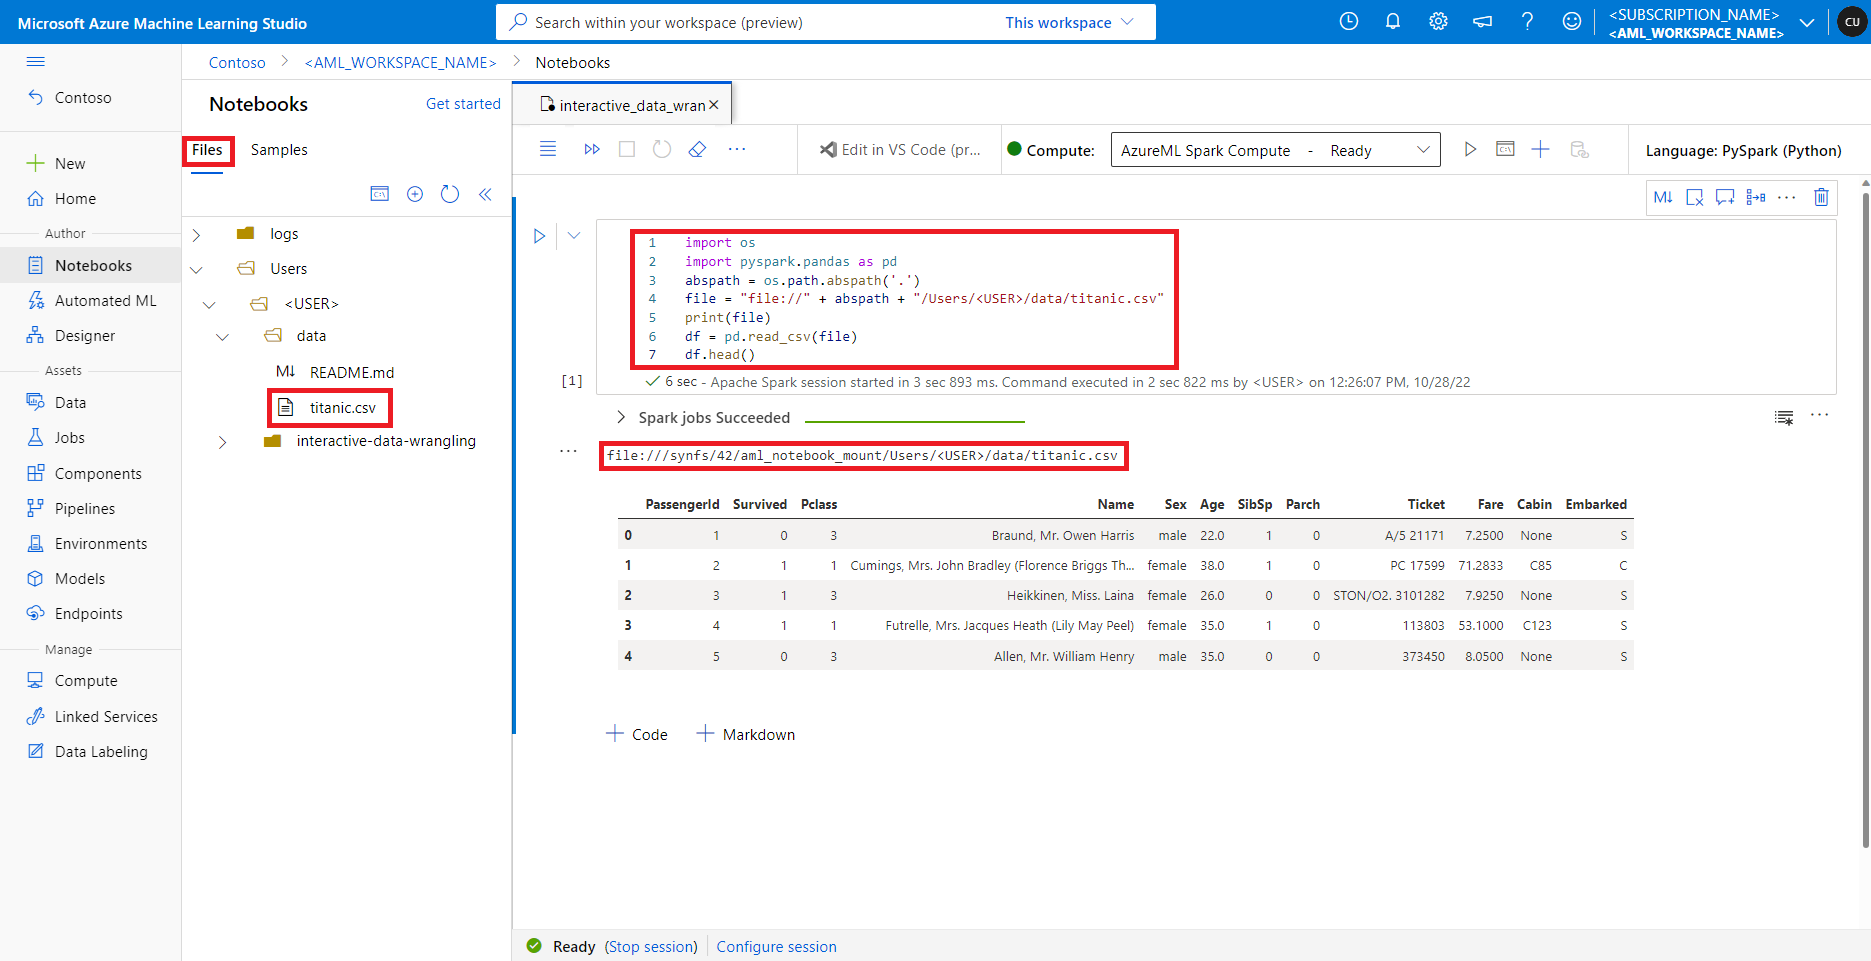
In Azure Machine Learning studio, files in the default file share are shown in the directory tree under the Files tab. Notebook code can directly access files stored in this file share with file:// protocol, along with the absolute path of the file, without more configurations. This code snippet shows how to access a file stored on the default file share:
import os
import pyspark.pandas as pd
from pyspark.ml.feature import Imputer

abspath = os.path.abspath(".")
file = "file://" + abspath + "/Users/<USER>/data/titanic.csv"
print(file)
df = pd.read_csv(file, index_col="PassengerId")
imputer = Imputer(
    inputCols=["Age"],
    outputCol="Age").setStrategy("mean") # Replace missing values in Age column with the mean value
df.fillna(value={"Cabin" : "None"}, inplace=True) # Fill Cabin column with value "None" if missing
df.dropna(inplace=True) # Drop the rows which still have any missing value
output_path = "file://" + abspath + "/Users/<USER>/data/wrangled"
df.to_csv(output_path, index_col="PassengerId")
Note
This Python code sample uses pyspark.pandas. Only the Spark runtime version 3.2 or later supports this.
Next steps
Feedback
Coming soon: Throughout 2024 we will be phasing out GitHub Issues as the feedback mechanism for content and replacing it with a new feedback system. For more information see: https://aka.ms/ContentUserFeedback.
Submit and view feedback for