Azure Virtual Machines deployment for SAP NetWeaver
Azure Virtual Machines is the solution for organizations that need compute and storage resources, in minimal time, and without lengthy procurement cycles. You can use Azure Virtual Machines to deploy classical applications, like SAP NetWeaver-based applications, in Azure. Extend an application's reliability and availability without additional on-premises resources. Azure Virtual Machines supports cross-premises connectivity, so you can integrate Azure Virtual Machines into your organization's on-premises domains, private clouds, and SAP system landscape.
In this article, we cover the steps to deploy SAP applications on virtual machines (VMs) in Azure, including alternate deployment options and troubleshooting. This article builds on the information in Azure Virtual Machines planning and implementation for SAP NetWeaver. It also complements SAP installation documentation and SAP Notes, which are the primary resources for installing and deploying SAP software.
Prerequisites
Setting up an Azure virtual machine for SAP software deployment involves multiple steps and resources. Before you start, make sure that you meet the prerequisites for installing SAP software on virtual machines in Azure.
Local computer
To manage Windows or Linux VMs, you can use a PowerShell script and the Azure portal. For both tools, you need a local computer running Windows 7 or a later version of Windows. If you want to manage only Linux VMs and you want to use a Linux computer for this task, you can use Azure CLI.
Internet connection
To download and run the tools and scripts that are required for SAP software deployment, you must be connected to the Internet. The Azure VM that is running the Azure Extension for SAP also needs access to the Internet. If the Azure VM is part of an Azure virtual network or on-premises domain, make sure that the relevant proxy settings are set, as described in Configure the proxy.
Microsoft Azure subscription
You need an active Azure account.
Topology and networking
You need to define the topology and architecture of the SAP deployment in Azure:
- Azure storage accounts to be used
- Virtual network where you want to deploy the SAP system
- Resource group to which you want to deploy the SAP system
- Azure region where you want to deploy the SAP system
- SAP configuration (two-tier or three-tier)
- VM sizes and the number of additional data disks to be mounted to the VMs
- SAP Correction and Transport System (CTS) configuration
Create and configure Azure storage accounts (if necessary) or Azure virtual networks before you begin the SAP software deployment process. For information about how to create and configure these resources, see Azure Virtual Machines planning and implementation for SAP NetWeaver.
SAP sizing
Know the following information, for SAP sizing:
- Projected SAP workload, for example, by using the SAP Quick Sizer tool, and the SAP Application Performance Standard (SAPS) number
- Required CPU resource and memory consumption of the SAP system
- Required input/output (I/O) operations per second
- Required network bandwidth of eventual communication between VMs in Azure
- Required network bandwidth between on-premises assets and the Azure-deployed SAP system
Resource groups
In Azure Resource Manager, you can use resource groups to manage all the application resources in your Azure subscription. For more information, see Azure Resource Manager overview.
Resources
SAP resources
When you're setting up your SAP software deployment, you need the following SAP resources:
SAP Note 1928533, which has:
- List of Azure VM sizes that are supported for the deployment of SAP software
- Important capacity information for Azure VM sizes
- Supported SAP software, and operating system (OS) and database combinations
- Required SAP kernel version for Windows and Linux on Microsoft Azure
SAP Note 2015553 lists prerequisites for SAP-supported SAP software deployments in Azure.
SAP Note 2178632 has detailed information about all monitoring metrics reported for SAP in Azure.
SAP Note 1409604 has the required SAP Host Agent version for Windows in Azure.
SAP Note 2191498 has the required SAP Host Agent version for Linux in Azure.
SAP Note 2243692 has information about SAP licensing on Linux in Azure.
SAP Note 1984787 has general information about SUSE Linux Enterprise Server 12.
SAP Note 2002167 has general information about Red Hat Enterprise Linux 7.x.
SAP Note 2069760 has general information about Oracle Linux 7.x.
SAP Note 1999351 has additional troubleshooting information for the Azure Extension for SAP.
SAP Note 1597355 has general information about swap-space for Linux.
SAP on Azure SCN page has news and a collection of useful resources.
SAP Community WIKI has all required SAP Notes for Linux.
SAP-specific PowerShell cmdlets that are part of Azure PowerShell.
SAP-specific Azure CLI commands that are part of Azure CLI.
Windows resources
These Microsoft articles cover SAP deployments in Azure:
- Azure Virtual Machines planning and implementation for SAP NetWeaver
- Azure Virtual Machines deployment for SAP NetWeaver (this article)
- Azure Virtual Machines DBMS deployment for SAP NetWeaver
Deployment scenarios for SAP software on Azure VMs
You have multiple options for deploying VMs and associated disks in Azure. It's important to understand the differences between deployment options, because you might take different steps to prepare your VMs for deployment based on the deployment type you choose.
Scenario 1: Deploying a VM from the Azure Marketplace for SAP
You can use an image provided by Microsoft or by a third party in the Azure Marketplace to deploy your VM. The Marketplace offers some standard OS images of Windows Server and different Linux distributions. You also can deploy an image that includes database management system (DBMS) SKUs, for example, Microsoft SQL Server. For more information about using images with DBMS SKUs, see Azure Virtual Machines DBMS deployment for SAP NetWeaver.
The following flowchart shows the SAP-specific sequence of steps for deploying a VM from the Azure Marketplace:

Create a virtual machine by using the Azure portal
The easiest way to create a new virtual machine with an image from the Azure Marketplace is by using the Azure portal.
- Navigate to Create a resource in the Azure portal. Or, in the Azure portal menu, select + New.
- Select Compute, and then select the type of operating system you want to deploy. For example, Windows Server 2012 R2 or higher, SUSE Linux Enterprise Server 12 or higher, Red Hat Enterprise Linux 7.x or higher (RHEL 7.2), or Oracle Linux 7.2 or higher. The default list view doesn't show all supported operating systems. Select see all for a full list. For more information about supported operating systems for SAP software deployment, see SAP Note 1928533.
- On the next page, review terms and conditions.
- In the Select a deployment model box, select Resource Manager.
- Select Create.
The wizard guides you through setting the required parameters to create the virtual machine, in addition to all required resources, like network interfaces and storage accounts. Some of these parameters are:
Basics:
- Name: The name of the resource (the virtual machine name).
- VM disk type: Select the disk type of the OS disk. If you want to use Premium Storage for your data disks, we recommend using Premium Storage for the OS disk as well.
- Username and password or SSH public key: Enter the username and password of the user that is created during the provisioning. For a Linux virtual machine, you can enter the public Secure Shell (SSH) key that you use to sign in to the machine.
- Subscription: Select the subscription that you want to use to provision the new virtual machine.
- Resource group: The name of the resource group for the VM. You can enter either the name of a new resource group or the name of a resource group that already exists.
- Location: Where to deploy the new virtual machine. If you want to connect the virtual machine to your on-premises network, make sure you select the location of the virtual network that connects Azure to your on-premises network. For more information, see Microsoft Azure networking.
Size:
For a list of supported VM types, see SAP Note 1928533. Be sure you select the correct VM type if you want to use Azure Premium Storage. Not all VM types support Premium Storage. For more information, see Azure storage for SAP workloads.
Settings:
- Storage
- Disk Type: Select the disk type of the OS disk. If you want to use Premium Storage for your data disks, we recommend using Premium Storage for the OS disk as well.
- Use managed disks: If you want to use Managed Disks, select Yes. For more information about Managed Disks, see chapter Managed Disks in the planning guide.
- Storage account: Select an existing storage account or create a new one. Not all storage types work for running SAP applications. For more information about storage types, see Storage structure of a VM for RDBMS Deployments.
- Network
- Virtual network and Subnet: To integrate the virtual machine with your intranet, select the virtual network that is connected to your on-premises network.
- Public IP address: Select the public IP address that you want to use, or enter parameters to create a new public IP address. You can use a public IP address to access your virtual machine over the Internet. Make sure that you also create a network security group to help secure access to your virtual machine.
- Network security group: For more information, see Control network traffic flow with network security groups.
- Extensions: You can install virtual machine extensions by adding them to the deployment. You don't need to add extensions in this step. The extensions required for SAP support are installed later. See chapter Configure the Azure Extension for SAP in this guide.
- High Availability: Select either virtual machine scale set, availability zone or availability set deployment option. The appropriate choices for deployment options depend on the system configuration you prefer within an Azure region, whether it involves spanning across multiple zones, residing in a single zone, or operating in a region without zones.
- Monitoring
- Boot diagnostics: You can select Disable for boot diagnostics.
- Guest OS diagnostics: You can select Disable for monitoring diagnostics.
- Storage
Summary:
Review your selections, and then select OK.
Your virtual machine is deployed in the resource group you selected.
Create a virtual machine by using a template
You can create a virtual machine by using one of the SAP templates published in the azure-quickstart-templates GitHub repository. You also can manually create a virtual machine by using the Azure portal, PowerShell, or Azure CLI.
Two-tier configuration (only one virtual machine) template (sap-2-tier-marketplace-image)
To create a two-tier system by using only one virtual machine, use this template.
-
To create a two-tier system by using only one virtual machine and Managed Disks, use this template.
Three-tier configuration (multiple virtual machines) template (sap-3-tier-marketplace-image)
To create a three-tier system by using multiple virtual machines, use this template.
-
To create a three-tier system by using multiple virtual machines and Managed Disks, use this template.
In the Azure portal, enter the following parameters for the template:
Basics:
- Subscription: The subscription to use to deploy the template.
- Resource group: The resource group to use to deploy the template. You can create a new resource group, or you can select an existing resource group in the subscription.
- Location: Where to deploy the template. If you selected an existing resource group, the location of that resource group is used.
Settings:
SAP System ID: The SAP System ID (SID).
OS type: The operating system you want to deploy, for example, Windows Server 2012 R2, SUSE Linux Enterprise Server 12 (SLES 12), Red Hat Enterprise Linux 7.2 (RHEL 7.2), or Oracle Linux 7.2.
The list view doesn't show all supported operating systems. For more information about supported operating systems for SAP software deployment, see SAP Note 1928533.
SAP system size: The size of the SAP system.
The number of SAPS the new system provides. If you aren't sure how many SAPS the system requires, ask your SAP Technology Partner or System Integrator.
System availability (three-tier template only): The system availability.
Select HA for a configuration that is suitable for a high-availability installation. Two database servers and two servers for ABAP SAP Central Services (ASCS) are created.
Storage type (two-tier template only): The type of storage to use.
For larger systems, we highly recommend using Azure Premium Storage. For more information about storage types, see these resources:
Admin username and Admin password: A username and password. A new user is created, for signing in to the virtual machine.
New or existing subnet: Determines whether a new virtual network and subnet are created or an existing subnet is used. If you already have a virtual network that is connected to your on-premises network, select Existing.
Subnet ID: If you want to deploy the VM into an existing VNet where you have a subnet defined the VM should be assigned to, name the ID of that specific subnet. The ID usually looks like this: /subscriptions/<subscription id>/resourceGroups/<resource group name>/providers/Microsoft.Network/virtualNetworks/<virtual network name>/subnets/<subnet name>
Terms and conditions:
Review and accept the legal terms.Select Purchase.
The Azure VM Agent is deployed by default when you use an image from the Azure Marketplace.
Configure proxy settings
Depending on how your on-premises network is configured, you might need to set up the proxy on your VM. If your VM is connected to your on-premises network via VPN or ExpressRoute, the VM might not be able to access the Internet, and won't be able to download the required VM extensions or collect Azure infrastructure information for the SAP Host agent via the SAP extension for Azure. For more information, see Configure the proxy.
Join a domain (Windows only)
If your Azure deployment is connected to an on-premises Active Directory or DNS instance via an Azure site-to-site VPN connection or ExpressRoute (this is called cross-premises in Azure Virtual Machines planning and implementation for SAP NetWeaver), it is expected that the VM is joining an on-premises domain. For more information about considerations for this task, see Join a VM to an on-premises domain (Windows only).
Configure VM Extension
To be sure SAP supports your environment, set up the Azure Extension for SAP as described in Configure the Azure Extension for SAP.
Post-deployment steps
After you create the VM and the VM is deployed, you need to install the required software components in the VM. Because of the deployment/software installation sequence in this type of VM deployment, the software to be installed must already be available, either in Azure, on another VM, or as a disk that can be attached. Or, consider using a cross-premises scenario, in which connectivity to the on-premises assets (installation shares) is given.
After you deploy your VM in Azure, follow the same guidelines and tools to install the SAP software on your VM as you would in an on-premises environment. To install SAP software on an Azure VM, both SAP and Microsoft recommend that you upload and store the SAP installation media on Azure VHDs or Managed Disks, or that you create an Azure VM that works as a file server that has all the required SAP installation media.
Scenario 2: Deploying a VM with a custom image for SAP
Because different versions of an operating system or DBMS have different patch requirements, the images you find in the Azure Marketplace might not meet your needs. You might instead want to create a VM by using your own OS/DBMS VM image, which you can deploy again later. You use different steps to create a private image for Linux than to create one for Windows.
Windows
To prepare a Windows image that you can use to deploy multiple virtual machines, the Windows settings (like Windows SID and hostname) must be abstracted or generalized on the on-premises VM. You can use sysprep to do this.
Linux
To prepare a Linux image that you can use to deploy multiple virtual machines, some Linux settings must be abstracted or generalized on the on-premises VM. You can use
waagent -deprovisionto do this. For more information, see Capture a Linux virtual machine running on Azure and the Azure Linux agent user guide.
You can prepare and create a custom image, and then use it to create multiple new VMs. This is described in Azure Virtual Machines planning and implementation for SAP NetWeaver. Set up your database content either by using SAP Software Provisioning Manager to install a new SAP system (restores a database backup from a disk that's attached to the virtual machine) or by directly restoring a database backup from Azure storage, if your DBMS supports it. For more information, see Azure Virtual Machines DBMS deployment for SAP NetWeaver. If you have already installed an SAP system on your on-premises VM (especially for two-tier systems), you can adapt the SAP system settings after the deployment of the Azure VM by using the System Rename procedure supported by SAP Software Provisioning Manager (SAP Note 1619720). Otherwise, you can install the SAP software after you deploy the Azure VM.
The following flowchart shows the SAP-specific sequence of steps for deploying a VM from a custom image:

Create a virtual machine by using the Azure portal
The easiest way to create a new virtual machine from a Managed Disk image is by using the Azure portal. For more information on how to create a Manage Disk Image, read Capture a managed image of a generalized VM in Azure
- Navigate to Images in the Azure portal. Or, in the Azure portal menu, select Images.
- Select the Managed Disk image you want to deploy and click on Create VM
The wizard guides you through setting the required parameters to create the virtual machine, in addition to all required resources, like network interfaces and storage accounts. Some of these parameters are:
Basics:
- Name: The name of the resource (the virtual machine name).
- VM disk type: Select the disk type of the OS disk. If you want to use Premium Storage for your data disks, we recommend using Premium Storage for the OS disk as well.
- Username and password or SSH public key: Enter the username and password of the user that is created during the provisioning. For a Linux virtual machine, you can enter the public Secure Shell (SSH) key that you use to sign in to the machine.
- Subscription: Select the subscription that you want to use to provision the new virtual machine.
- Resource group: The name of the resource group for the VM. You can enter either the name of a new resource group or the name of a resource group that already exists.
- Location: Where to deploy the new virtual machine. If you want to connect the virtual machine to your on-premises network, make sure you select the location of the virtual network that connects Azure to your on-premises network. For more information, see Microsoft Azure networking in Azure Virtual Machines planning and implementation for SAP NetWeaver.
Size:
For a list of supported VM types, see SAP Note 1928533. Be sure you select the correct VM type if you want to use Azure Premium Storage. Not all VM types support Premium Storage. For more information, see Azure storage for SAP workloads.
Settings:
- Storage
- Disk Type: Select the disk type of the OS disk. If you want to use Premium Storage for your data disks, we recommend using Premium Storage for the OS disk as well.
- Use managed disks: If you want to use Managed Disks, select Yes. For more information about Managed Disks, see chapter Managed Disks in the planning guide.
- Network
- Virtual network and Subnet: To integrate the virtual machine with your intranet, select the virtual network that is connected to your on-premises network.
- Public IP address: Select the public IP address that you want to use, or enter parameters to create a new public IP address. You can use a public IP address to access your virtual machine over the Internet. Make sure that you also create a network security group to help secure access to your virtual machine.
- Network security group: For more information, see Control network traffic flow with network security groups.
- Extensions: You can install virtual machine extensions by adding them to the deployment. You don't need to add extension in this step. The extensions required for SAP support are installed later. See chapter Configure the Azure Extension for SAP in this guide.
- High Availability: Select either virtual machine scale set, availability zone or availability set deployment option. The appropriate choices for deployment options depend on the system configuration you prefer within an Azure region, whether it involves spanning across multiple zones, residing in a single zone, or operating in a region without zones.
- Monitoring
- Boot diagnostics: You can select Disable for boot diagnostics.
- Guest OS diagnostics: You can select Disable for monitoring diagnostics.
- Storage
Summary:
Review your selections, and then select OK.
Your virtual machine is deployed in the resource group you selected.
Create a virtual machine by using a template
To create a deployment by using a private OS image from the Azure portal, use one of the following SAP templates. These templates are published in the azure-quickstart-templates GitHub repository. You also can manually create a virtual machine, by using PowerShell.
Two-tier configuration (only one virtual machine) template (sap-2-tier-user-image)
To create a two-tier system by using only one virtual machine, use this template.
-
To create a two-tier system by using only one virtual machine and a Managed Disk image, use this template.
Three-tier configuration (multiple virtual machines) template (sap-3-tier-user-image)
To create a three-tier system by using multiple virtual machines or your own OS image, use this template.
-
To create a three-tier system by using multiple virtual machines or your own OS image and a Managed Disk image, use this template.
In the Azure portal, enter the following parameters for the template:
Basics:
- Subscription: The subscription to use to deploy the template.
- Resource group: The resource group to use to deploy the template. You can create a new resource group or select an existing resource group in the subscription.
- Location: Where to deploy the template. If you selected an existing resource group, the location of that resource group is used.
Settings:
SAP System ID: The SAP System ID.
OS type: The operating system type you want to deploy (Windows or Linux).
SAP system size: The size of the SAP system.
The number of SAPS the new system provides. If you aren't sure how many SAPS the system requires, ask your SAP Technology Partner or System Integrator.
System availability (three-tier template only): The system availability.
Select HA for a configuration that is suitable for a high-availability installation. Two database servers and two servers for ASCS are created.
Storage type (two-tier template only): The type of storage to use.
For larger systems, we highly recommend using Azure Premium Storage. For more information about storage types, see the following resources:
User image VHD URI (unmanaged disk image template only): The URI of the private OS image VHD, for example, https://<accountname>.blob.core.windows.net/vhds/userimage.vhd.
User image storage account (unmanaged disk image template only): The name of the storage account where the private OS image is stored, for example, <accountname> in https://<accountname>.blob.core.windows.net/vhds/userimage.vhd.
userImageId (managed disk image template only): ID of the Managed Disk image you want to use
Admin username and Admin password: The username and password.
A new user is created, for signing in to the virtual machine.
New or existing subnet: Determines whether a new virtual network and subnet is created or an existing subnet is used. If you already have a virtual network that is connected to your on-premises network, select Existing.
Subnet ID: If you want to deploy the VM into an existing VNet where you have a subnet defined the VM should be assigned to, name the ID of that specific subnet. The ID usually looks like this: /subscriptions/<subscription id>/resourceGroups/<resource group name>/providers/Microsoft.Network/virtualNetworks/<virtual network name>/subnets/<subnet name>
Terms and conditions:
Review and accept the legal terms.Select Purchase.
Install the VM Agent (Linux only)
To use the templates described in the preceding section, the Linux Agent must already be installed in the user image, or the deployment will fail. Download and install the VM Agent in the user image as described in Download, install, and enable the Azure VM Agent. If you don't use the templates, you also can install the VM Agent later.
Join a domain (Windows only)
If your Azure deployment is connected to an on-premises Active Directory or DNS instance via an Azure site-to-site VPN connection or Azure ExpressRoute (this is called cross-premises in Azure Virtual Machines planning and implementation for SAP NetWeaver), it's expected that the VM is joining an on-premises domain. For more information about considerations for this step, see Join a VM to an on-premises domain (Windows only).
Configure proxy settings
Depending on how your on-premises network is configured, you might need to set up the proxy on your VM. If your VM is connected to your on-premises network via VPN or ExpressRoute, the VM might not be able to access the Internet, and won't be able to download the required VM extensions or collect Azure infrastructure information for the SAP Host agent via the SAP extension for Azure, see Configure the proxy.
Configure Azure VM Extension for SAP
To be sure SAP supports your environment, set up the Azure Extension for SAP as described in Configure the Azure Extension for SAP.
Scenario 3: Moving an on-premises VM by using a nongeneralized Azure VHD with SAP
In this scenario, you plan to move a specific SAP system from an on-premises environment to Azure. You can do this by uploading the VHD that has the OS, the SAP binaries, and eventually the DBMS binaries, plus the VHDs with the data and log files of the DBMS, to Azure. Unlike the scenario described in Scenario 2: Deploying a VM with a custom image for SAP, in this case, you keep the hostname, SAP SID, and SAP user accounts in the Azure VM, because they were configured in the on-premises environment. You don't need to generalize the OS. This scenario applies most often to cross-premises scenarios where part of the SAP landscape runs on-premises and part of it runs on Azure.
In this scenario, the VM Agent is not automatically installed during deployment. Because the VM Agent and the Azure Extension for SAP are required to run SAP NetWeaver on Azure, you need to download, install, and enable both components manually after you create the virtual machine.
For more information about the Azure VM Agent, see the following resources.
Azure Virtual Machine Agent overview
The following flowchart shows the sequence of steps for moving an on-premises VM by using a non-generalized Azure VHD:

If the disk is already uploaded and defined in Azure (see Azure Virtual Machines planning and implementation for SAP NetWeaver), do the tasks described in the next few sections.
Create a virtual machine
To create a deployment by using a private OS disk through the Azure portal, use the SAP template published in the azure-quickstart-templates GitHub repository. You also can manually create a virtual machine, by using PowerShell.
Two-tier configuration (only one virtual machine) template (sap-2-tier-user-disk)
To create a two-tier system by using only one virtual machine, use this template.
Two-tier configuration (only one virtual machine) template - Managed Disk (sap-2-tier-user-disk-md)
To create a two-tier system by using only one virtual machine and a Managed Disk, use this template.
In the Azure portal, enter the following parameters for the template:
Basics:
- Subscription: The subscription to use to deploy the template.
- Resource group: The resource group to use to deploy the template. You can create a new resource group or select an existing resource group in the subscription.
- Location: Where to deploy the template. If you selected an existing resource group, the location of that resource group is used.
Settings:
SAP System ID: The SAP System ID.
OS type: The operating system type you want to deploy (Windows or Linux).
SAP system size: The size of the SAP system.
The number of SAPS the new system provides. If you are not sure how many SAPS the system requires, ask your SAP Technology Partner or System Integrator.
Storage type (two-tier template only): The type of storage to use.
For larger systems, we highly recommend using Azure Premium Storage. For more information about storage types, see the following resources:
OS disk VHD URI (unmanaged disk template only): The URI of the private OS disk, for example, https://<accountname>.blob.core.windows.net/vhds/osdisk.vhd.
OS disk Managed Disk ID (managed disk template only): The ID of the Managed Disk OS disk, /subscriptions/92d102f7-81a5-4df7-9877-54987ba97dd9/resourceGroups/group/providers/Microsoft.Compute/disks/WIN
New or existing subnet: Determines whether a new virtual network and subnet are created, or an existing subnet is used. If you already have a virtual network that is connected to your on-premises network, select Existing.
Subnet ID: If you want to deploy the VM into an existing VNet where you have a subnet defined the VM should be assigned to, name the ID of that specific subnet. The ID usually looks like this: /subscriptions/<subscription id>/resourceGroups/<resource group name>/providers/Microsoft.Network/virtualNetworks/<virtual network name>/subnets/<subnet name>
Terms and conditions:
Review and accept the legal terms.Select Purchase.
Install the VM Agent
To use the templates described in the preceding section, the VM Agent must be installed on the OS disk, or the deployment will fail. Download and install the VM Agent in the VM, as described in Download, install, and enable the Azure VM Agent.
If you don't use the templates described in the preceding section, you can also install the VM Agent afterwards.
Join a domain (Windows only)
If your Azure deployment is connected to an on-premises Active Directory or DNS instance via an Azure site-to-site VPN connection or ExpressRoute (this is called cross-premises in Azure Virtual Machines planning and implementation for SAP NetWeaver), it is expected that the VM is joining an on-premises domain. For more information about considerations for this task, see Join a VM to an on-premises domain (Windows only).
Configure proxy settings
Depending on how your on-premises network is configured, you might need to set up the proxy on your VM. If your VM is connected to your on-premises network via VPN or ExpressRoute, the VM might not be able to access the Internet, and won't be able to download the required VM extensions or collect Azure infrastructure information for the SAP Host agent via the SAP extension for Azure, see Configure the proxy.
Configure Azure VM Extension for SAP
To be sure SAP supports your environment, set up the Azure Extension for SAP as described in Configure the Azure Extension for SAP.
Detailed tasks for SAP software deployment
This section has detailed steps for doing specific tasks in the configuration and deployment process.
Join a VM to an on-premises domain (Windows only)
If you deploy SAP VMs in a cross-premises scenario, where on-premises Active Directory and DNS are extended in Azure, it's expected that the VMs are joining an on-premises domain. The detailed steps you take to join a VM to an on-premises domain, and the additional software required to be a member of an on-premises domain, varies by customer. Usually, to join a VM to an on-premises domain, you need to install additional software, like antimalware software, and backup or monitoring software.
In this scenario, you also need to make sure that if Internet proxy settings are forced when a VM joins a domain in your environment, the Windows Local System Account (S-1-5-18) in the Guest VM has the same proxy settings. The easiest option is to force the proxy by using a domain Group Policy, which applies to systems in the domain.
Download, install, and enable the Azure VM Agent
For virtual machines that are deployed from an OS image that isn't generalized (for example, an image that doesn't originate in the Windows System Preparation, or sysprep, tool), you need to manually download, install, and enable the Azure VM Agent.
If you deploy a VM from the Azure Marketplace, this step isn't required. Images from the Azure Marketplace already have the Azure VM Agent.
Windows
- Download the Azure VM Agent:
- Download the Azure VM Agent installer package.
- Store the VM Agent MSI package locally on a personal computer or server.
- Install the Azure VM Agent:
- Connect to the deployed Azure VM by using Remote Desktop Protocol (RDP).
- Open a Windows Explorer window on the VM and select the target directory for the MSI file of the VM Agent.
- Drag the Azure VM Agent Installer MSI file from your local computer/server to the target directory of the VM Agent on the VM.
- Double-click the MSI file on the VM.
- For VMs that are joined to on-premises domains, make sure that eventual Internet proxy settings also apply to the Windows Local System account (S-1-5-18) in the VM, as described in Configure the proxy. The VM Agent runs in this context and needs to be able to connect to Azure.
No user interaction is required to update the Azure VM Agent. The VM Agent is automatically updated, and doesn't require a VM restart.
Linux
Use the following commands to install the VM Agent for Linux:
SUSE Linux Enterprise Server (SLES)
sudo zypper install WALinuxAgentRed Hat Enterprise Linux (RHEL) or Oracle Linux
sudo yum install WALinuxAgent
If the agent is already installed, to update the Azure Linux Agent, do the steps described in Update the Azure Linux Agent on a VM to the latest version from GitHub.
Configure the proxy
The steps you take to configure the proxy in Windows are different from the way you configure the proxy in Linux.
Windows
Proxy settings must be set up correctly for the Local System account to access the Internet. If your proxy settings aren't set by Group Policy, you can configure the settings for the Local System account.
- Go to Start, enter gpedit.msc, and then select Enter.
- Select Computer Configuration > Administrative Templates > Windows Components > Internet Explorer. Make sure that the setting Make proxy settings per-machine (rather than per-user) is disabled or not configured.
- In Control Panel, go to Network and Sharing Center > Internet Options.
- On the Connections tab, select the LAN settings button.
- Clear the Automatically detect settings check box.
- Select the Use a proxy server for your LAN check box, and then enter the proxy address and port.
- Select the Advanced button.
- In the Exceptions box, enter the IP address 168.63.129.16. Select OK.
Linux
Configure the correct proxy in the configuration file of the Microsoft Azure Guest Agent, which is located at \etc\waagent.conf.
Set the following parameters:
HTTP proxy host. For example, set it to proxy.corp.local.
HttpProxy.Host=<proxy host>HTTP proxy port. For example, set it to 80.
HttpProxy.Port=<port of the proxy host>Restart the agent.
sudo service waagent restart
If you want to use the Azure repositories, make sure that the traffic to these repositories isn't going through your on-premises intranet. If you created user-defined routes to enable forced tunneling, make sure that you add a route that routes traffic to the repositories directly to the Internet, and not through your site-to-site VPN connection.
The VM Extension for SAP also needs to be able to access the internet. Make sure to install the new VM Extension for SAP and follow the steps in Configure the Azure VM extension for SAP solutions with Azure CLI in the VM Extension for SAP installation guide to configure the proxy.
SLES
You also need to add routes for the IP addresses listed in \etc\regionserverclnt.cfg. The following figure shows an example:
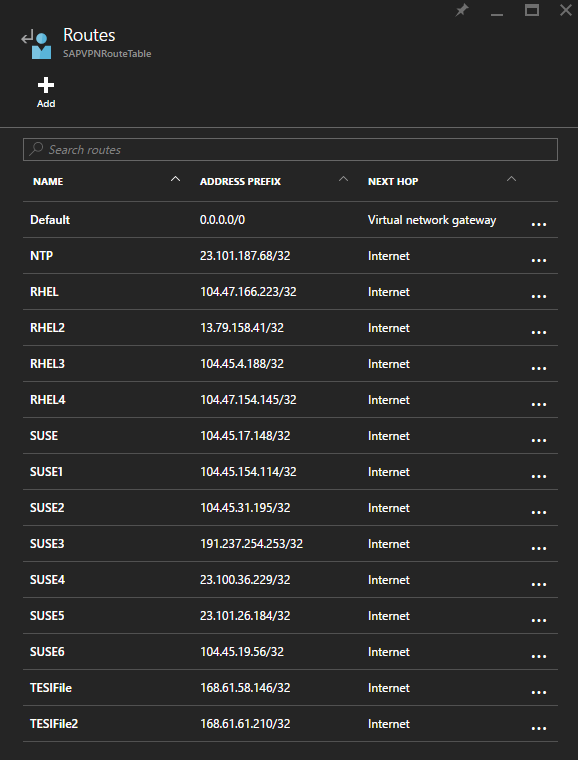
RHEL
You also need to add routes for the IP addresses of the hosts listed in \etc\yum.repos.d\rhui-load-balancers. For an example, see the preceding figure.
Oracle Linux
There are no repositories for Oracle Linux on Azure. You need to configure your own repositories for Oracle Linux or use the public repositories.
For more information about user-defined routes, see User-defined routes and IP forwarding.
Azure Extension for SAP
Note
General Support Statement:
Support for the Azure Extension for SAP is provided through SAP support channels. If you need assistance with the Azure Extension for SAP, please open a support case with SAP Support.
When you've prepared the VM as described in Deployment scenarios of VMs for SAP on Azure, the Azure VM Agent is installed on the virtual machine. The next step is to deploy the Azure Extension for SAP, which is available in the Azure Extension Repository in the global Azure datacenters. For more information, see Configure the Azure Extension for SAP.
Next steps
Learn about RHEL for SAP in-place upgrade
Feedback
Coming soon: Throughout 2024 we will be phasing out GitHub Issues as the feedback mechanism for content and replacing it with a new feedback system. For more information see: https://aka.ms/ContentUserFeedback.
Submit and view feedback for