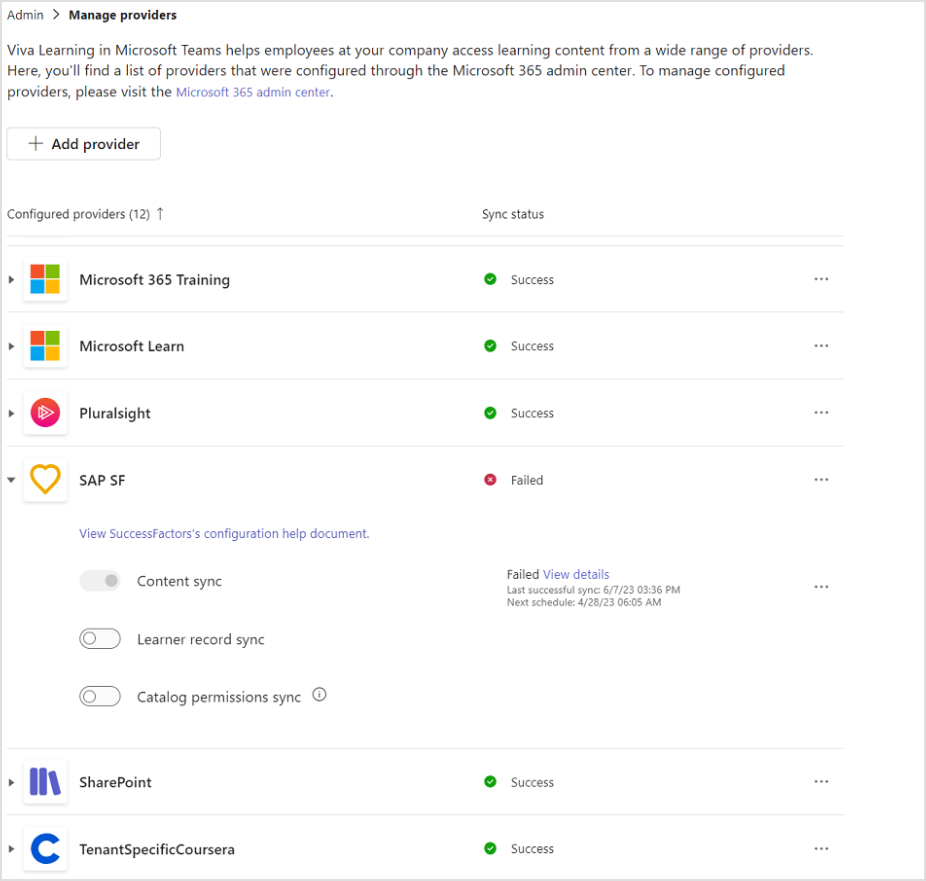
Manage providers in Viva Learning
You can configure providers from Manage Providers in Viva Learning Admin.
The Add Provider list shows you the available providers for configuration. Once a provider is confirmed, it appears on the Configured Providers list.
Note
Features in the Viva Learning Admin tab require both:
- Viva Suite or Viva Learning license
- Global admin, knowledge admin, or knowledge manage role
Review this article to Learn how to assign roles.
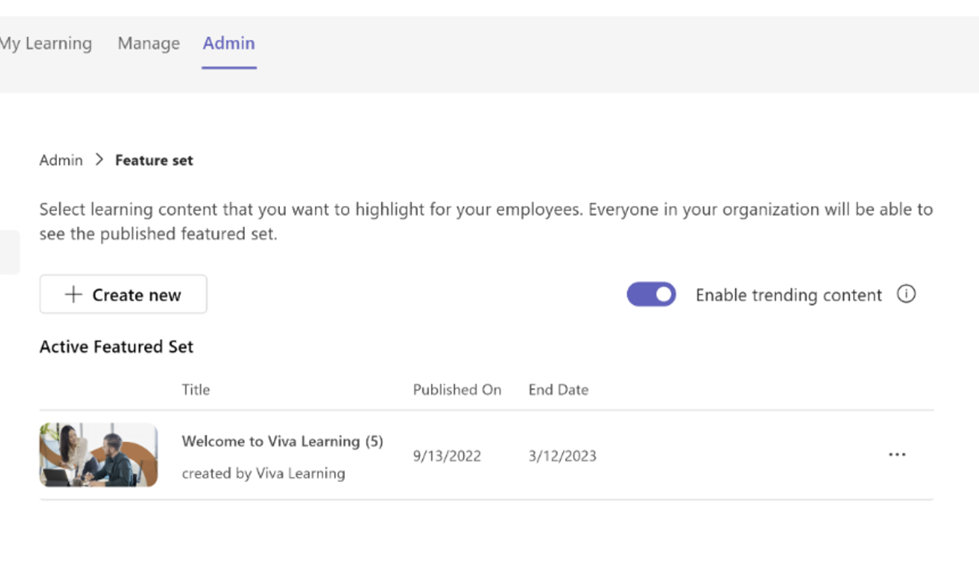
To create a set of featured content that will show up for your users, select the Create featured set in the top left corner.
Managing Providers
Navigate to Manage Providers for a detailed view of all configured learning providers and to manage the learning providers and respective offerings. Refer to Manage learning management systems and Add other content providers for more information.
The following features are accessible by the listed admin roles:
Manage Providers: global admin, knowledge admin, knowledge manager (read only) Admin Tab: global admin, knowledge admin, knowledge manager
Manage Providers Configuration
You can configure providers using Manage providers in Viva Learning Admin. The Add providers list displays the available providers for configuration. Once a provider is configured, it appears in the Configured providers list.
Adding a provider requires either a Global Admin or Knowledge Admin role. Review this article to Learn how to assign roles.
You can edit or delete an existing configured provider directly from Manage providers.
Note
If you delete all learning providers, the Viva Learning Teams app will be empty.
Open the Viva Learning App in Teams or go to the Viva Learning Web App.
Go to the Admin tab in Viva Learning and select Manage Providers on the left menu.
Select Add Provider.
Select the provider you want to configure and select Next.
Add provider configurations as applicable and select Save. This adds the provider in the Configured providers list.
You can track the current sync status, last successful sync time, next scheduled sync time, ingestion logs, and trigger full sync for each component in the expanded view:
Sync status and timestamp: Check the current sync status (success/failed/in progress) of catalog, learner records, and catalog permissions.
Manual sync trigger: Trigger the sync manually for a delta/full sync. Once a full sync is triggered, the sync status is updated accordingly.
Export log: Admins can refer to the export log file for a detail about successful and failed sync cycles.
Note
The sync status, sync time stamp and export logs are only currently available for catalog sync for all providers. Sync status and sync timestamp for learner records are only available for SAP SuccessFactor. Manual sync trigger is only available for catalog in SharePoint and SAP SuccessFactor.
Note
We recommend an aspect ratio of 16:9 for images to render properly in Viva Learning.
How content shows up in the My Learning page
The My Learning tab helps users take control of their learning journey. Users are able to track assignments, recommendations, bookmarks, recent history, and completed courses on this page.
Recommended to you: Recommendations from your peers show up here.
Bookmarks: Content bookmarked by the user will be shown here.
Recently viewed: The user's 20 most recently viewed items are shown under this tab. The most recently viewed item is shown first.
Completed: Courses completed by the user show under this tab.
Feature sets
To create a set of featured content that will show up for your users, select Create featured set in the top left corner.
Feedback
Coming soon: Throughout 2024 we will be phasing out GitHub Issues as the feedback mechanism for content and replacing it with a new feedback system. For more information see: https://aka.ms/ContentUserFeedback.
Submit and view feedback for