Training
Learning path
Use advance techniques in canvas apps to perform custom updates and optimization - Training
Use advance techniques in canvas apps to perform custom updates and optimization
This browser is no longer supported.
Upgrade to Microsoft Edge to take advantage of the latest features, security updates, and technical support.
This article is to learn to write your own WebView2 code. If you want to run a sample first, see Win32 sample app or another sample app article, such as WinUI 3 (Windows App SDK) sample app.
This article covers how to set up your development tools and create an initial WebView2 app for WinUI 3 (Windows App SDK), and learn about WebView2 concepts along the way. You first use the Blank App, Packaged (WinUI 3 in Desktop) Visual Studio project template, which uses the WindowsAppSDK, which includes the WebView2 SDK. You then add a WebView2 control, an Address bar and Go button, and URL logic to only allow navigating to HTTPS URLs.
In this tutorial, you do the following:
Set up the development environment.
Use the Blank App, Packaged (WinUI 3 in Desktop) Visual Studio project template to create a blank WinUI 3 project, which defines an app that contains a button.
Add a WebView2 control instead of the button, and initially navigate to the Microsoft homepage. WebView2 is supported because the project template uses the Microsoft.WindowsAppSDK NuGet package, which includes the WebView2 SDK.
Add an Address bar as a text box control, and then use the entered HTTPS string to navigate to a new webpage:
Insert JavaScript into the WebView2 control, to display a warning alert (dialog) when the user tries to navigate to a URL that has only an http:// prefix instead of https://:
A completed version of this tutorial project is available in the WebView2Samples repo:
Make sure that Visual Studio 2022 is installed and up-to-date.
To install the latest Visual Studio 2022:
Go to Visual Studio: IDE and Code Editor for Software Developers and Teams, and then in the Visual Studio 2022 section, click the Download button, and then select Community 2022 or another version.
In the Downloads popup in the upper right of Microsoft Edge, VisualStudioSetup.exe is listed. Click Open file.
Visual Studio Installer opens.
Follow the prompts, and accept the defaults. You'll install or update a workload and a component of a workload in the next step.
Make sure that the latest Windows App SDK is installed in Visual Studio 2022. The Windows App SDK includes Visual Studio project templates, and includes the WebView2 SDK. These project templates include the Blank App, Packaged (WinUI 3 in Desktop) project template, which uses the WindowsAppSDK, including the WebView2 SDK.
The Windows App SDK is installed as the Windows App SDK C# Templates component of the .NET Desktop Development workload for Visual Studio. Before Visual Studio 2022 version 17.1, the Windows App SDK was instead installed as a Visual Studio extension, as explained in Install tools for the Windows App SDK.
To install the latest Visual Studio 2022 the latest Windows App SDK:
In Windows, press the Start key, and then type Visual Studio 2022.
The Visual Studio 2022 app is listed.
Click Open.
The Visual Studio 2022 dialog opens, with sections including Open recent and Get started.
Click Continue without code.
Visual Studio opens.
In the Tools menu, select Get Tools and Features.
The Visual Studio Installer window opens.
Make sure the Workloads tab is selected.
In the Desktop & Mobile section, select the card for the .NET desktop development workload, so that a checkmark appears:

In the Installation details tree on the right, in .NET desktop development > Optional, select the checkbox for the Windows App SDK C# Templates component, near the bottom of the tree.
Click the Modify button.
The User Account Control dialog opens.
Click the Yes button.
You're prompted to close Visual Studio.
Click the Continue button (assuming you have no unsaved work).
Visual Studio downloads and installs the latest Windows App SDK C# Templates component. In the Visual Studio Installer window, a message says All installations are up to date, and Visual Studio 2022 opens.
Next, create a project that's a basic WebView2 app for WinUI 3 (Windows App SDK). This desktop app will contain a single main window. The project won't contain any WebView2 code yet.
To create a WebView2 app for WinUI 3 (Windows App SDK):
If Visual Studio is running, select File > New > Project. The Create a new project dialog opens.
If Visual Studio 2022 is not running:
In Windows, press the Start key, and then type Visual Studio 2022.
The Visual Studio 2022 app is listed.
Click Open.
The Visual Studio 2022 startup dialog opens, with sections including Open recent and Get started.
In the Get started section, click the Create a new project card. The Create a new project window opens.
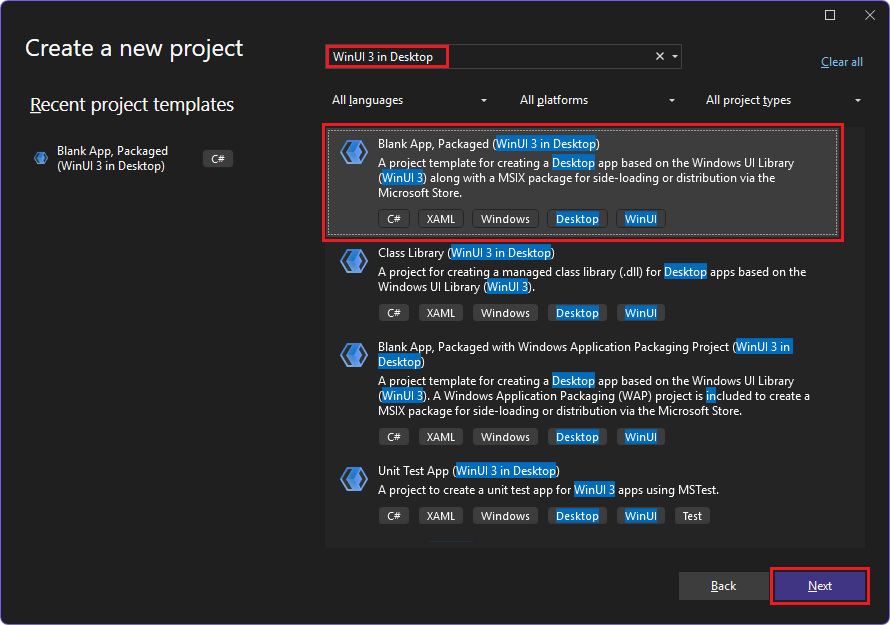
In the Create a new project window, in the Search for templates field, enter WinUI 3 in Desktop:
The project templates that were installed in the previous major step are listed.
Click the Blank App, Packaged (WinUI 3 in Desktop) card to select it, and then click the Next button.
The Configure your new project dialog appears.
In the Project name text box, enter a project name, such as WinUI3GetStarted:
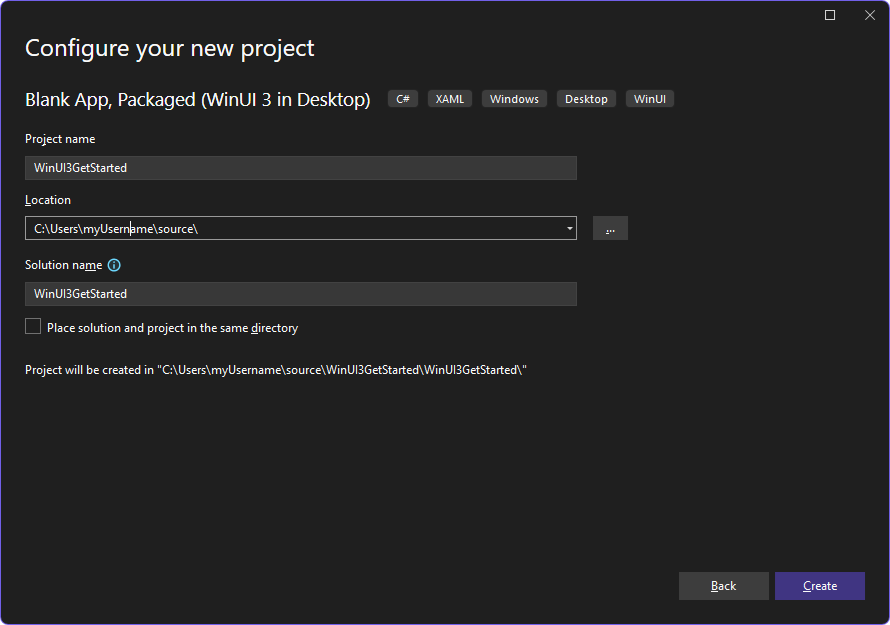
In the Location text box, enter or navigate to a directory, such as C:\Users\myUsername\source\.
Click the Create button.
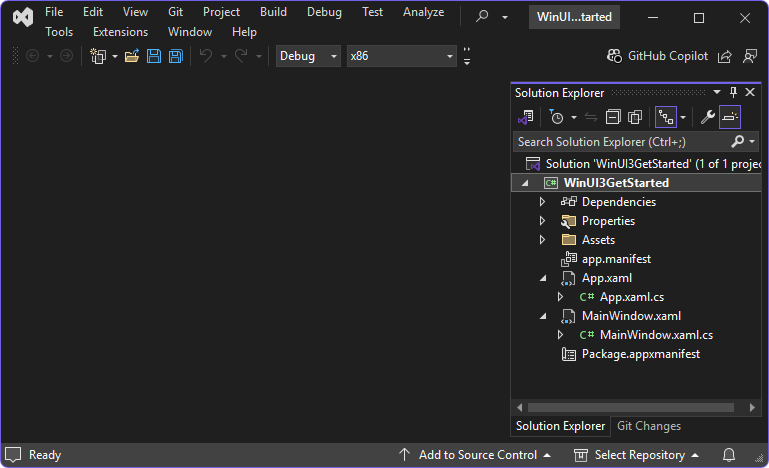
The project is created:
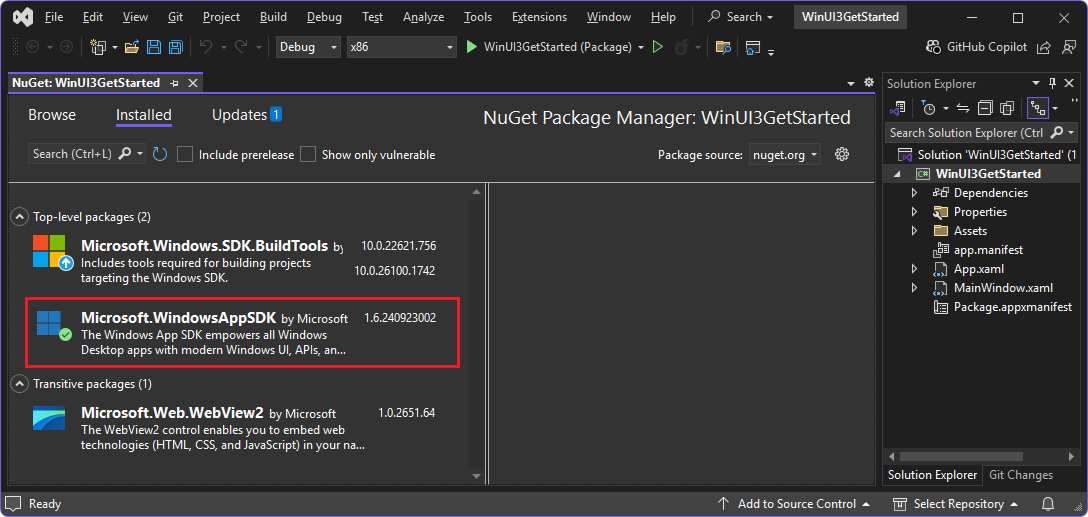
When you create a new project in Visual Studio, check the status of the solution's NuGet packages. Make sure the needed NuGet packages were installed by the project template, and make sure the packages have been updated, so that the project has the latest features and fixes.
To update or install the latest Windows App SDK NuGet package for your project:
In Visual Studio, in Solution Explorer, right-click the WinUI3GetStarted project, and then select Manage NuGet Packages.
In Visual Studio, the NuGet: WinUI3GetStarted tab opens. If the Microsoft.WindowsAppSDK package has been installed during project creation using the project template, the Installed tab is selected, and that package is listed:
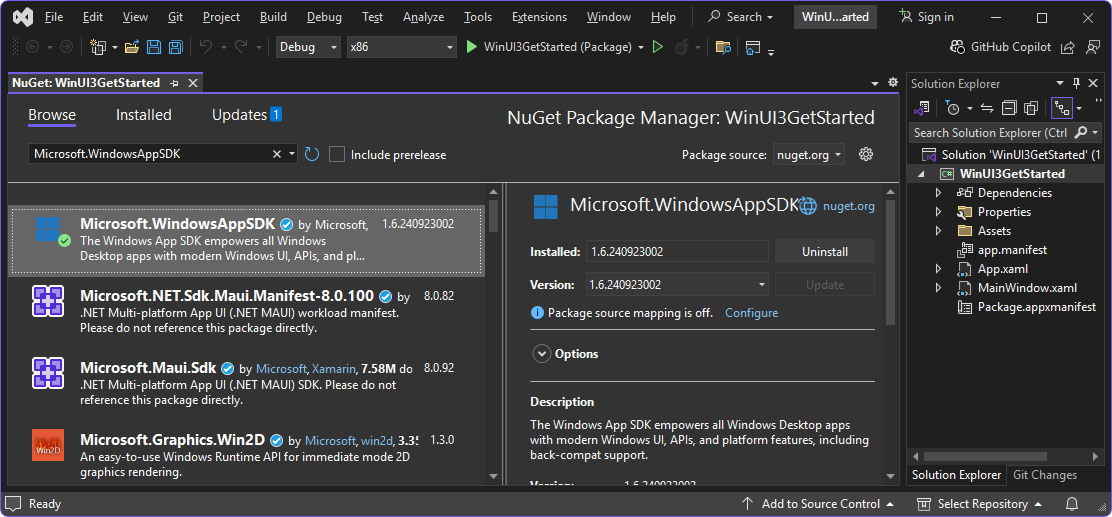
If the Microsoft.WindowsAppSDK package is not listed in the Installed tab:
Click the Browse tab, and then in the Search text box, enter Microsoft.WindowsAppSDK.
Select the Microsoft.WindowsAppSDK card:
Click the Install button, to the right.
The Preview Changes dialog opens.
Click the Apply button, and then accept the license terms.
The Microsoft.WindowsAppSDK NuGet package is installed.
In the NuGet - Solution tab, click the Updates tab, and then optionally update any packages that are listed there.
Close the NuGet - Solution tab.
The new WinUI 3 project remains opens in Solution Explorer in Visual Studio:
The App.xaml.cs file defines an Application class that represents your app instance.
The MainWindow.xaml.cs file defines a MainWindow class that represents the main window that's displayed by your app instance. The classes derive from types in the Microsoft.UI.Xaml namespace of WinUI.
To build and run the project:
Select File > Save All (Ctrl+Shift+S).
Select Debug > Start (F5).
The Enable Developer Mode for Windows dialog might open:
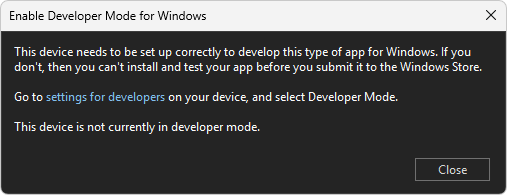
If that dialog appears, click settings for developers, turn on the Developer Mode toggle, click the Yes button, and then click the Close button of the Visual Studio dialog. For more information about Developer Mode, see Enable your device for development, at Build desktop apps for Windows.
The project builds. The blank WinUI Desktop app opens, with no WebView2 control added yet:
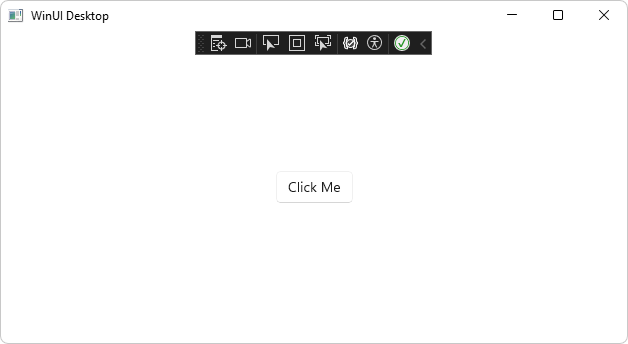
Click the Click Me button.
The button label changes to Clicked.
Close the app.
The project is based on the project template Blank App, Packaged (WinUI 3 in Desktop), which uses the Microsoft.WindowsAppSDK NuGet package, which includes the WebView2 SDK. So we can add WebView2 code. You'll edit the MainWindow.xaml and MainWindow.xaml.cs files to add a WebView2 control to the blank WinUI 3 app project, initially loading the Microsoft home page. In the XAML file, the WebView control will be tagged like:
<controls:WebView2 x:Name="MyWebView" Source="https://www.microsoft.com">
To add a WebView2 control that initially navigates to the Microsoft home page:
In Visual Studio, in Solution Explorer, double-click MainWindow.xaml.
The file opens in the code editor.
Copy and paste the following attribute inside the <Window> start tag, at the end of the list of XML namespaces:
xmlns:controls="using:Microsoft.UI.Xaml.Controls"
That code adds the WebView2 XAML namespace. Make sure your code in MainWindow.xaml is similar to the following:
<?xml version="1.0" encoding="utf-8"?>
<Window
    x:Class="MyWebView2WinUI3.MainWindow"
    xmlns="http://schemas.microsoft.com/winfx/2006/xaml/presentation"
    xmlns:x="http://schemas.microsoft.com/winfx/2006/xaml"
    xmlns:local="using:MyWebView2WinUI3"
    xmlns:d="http://schemas.microsoft.com/expression/blend/2008"
    xmlns:mc="http://schemas.openxmlformats.org/markup-compatibility/2006"
    xmlns:controls="using:Microsoft.UI.Xaml.Controls"
    mc:Ignorable="d">

    <StackPanel Orientation="Horizontal" HorizontalAlignment="Center" VerticalAlignment="Center">
        <Button x:Name="myButton" Click="myButton_Click">Click Me</Button>
    </StackPanel>
</Window>
Delete the <StackPanel> element (three lines).
Above the </Window> end tag, paste the following <Grid> element:
<Grid>
    <Grid.RowDefinitions>
        <RowDefinition Height="Auto"/>
        <RowDefinition Height="*"/>
    </Grid.RowDefinitions>
    <Grid.ColumnDefinitions>
        <ColumnDefinition Width="*"/>
        <ColumnDefinition Width="Auto"/>
    </Grid.ColumnDefinitions>

    <controls:WebView2 x:Name="MyWebView"  Grid.Row="1" Grid.ColumnSpan="2"
        Source="https://www.microsoft.com" HorizontalAlignment="Stretch"
        VerticalAlignment="Stretch"/>
</Grid>
This <Grid> element contains a <controls:WebView2> element named MyWebView, which has a Source attribute that sets the initial URI that's displayed in the WebView2 control (https://www.microsoft.com). When the app opens, it will initially display the Microsoft.com home page, in the WebView2 control.
In Solution Explorer, expand MainWindow.xaml and then double-click MainWindow.xaml.cs.
In MainWindow.xaml.cs, delete the following line of C# code in the myButton_Click method:
myButton.Content = "Clicked";
The method is empty for now. We'll use it for the Address bar's Go button later.
Select File > Save All (Ctrl+Shift+S).
Press F5.
The project builds, and the app opens:
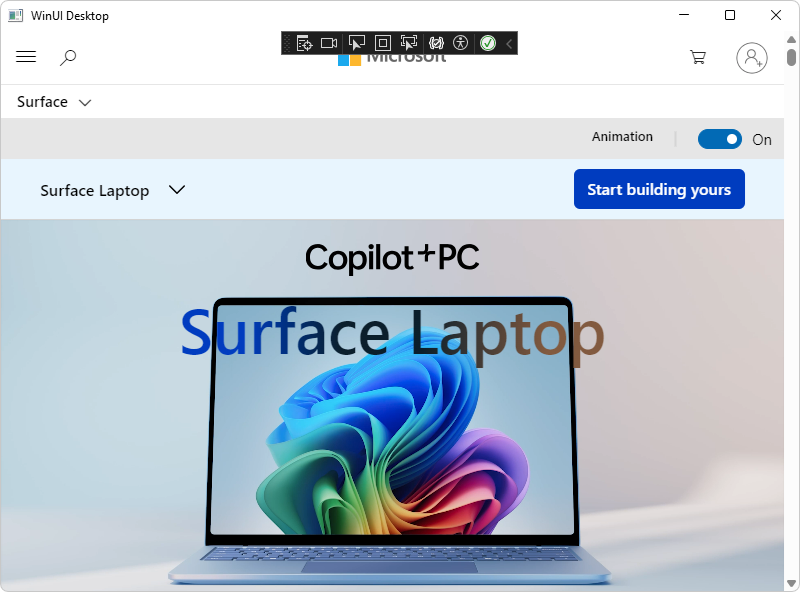
The app is a WebView2 host app that includes the WebView2 control. The WebView2 control initially displays the website https://www.microsoft.com. There's no Address bar text box or Go button yet.
Close the app.
To allow users to control which webpage is displayed in the WebView2 control, add an Address bar to the app, as follows:
In MainWindow.xaml, paste the following code inside the <Grid> element, above the <controls:WebView2> element:
   <TextBox Name="addressBar" Grid.Column="0"/>
   <Button x:Name="myButton" Grid.Column="1" Click="myButton_Click">Go</Button>
Make sure the resulting <Grid> element in the MainWindow.xaml file matches the following:
<Grid>
    <Grid.RowDefinitions>
        <RowDefinition Height="Auto"/>
        <RowDefinition Height="*"/>
    </Grid.RowDefinitions>
    <Grid.ColumnDefinitions>
        <ColumnDefinition Width="*"/>
        <ColumnDefinition Width="Auto"/>
    </Grid.ColumnDefinitions>

    <TextBox Name="addressBar" Grid.Column="0"/>
    <Button x:Name="myButton" Grid.Column="1" Click="myButton_Click">Go</Button>

    <controls:WebView2 x:Name="MyWebView"  Grid.Row="1" Grid.ColumnSpan="2"
        Source="https://www.microsoft.com" HorizontalAlignment="Stretch"
        VerticalAlignment="Stretch"/>
</Grid>
In MainWindow.xaml.cs, paste the following try/catch block into the body of the myButton_Click method:
private void myButton_Click(object sender, RoutedEventArgs e)
{
    try
    {
        Uri targetUri = new Uri(addressBar.Text);
        MyWebView.Source = targetUri;
    }
    catch (FormatException ex)
    {
        // Incorrect address entered.
    }
}
This code navigates the WebView2 control to the URL that the user enters in the Address bar, when the user clicks the Go button, by re-setting the value of the MyWebView.Source property, which is equivalent to the Source attribute of the <controls:WebView2 x:Name="MyWebView"> element.
Select File > Save All (Ctrl+Shift+S).
Press F5.
The project builds, and the app opens, initially showing the Microsoft home page. There's now an Address bar and a Go button.
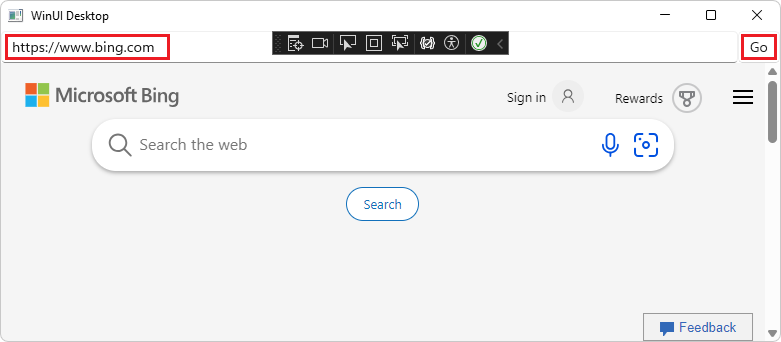
Enter a new complete HTTPS URL in the Address bar, such as https://www.bing.com, and then click the Go button:
The WebView2 control in the app displays the Bing website. The Address bar displays the URL, such as https://www.bing.com.
Enter an incomplete URL in the Address bar, such as bing.com, and then click the Go button.
The WebView2 control doesn't attempt to navigate to that URL. An exception is thrown, because the URL doesn't start with http:// or https://. In the try section, the addressBar.Text string doesn't start with http:// or https://, yet the non-URI string is passed to the Uri constructor, which throws a System.UriFormatException exception. In Visual Studio, the Output pane displays "Exception thrown: 'System.UriFormatException' in System.Private.Uri.dll". The app continues running.
Close the app.
An app that hosts a WebView2 control listens for the following events:
NavigationStartingSourceChangedContentLoadingHistoryChangedNavigationCompletedThese events are raised by a WebView2 control during webpage navigation. If an HTTP redirect occurs, there are multiple NavigationStarting events in a row. For more information, see Navigation events for WebView2 apps.
When an error occurs, the following events are raised, and an error webpage might be displayed:
SourceChangedContentLoadingHistoryChangedIn this section, you add code to import the WebView2 Core library, which handles navigation events to go to various types of URLs.
To handle navigation events:
In MainWindow.xaml.cs, add the following line at the top, above the other using statements:
using Microsoft.Web.WebView2.Core;
Register a handler for NavigationStarting that cancels any non-HTTPS requests:
In MainWindow.xaml.cs, in the constructor, add the following NavigationStarting line:
public MainWindow()
{
    this.InitializeComponent();
    MyWebView.NavigationStarting += EnsureHttps;
}
That line registers the EnsureHttps method (added below) as a listener of the NavigationStarting event.
Below the constructor, add the following EnsureHttps method:
private void EnsureHttps(WebView2 sender, CoreWebView2NavigationStartingEventArgs args)
{
    String uri = args.Uri;
    if (!uri.StartsWith("https://"))
    {
        args.Cancel = true;
    }
    else
    {
        addressBar.Text = uri;
    }
}
Select File > Save All (Ctrl+Shift+S).
Press F5.
The project builds, and the app opens.
In the app, in the Address bar, enter an HTTP URL, such as http://bing.com, and then click the Go button.
The app doesn't navigate to that page, because navigation is blocked to HTTP sites. We haven't yet added a dialog to tell the user why the displayed site didn't change.
Enter an HTTPS URL, such as https://bing.com, and then click the Go button.
The app navigates to the specified page, because navigation is allowed for HTTPS sites.
In the app, in the Address bar, enter a string without a prefix, such as bing.com, and then click the Go button.
The app doesn't navigate to that page. A UriFormatException exception is thrown, as before, and appears in the Output pane in Visual Studio.
Close the app.
You can use the host app to inject JavaScript code into the WebView2 control at runtime. You can task WebView2 to run arbitrary JavaScript, or add initialization scripts. The injected JavaScript applies to all new top-level documents and any child frames, until the JavaScript is removed. The injected JavaScript is run with specific timing, to either:
Run the injected JavaScript after the creation of the global object.
Run the injected JavaScript before running any other script that's included in the HTML document.
Below, you add JavaScript that displays an alert when a user tries to open a non-HTTPS site. To do this, you inject a script into the web content that uses ExecuteScriptAsync.
To display an alert when the user tries to navigate to a non-HTTPS site:
In MainWindow.xaml.cs, in the EnsureHttps method, add the following ExecuteScriptAsync line:
private void EnsureHttps(WebView2 sender, CoreWebView2NavigationStartingEventArgs args)
{
    String uri = args.Uri;
    if (!uri.StartsWith("https://"))
    {
        MyWebView.ExecuteScriptAsync($"alert('{uri} is not safe, try an https link')");
        args.Cancel = true;
    }
    else
    {
        addressBar.Text = uri;
    }
}
Select File > Save All (Ctrl+Shift+S).
Press F5.
The project builds, and the app opens.
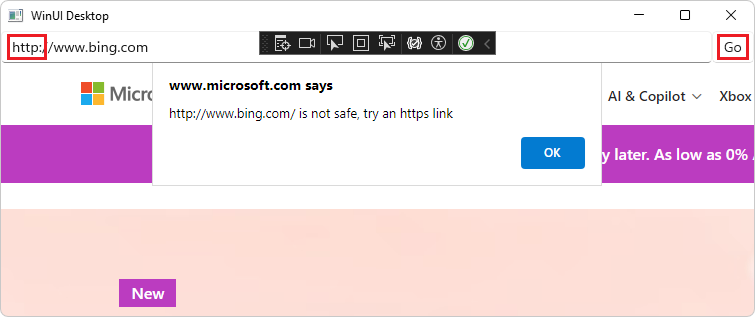
In the app's Address bar, enter a non-HTTPS URL, such as http://www.bing.com, and then click the Go button.
The app's WebView2 control displays an alert dialog for non-HTTPS websites, saying that the non-HTTPS uri is not safe:
Close the app.
Congratulations, you've built a WebView2 WinUI 3 (Windows App SDK) app!
WebView2Samples repo.developer.microsoft.com:
GitHub:
Training
Learning path
Use advance techniques in canvas apps to perform custom updates and optimization - Training
Use advance techniques in canvas apps to perform custom updates and optimization
Documentation
WinUI 3 (Windows App SDK) sample app - Microsoft Edge Developer documentation
This WebView2 sample demonstrates how to use the WebView2 control and WebView2 APIs to implement a web browser in a WinUI 3 (Windows App SDK) sample app.
Get started with WebView2 in WinUI 2 (UWP) apps - Microsoft Edge Developer documentation
Get started guide with WebView2 for WinUI 2 apps.
WebView2 in WinUI 3 (Windows App SDK) apps - Microsoft Edge Developer documentation
How to include a WebView2 control within your WinUI 3 (Windows App SDK) app.