Migrate to App Service Environment v3
Note
There are two automated migration features available to help you upgrade to App Service Environment v3. To learn more about those features and for help deciding which migration option is right for you, see Migration path decision tree. Consider one of the automated options for a quicker path to App Service Environment v3.
If you're currently using App Service Environment v1 or v2, you have the opportunity to migrate your workloads to App Service Environment v3. App Service Environment v3 has advantages and feature differences that provide enhanced support for your workloads and can reduce overall costs. Consider using the the automated migration features if your environment meets the criteria described in the migration path decision tree.
If your App Service Environment isn't supported for the migration features, you must use one of the manual methods to migrate to App Service Environment v3.
Prerequisites
Scenario: You have an app that runs on App Service Environment v1 or App Service Environment v2, and you need that app to run on App Service Environment v3.
For any migration method that doesn't use the automated migration features, you need to create the App Service Environment v3 resource and a new subnet by using the method of your choice.
Networking changes between App Service Environment v1/v2 and App Service Environment v3 involve new (and for internet-facing environments, additional) IP addresses. You need to update any infrastructure that relies on these IPs. Be sure to account for inbound dependency changes, such as the Azure Load Balancer port.
Multiple App Service Environments can't exist in a single subnet. If you need to use your existing subnet for your new App Service Environment v3 resource, you must delete the existing App Service Environment before you create a new one. For this scenario, we recommend that you back up your apps and then restore them in the new environment after you create and configure the environment. This process causes application downtime because of the time it takes to:
- Delete the old environment.
- Create the App Service Environment v3 resource.
- Configure any infrastructure and connected resources to work with the new environment.
- Deploy your apps onto the new environment.
Checklist before migrating apps
- Create an App Service Environment v3 resource.
- Update any networking dependencies with the IP addresses associated with the new environment.
- Plan for downtime (if applicable).
- Decide on a process for re-creating your apps in your new environment.
Size and scale the environment
App Service Environment v3 uses Isolated v2 Azure App Service plans that are priced and sized differently from Isolated plans. Review the pricing details to understand how you're new environment needs to be sized and scaled to ensure appropriate capacity. There's no difference in how you create App Service plans for App Service Environment v3 compared to previous versions.
Evaluate backup and restore
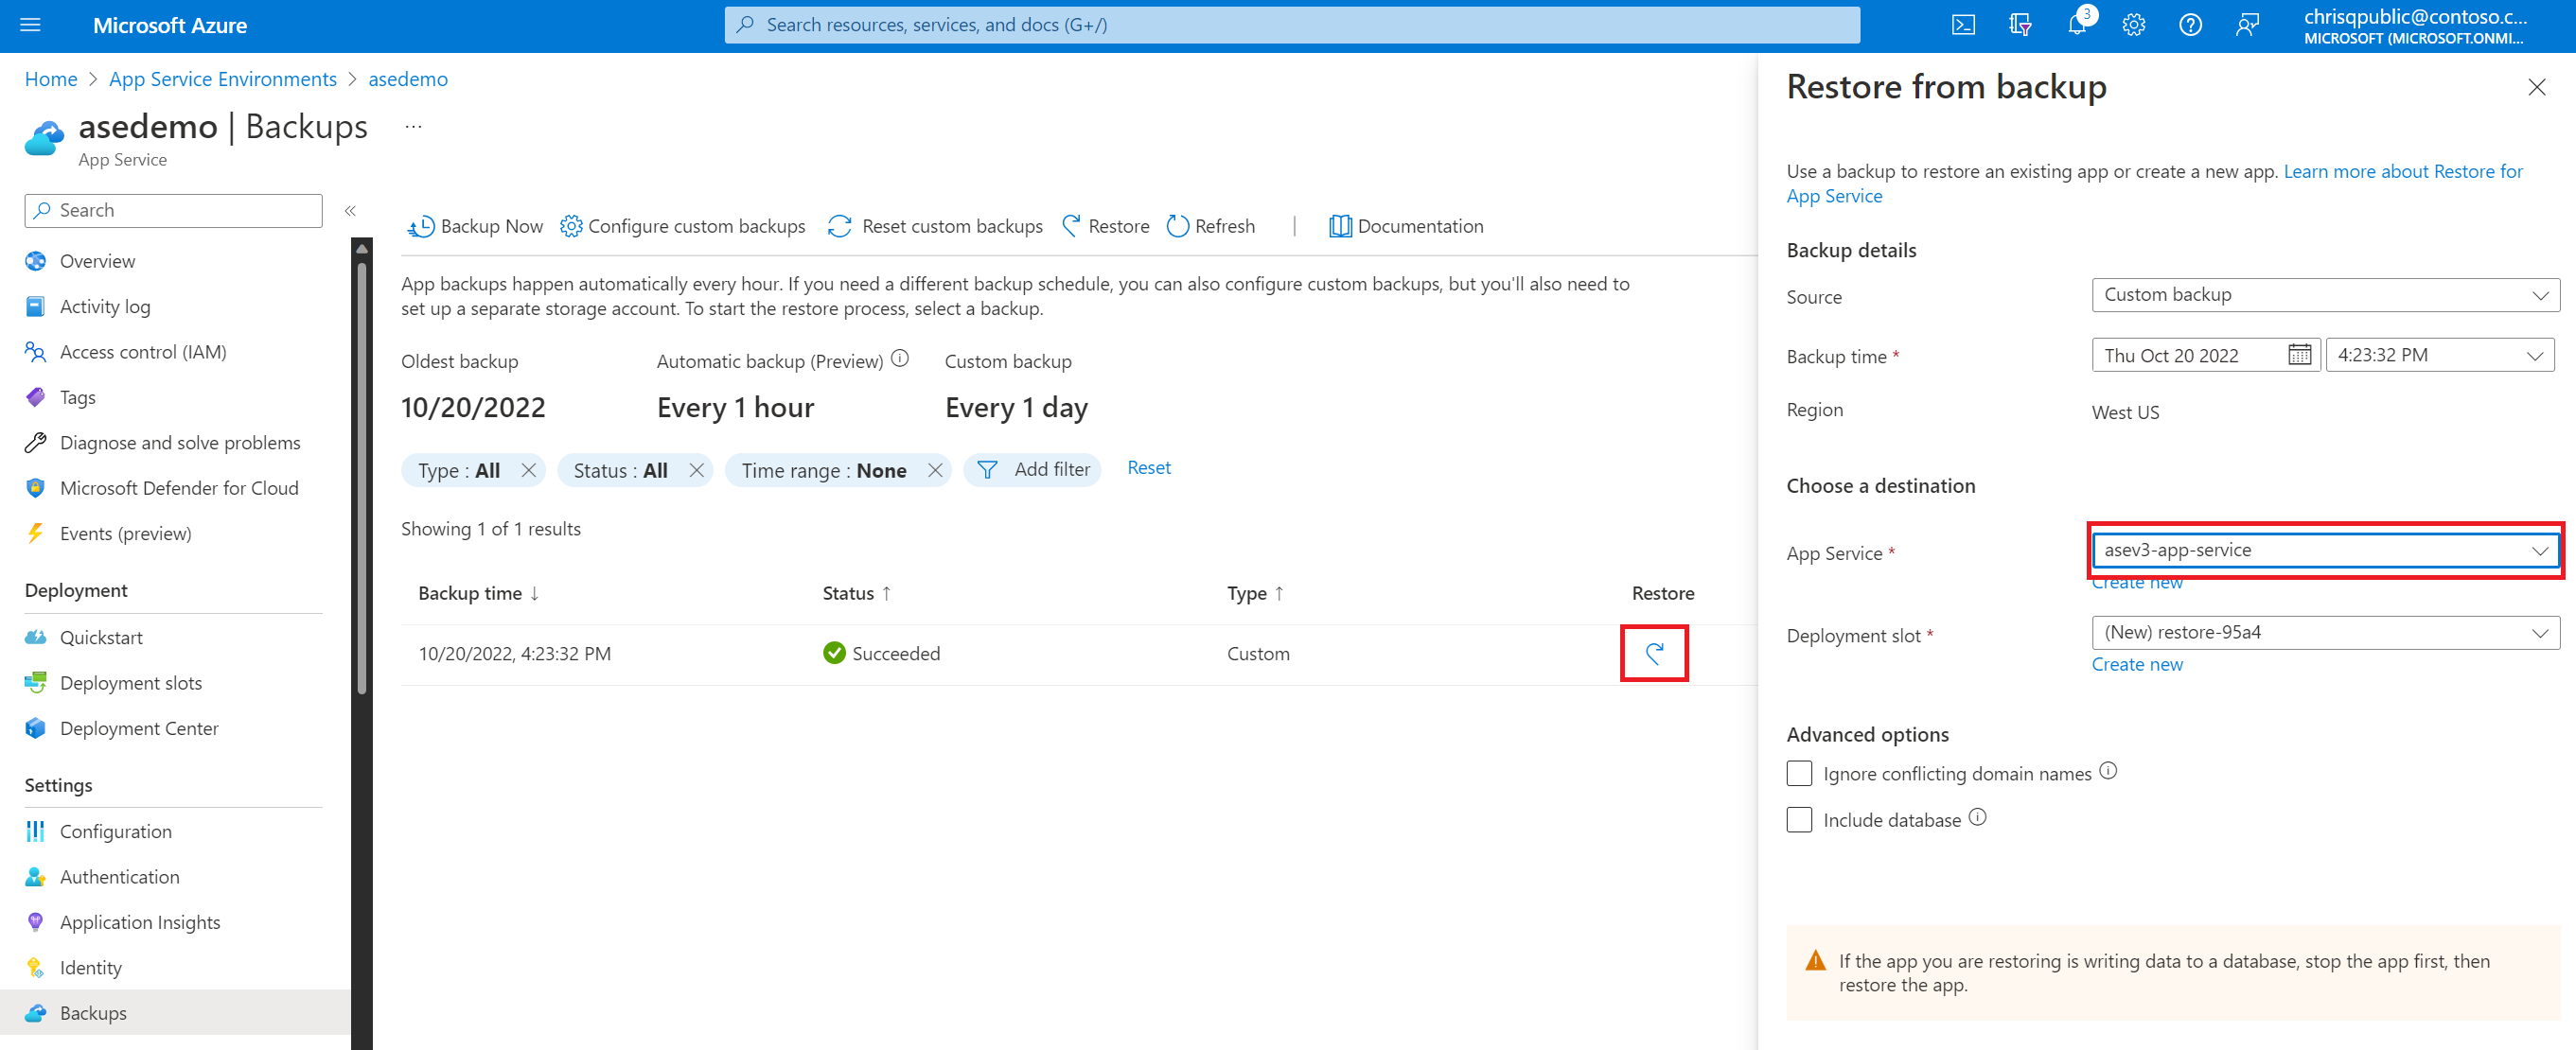
You can use the back up and restore feature to keep your app configuration, file content, and database connected to your app when you're migrating to the new environment.
You must configure custom backups for your apps in order to restore them to App Service Environment v3. Automatic backup doesn't support restoration on different App Service Environment versions. For more information on custom backups, see Automatic vs. custom backups.
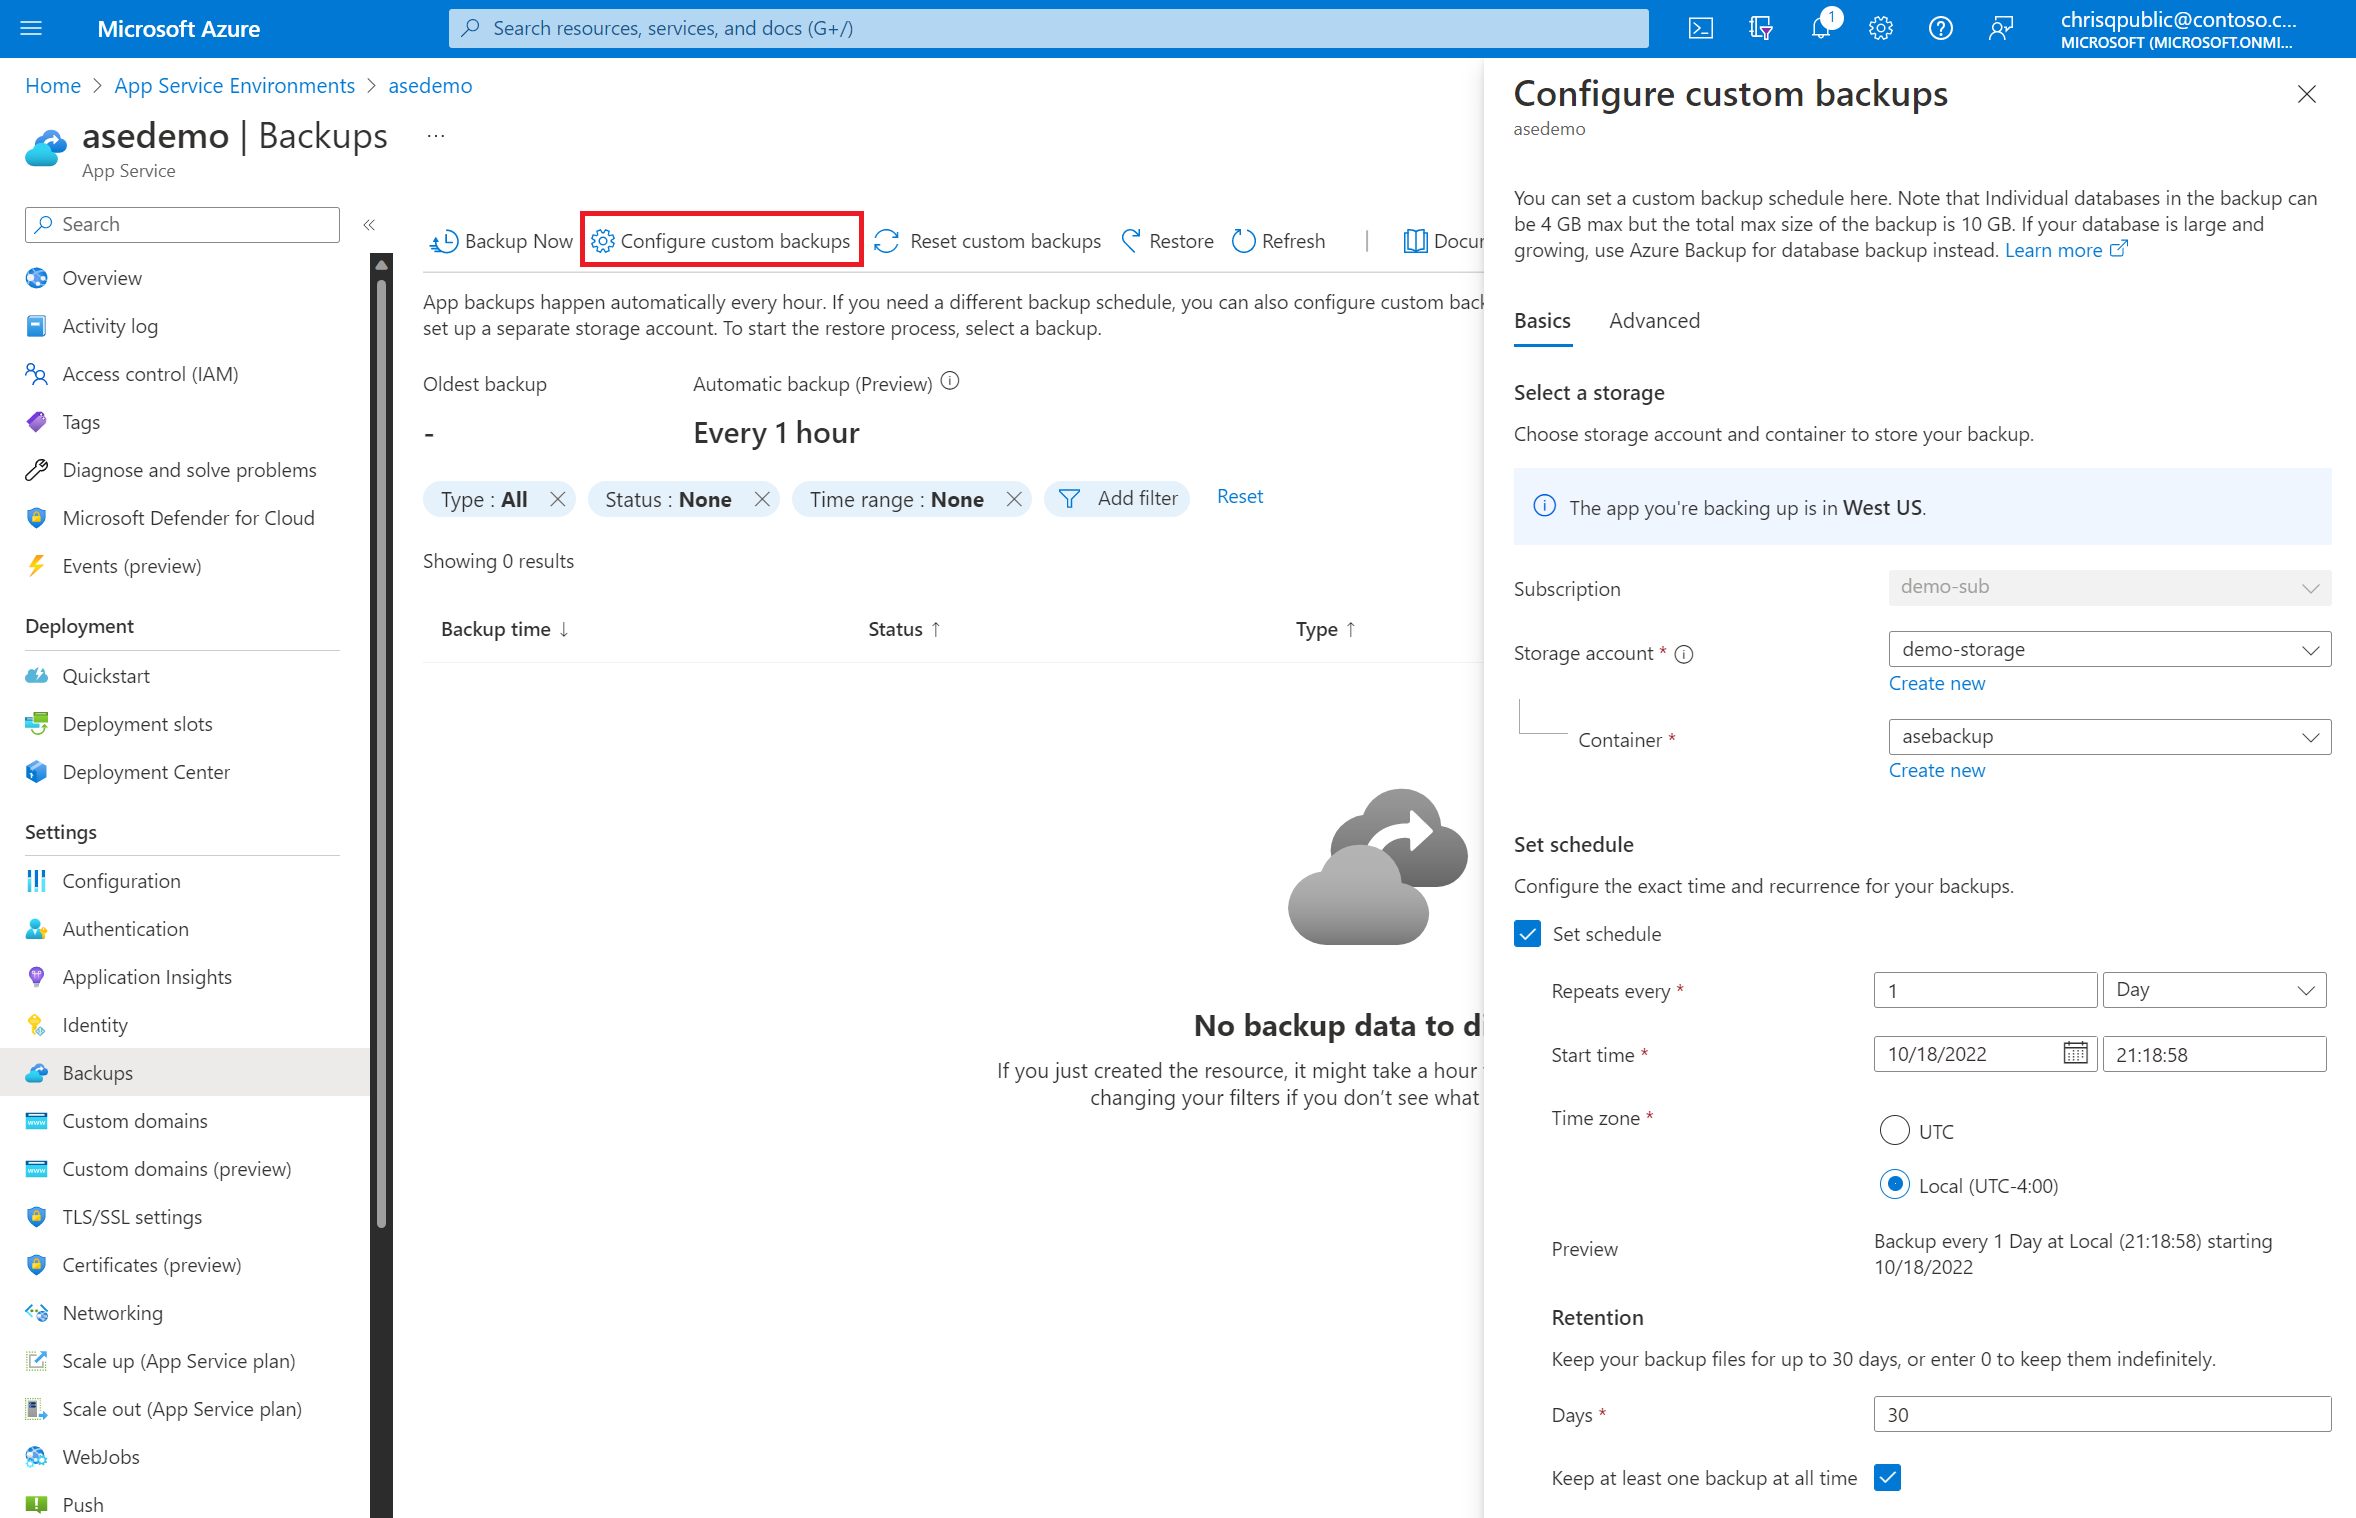
You can select a custom backup and restore it to App Service in your App Service Environment v3 resource. You must create the App Service plan that you'll restore to before you restore the app. You can choose to restore the backup to the production slot, an existing slot, or a new slot that you create during the restoration process.
| Benefits | Limitations |
|---|---|
| Quick - should take only 5 to 10 minutes per app. | Support is limited to certain database types. |
| You can restore multiple apps at the same time. (You need to configure restoration for each app individually.) | The old environment, the new environment, and supporting resources (for example apps, databases, storage accounts, and containers) must all be in the same subscription. |
| In-app MySQL databases are automatically backed up without any configuration. | Backups can be up to 10 GB of app and database content. Up to 4 GB of that content can be the database backup. If the backup size exceeds this limit, you get an error. |
| You can restore the app to a snapshot of a previous state. | Using a firewall-enabled storage account as the destination for your backups isn't supported. |
| You can integrate with Azure Traffic Manager and Azure Application Gateway to distribute traffic across old and new environments. | Using a storage account with private endpoints for backup and restore isn't supported. |
| You can create empty web apps to restore to in your new environment before you start restoring, to speed up the process. | Only custom backups are supported. |
Clone your app to App Service Environment v3
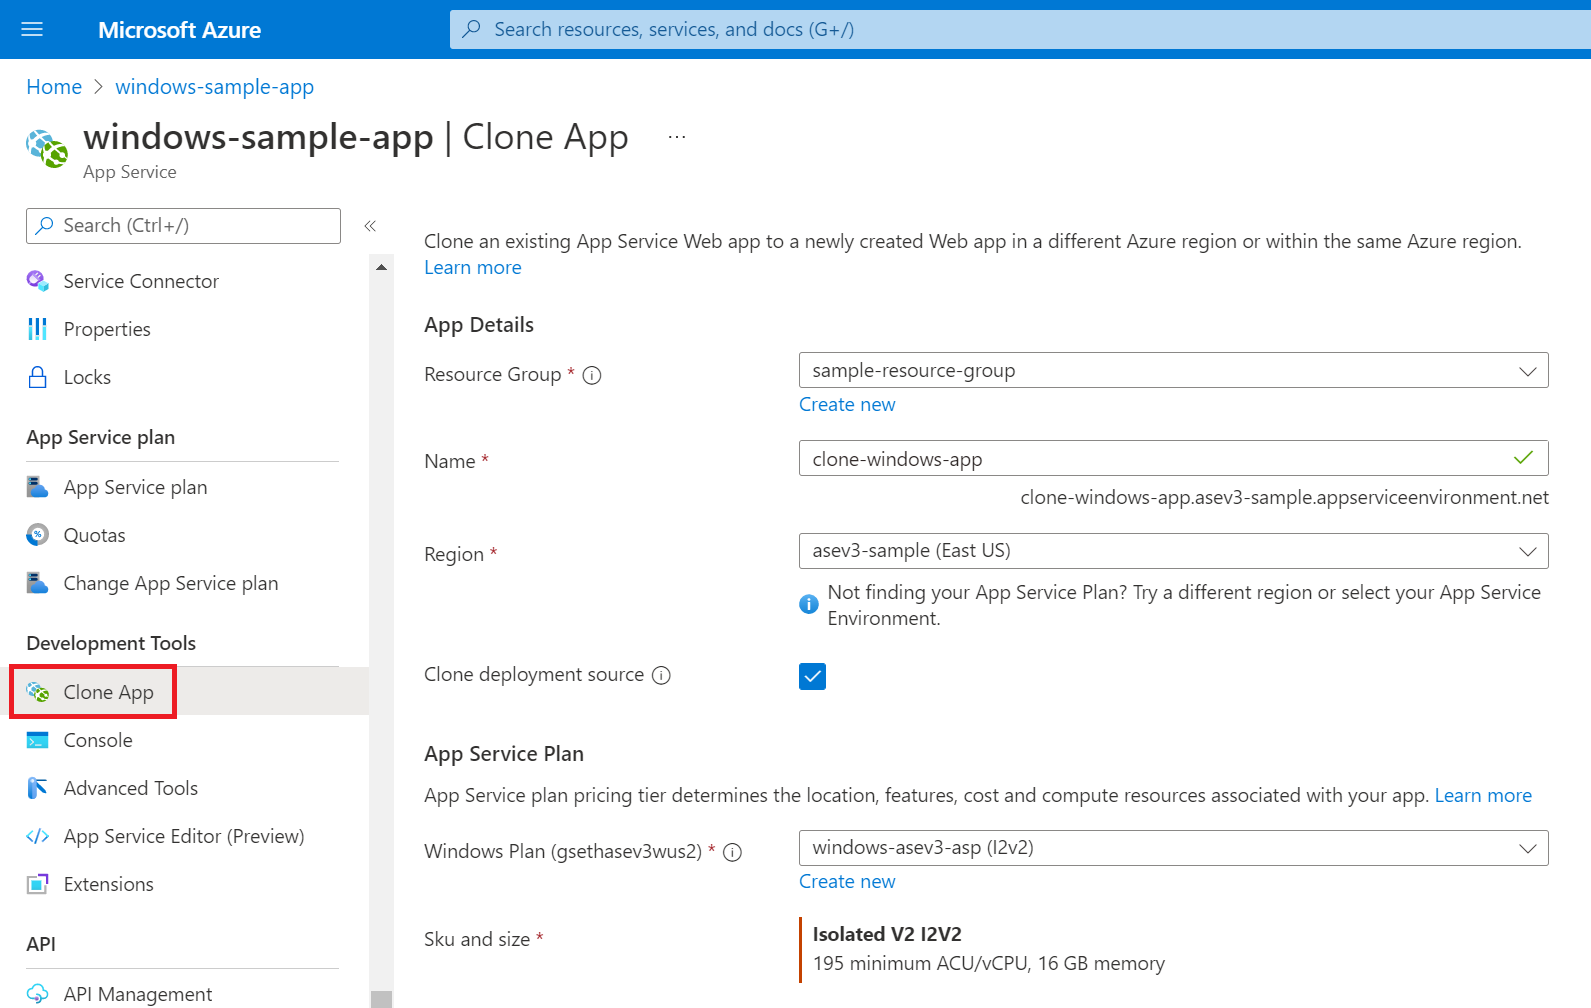
Cloning your apps is another feature that you can use to get your Windows apps onto App Service Environment v3. The limitations for cloning apps are the same as those for the App Service backup feature. For more information, see Back up an app in Azure App Service.
Note
Cloning apps is supported for App Service plans on Windows only.
We recommend this solution for users who are using App Service on Windows and can't migrate by using the migration feature. You need to set up your new App Service Environment v3 resource before you clone any apps. Cloning an app can take up to 30 minutes to complete.
To clone an app by using PowerShell, see the instructions.
To clone an app by using the Azure portal:
In the Azure portal, go to your existing App Service plan. Under Development Tools, select Clone App.
Fill in the required fields by using the details for your new App Service Environment v3 resource:
- For Resource Group, select an existing resource group or create a new one.
- For Name, give your app a name. This name can be the same as the old app, but the site's default URL for the new environment will be different. You need to update any custom DNS or connected resources to point to the new URL.
- For Region, use your App Service Environment v3 name.
- If you want to clone your deployment source, select the Clone deployment source checkbox.
- For Windows Plan, you can use an existing App Service plan from your new environment if you created one already, or you can create a new plan. The available App Service plans in your new App Service Environment v3 resource appear in the dropdown list.
- For Sku and size, modify the memory and CPU as needed by using one of the Isolated v2 options if you're creating a new App Service plan. App Service Environment v3 uses Isolated v2 plans, which have more memory and CPU per corresponding instance size compared to the Isolated plans. For more information, see the App Service Environment v3 pricing details.
| Benefits | Limitations |
|---|---|
| You can automate cloning by using PowerShell. | Supported only for App Service plans on Windows. |
| You can clone multiple apps at the same time. (Cloning needs to be configured for each app individually or through a script.) | Support is limited to certain database types. |
| You can integrate with Azure Traffic Manager and Azure Application Gateway to distribute traffic across old and new environments. | The old environment, the new environment, and supporting resources (for example apps, databases, storage accounts, and containers) must all be in the same subscription. |
Manually create your apps in App Service Environment v3
If the migration feature doesn't support your apps or you want to take a more manual route, you can deploy your apps by following the same process that you used for your existing App Service Environment.
You can export Azure Resource Manager templates (ARM templates) of your existing apps, App Service plans, and any other supported resources and deploy them in or with your new environment. To export a template for just an app, go to your App Service plan. Under Automation, select Export template.
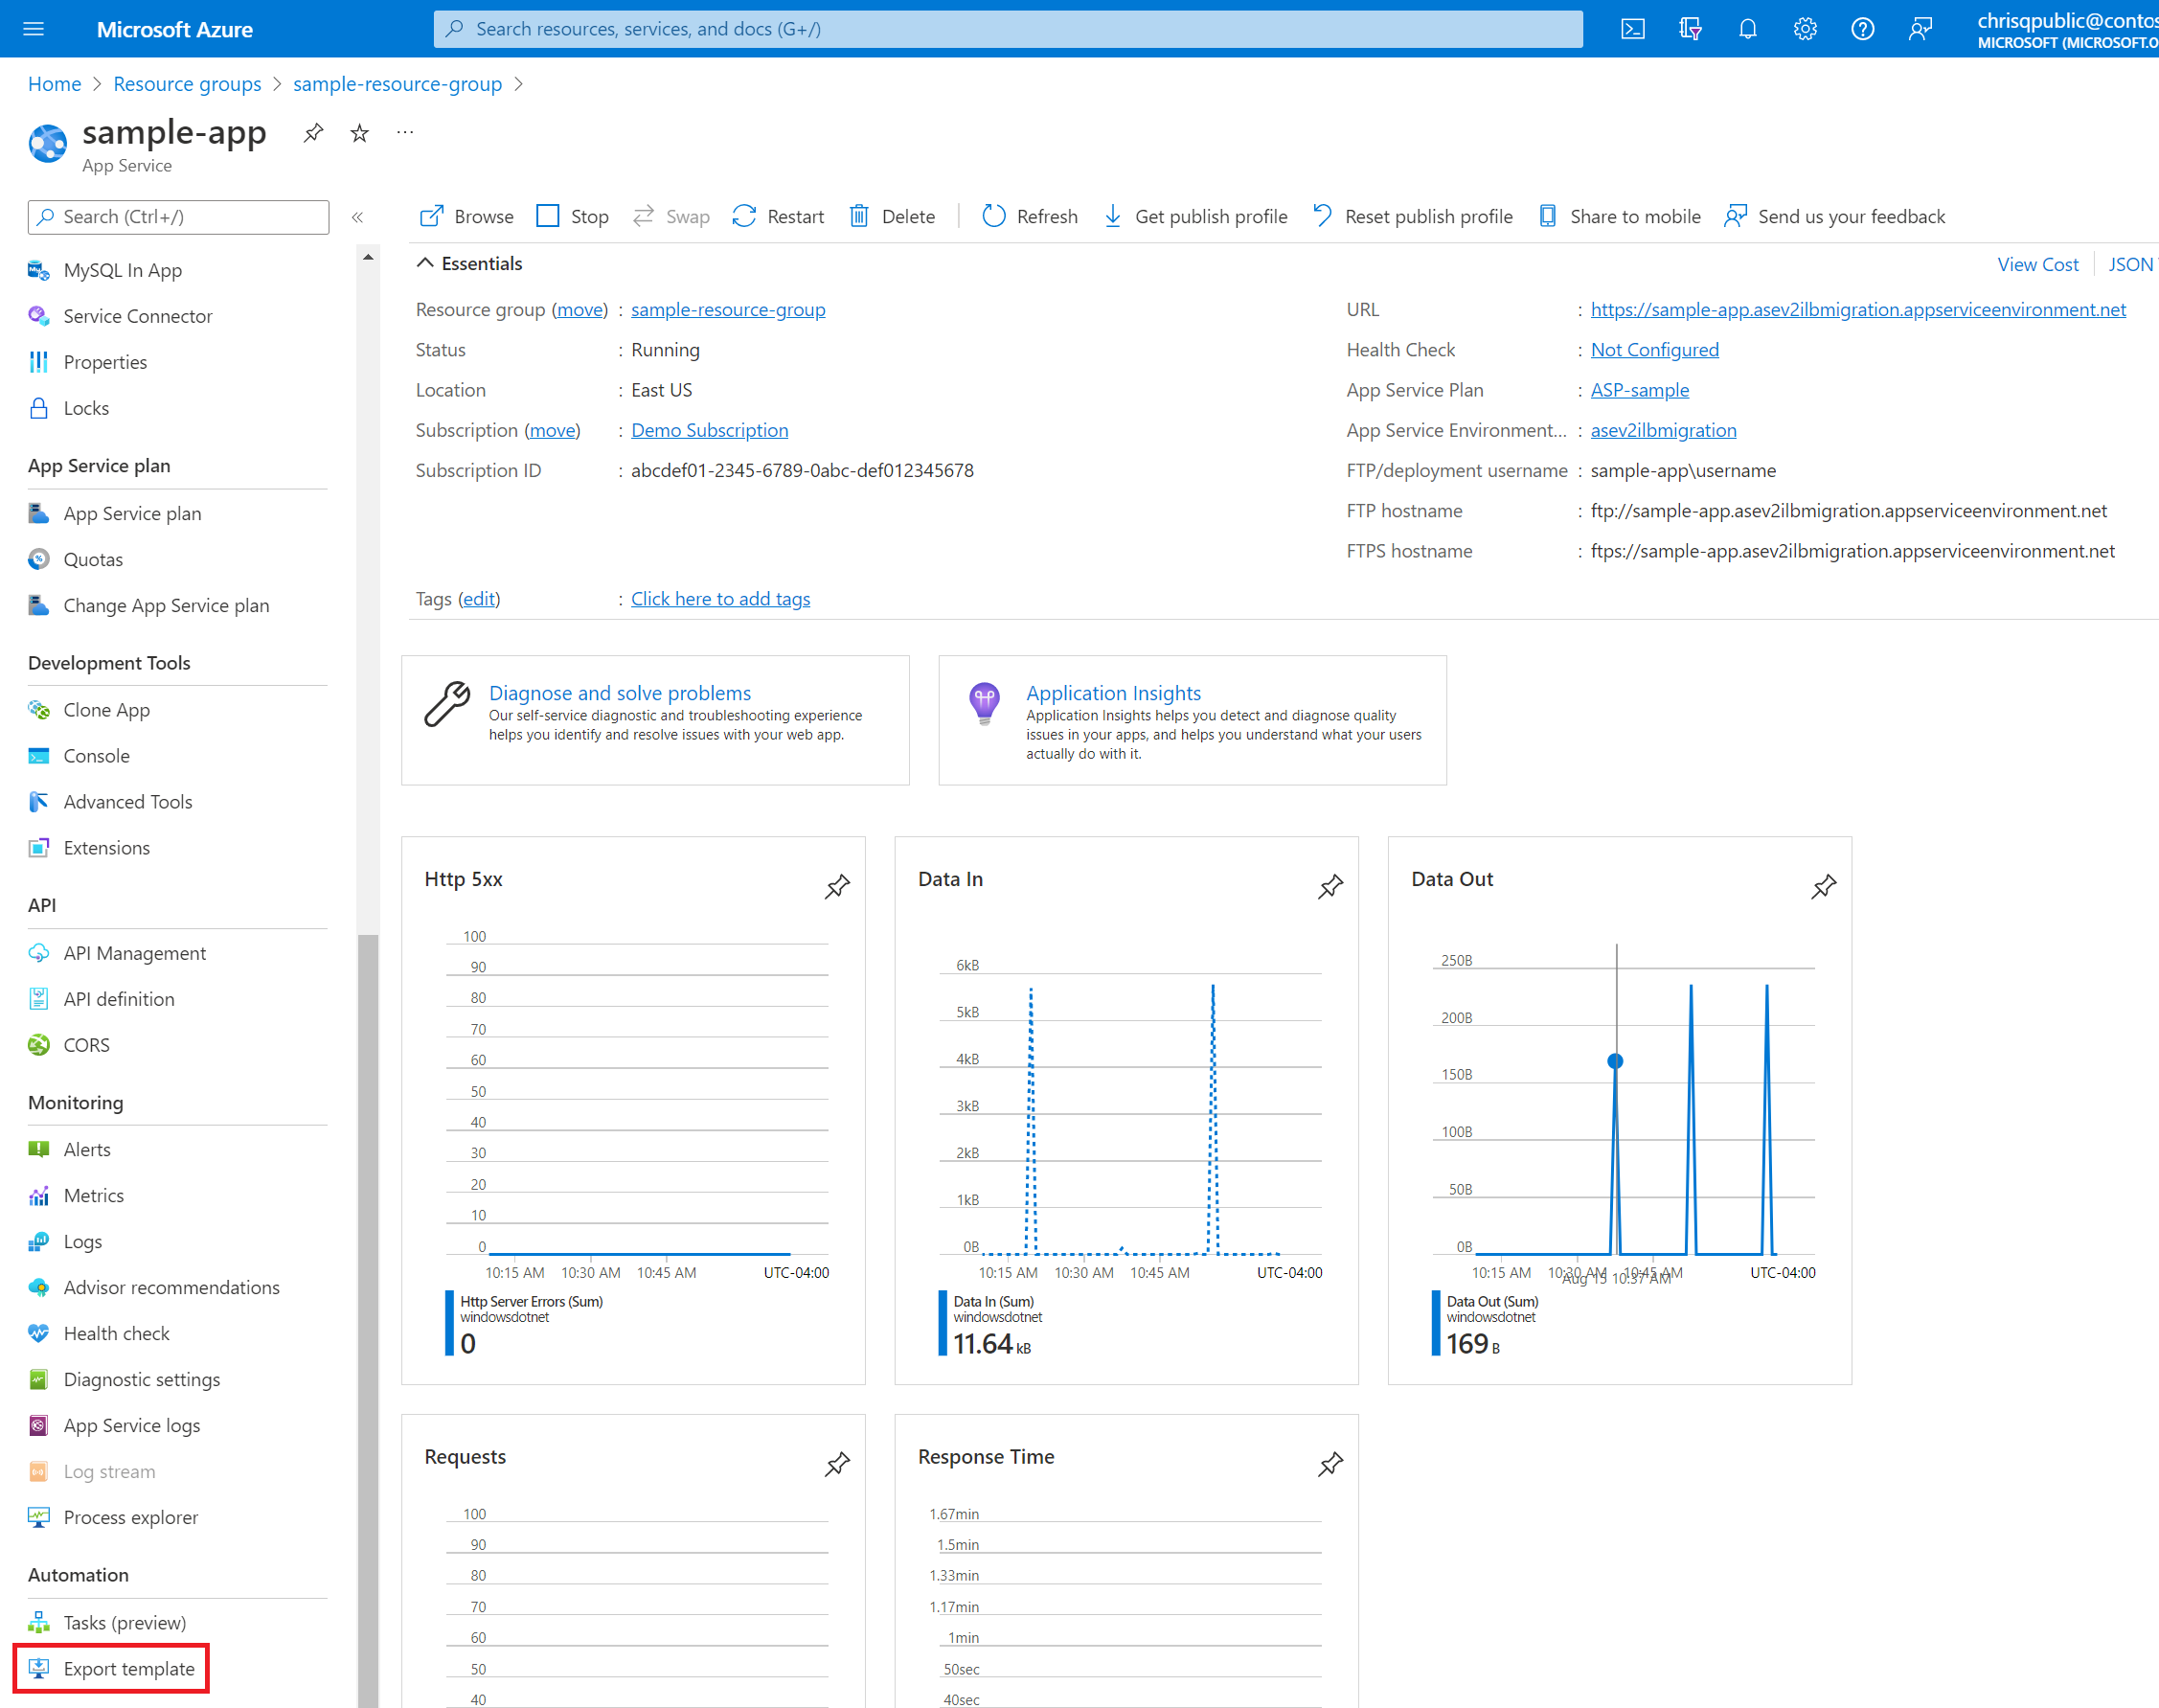
You can also export templates for multiple resources directly from your resource group. Go to your resource group, select the resources that you want a template for, and then select Export template.

The following initial changes to your ARM templates are required to get your apps onto App Service Environment v3:
Update
skuparameters for an App Service plan to an Isolated v2 plan:"type": "Microsoft.Web/serverfarms", "apiVersion": "2021-02-01", "name": "[parameters('serverfarm_name')]", "location": "East US", "sku": { "name": "I1v2", "tier": "IsolatedV2", "size": "I1v2", "family": "Iv2", "capacity": 1 },Update the App Service plan (
serverfarm) parameter that the app will be deployed into to the plan that's associated with App Service Environment v3.Update the hosting environment profile (
hostingEnvironmentProfile) parameter to the new App Service Environment v3 resource ID.An ARM template export includes all properties that the resource providers expose for the resources. Remove all nonrequired properties, such as properties that point to the domain of the old app. For example, you could simplify the
sitesresource to the following sample:"type": "Microsoft.Web/sites", "apiVersion": "2021-02-01", "name": "[parameters('site_name')]", "location": "East US", "dependsOn": [ "[resourceId('Microsoft.Web/serverfarms', parameters('serverfarm_name'))]" ], "properties": { "serverFarmId": "[resourceId('Microsoft.Web/serverfarms', parameters('serverfarm_name'))]", "siteConfig": { "linuxFxVersion": "NODE|14-lts" }, "hostingEnvironmentProfile": { "id": "[parameters('hostingEnvironments_externalid')]" } }
Other changes might be required, depending on how you configured your app. For example, if you use system-assigned managed identities and the same application names for your old and new environments, you might run into conflicts. To resolve this conflict and avoid downtime, you can use a user-assigned managed identity.
You can deploy ARM templates by using the Azure portal, the Azure CLI, or PowerShell.
Migrate manually
The in-place migration feature automates the migration to App Service Environment v3 and transfers all of your apps to the new environment. There's about one hour of downtime during this migration. If your apps can't have any downtime, we recommend that you use the side-by-side migration feature, which is a zero-downtime migration option since the new environment is created in a different subnet. If you also choose not to use the side-by-side migration feature, you can use one of the manual options to re-create your apps in App Service Environment v3.
You can distribute traffic between your old and new environments by using Application Gateway. If you're using an internal load balancer (ILB) App Service Environment, create an Azure Application Gateway instance with an extra back-end pool to distribute traffic between your environments. For information about ILB App Service Environments and internet-facing App Service Environments, see Application Gateway integration.
You can also use services like Azure Front Door, Azure Content Delivery Network, and Azure Traffic Manager to distribute traffic between environments. Using these services allows for testing of your new environment in a controlled manner and helps you move to your new environment at your own pace.
After your migration and any testing with your new environment are complete, delete your old App Service Environment, the apps that are on it, and any supporting resources that you no longer need. You continue to be charged for any resources that you don't delete.
Frequently asked questions
How do I know if I should migrate to App Service Environment v3 using one of the manual options?
For help deciding which migration option is right for you, see Migration path decision tree. If your environment meets the criteria described in the migration path decision tree, consider using one of the automated migration features for a quicker path to App Service Environment v3. Manual migration is recommended if you need to slowly move your apps to your new environment and validate throughout the whole process.Will I experience downtime during the migration?
Downtime is dependent on your migration process. If you have a different App Service Environment that you can point traffic to while you migrate, or if you can use a different subnet to create your new environment, you won't have downtime. If you must use the same subnet, there's downtime while you delete the old environment, create the App Service Environment v3 resource, create the new App Service plans, re-create the apps, and update any resources that use the new IP addresses.Do I need to change anything about my apps to get them to run on App Service Environment v3?
No. Apps that run on App Service Environment v1 and v2 shouldn't need any modifications to run on App Service Environment v3. If you're using IP SSL, you must remove the IP SSL bindings before migrating.What if my App Service Environment has a custom domain suffix?
The migration feature supports this migration scenario. You can migrate by using a manual method if you don't want to use the migration feature. You can configure your custom domain suffix when creating your App Service Environment v3 resource or any time after.What if my App Service Environment v2 resource is zone pinned?
Zone pinning isn't a supported feature on App Service Environment v3. You can choose to enable zone redundancy when creating your App Service Environment v3 resource.What properties of my App Service Environment will change?
Review the feature differences between App Service Environment v3 and previous versions. For ILB App Service Environments, you keep the same ILB IP address. For internet-facing App Service Environments, the public IP address and the outbound IP address change.For internet-facing App Service Environments, previously there was a single IP for both inbound and outbound. For App Service Environment v3, they're separate. For more information, see App Service Environment v3 networking.
Is backup and restore supported for moving apps from App Service Environment v2 to v3? The back up and restore feature supports restoring apps between App Service Environment versions as long as you use a custom backup for the restoration. Automatic backup doesn't support restoration to different App Service Environment versions.
What will happen to my App Service Environment v1 and v2 resources after August 31, 2024?
After August 31, 2024, if you haven't migrated to App Service Environment v3, your App Service Environment v1 and v2 resources and the apps deployed in them will no longer be available.App Service Environment v1 and v2 are hosted on App Service scale units that run on Azure Cloud Services (classic) architecture. Because this architecture will be retired on August 31, 2024, App Service Environment v1 and v2 won't be available after that date. Migrate to App Service Environment v3 to keep your apps running, or save or back up any resources or data that you need to maintain.
Next steps
Feedback
Coming soon: Throughout 2024 we will be phasing out GitHub Issues as the feedback mechanism for content and replacing it with a new feedback system. For more information see: https://aka.ms/ContentUserFeedback.
Submit and view feedback for