Note
Access to this page requires authorization. You can try signing in or changing directories.
Access to this page requires authorization. You can try changing directories.
In this step of the tutorial, you generate a new ontology (preview) item that represents the Lakeshore Retail scenario.
Important
This feature is in preview.
Choose ontology creation method
This tutorial contains two options for setting up the ontology (preview) item. Choose from one of the following methods:
- Generate from semantic model: With these instructions, you use an existing semantic model to automatically generate an ontology that you can build upon and extend. Choose this option to see how to work with ontology when you already have a well-structured Power BI semantic model that represents your business domain.
- Build directly from OneLake: With these instructions, you create the ontology manually by binding properties directly from OneLake. Choose this option to see how to build an ontology when you don't have a semantic model, or want full control over ontology design from the start.
Choose your preferred scenario by using the links above (will reload the page) or the selector at the beginning of the article.
Generating an ontology from a semantic model
A semantic model in Fabric is a logical description of a domain, like a business. Semantic models hold information about your data and the relationships among that data. You can create semantic models from lakehouse tables. When your data is represented in a semantic model, you can generate an ontology directly from that semantic model. For more information, see Generating an ontology (preview) from a semantic model.
In this tutorial step, you generate an ontology from the sample semantic model that you set up in the previous step. Then, you verify and complete the ontology.
Generate ontology
Go to the RetailSalesModel semantic model in Fabric.
If the semantic model is still open from when you created it earlier, select Generate Ontology from the ribbon.

If you closed the semantic model earlier, you can select Generate Ontology from the model overview page without opening the model.
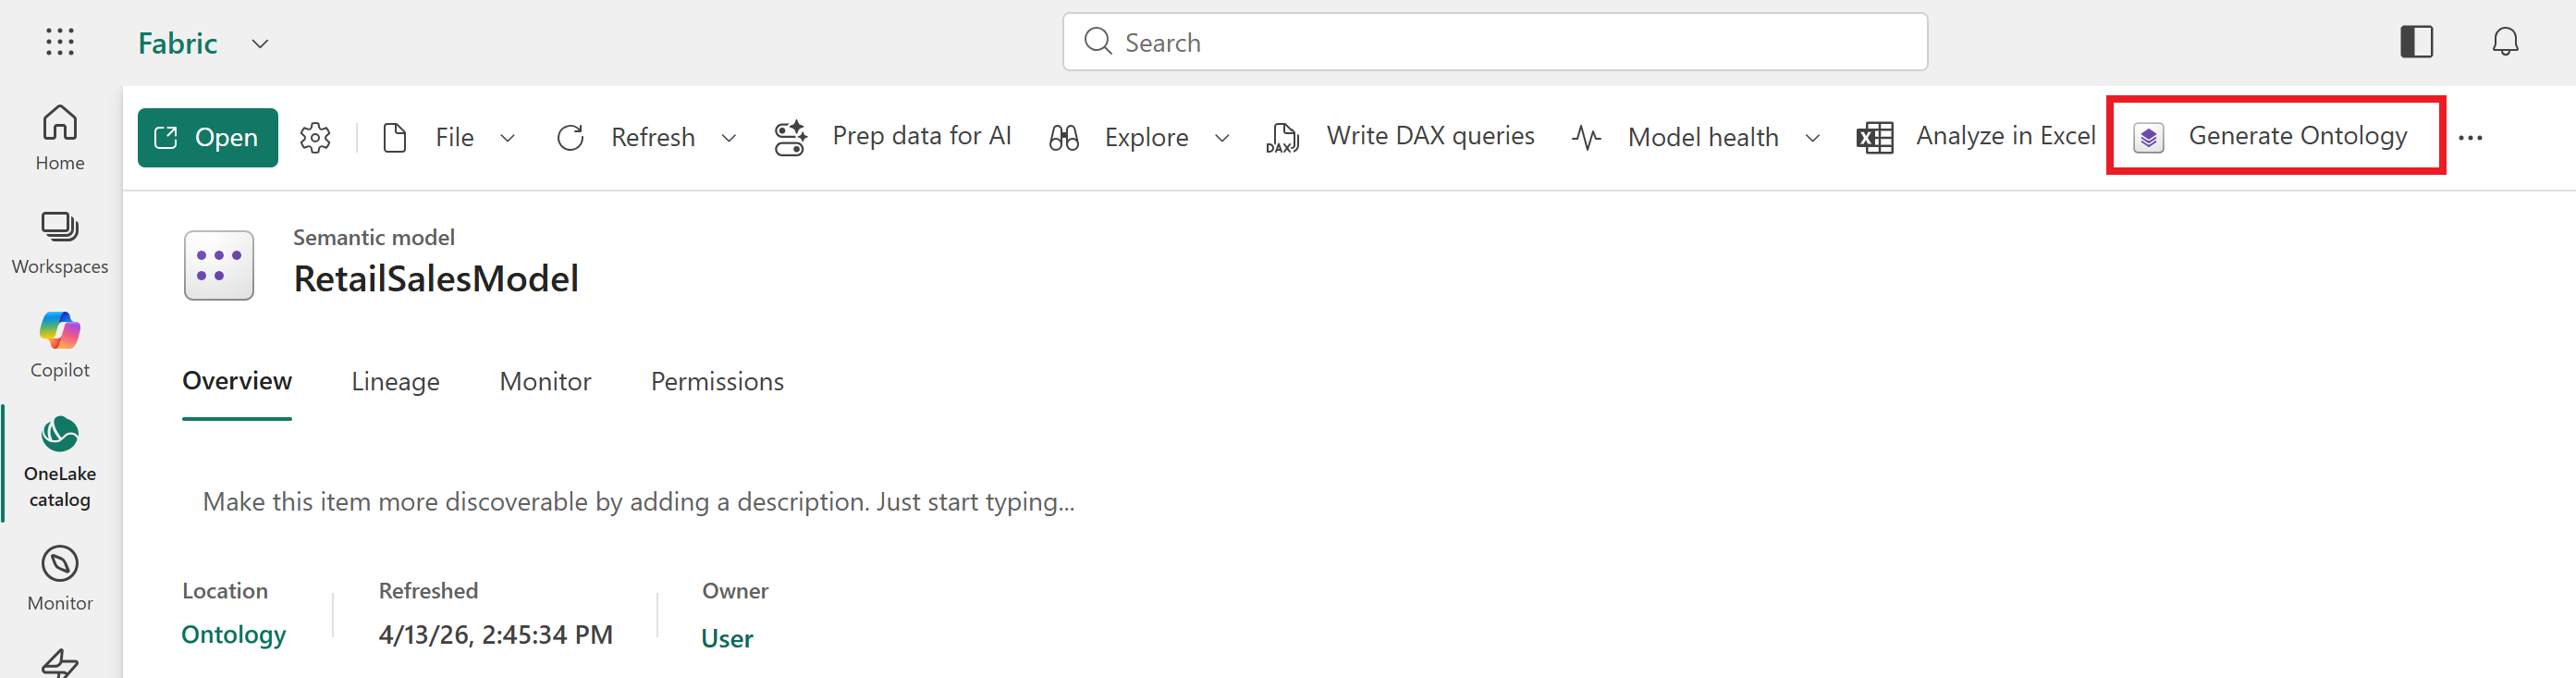
Select your Workspace and enter RetailSalesOntology for the Name. Select Create.
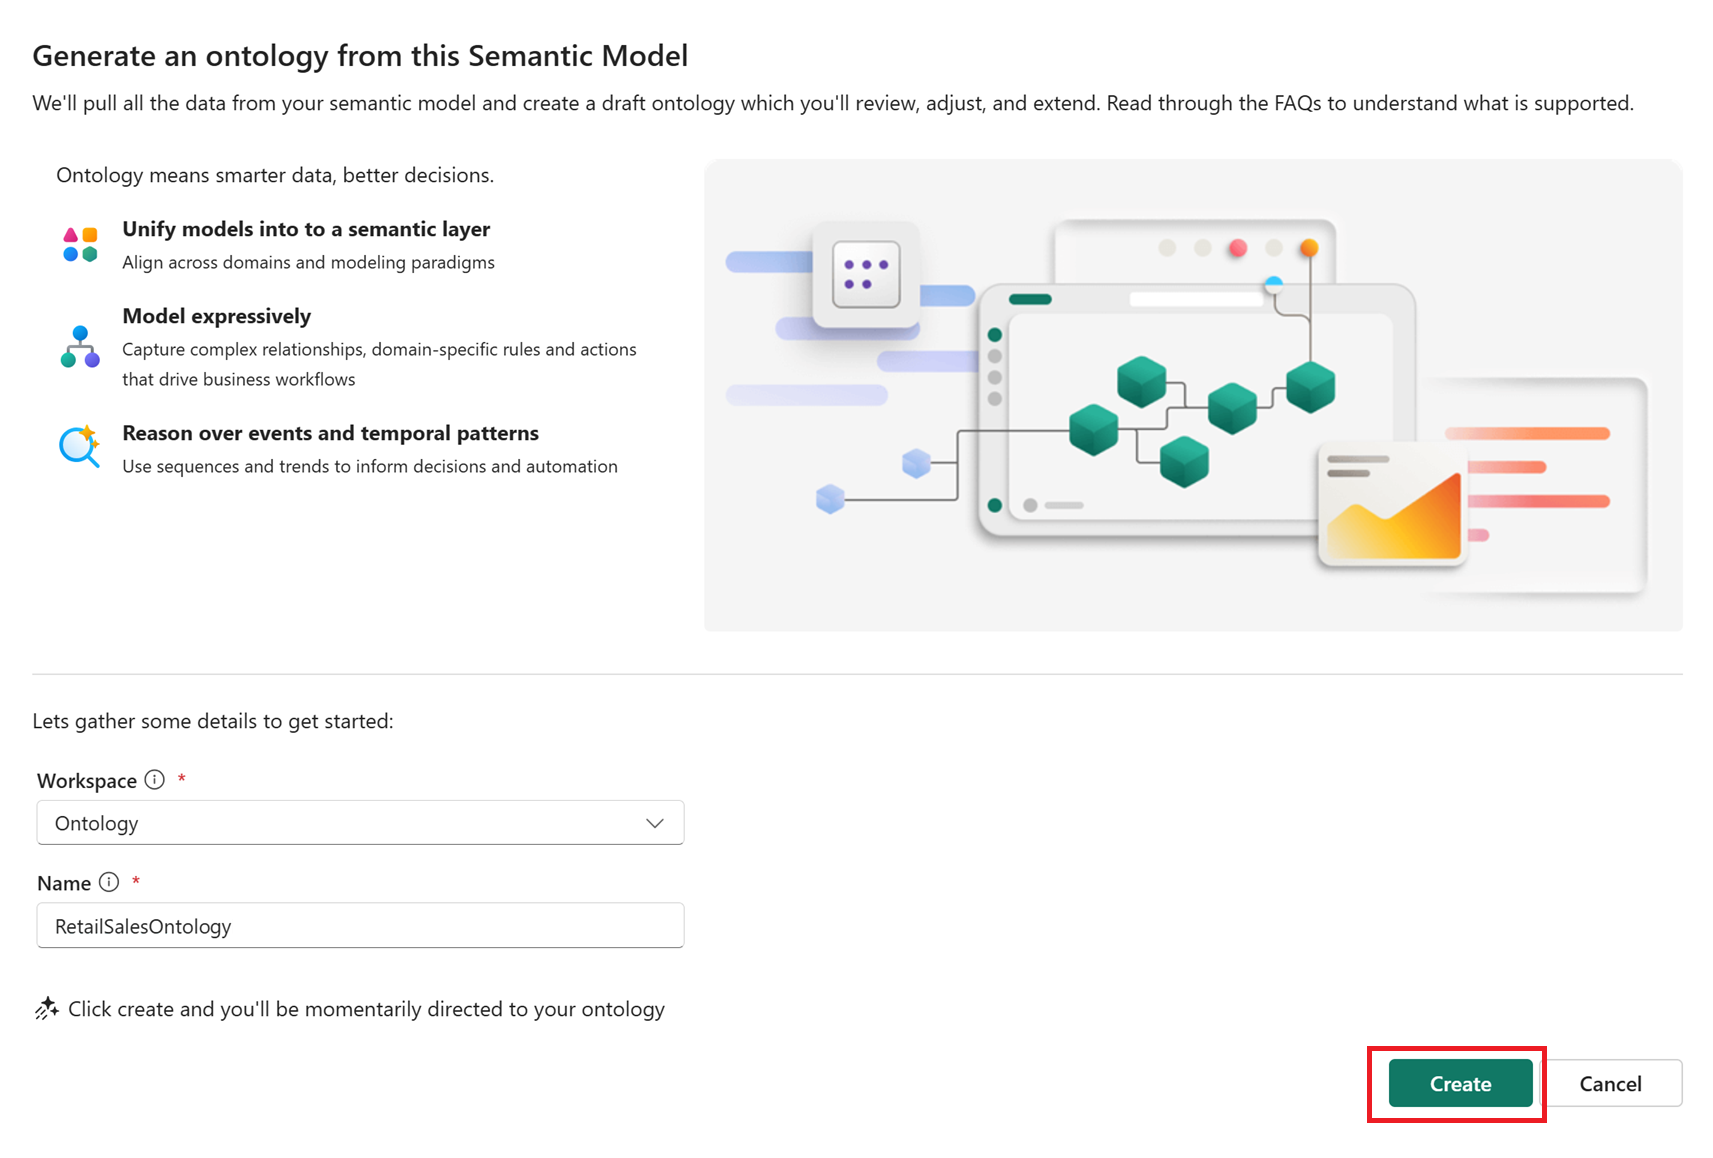
Tip
Ontology names can include numbers, letters, and underscores. Don't use spaces or dashes.


The ontology (preview) item opens when it's ready.

Note
If you see an error that Fabric is unable to create the ontology (preview) item, make sure that all the required settings are enabled for your tenant, as described in the Tutorial prerequisites.
Next, review the entity types, data bindings, and relationships that the semantic model generates. In the following sections, you make a few edits to complete the ontology configuration, and verify that generated items are correct.
Verify entity types
Entity types represent types of objects in a business. The Entity Types pane lists all three entity types in the ontology, named after the data tables (they might be listed in a different order):
- dimproducts
- dimstore
- factsales
Tip
If you don't see any entities in the ontology, make sure your semantic model is published, the tables in the semantic model are visible (not hidden), and relationships are defined. To revisit the setup steps for the semantic model, see Prepare the Power BI Semantic Model .
Rename entity types
Follow these steps to rename each entity type to a friendlier name.
Select the entity type. From the top ribbon, select View Entity Type details.

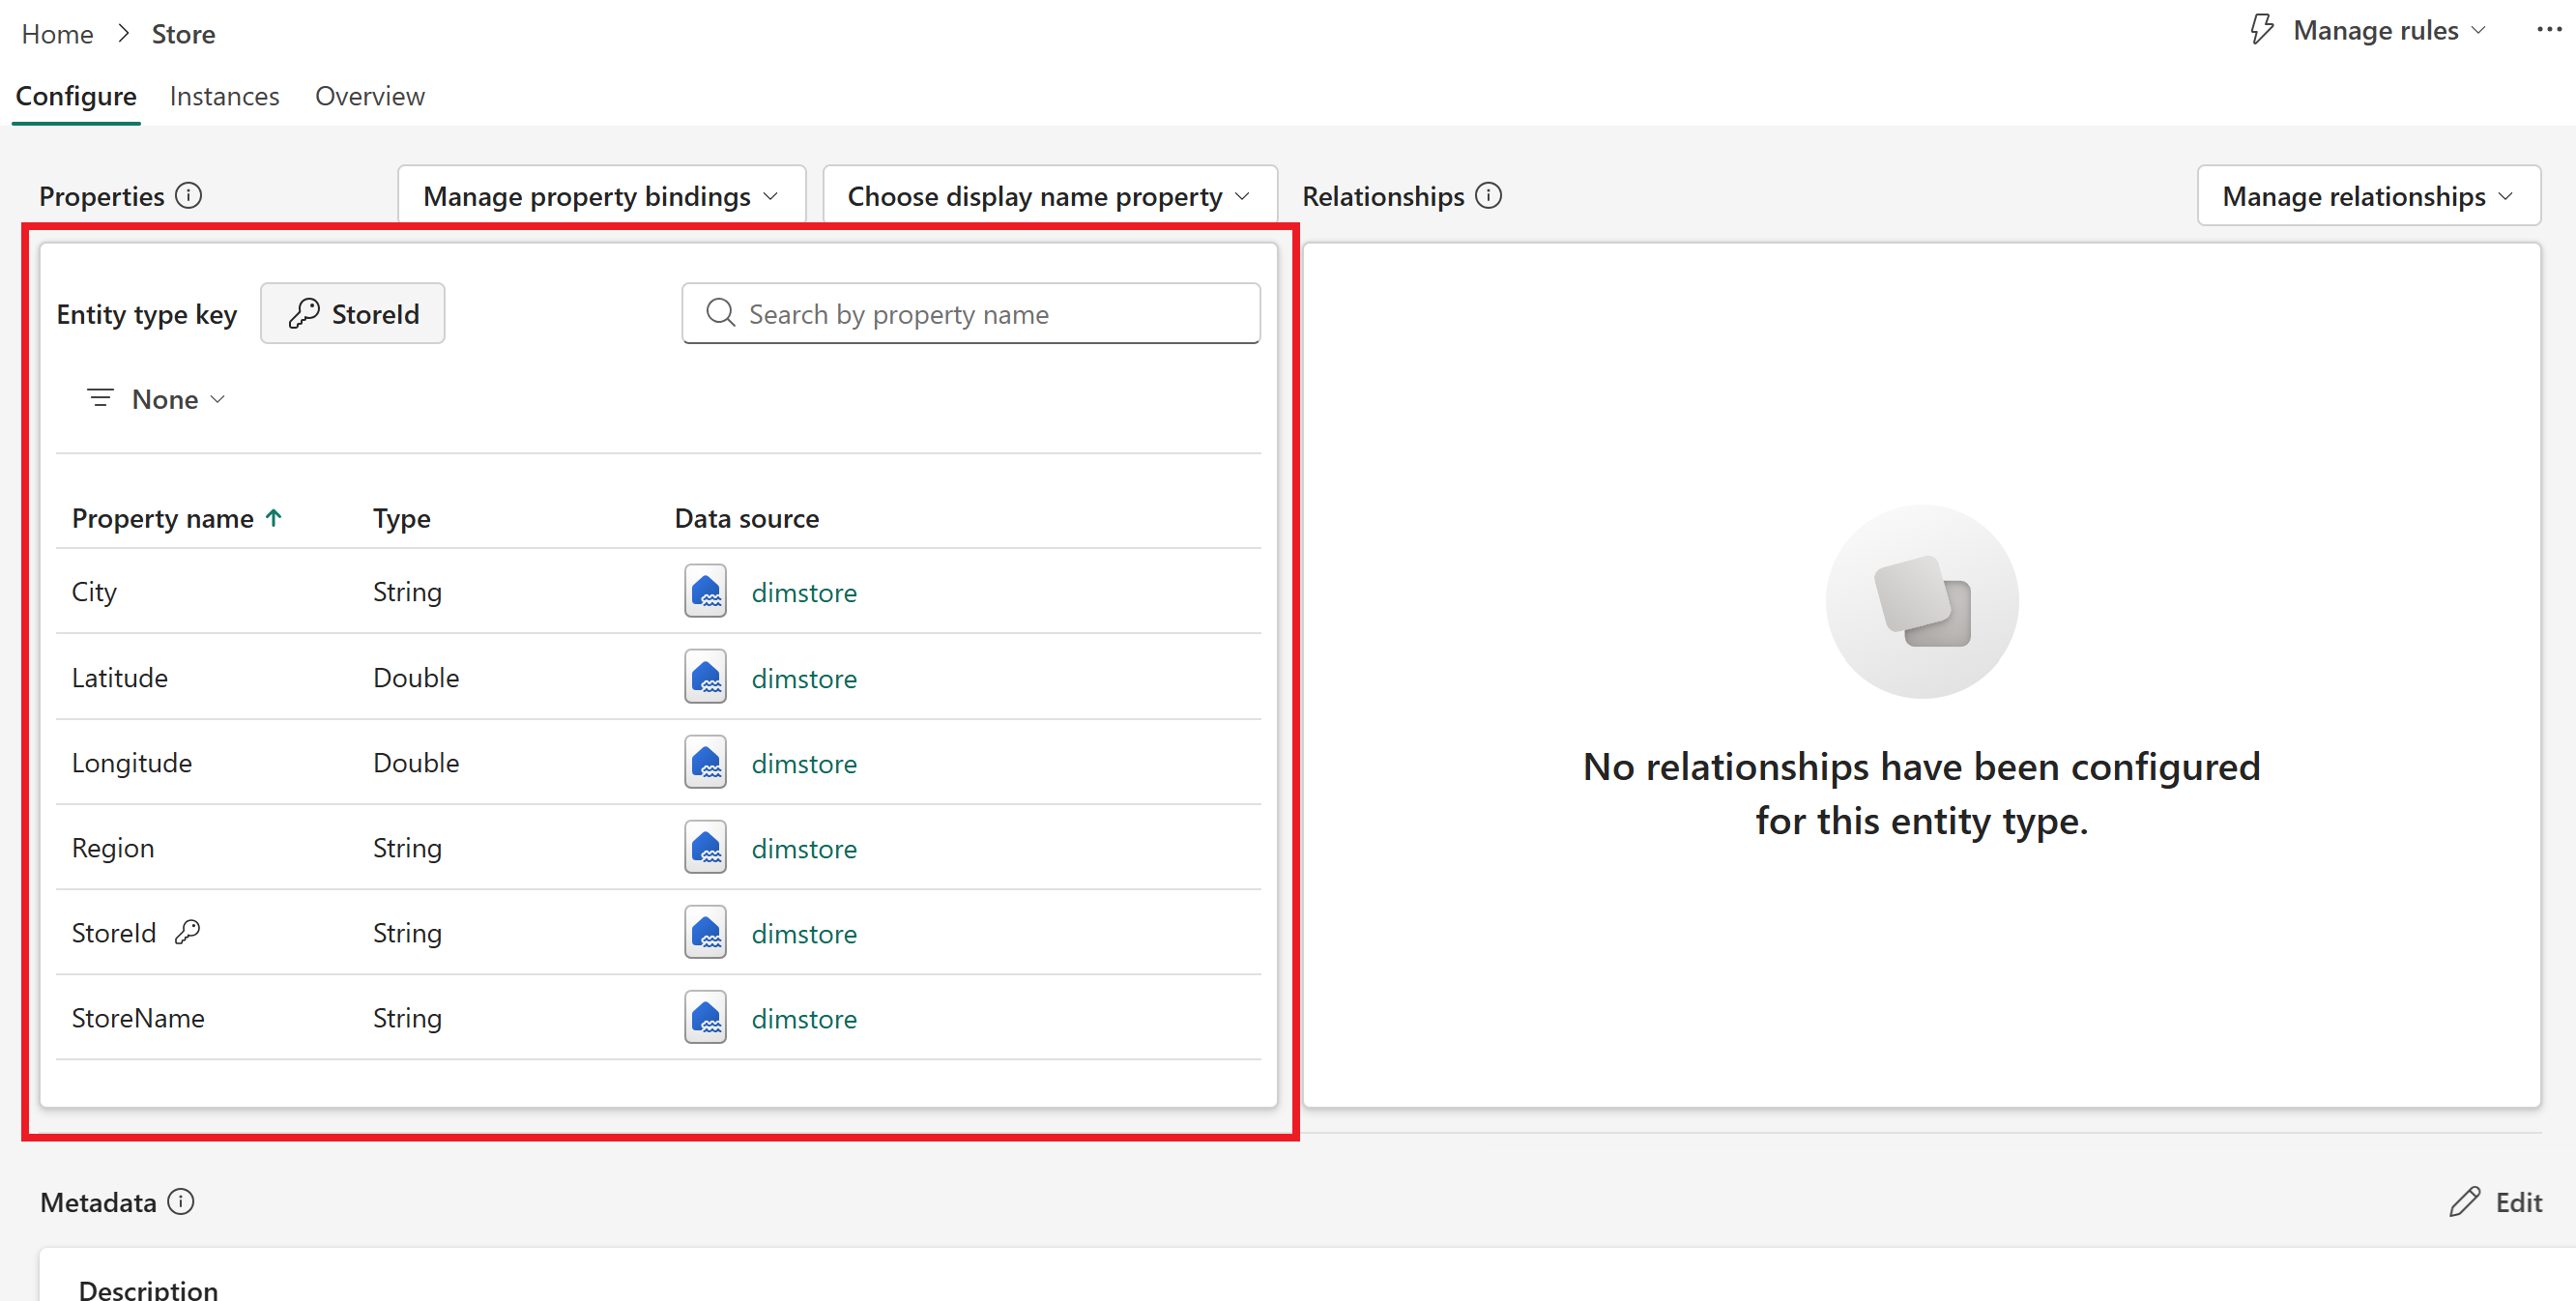
You see the Configure page for the entity. This page surfaces important information about the entity type, including its properties, data bindings, relationships, and more.
In the top right corner of the page, select ... > Rename.
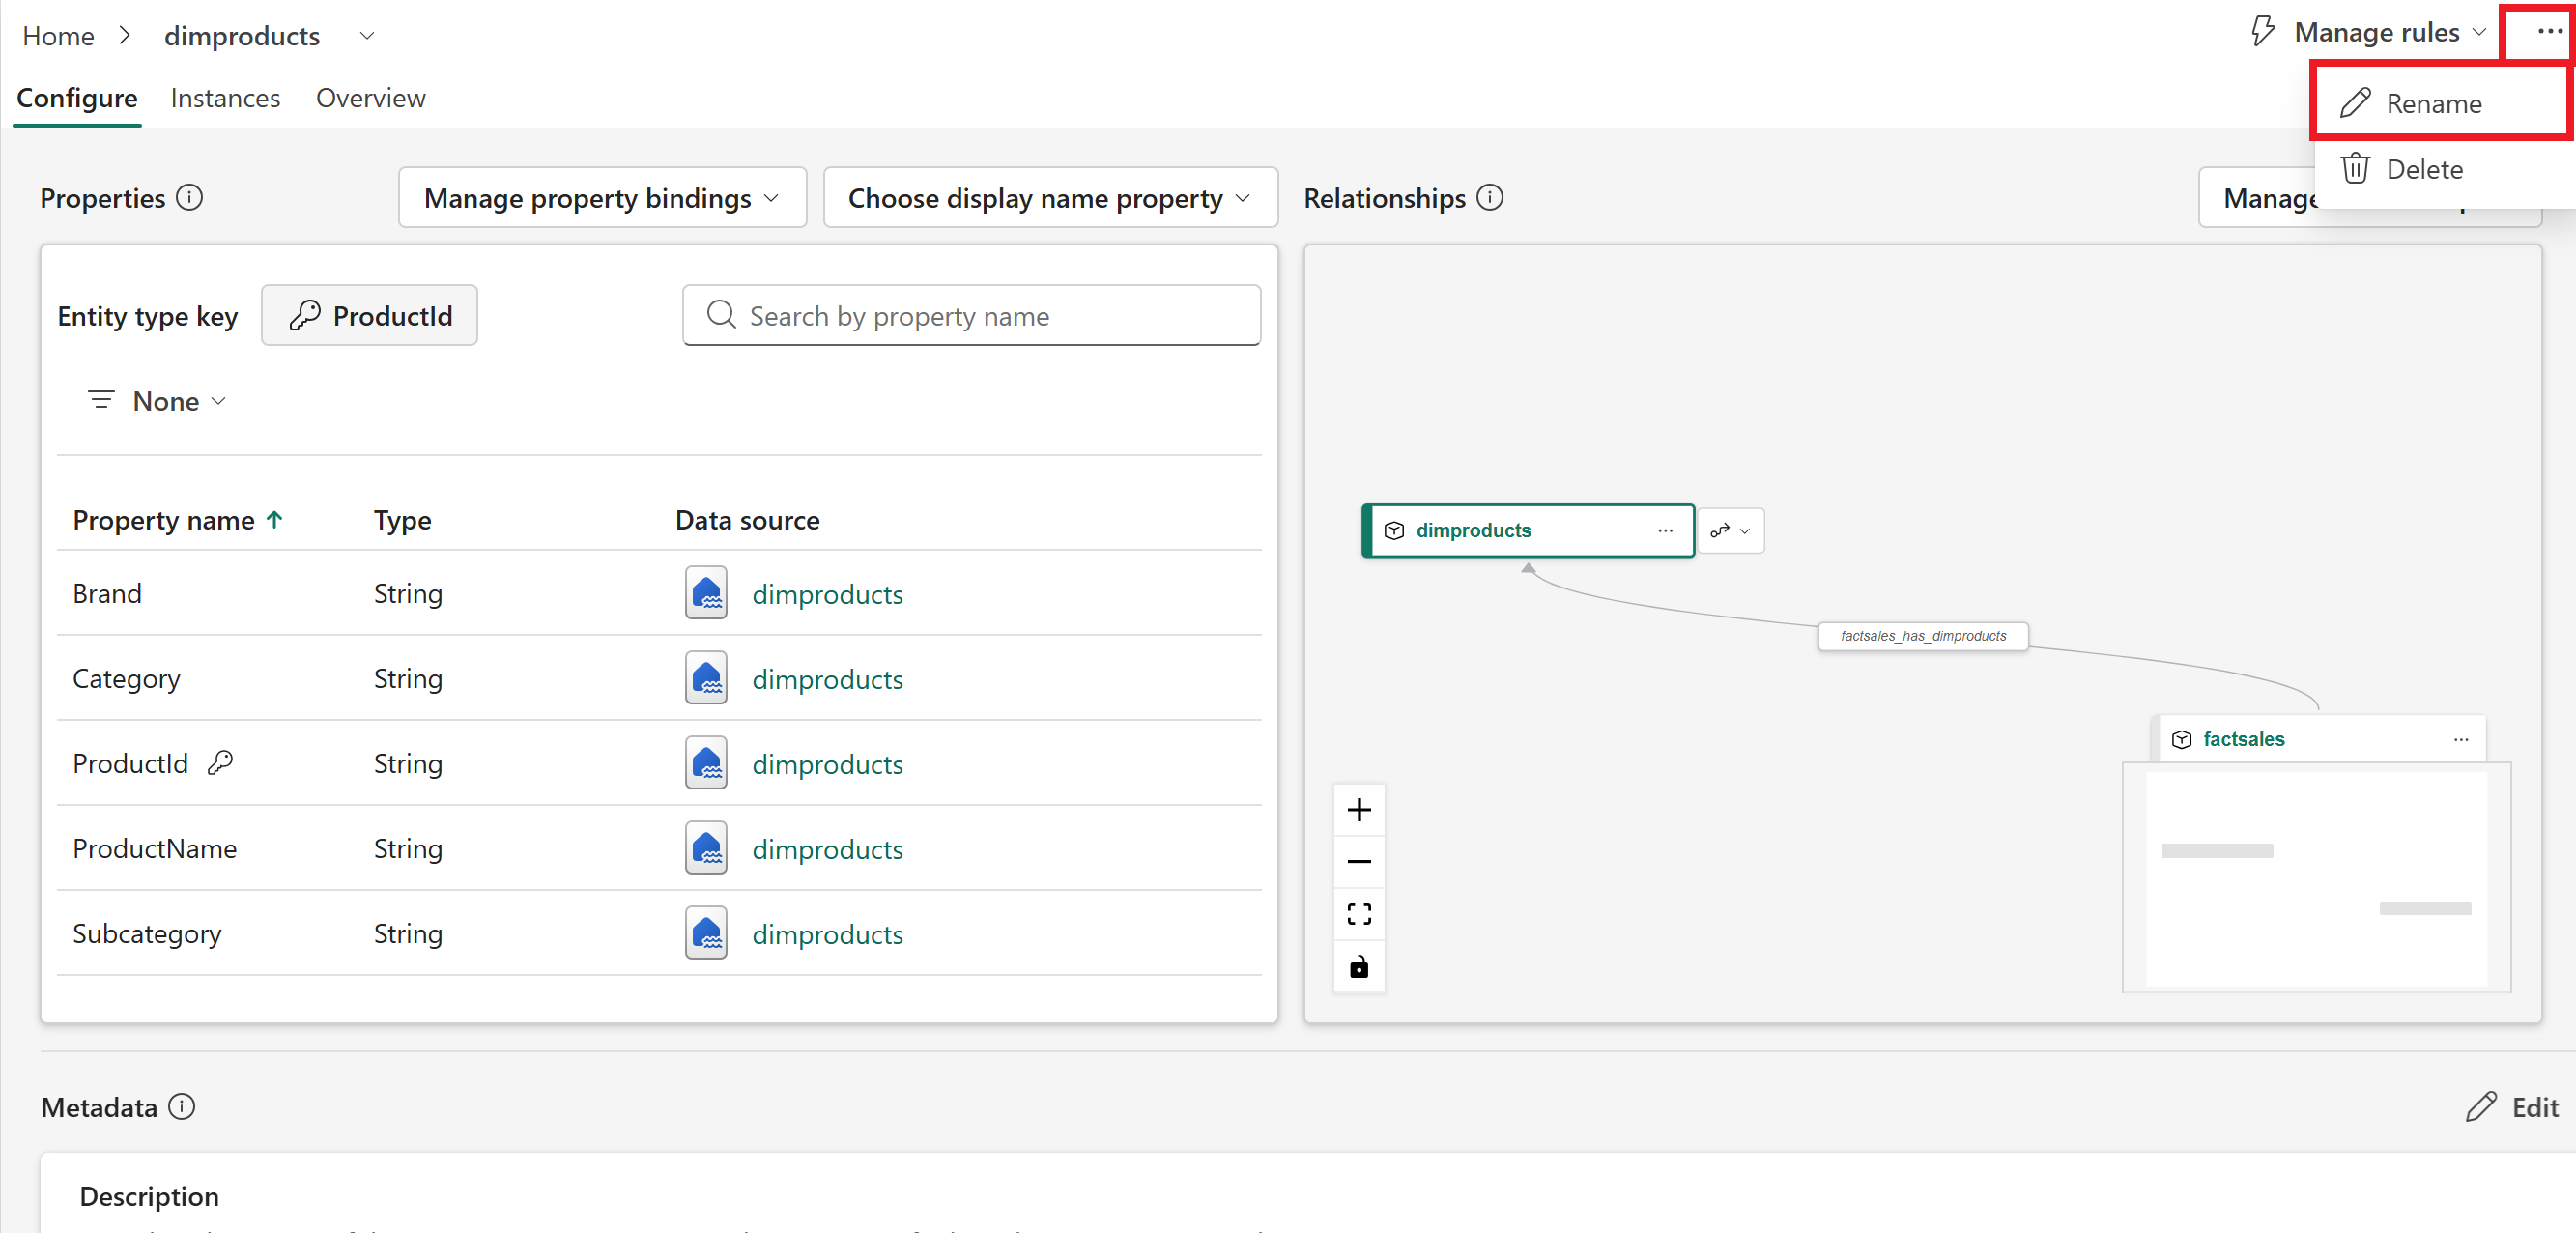
Enter the new name from the following table and Save.
Old name New name dimproducts Products
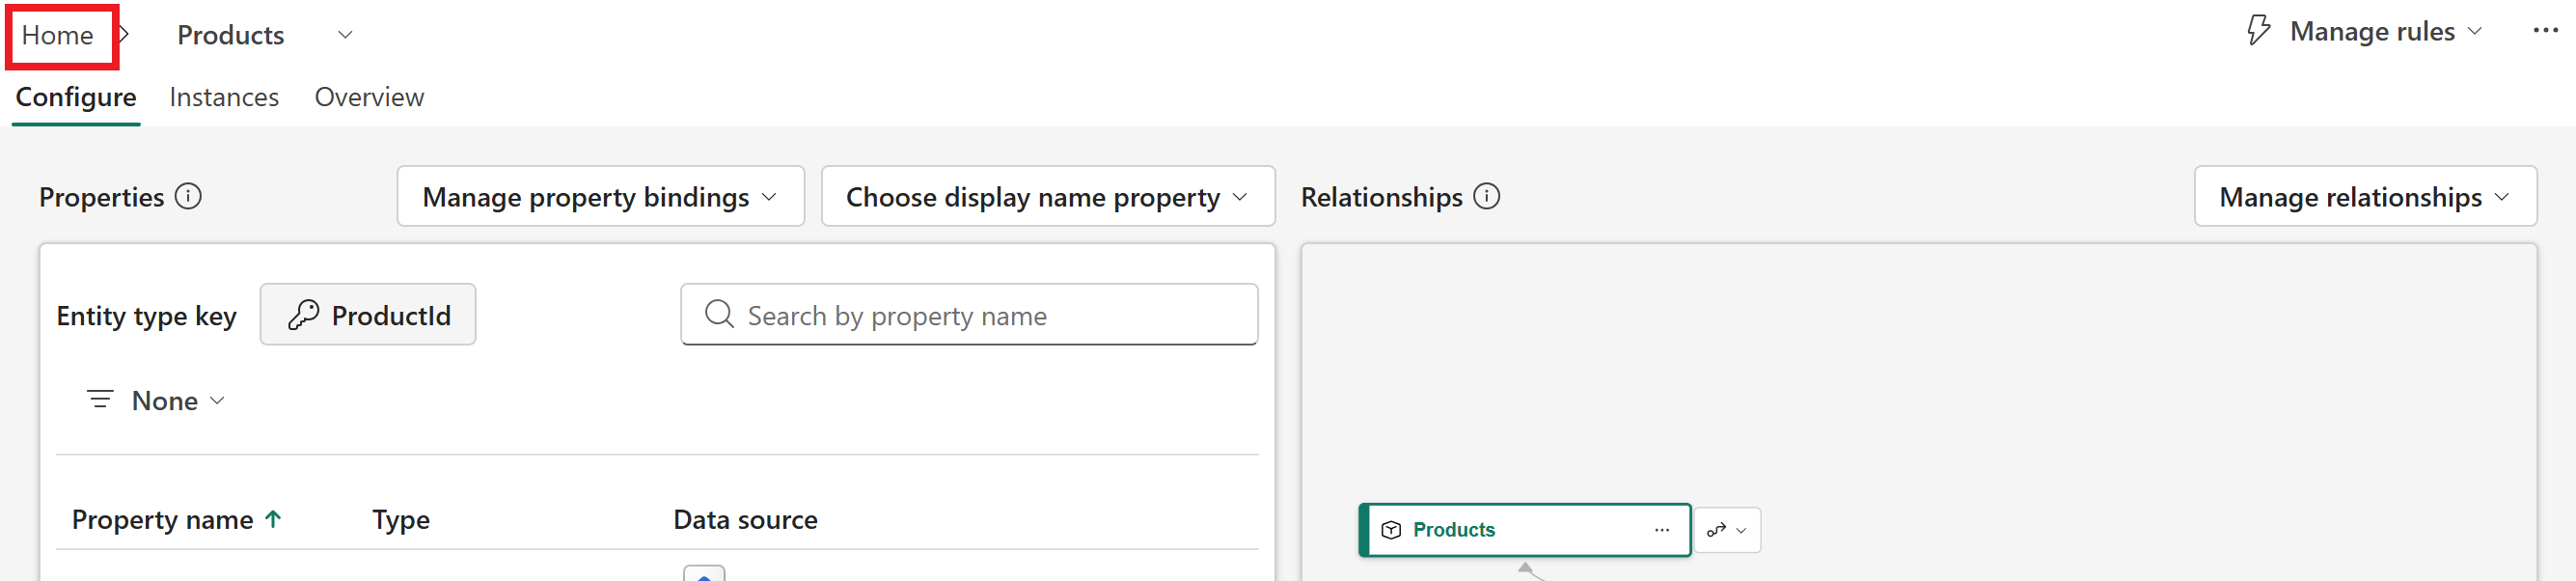
Note: Make sure to use the plural form Products, to avoid conflict with the GQL reserved wordPRODUCT.dimstore Store factsales SaleEvent Select Home to return to the configuration canvas to access the other entity types.
Repeat these steps until all entity types are renamed.

When you finish renaming all the entity types, they look like this (they might be listed in a different order).

Verify properties and bindings
Follow these steps to verify that each entity type has the correct properties and source data bindings.
Select the entity type. From the top ribbon, select View Entity Type details.
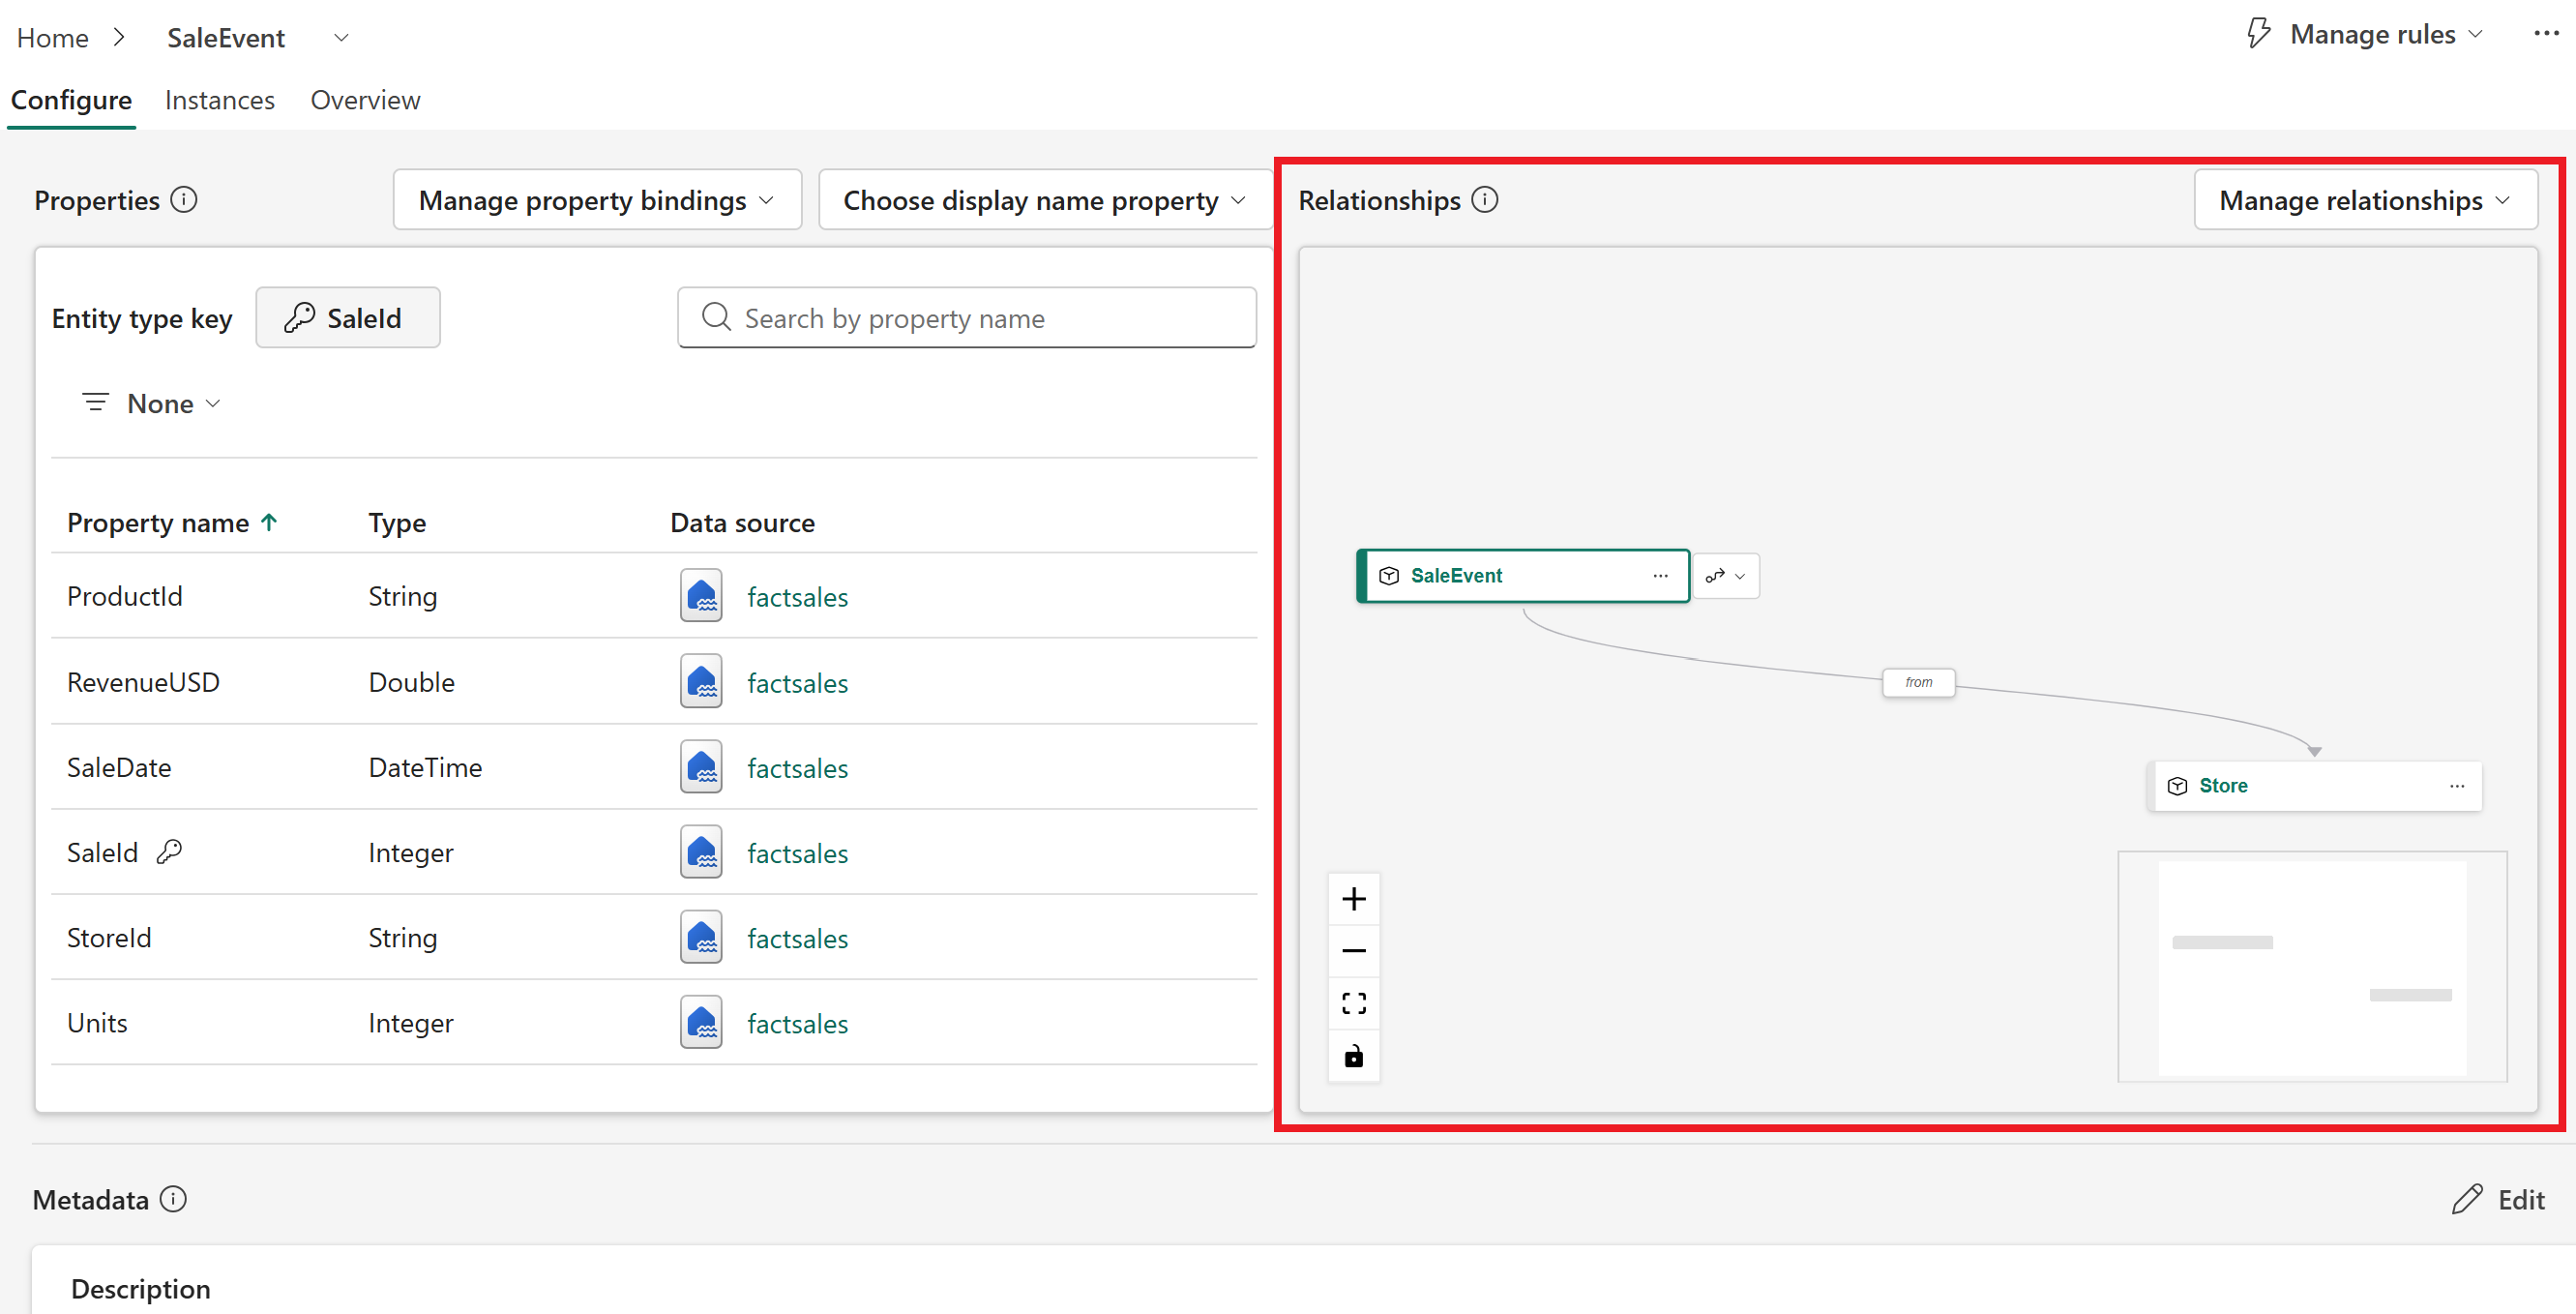
On the Configure page, look at the Properties section.
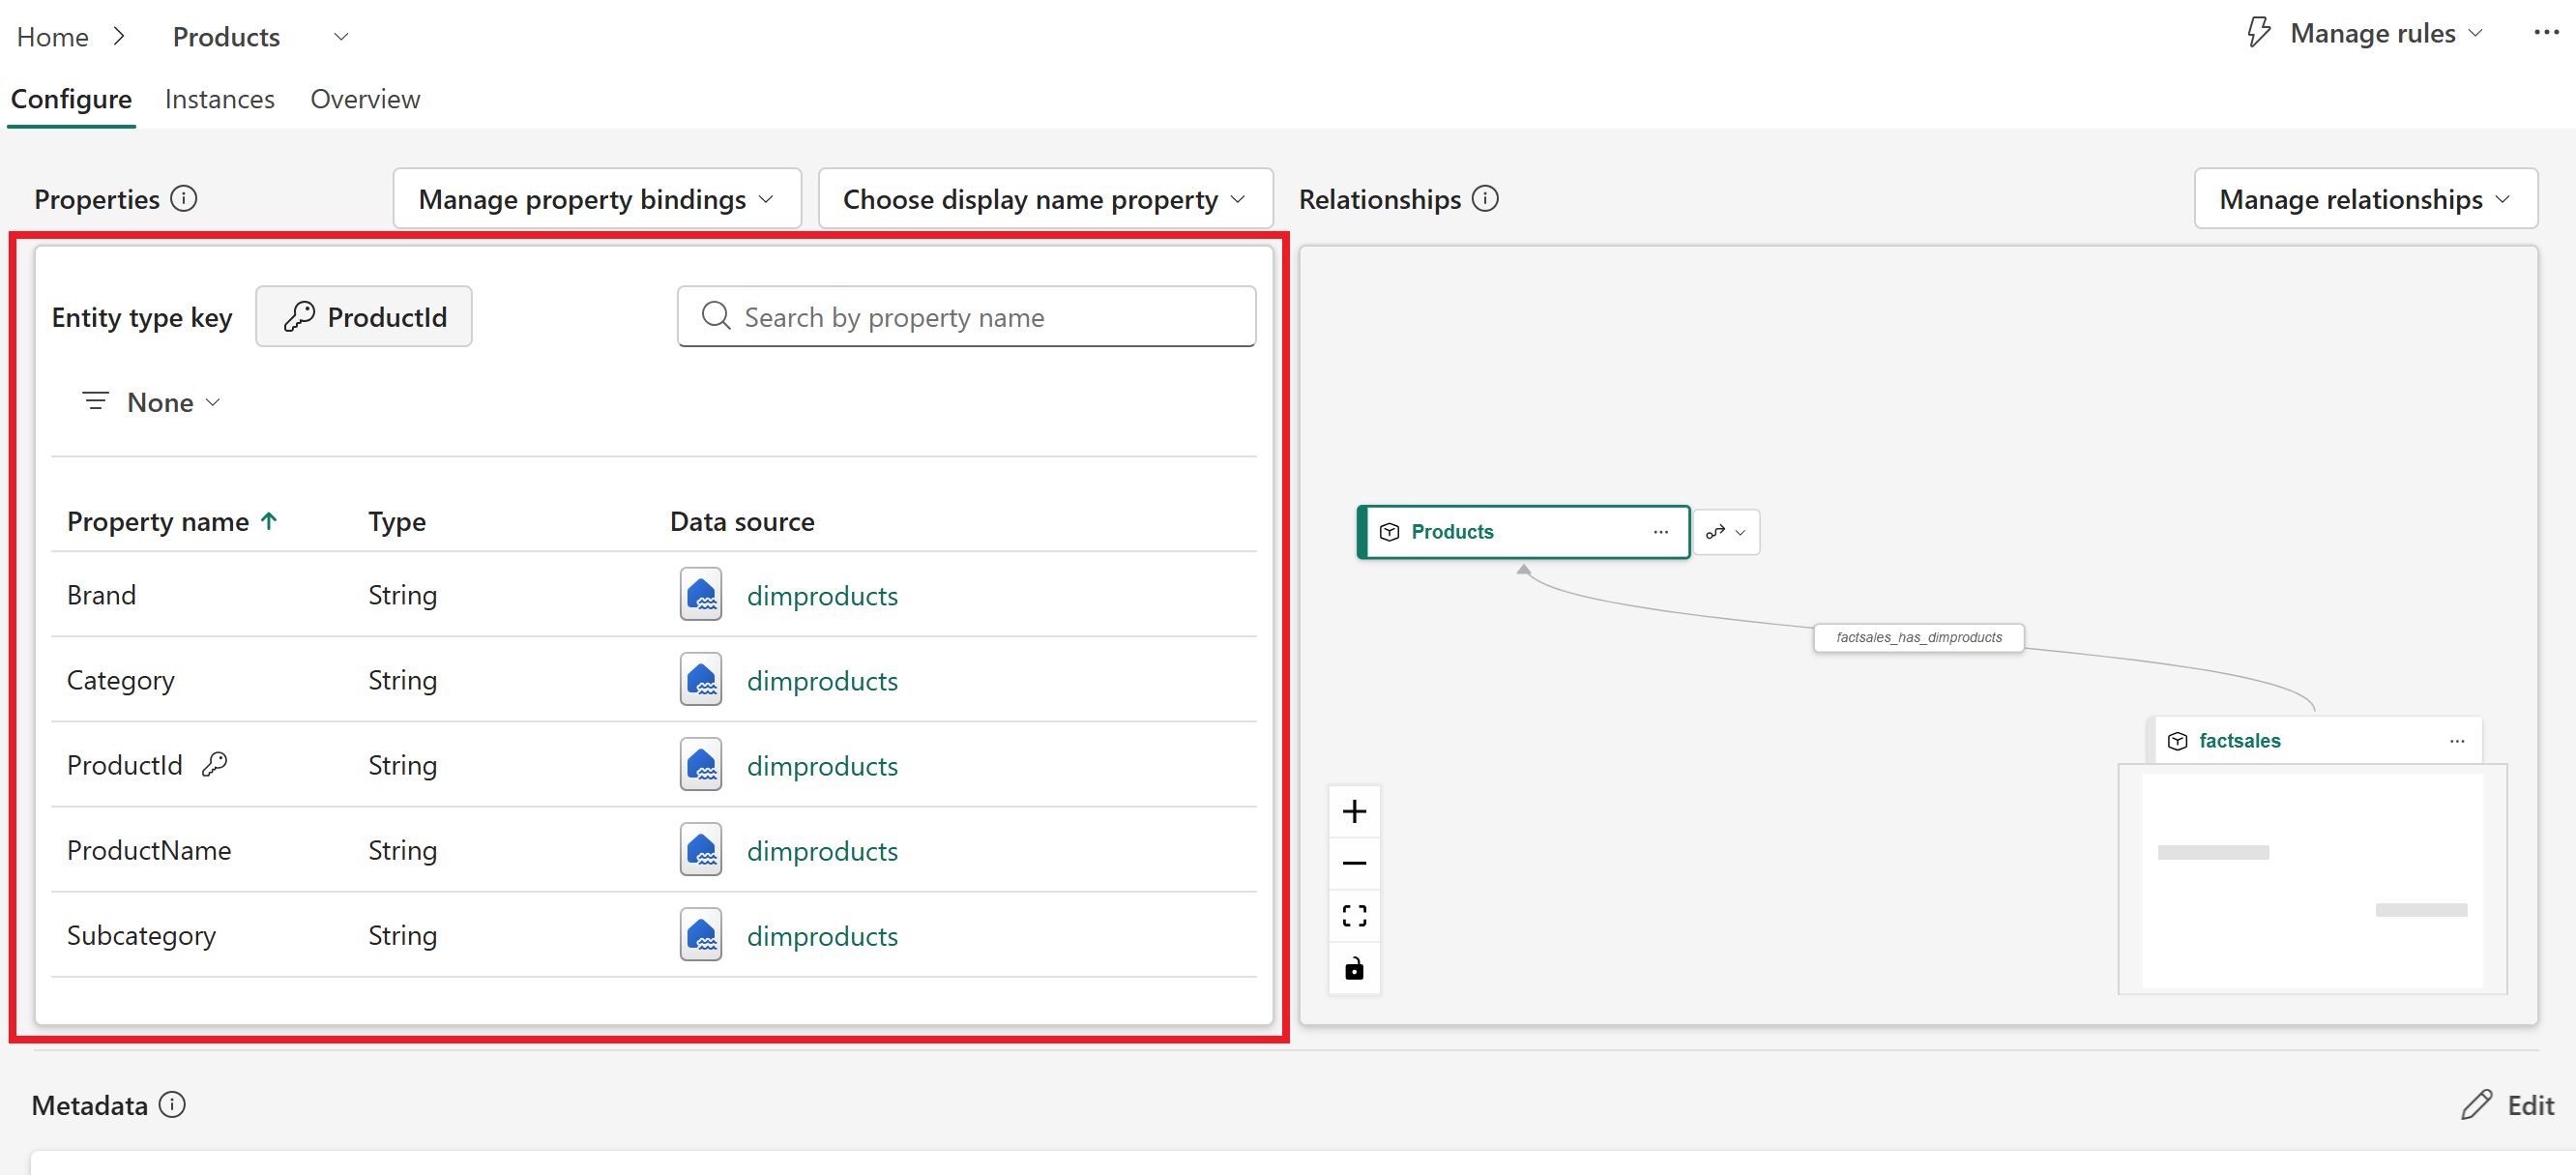
Verify the entity type properties match those in the following table.
Entity type Entity type key Properties Data source Products ProductIdBrand,Category,ProductId,ProductName,Subcategorydimproducts Store StoreIdCity,Latitude,Longitude,Region,StoreId,StoreNamedimstore SaleEvent ProductId,RevenueUSD,SaleDate,SaleId,StoreId,Unitsfactsales Select Home to return to the configuration canvas to access the other entity types.
Repeat these steps until all entity type properties are verified.

Add SaleEvent key
Each entity type has an entity type key that represents a unique identifier for each record of ingested data. You can select string and integer columns from your source data as the entity type key. Together, the columns you select uniquely identify a record.
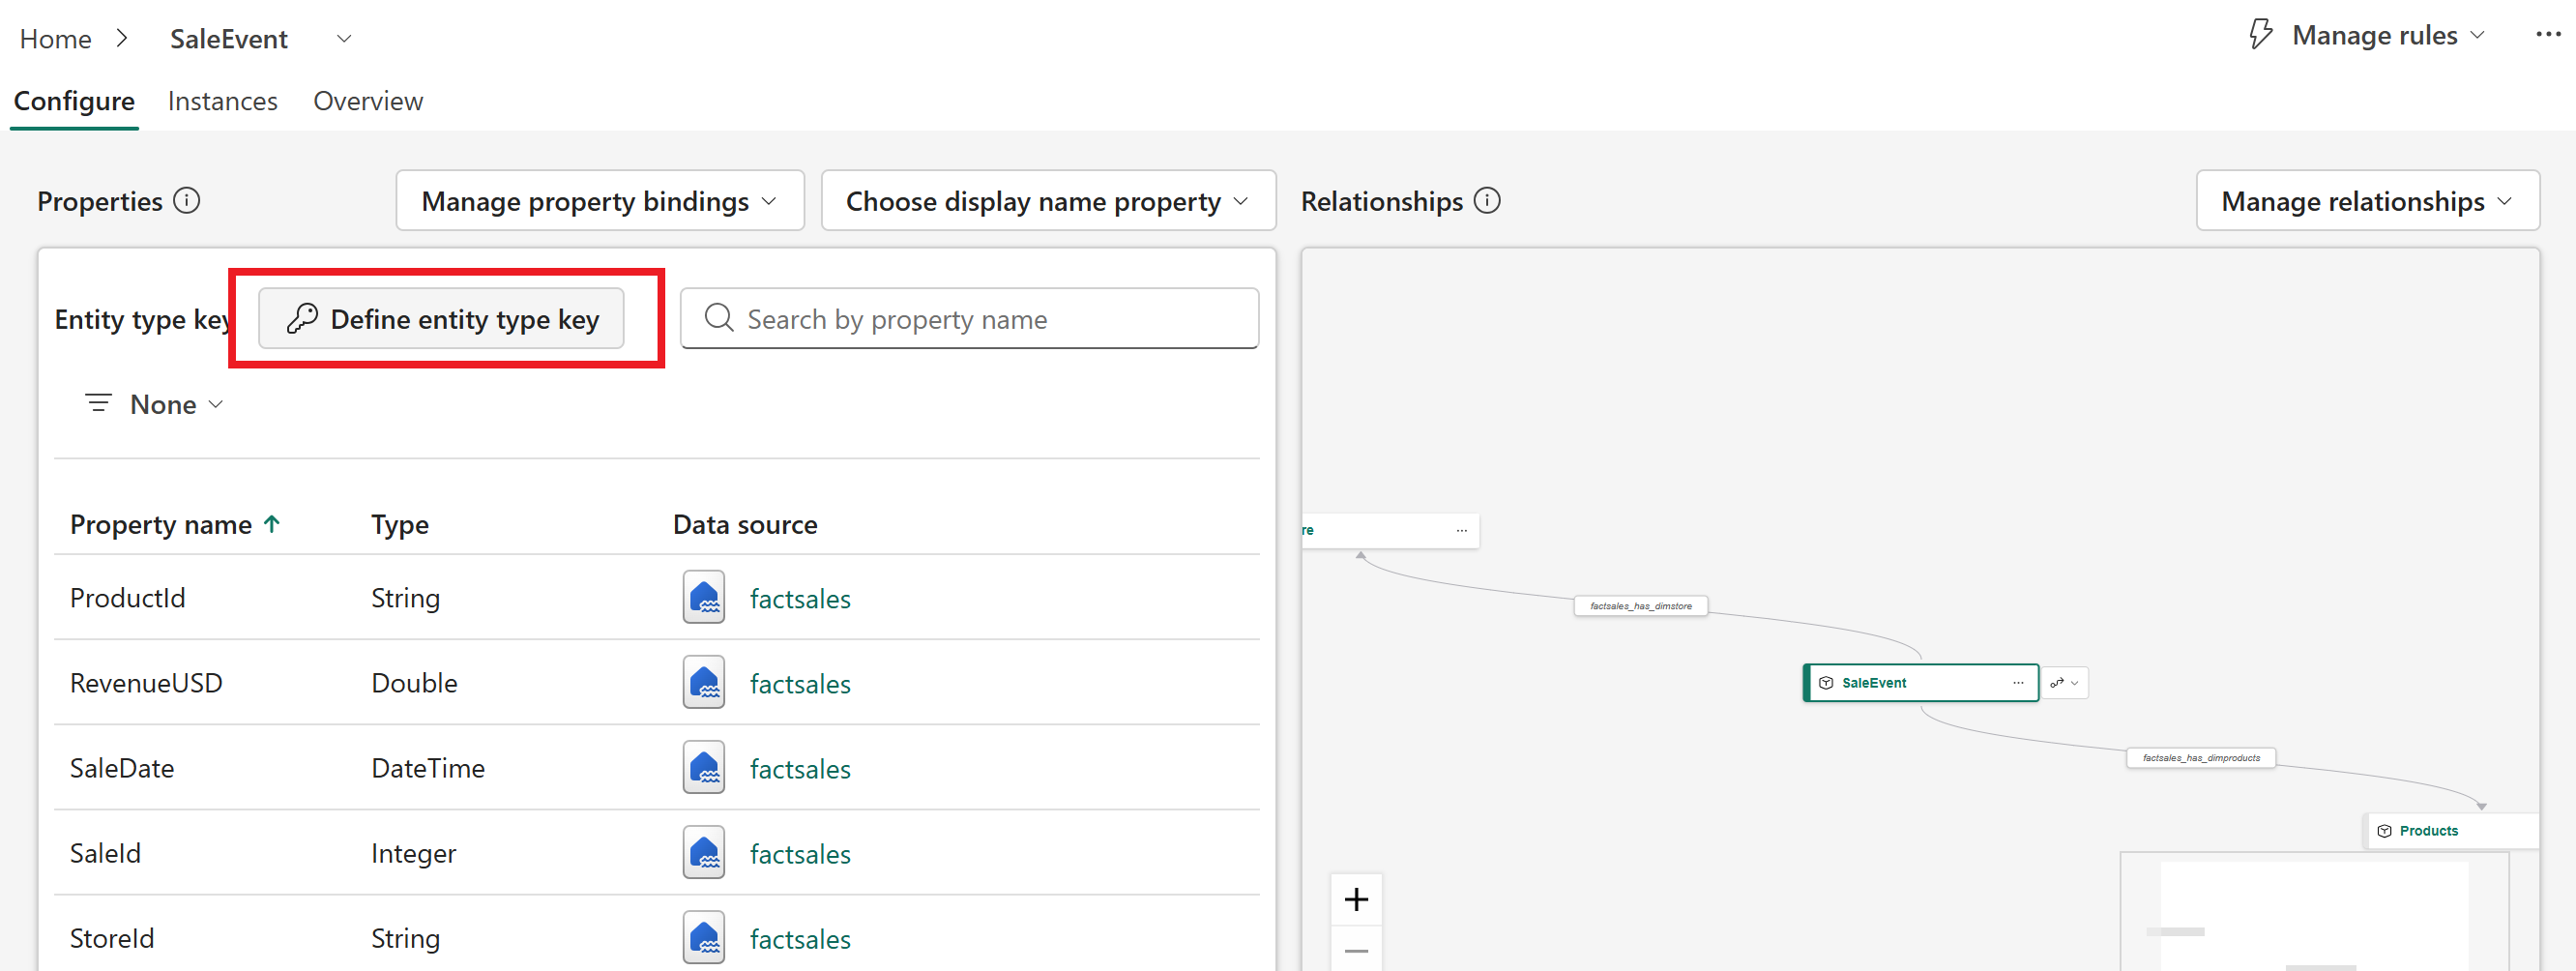
The SaleEvent entity type doesn't have a key that was imported from the source data, so you need to add it manually.
Open the Configure page for the SaleEvent entity type.
Select Define entity type key.
Select Define entity type key on the configuration details page. Select
SaleIdand Save.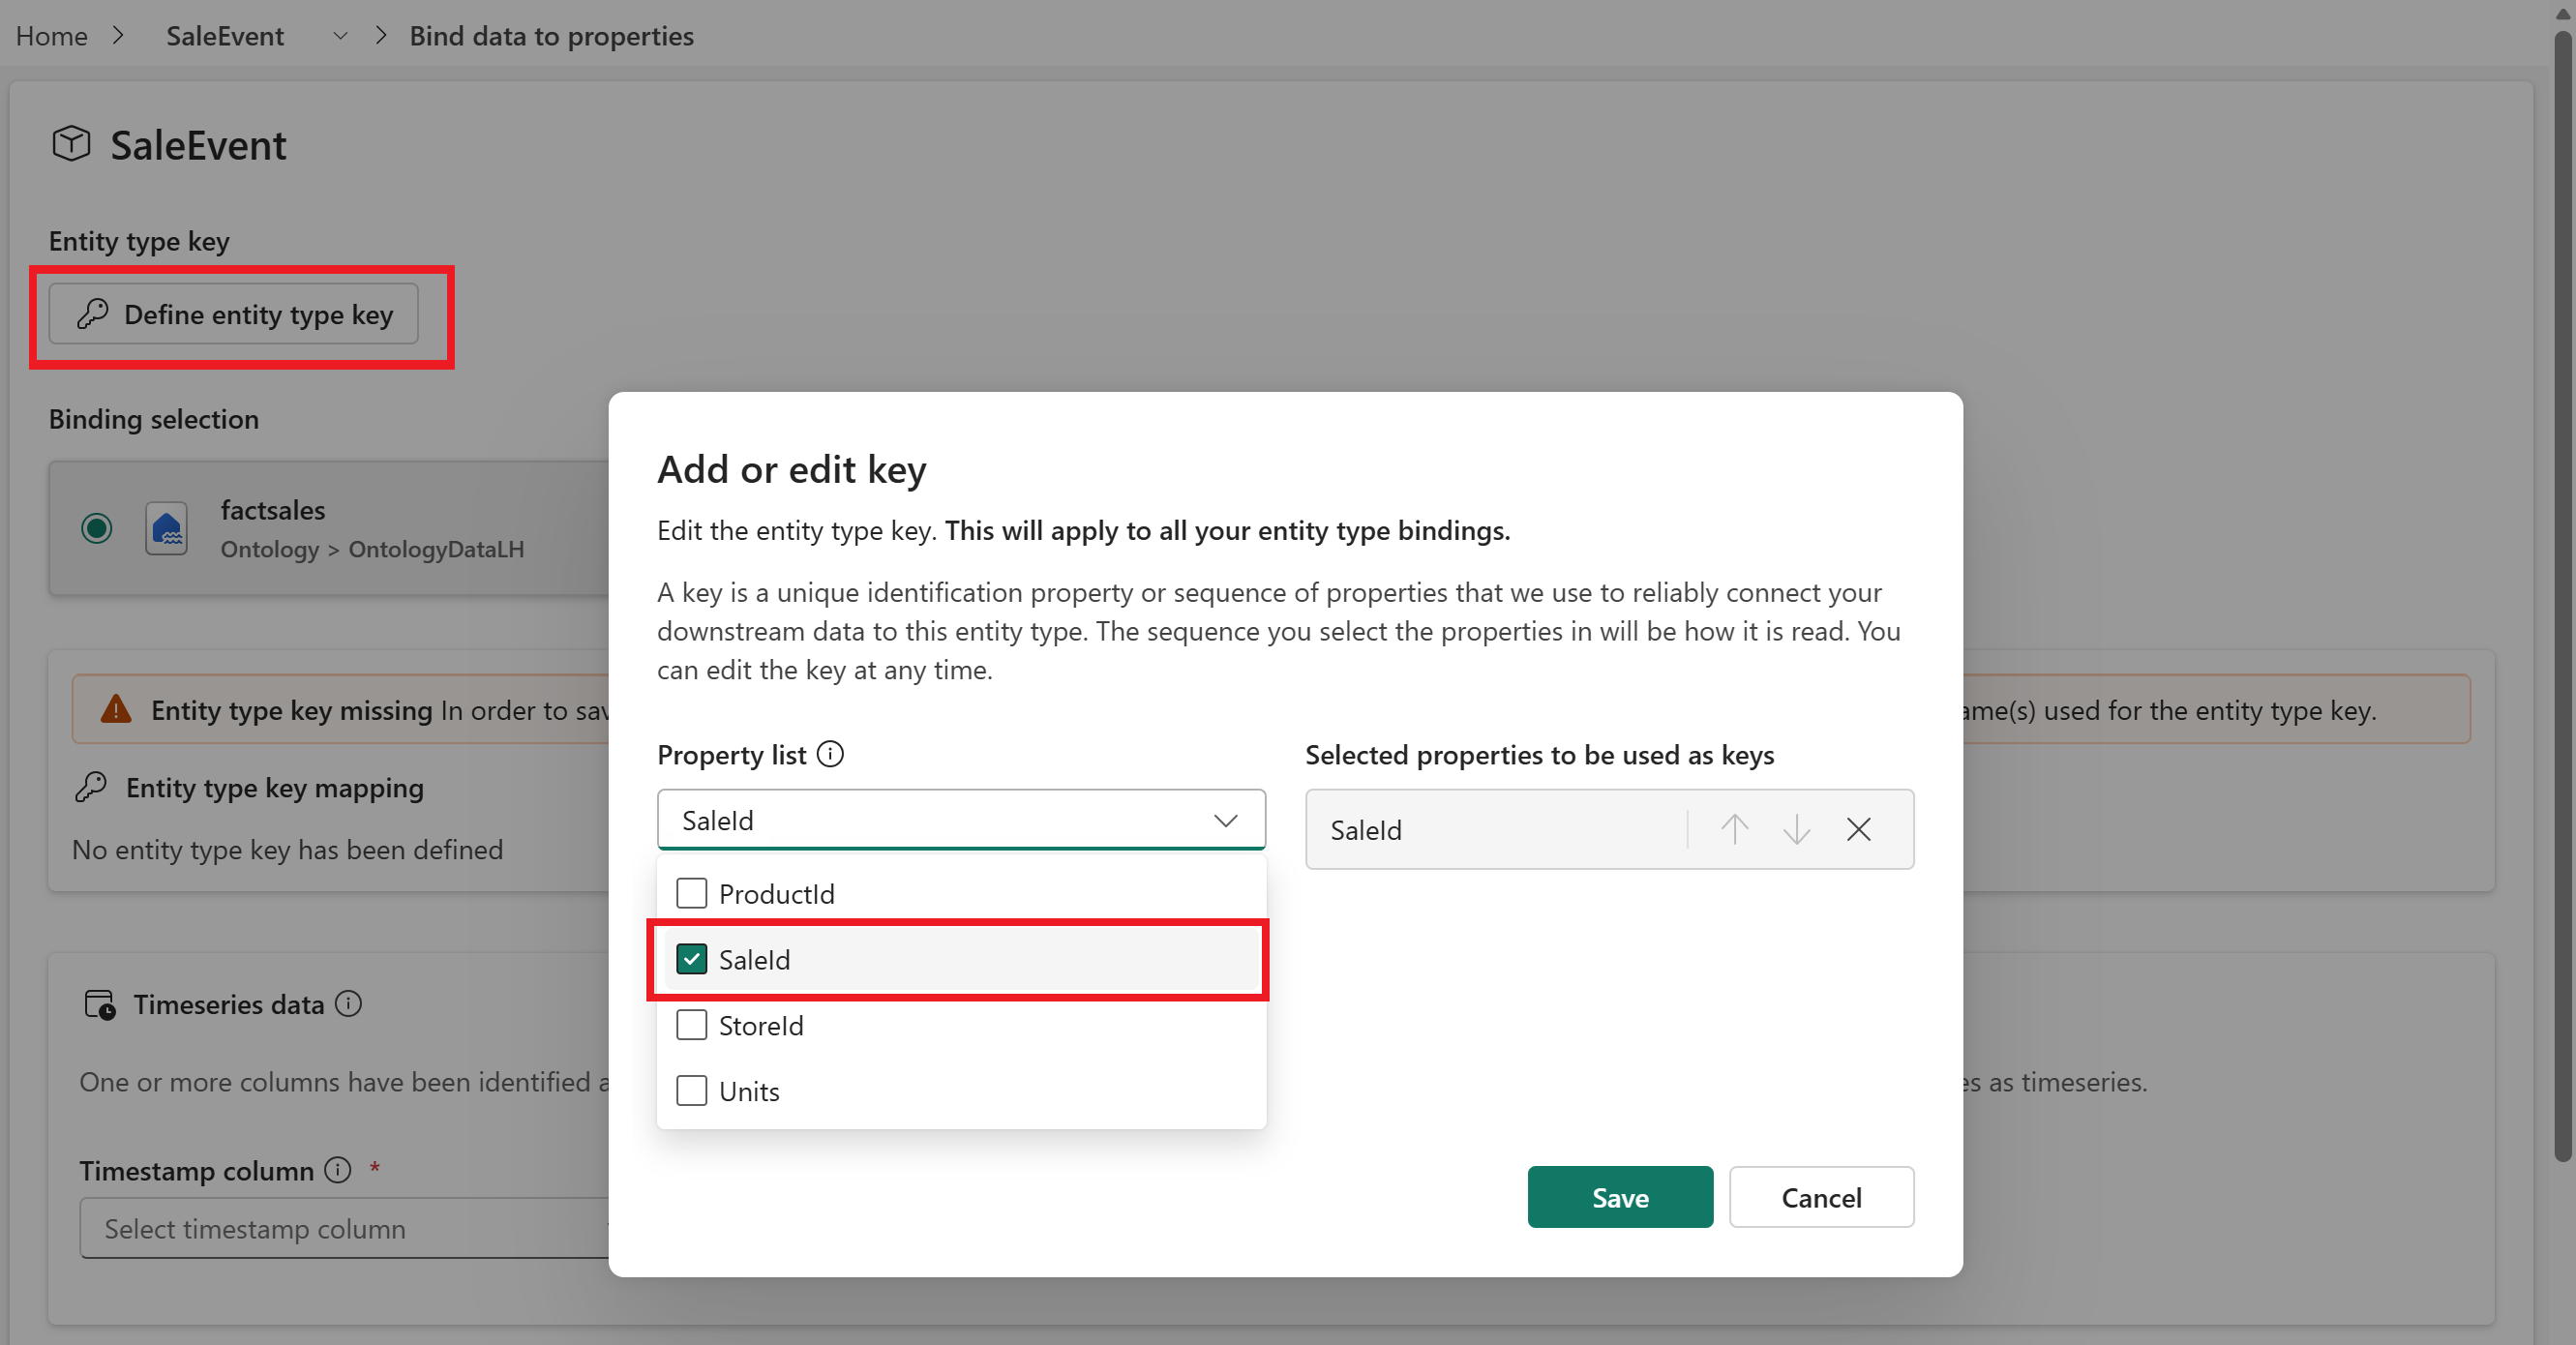
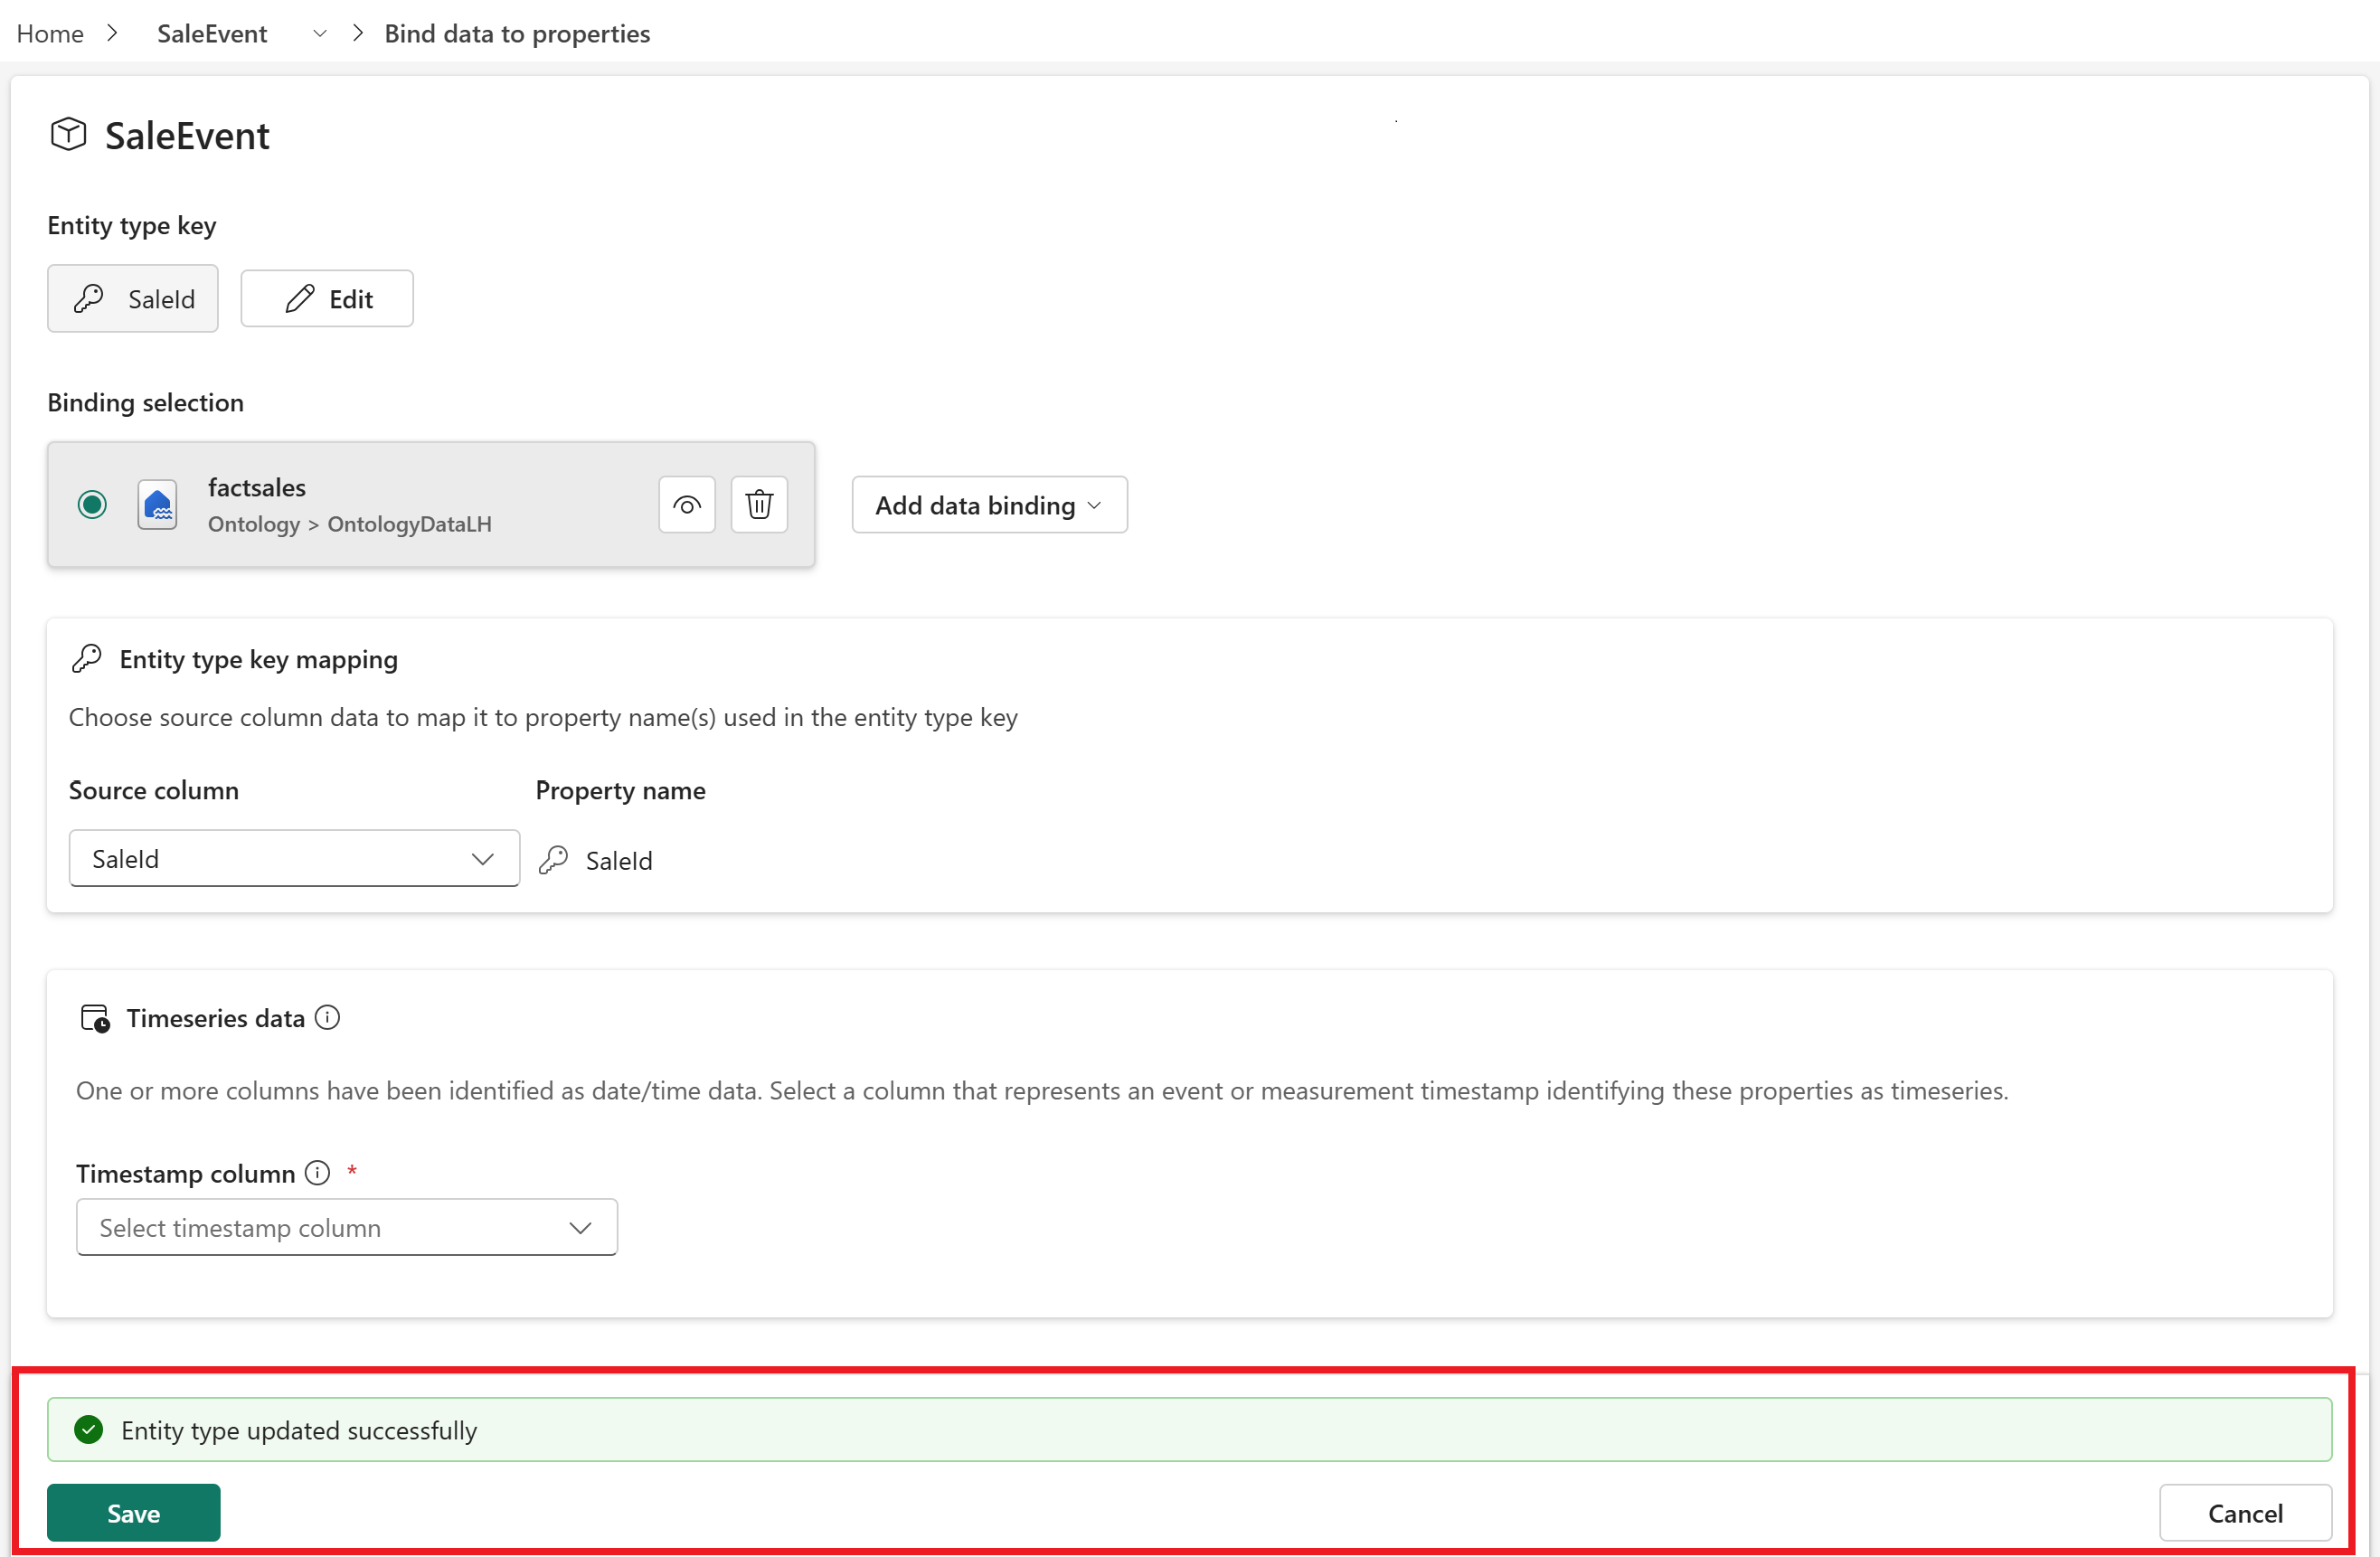
Save the configuration. Confirm that the entity type updated successfully, then select Cancel to close the configuration options.


Verify and configure relationship types
Finally, verify the relationship types between entity types. Relationship types represent how entity types are related to each other in a business context. The relationship types that the import process brings in from the semantic model are defined, but not fully configured and bound to data.
Select the SaleEvent entity type to display it and its relationship types on the configuration canvas.

Follow these steps to configure the details of each relationship type.
Select the relationship type on the configuration canvas. This action opens the relationship details configuration.
Observe the sections of the configuration page:
- Origin entity type: Lists details of the origin entity.
- Relationship type: Sets details of the relationship type.
- Target entity type: Lists details of the target entity.
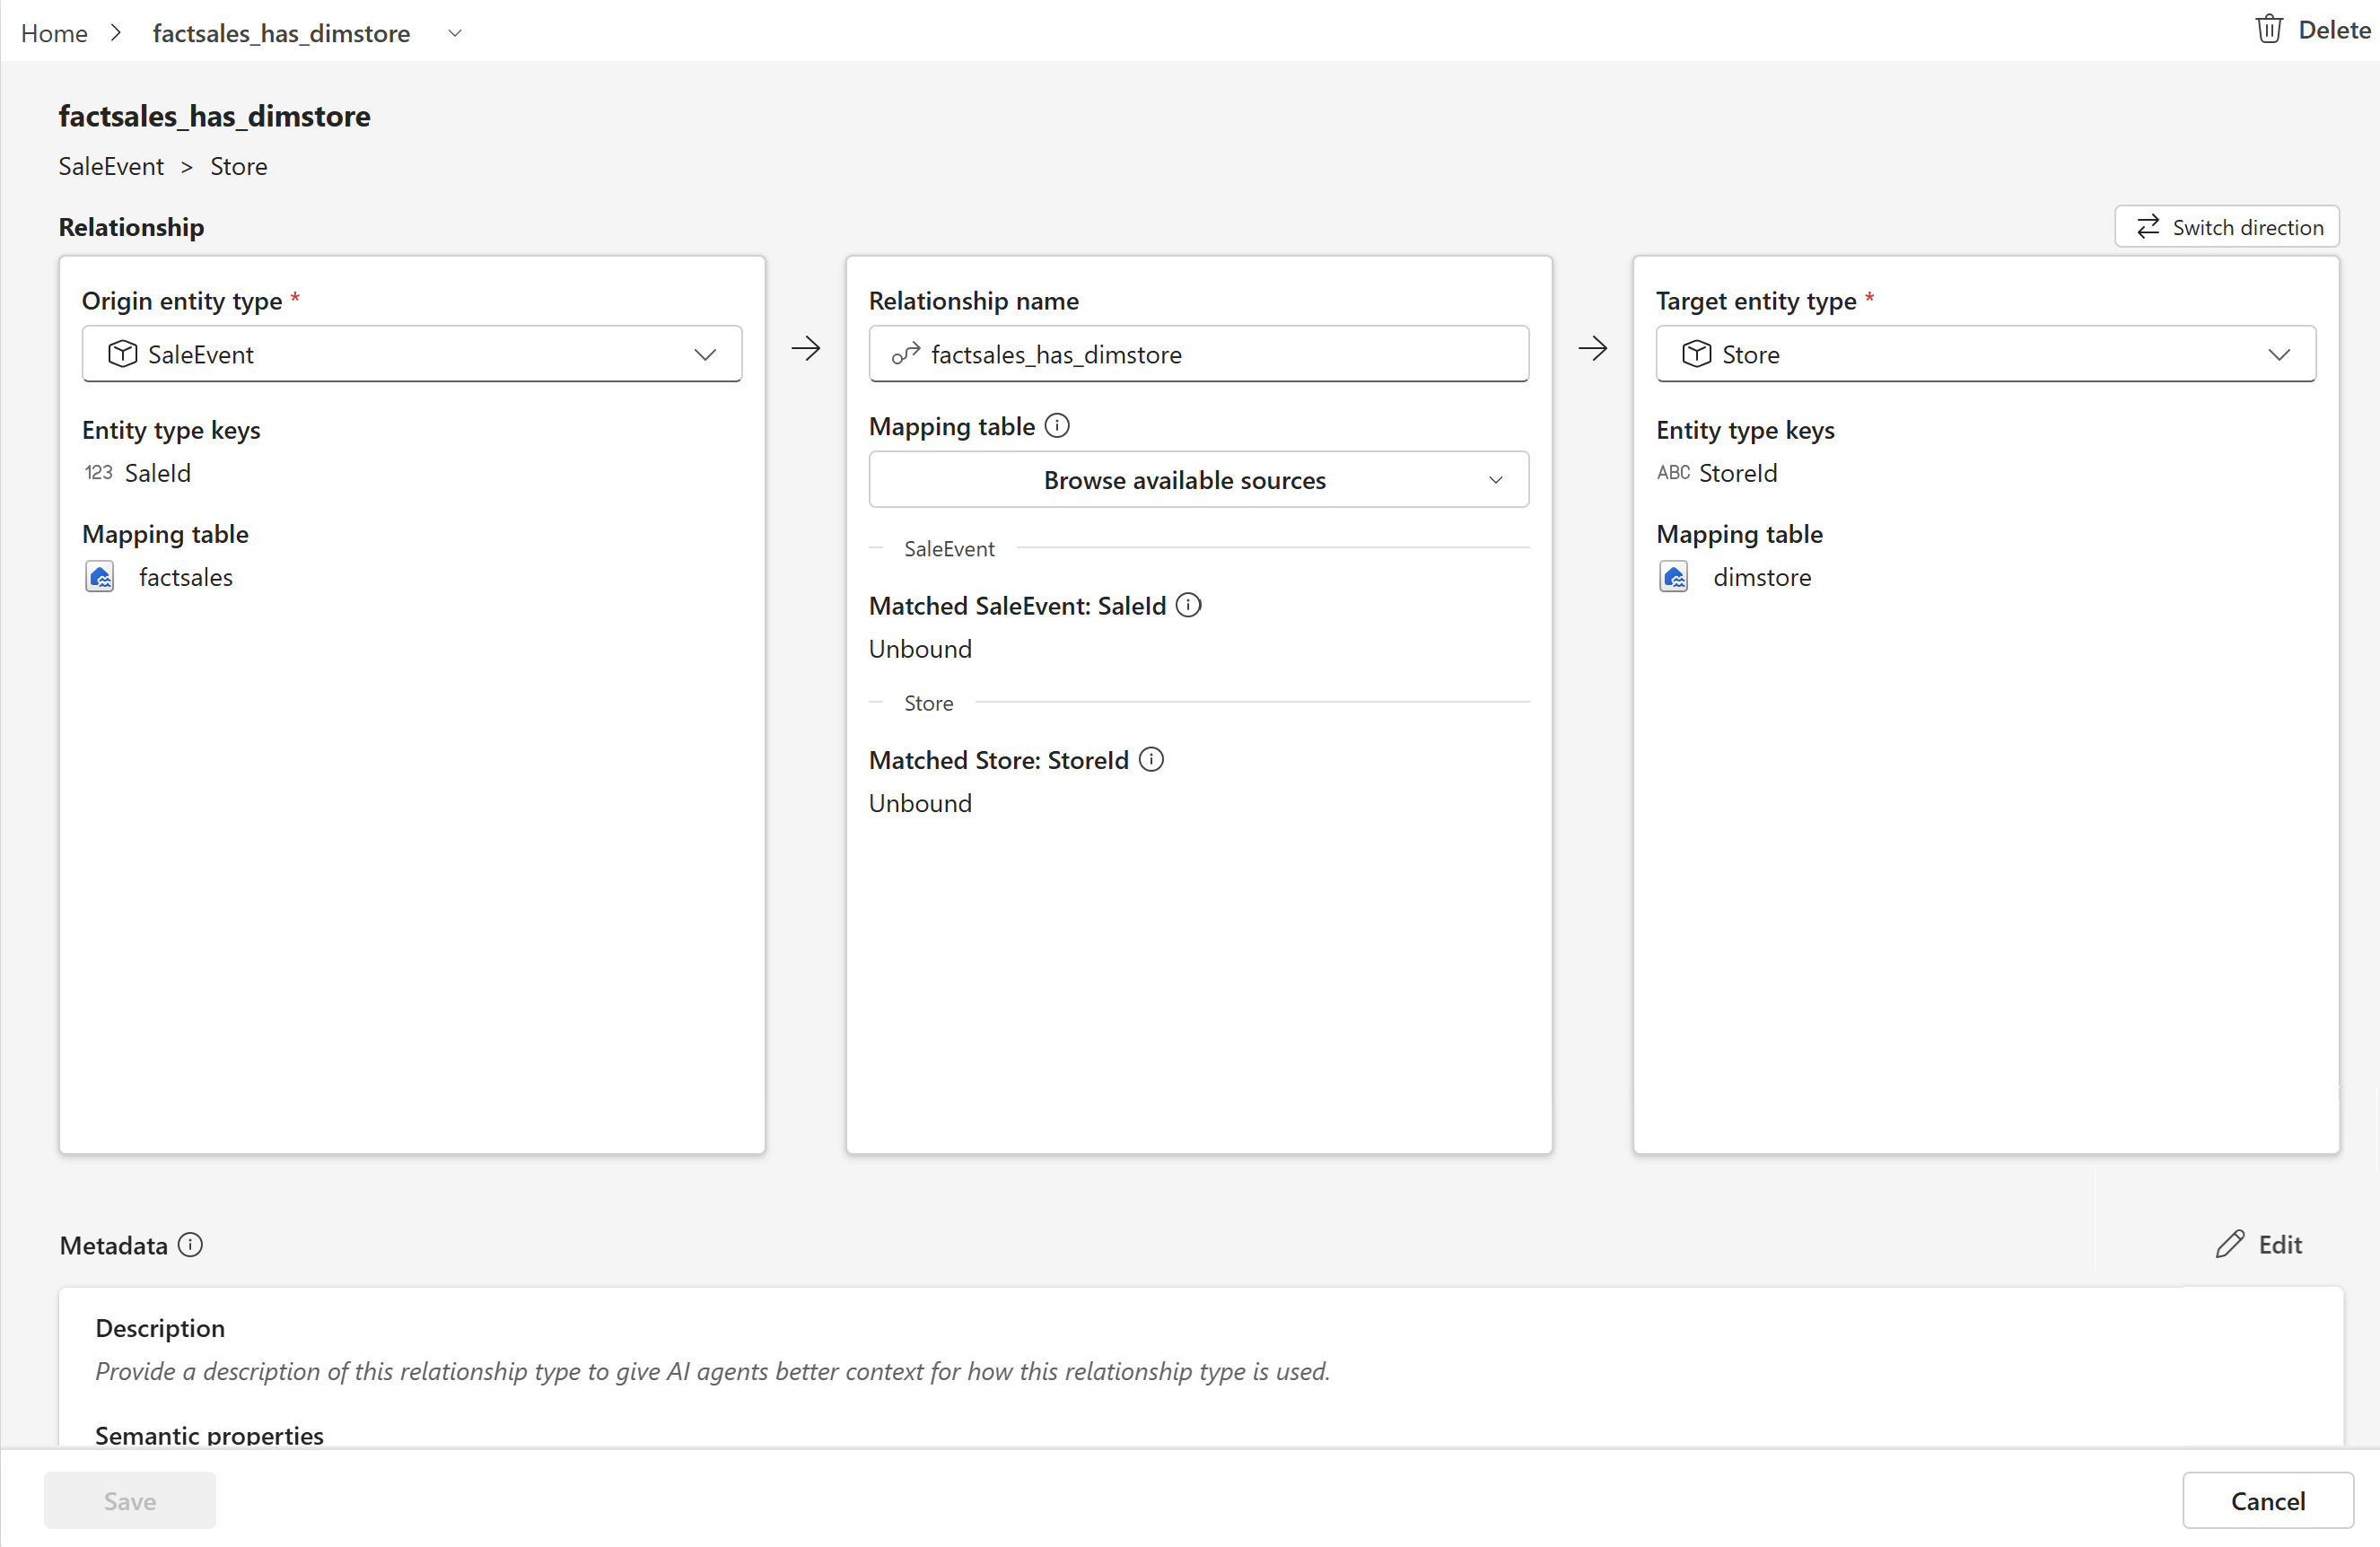
In the middle section, update the relationship type details to match those in the following table.
Original name New name Mapping table MatchedSaleEvent: SaleId Matched ... (target entity) factsales_has_dimstore from factsales
This table in the source data can link Store and SaleEvent entities together, because it contains identifying information for both entity types. Each row in this table references a store and a sale event by ID.SaleId
This setting specifies the column in the relationship source data table whose values match the key property defined on the SaleEvent entity. In this case, the relationship data source and the entity data source both use the factsales table, so you're selecting the same column (SaleId).StoreId
This setting specifies the column in the relationship source data table (factsales >StoreId) whose values match the key property defined on the Store entity (dimstore >StoreId). In the tutorial data, the column name is the same in both tables (StoreId).factsales_has_dimproducts sold factsales
This table in the source data can link Products and SaleEvent entities together, because it contains identifying information for both entity types. Each row in this table references a product and a sale event by ID.SaleId
This setting specifies the column in the relationship source data table whose values match the key property defined on the SaleEvent entity. In this case, the relationship data source and the entity data source both use the factsales table, so you're selecting the same column (SaleId).ProductId
This setting specifies the column in the relationship source data table (factsales >ProductId) whose values match the key property defined on the Products entity (dimproducts >ProductId). In the tutorial data, the column name is the same in both tables (ProductId).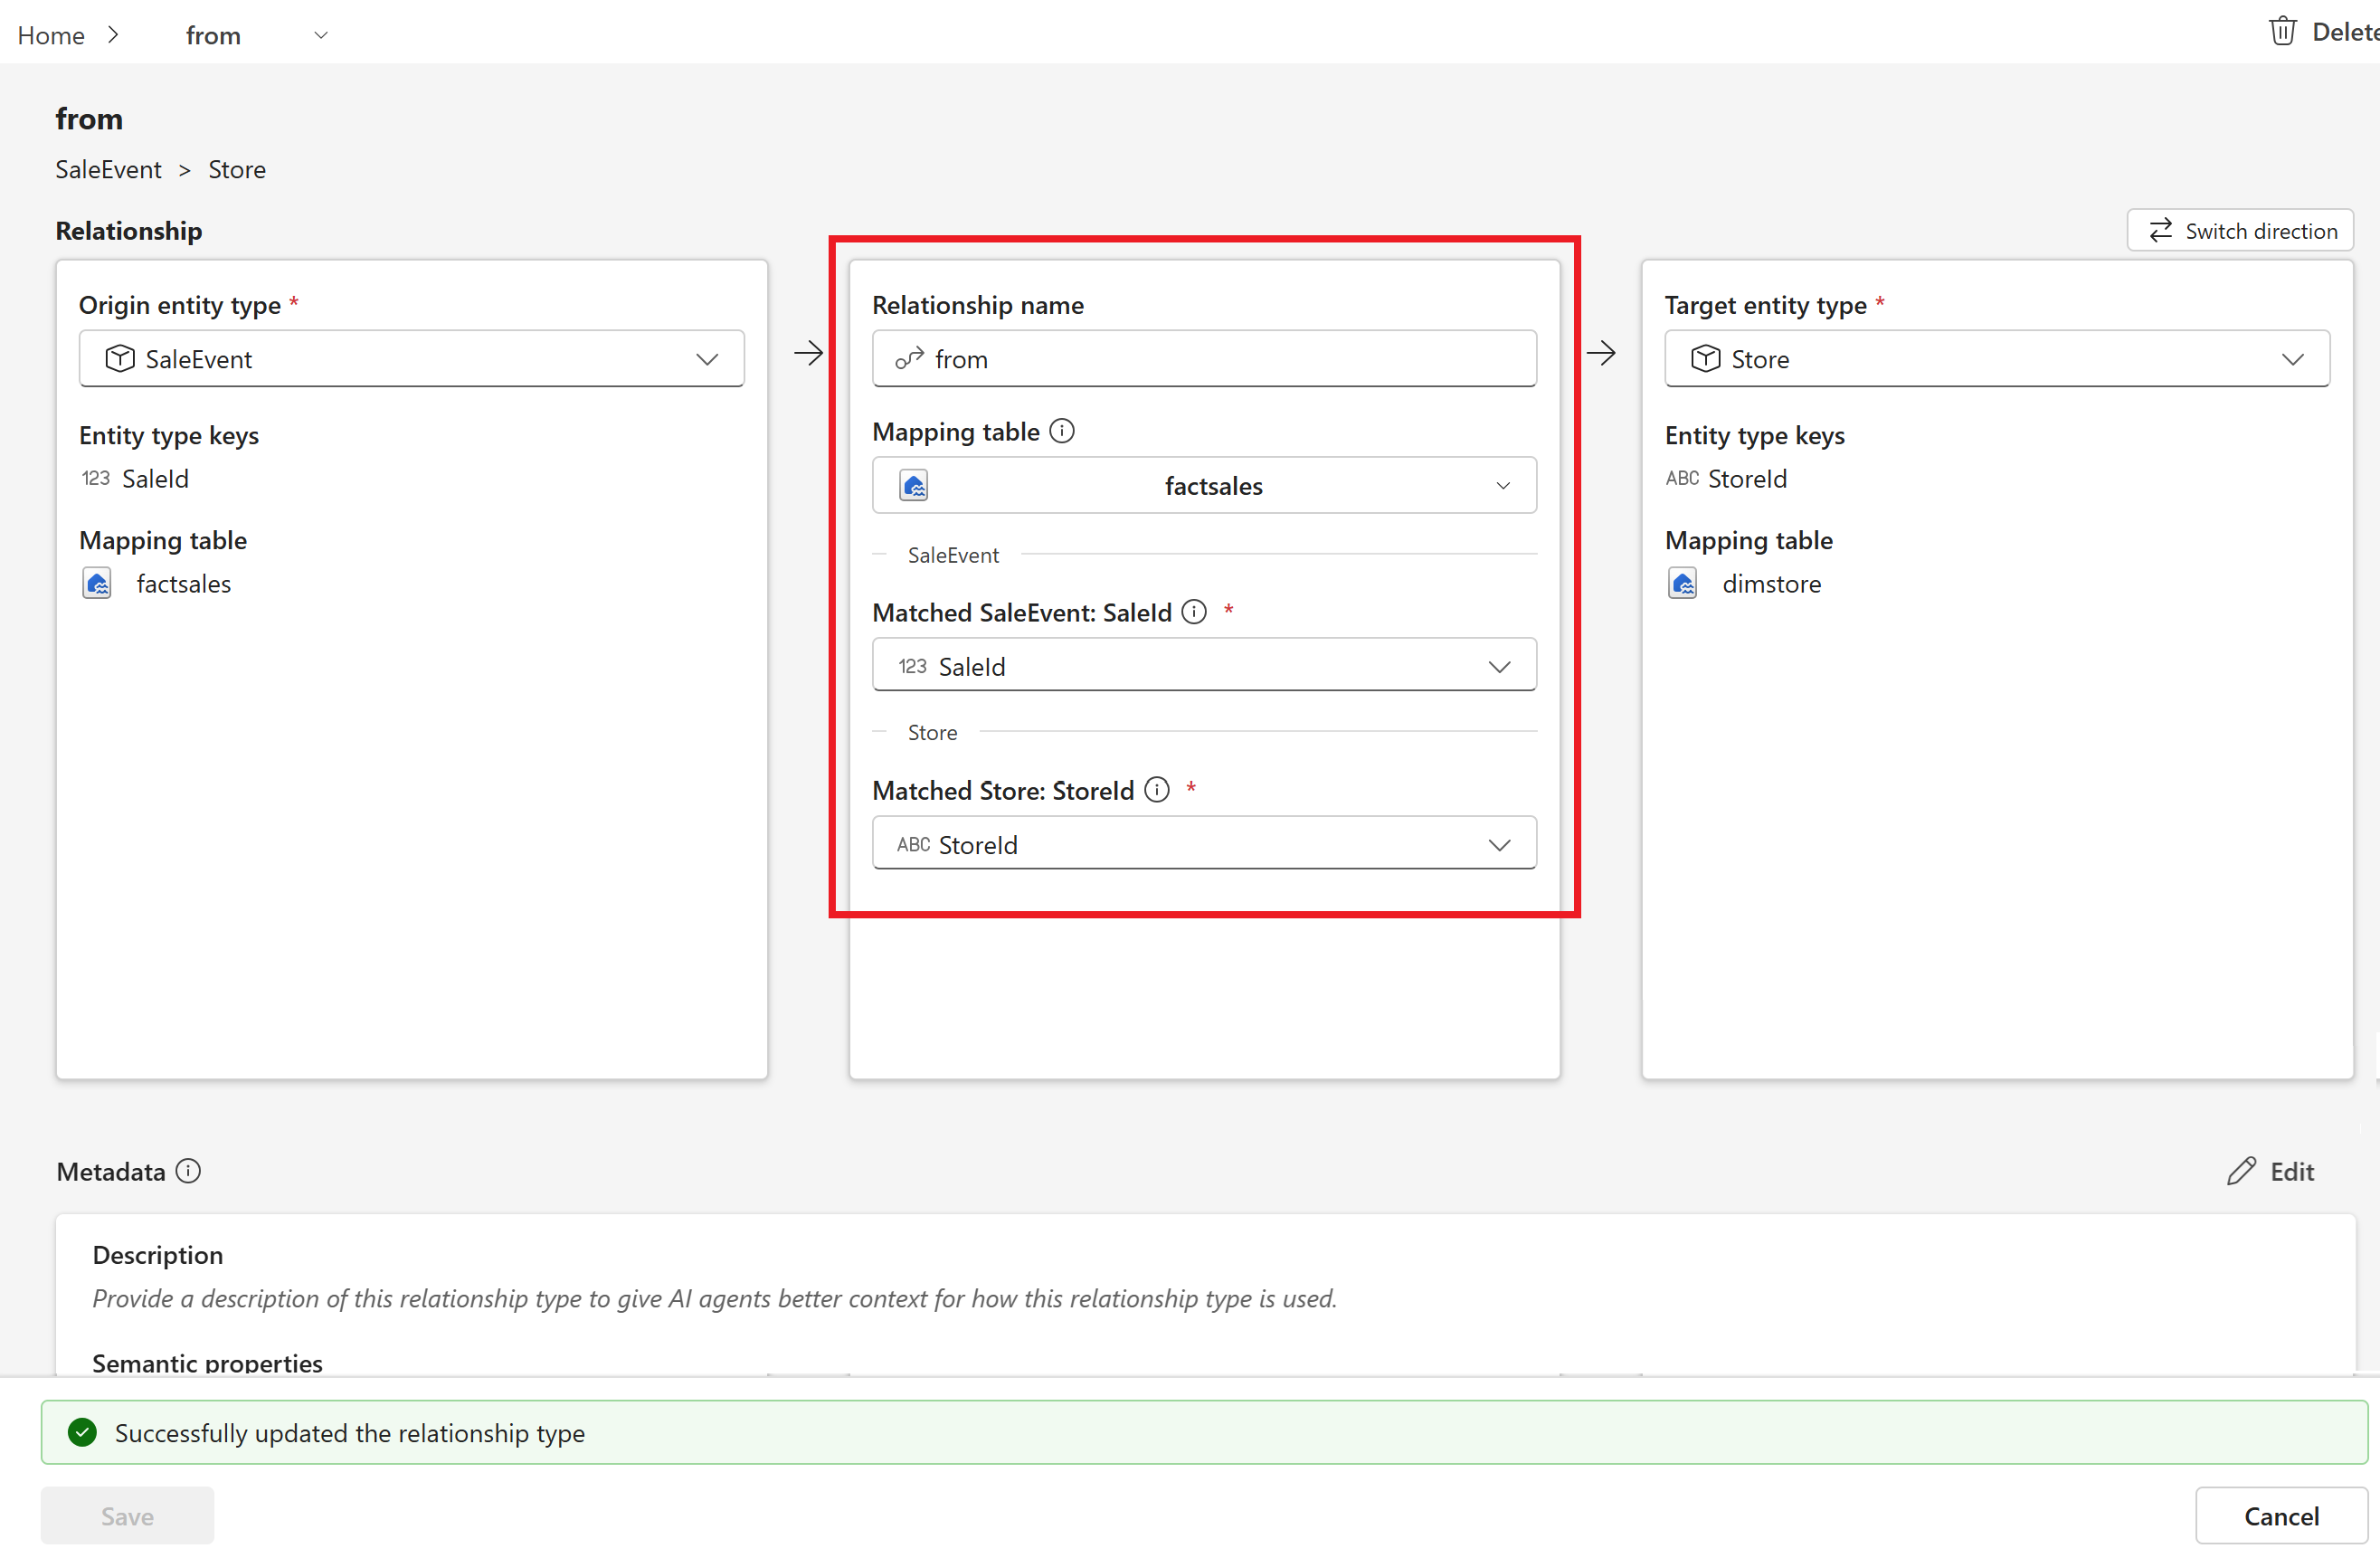
Important
Make sure to select the correct Matched columns that match the entity type key properties.
Save the configuration. Confirm that the relationship type updated successfully, then select Cancel to close the configuration options.
Select Home to return to the configuration canvas to access the other relationship type.
Repeat these steps until all relationship types are updated.


When you finish updating the relationship types, you see their new names reflected with the SaleEvent entity in the semantic canvas.

Building an ontology from OneLake
When your data is stored in OneLake, you can build an ontology from the OneLake data tables.
The manual process involves these steps:
- Create an ontology item
- Create entity types
- Create data bindings for the entity types
- Select entity type keys
- Create relationship types between entity types, and bind them to source data
In this tutorial step, you build an ontology from the sample OneLake data that you set up in the previous step.
Create ontology (preview) item
In your Fabric workspace, select + New item. Search for and select the Ontology (preview) item.
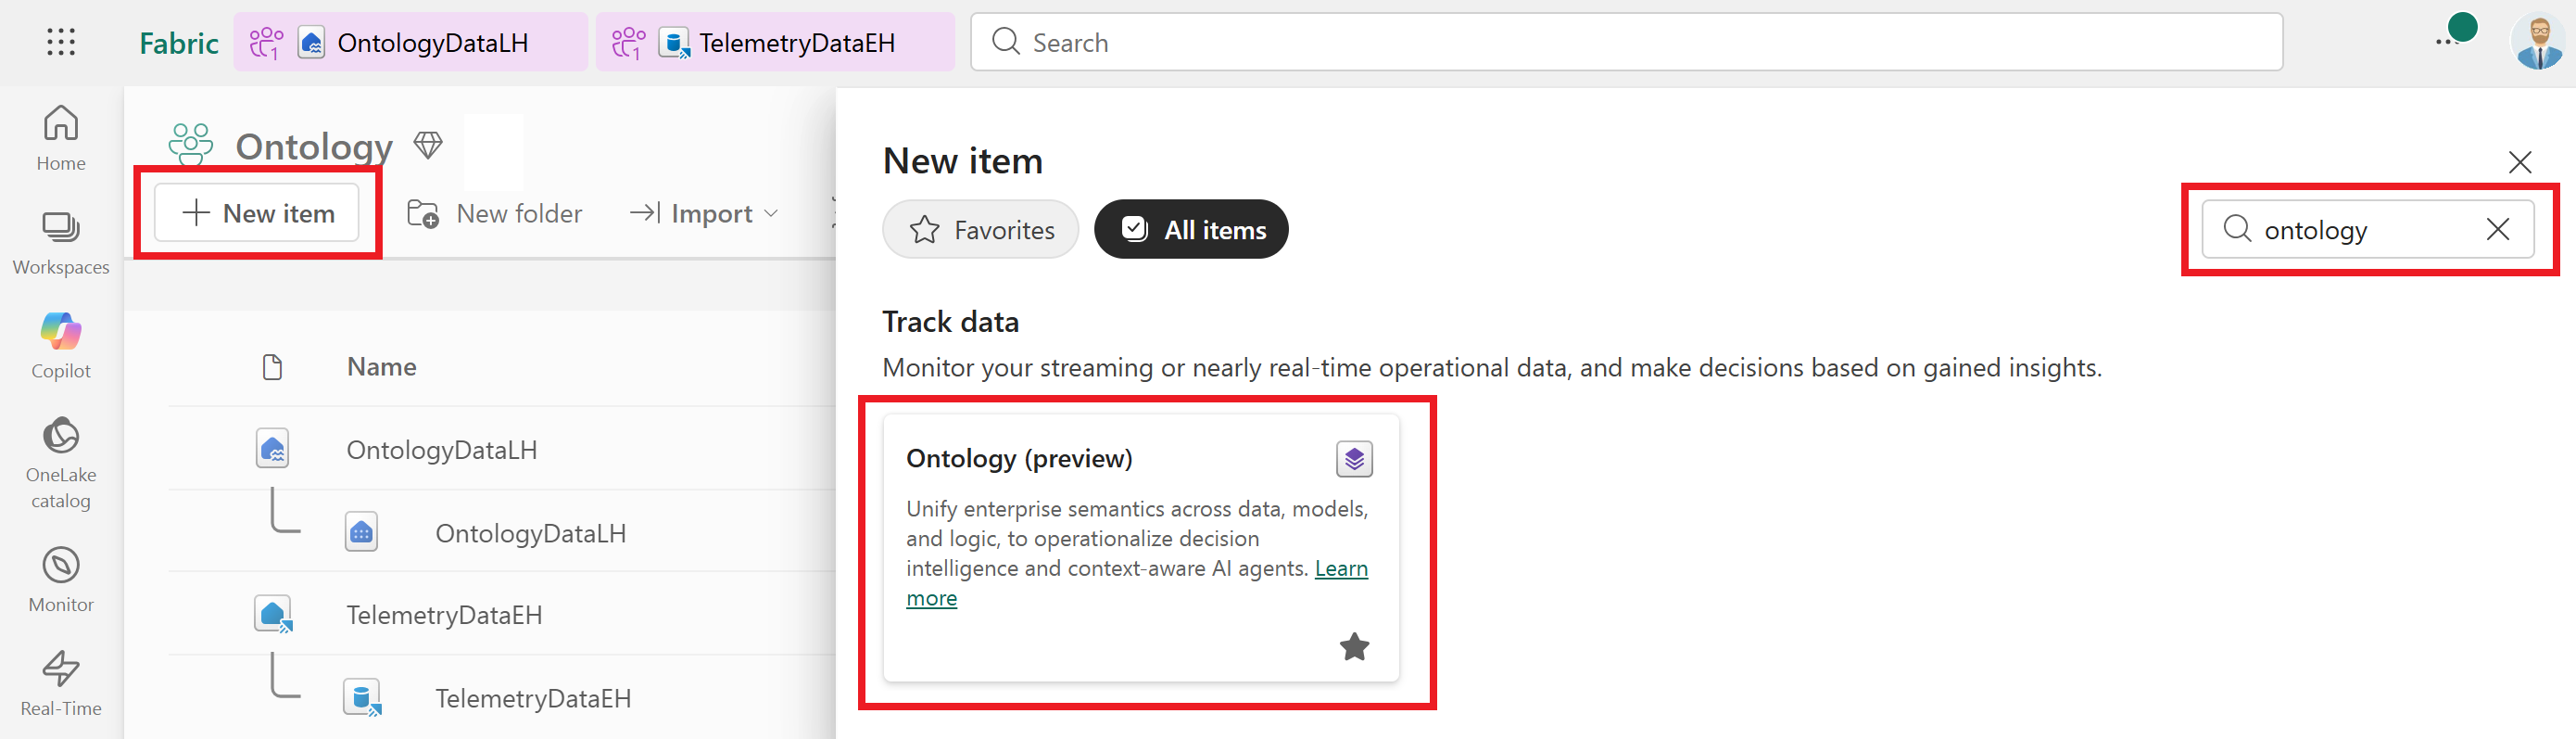
Enter RetailSalesOntology for the Name of your ontology and select Create.
Tip
Ontology names can include numbers, letters, and underscores. Don't use spaces or dashes.

The ontology opens when it's ready.

Note
If you see an error that Fabric is unable to create the ontology (preview) item, make sure that all the required settings are enabled for your tenant, as described in the Tutorial prerequisites.
Next, create entity types, data bindings, and relationships based on data from your lakehouse tables.
Create entity types and data bindings
First, create entity types. Entity types represent types of objects in a business. This step has three entity types: Store, Products, and SaleEvent. After you create the entity types, create their properties by binding source data columns from the OntologyDataLH lakehouse tables.
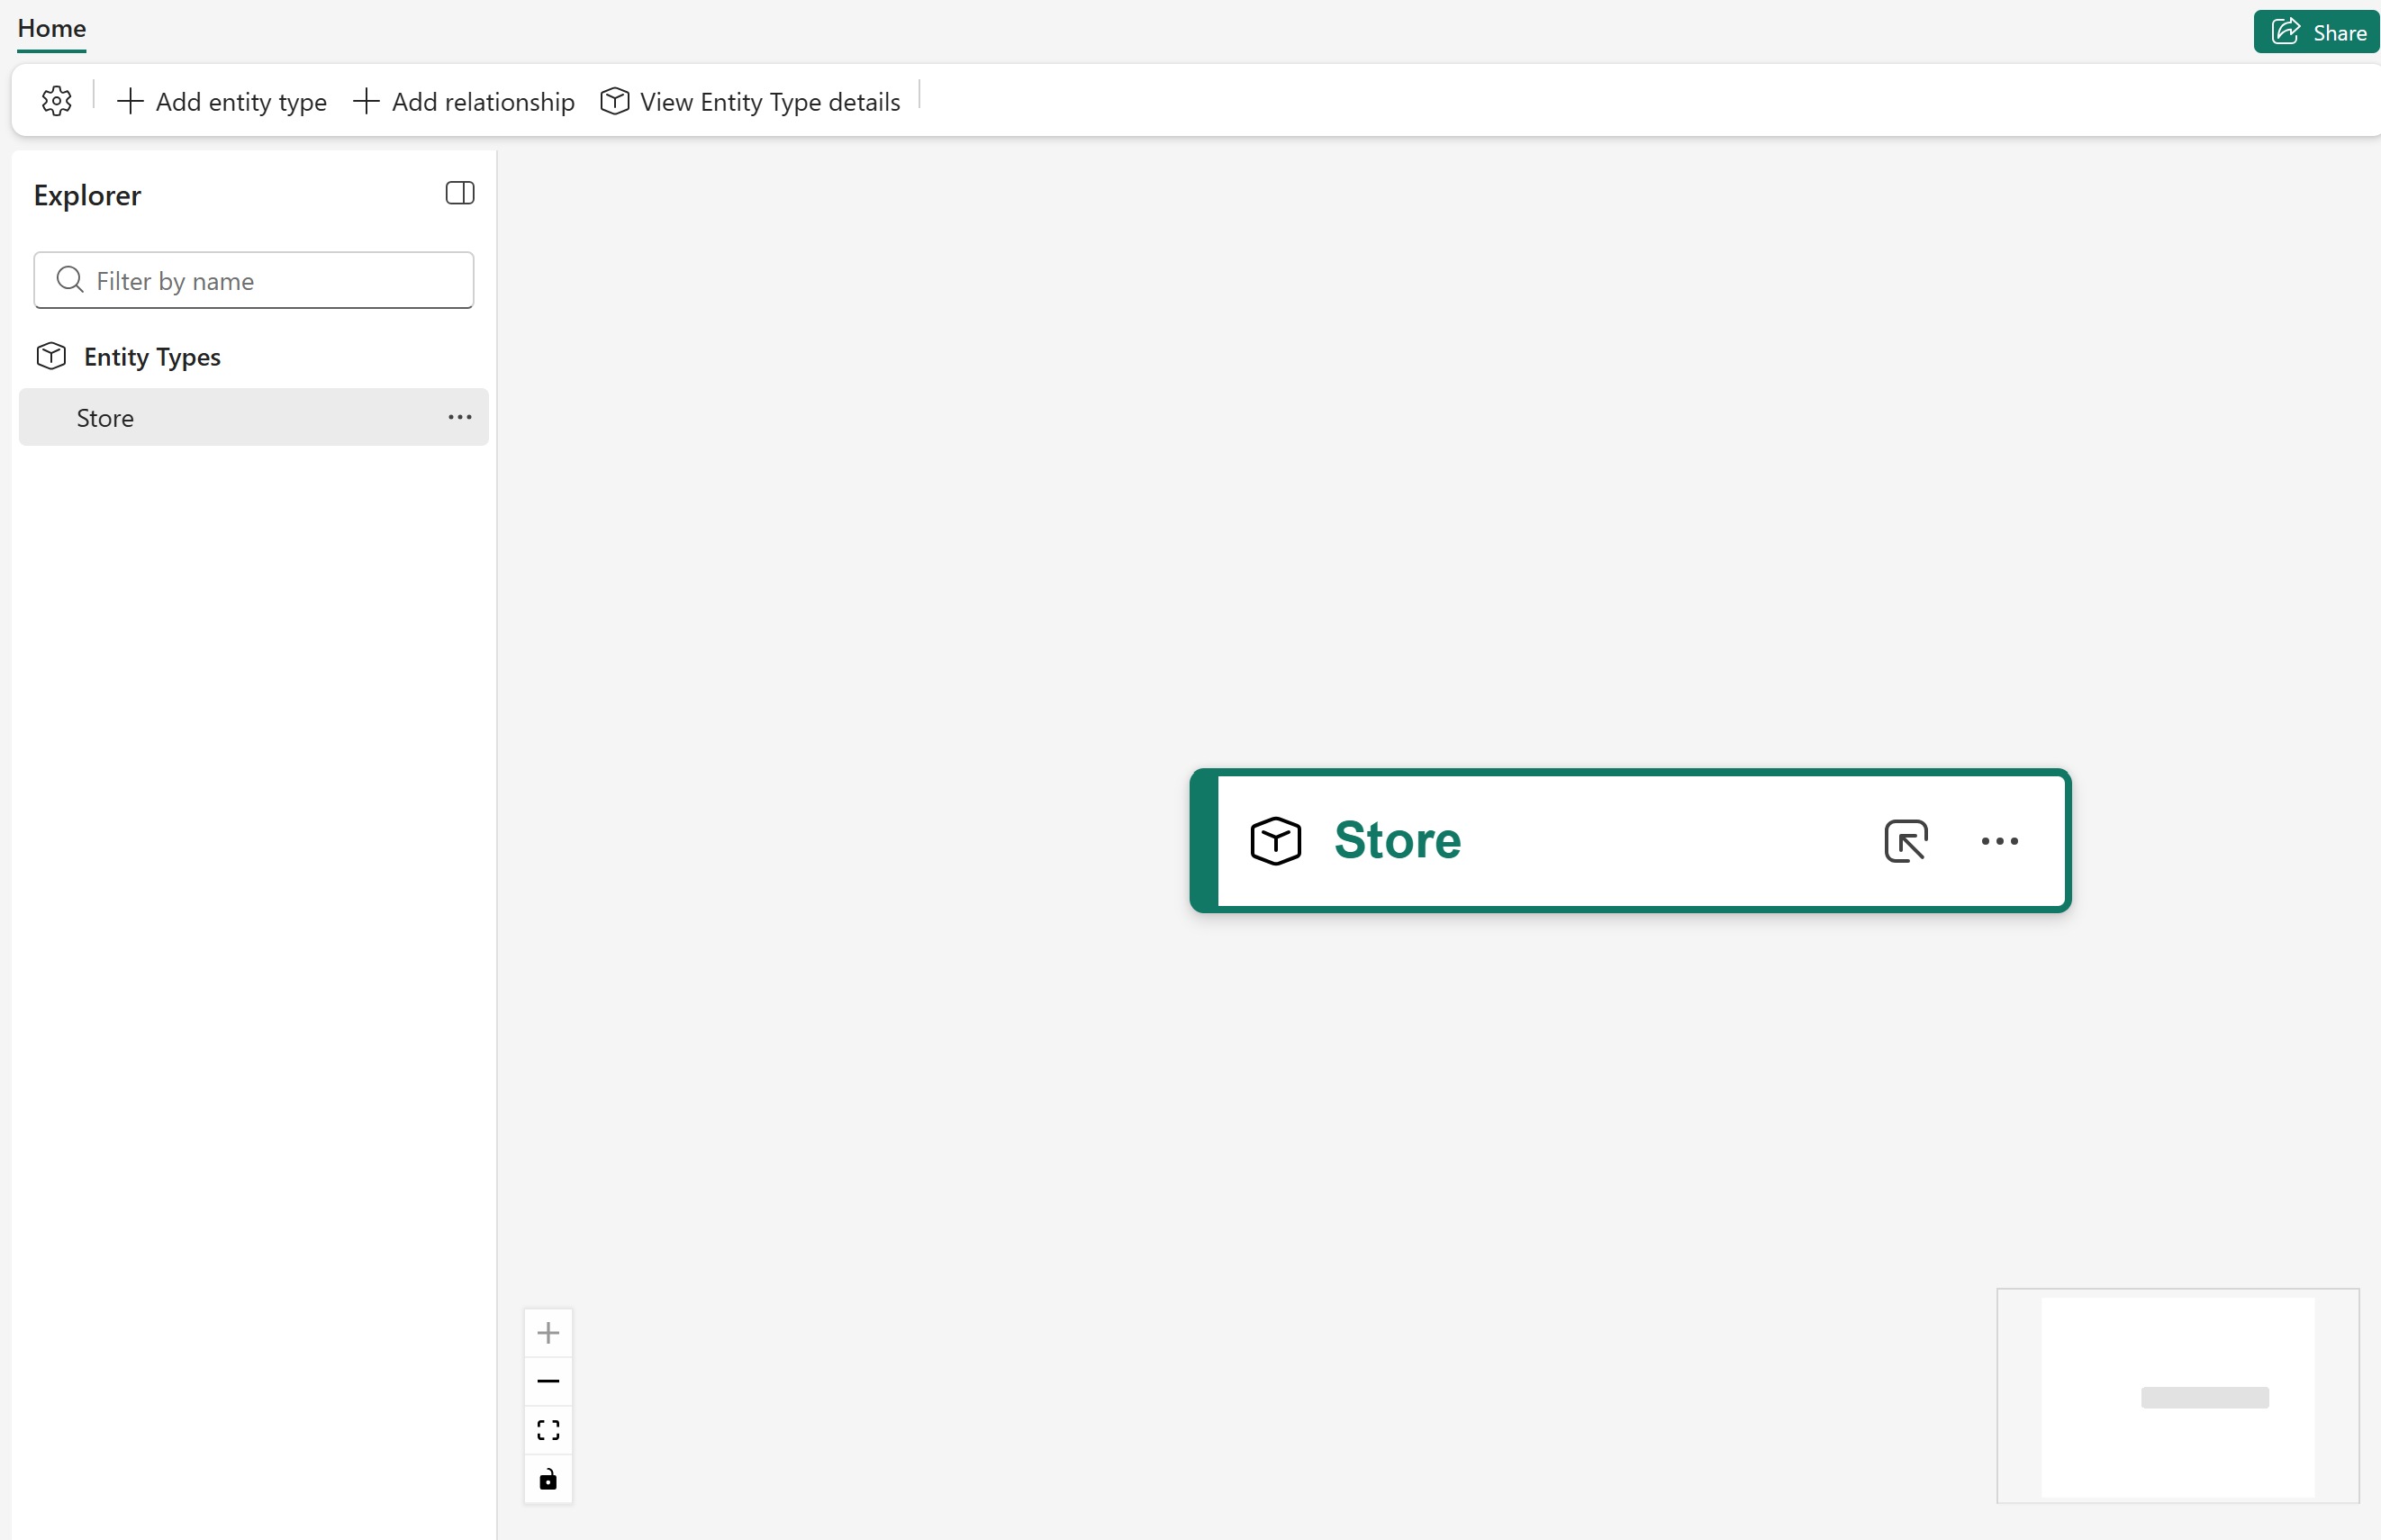
Add first entity type (Store)
From the top ribbon or the center of the configuration canvas, select Add entity type.

Enter Store for the name of your entity type and select Add Entity Type.
The Store entity type is added to the configuration canvas.
Bind Store data
On the configuration canvas, select ... next to the entity name and select Bind data.
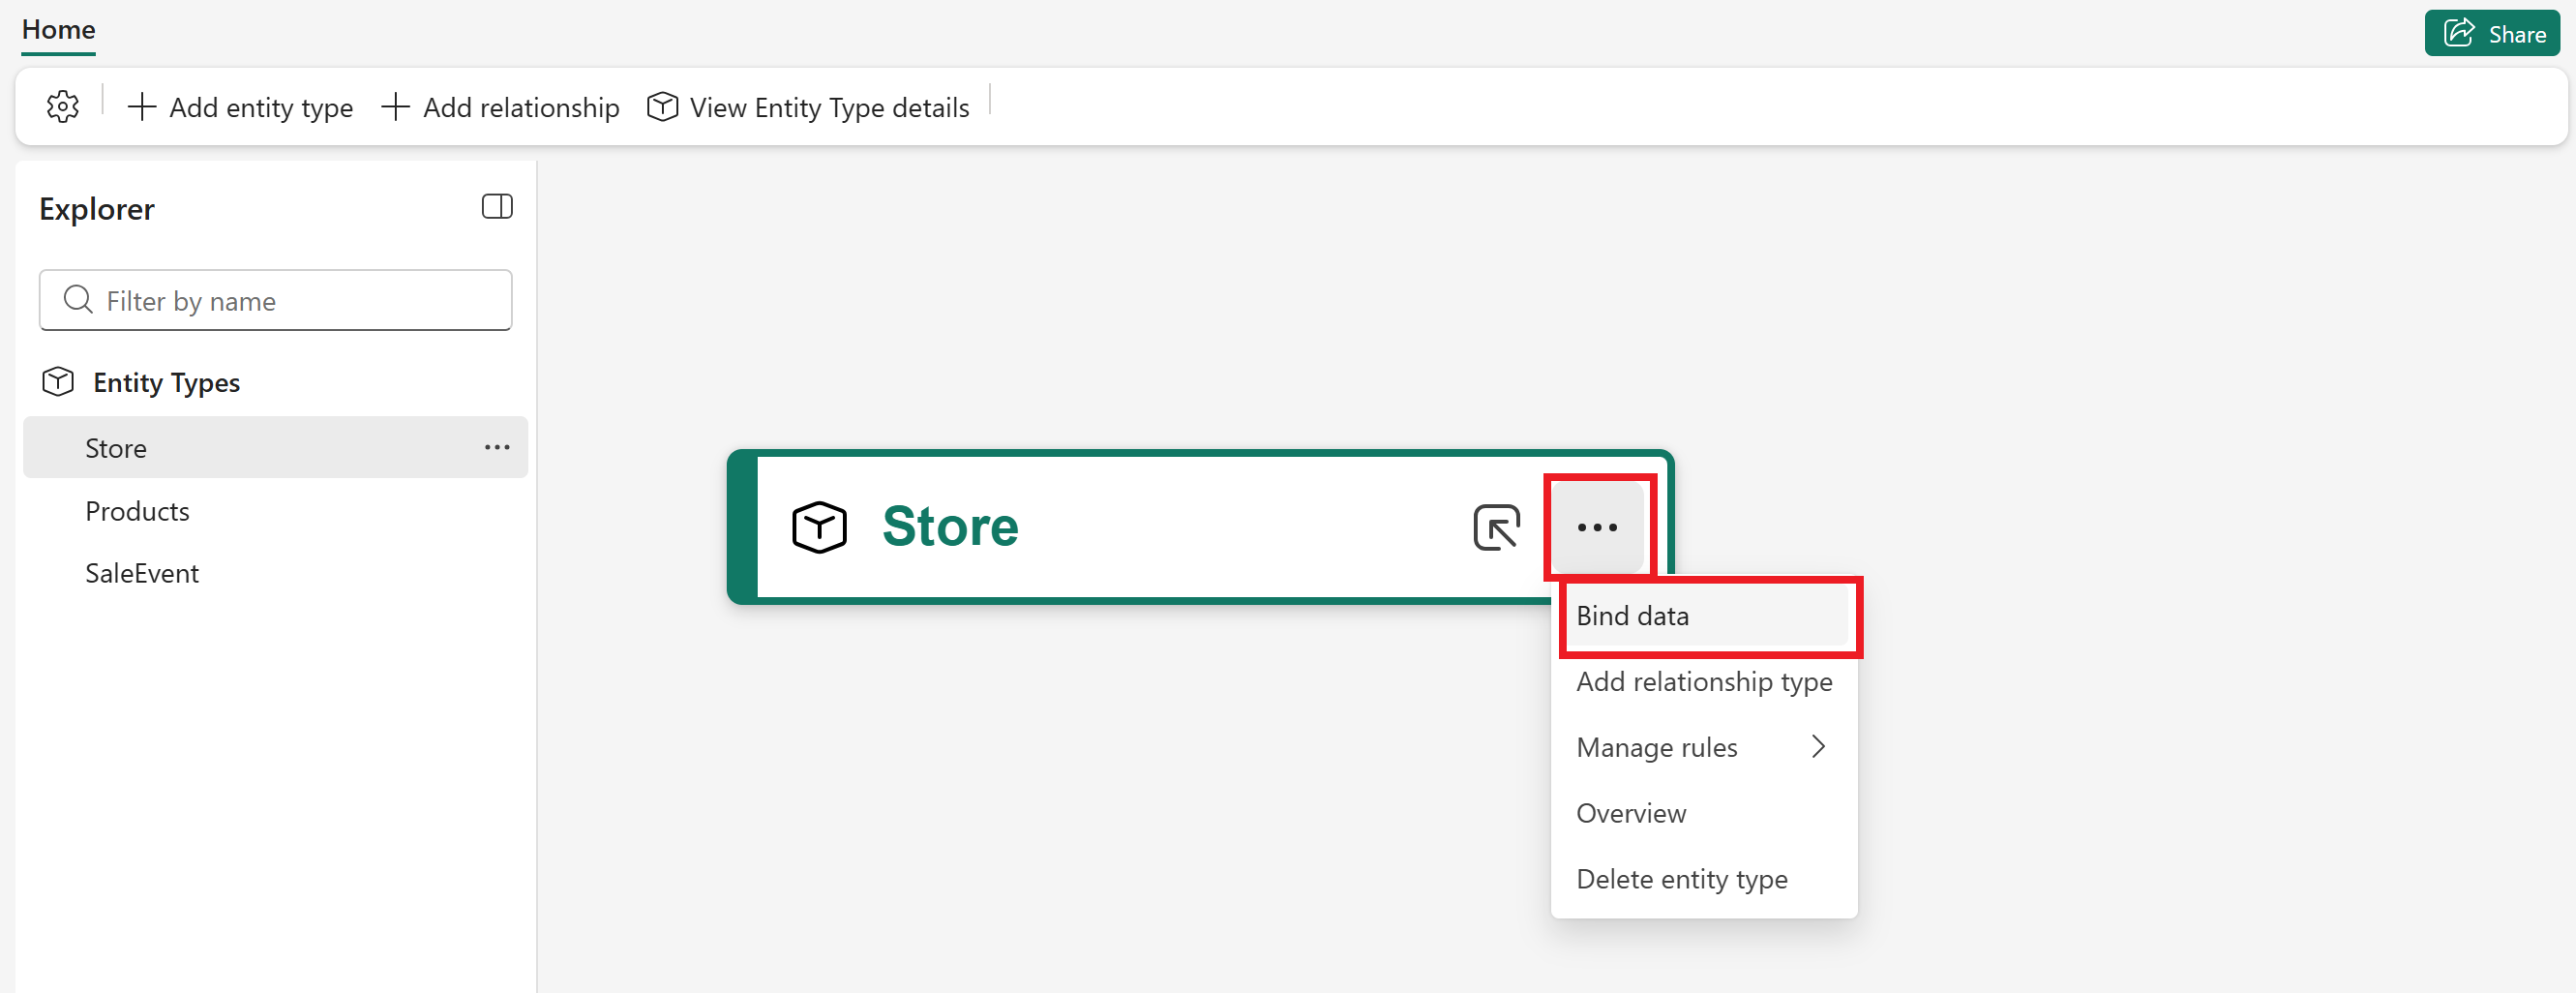
Select Add data binding > Lakehouse table.
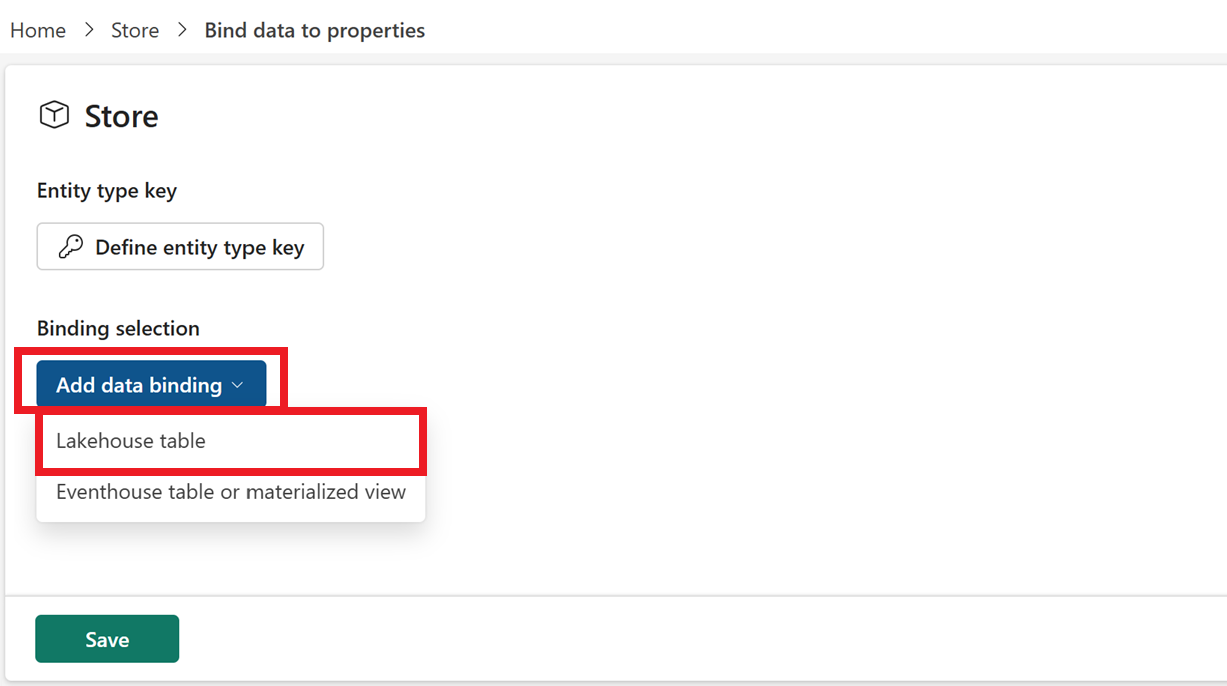
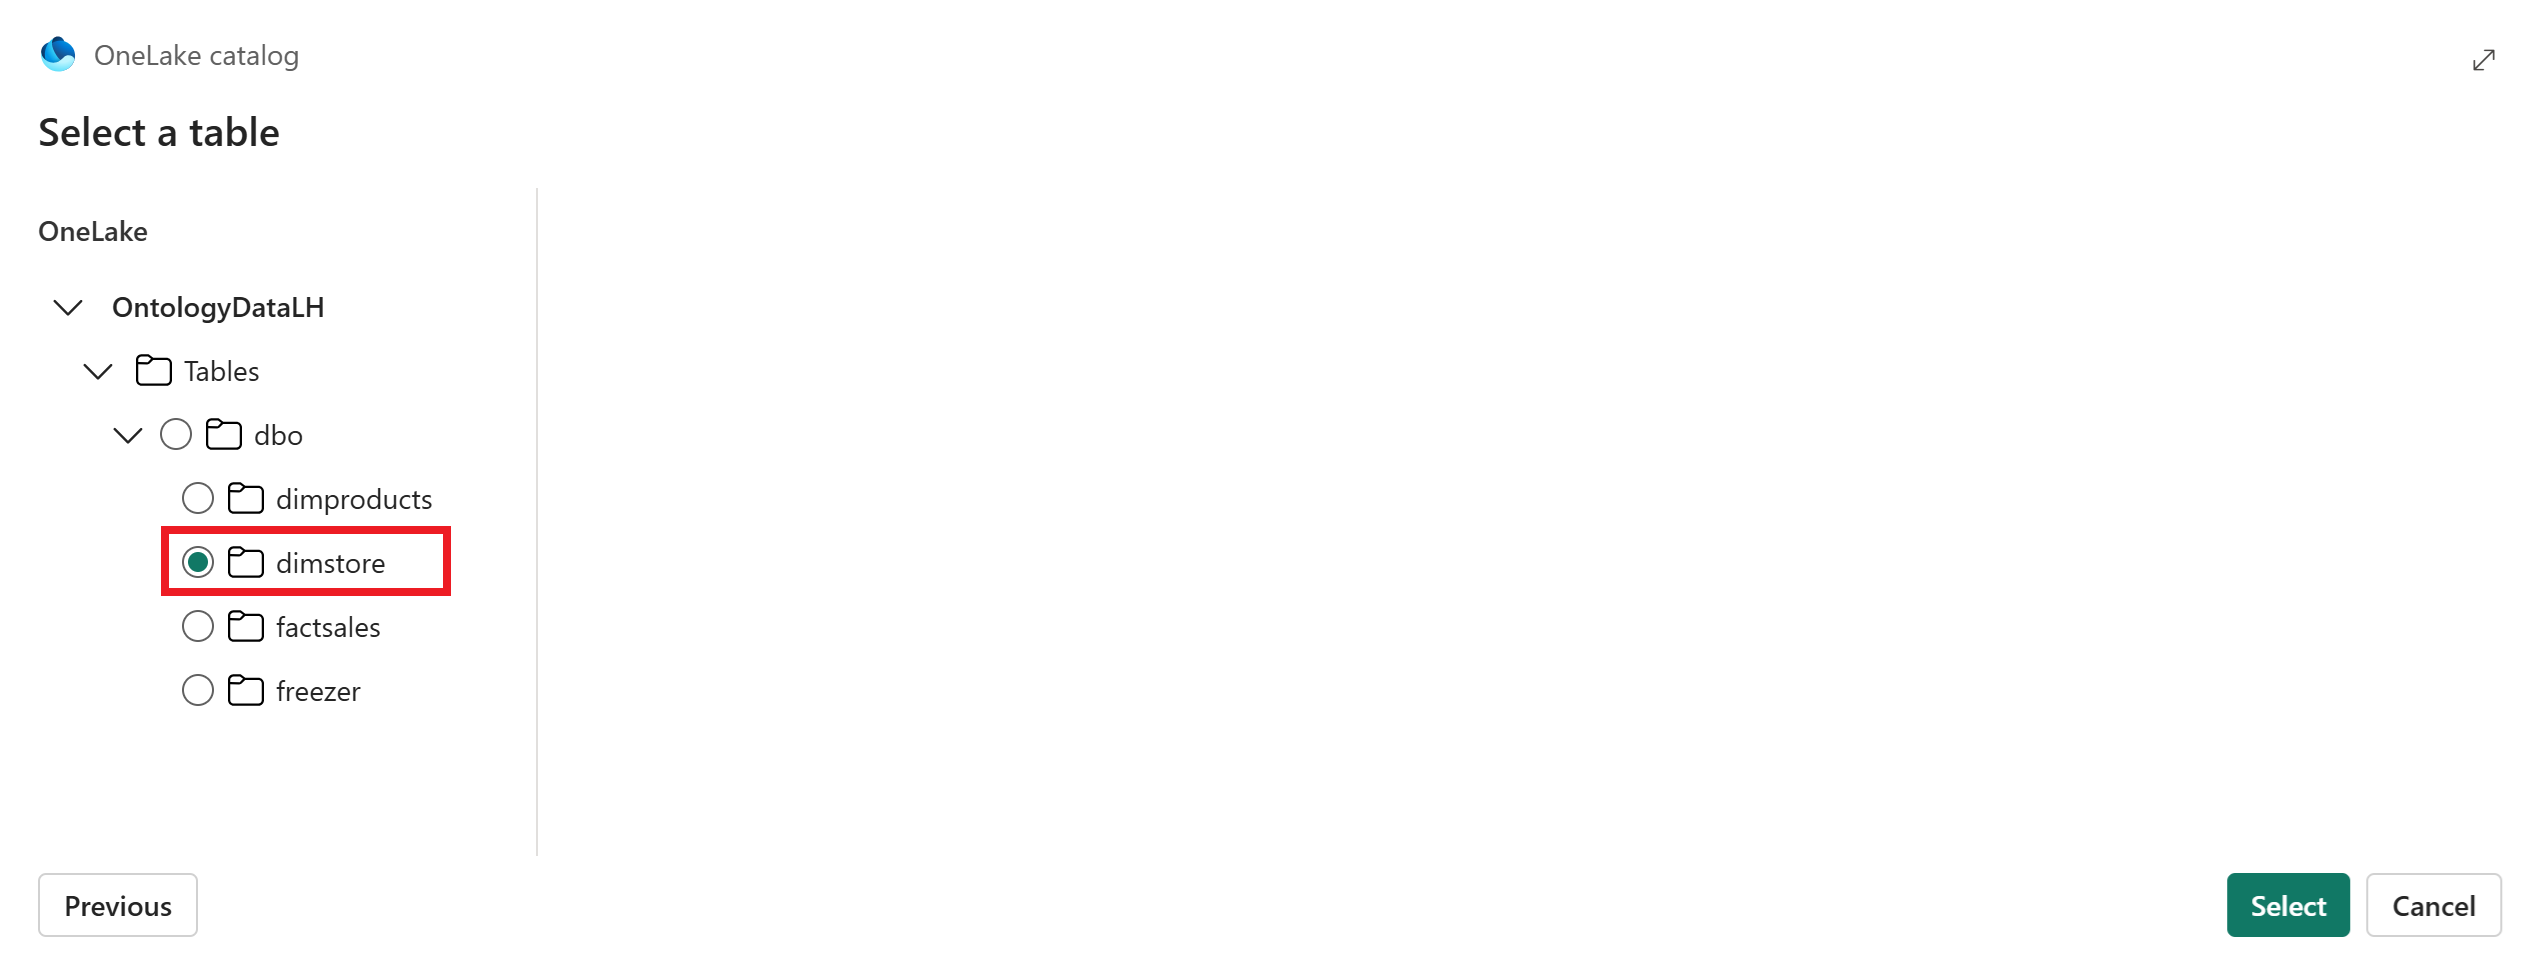
Choose your data source.
- Select the OntologyDataLH lakehouse and select Next.
- Select the dimstore table and Select.
Fields from the source table populate the data binding configuration. Observe the sections of the configuration page:
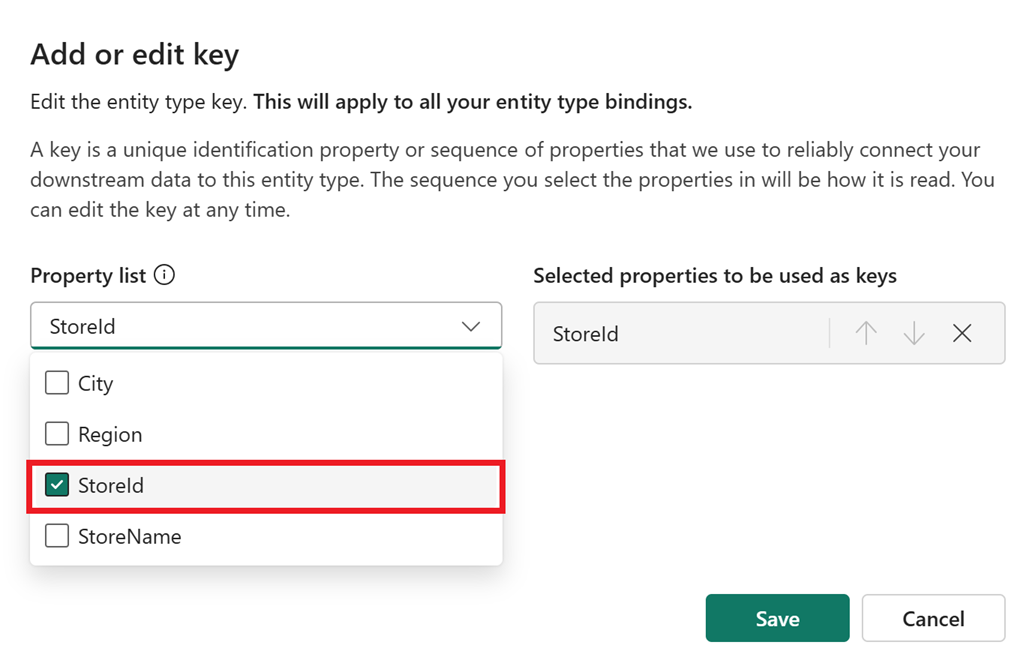
- Entity type key: Identifies the field (or fields) that can be used to uniquely identify each record of ingested data.
- Binding selection: Identifies the source table that holds the data for the binding.
- Entity type key mapping: Identifies the column(s) in the source data table that map to the entity type key property. You can select string and integer columns from your source data as the entity type key. Together, the columns you select uniquely identify a record.
- Properties: Lists the columns from the source data that will be represented as properties on the Store entity type. The Source column side populates automatically with the columns from the dimstore table, and the Property name side lists their corresponding property names on the Store entity type within ontology. For this tutorial, keep the default property names.
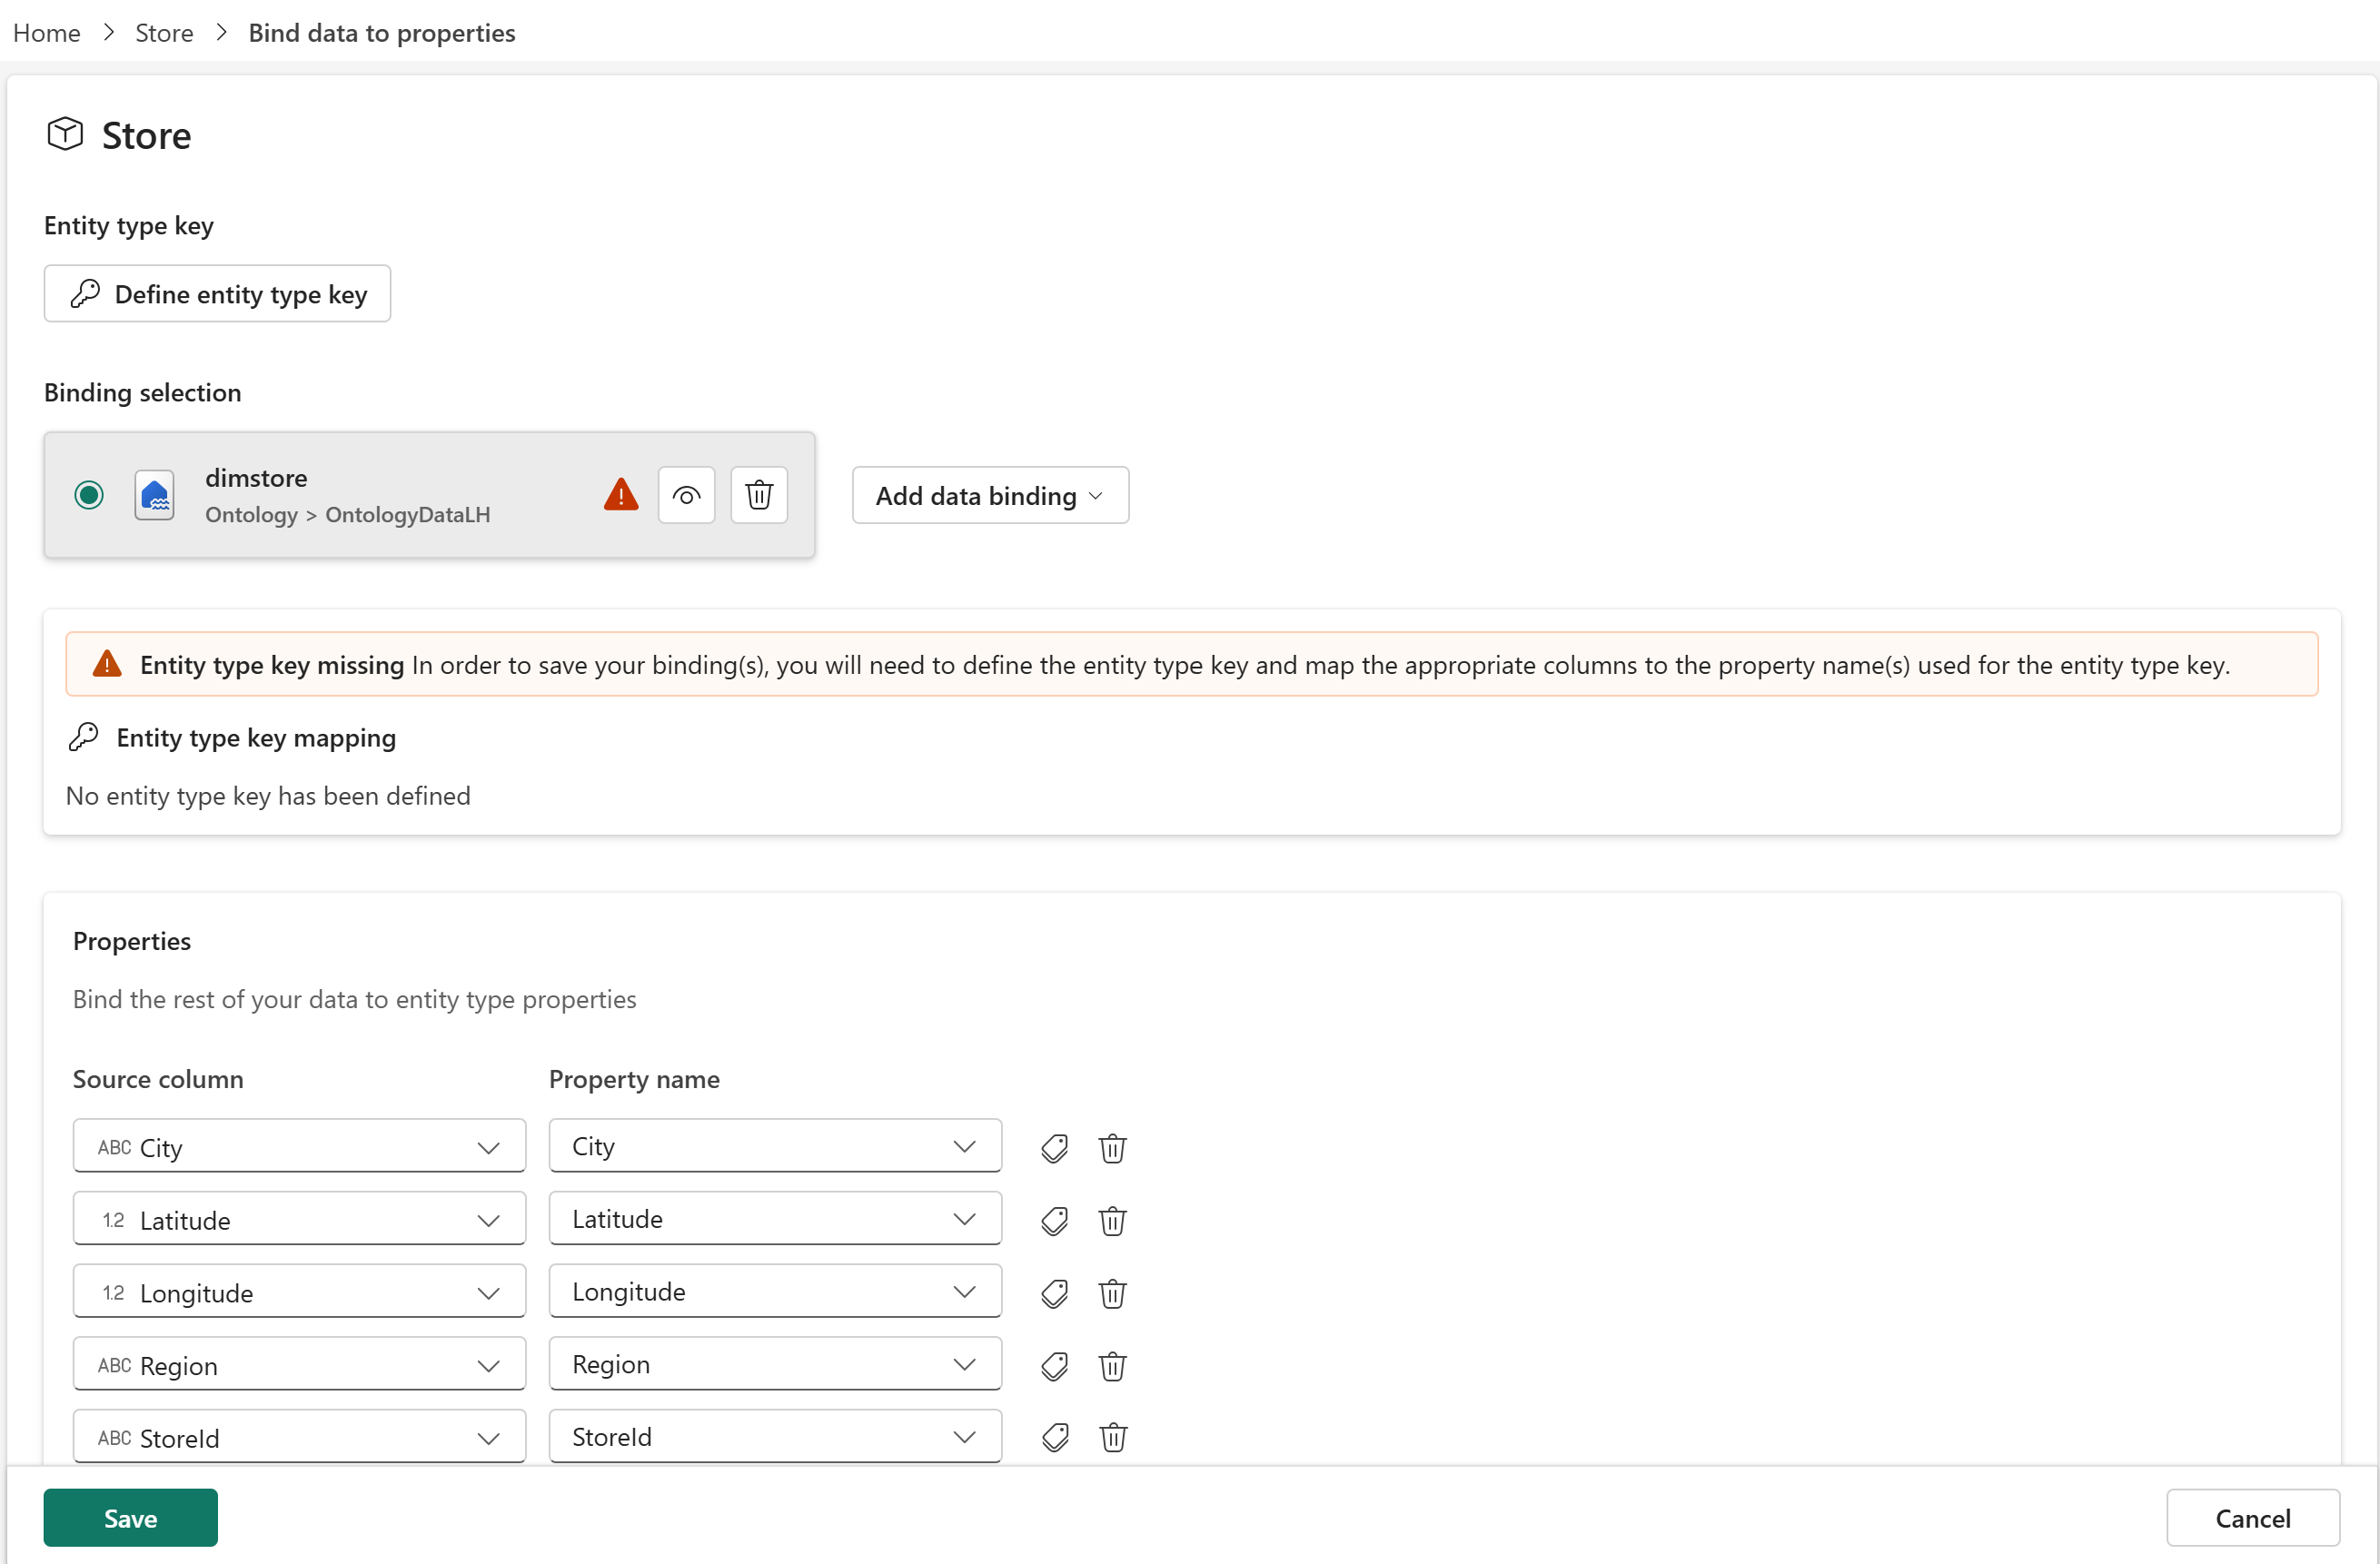
Select Define entity type key at the top of the configuration. Select StoreId from the property list and select Save.
Save the data binding.
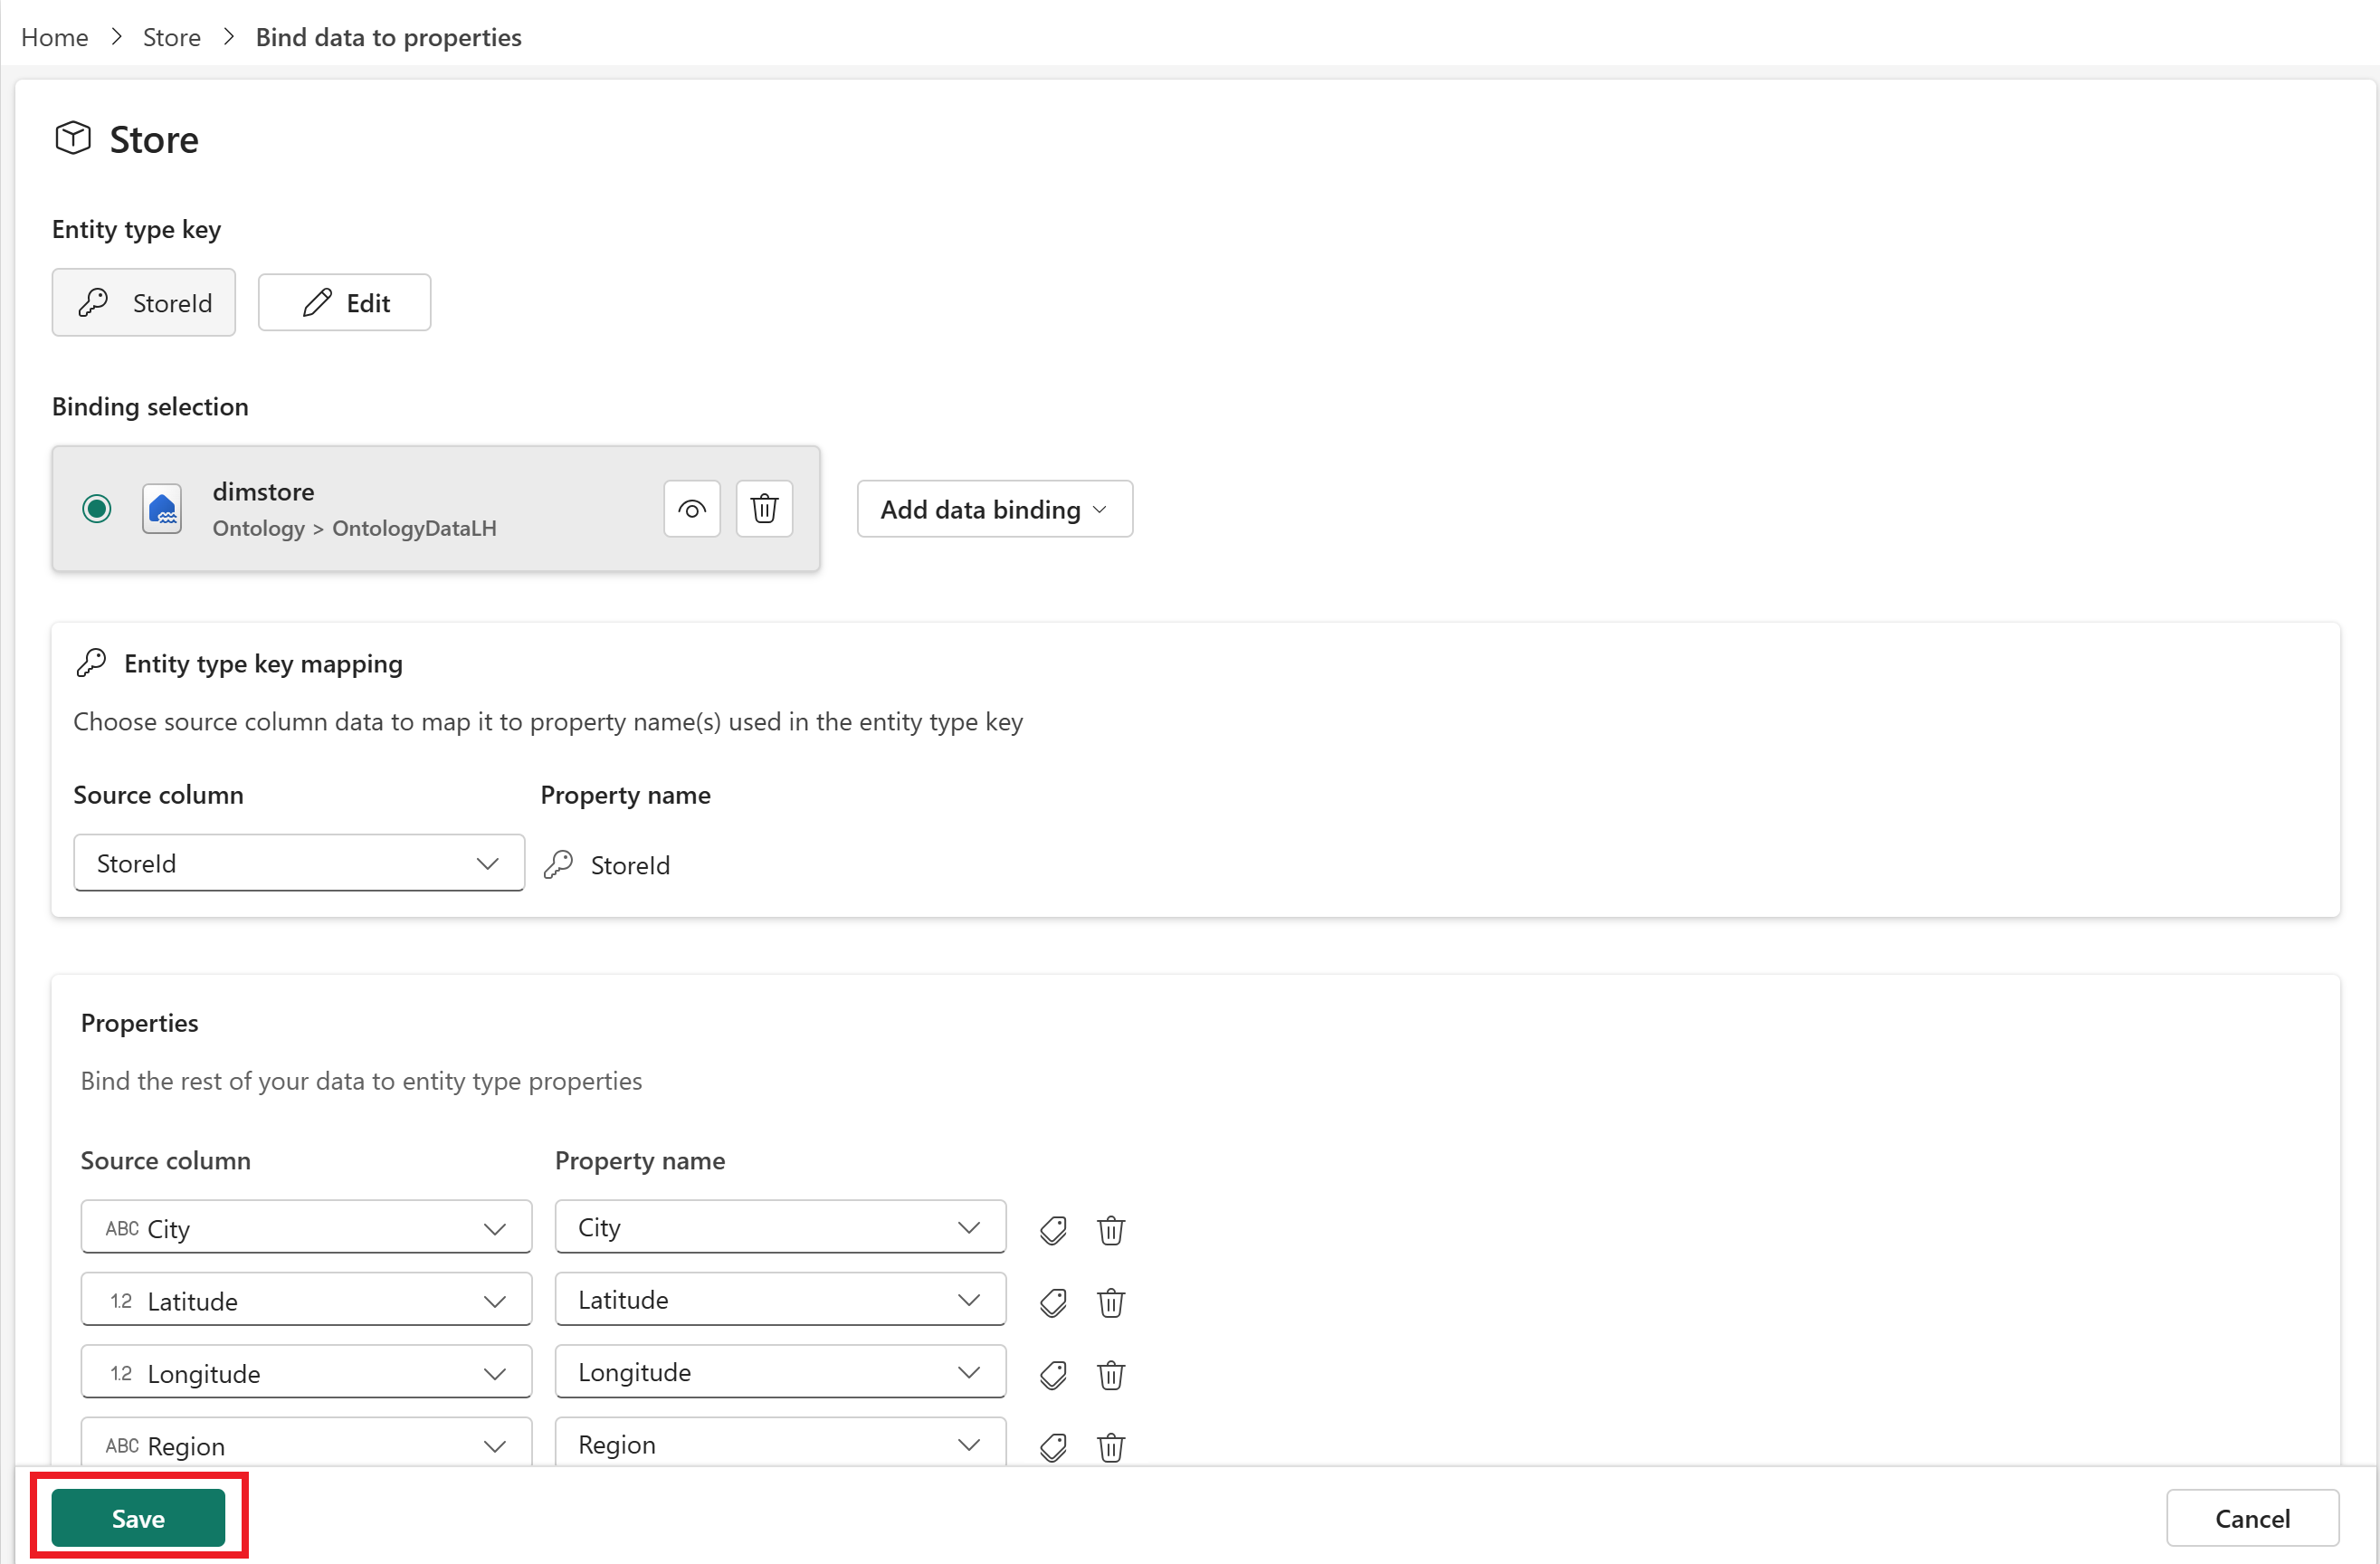
Confirm that the entity type updated successfully, then select Cancel to close the configuration options.

You see the Configure page of the entity type details. This page surfaces important information about the entity type, including its properties and data bindings. View your configured data bindings.


Now the Store entity type is ready. Continue to the next section to create the remaining entity types.
Add other entity types (Products, SaleEvent)
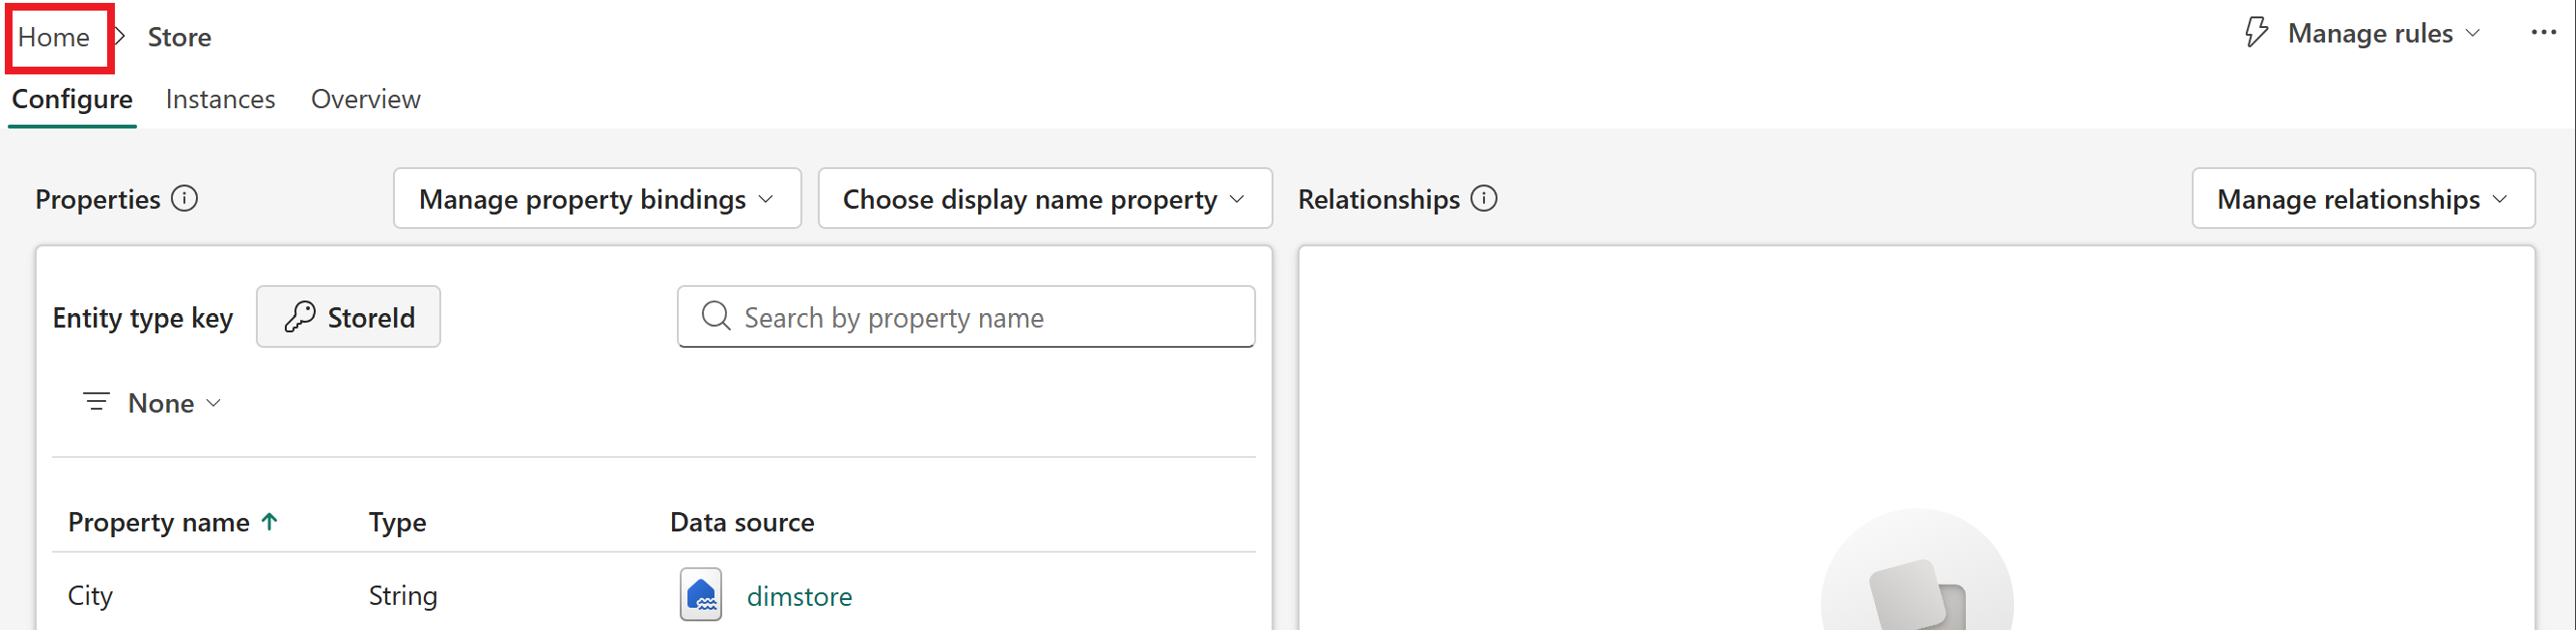
Select Home to return to the configuration canvas where you can add new entity types.
Follow the same steps that you used for the Store entity type to create the entity types described in the following table. Each entity has a data binding with the default columns from its source table.
| Entity type name | Source table in OntologyDataLH | Entity type key | Notes |
|---|---|---|---|
| Products | dimproducts | ProductId |
Use the plural name Products to avoid conflict with the GQL reserved word PRODUCT. |
| SaleEvent | factsales | SaleId |
The default binding configuration loads a new Timeseries data section. Ignore this field and continue binding static data as usual. |
When you're done, you see these entity types listed in the Explorer in the configuration canvas.

Create relationship types
Next, create relationship types between the entity types to represent contextual connections in your data.
SaleEvent from Store
Select the SaleEvent entity type from the Explorer.
Select Add relationship from the menu ribbon, or ... > Add relationship type from the configuration canvas.
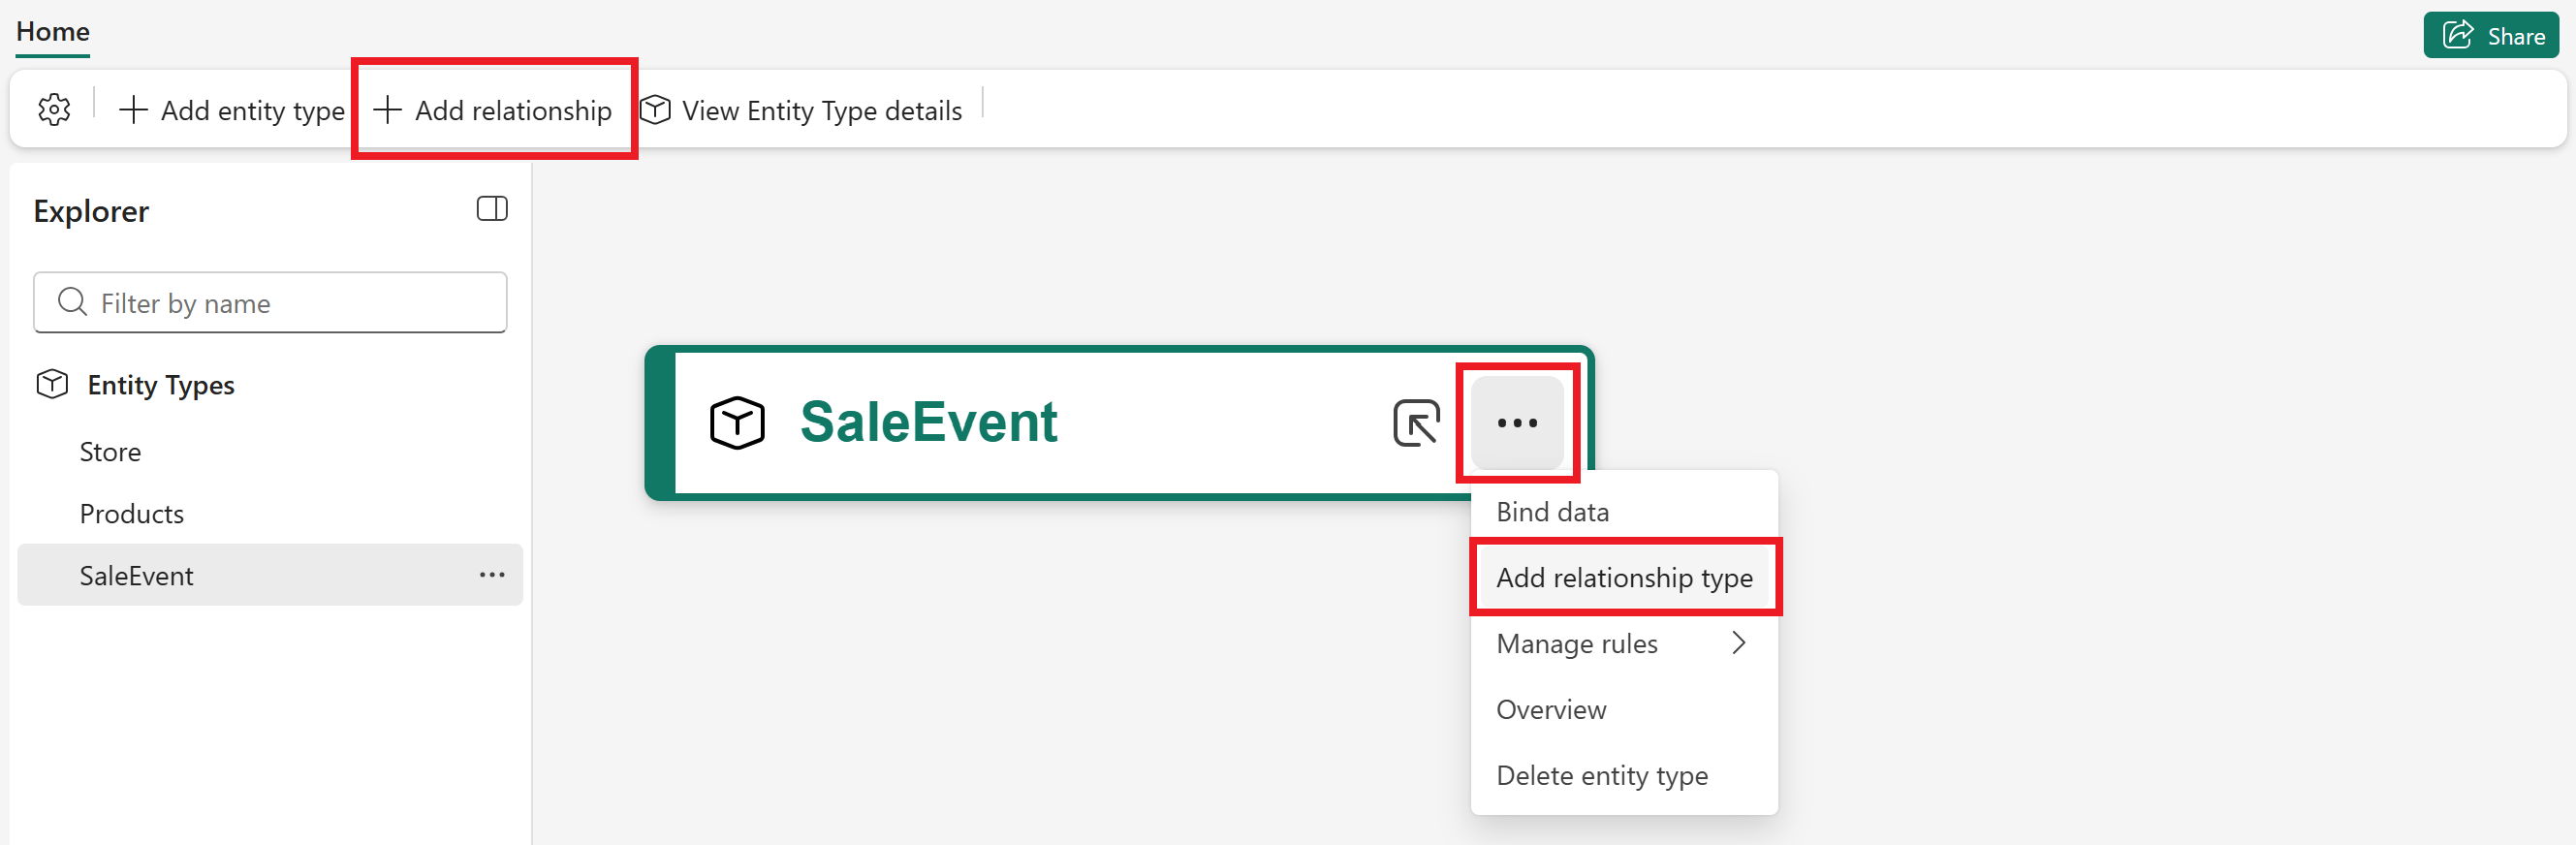
Enter the following relationship type details and select Create.
- Relationship type name: from
- Origin entity type: SaleEvent
- Target entity type: Store

The relationship is added to the semantic canvas. Select it to open the relationship details configuration. Observe the sections of the configuration page:
- Origin entity type: Lists details of the origin entity (SaleEvent in this case).
- Relationship type: Sets details of the relationship type.
- Target entity type: Lists details of the target entity (Store in this case).

In the middle section, enter the following details.
- Mapping table: Browse available sources and select the factsales table. This table in the source data can link Store and SaleEvent entities together, because it contains identifying information for both entity types. Each row in this table references a store and a sale event by ID.
- Matched SaleEvent: SaleId: Select
SaleId. This setting specifies the column in the relationship source data table whose values match the key property defined on the SaleEvent entity. In this case, the relationship data source and the entity data source both use the factsales table, so you're selecting the same column (SaleId). - Matched Store: StoreId: Select
StoreId. This setting specifies the column in the relationship source data table (factsales >StoreId) whose values match the key property defined on the Store entity (dimstore >StoreId). In the tutorial data, the column name is the same (StoreId) in both tables.

Important
Make sure to select the correct Matched columns that match the entity type key properties.
Save the relationship type. Confirm that the relationship type updated successfully, then select Cancel to close the configuration options.
You see the Configure page in the entity type overview, where the new relationship is visible next to the data bindings for the entity type.


Now the first relationship is created, and bound to data in your source table. Continue to the next section to create another relationship type.
SaleEvent sold Products
Select Home to return to the configuration canvas where you can add new entity types.
Follow the same steps that you used for the first relationship type to create a second relationship from the SaleEvent entity type that has the details described in the following table.
| Relationship type name | Origin entity type | Target entity type | Mapping table | Matched SaleEvent: SaleId | Matched Products: ProductId |
|---|---|---|---|---|---|
| sold | SaleEvent | Products | factsales | SaleId |
ProductId |
When you're done, you have two relationships from the SaleEvent entity type visible on the configuration canvas.

Next steps
In this step, you created an ontology (preview) item and populated it with entity types, their properties, and relationship types between them. Next, enrich the entities further by adding a Freezer entity that's bound to both static and time series data.
Next, continue to Enrich the ontology with additional data.