Note
Access to this page requires authorization. You can try signing in or changing directories.
Access to this page requires authorization. You can try changing directories.
This article explains how to create Fabric Activator alerts from a KQL queryset. Fabric Activator in Microsoft Fabric allows you to take actions when patterns or conditions are detected in data streams. For more information, see What is Activator.
You can configure Activator to trigger notifications based on KQL Queryset results in two scenarios:
- When scheduled KQL queries return results.
- When scheduled KQL queries return results with visualizations that meet specific conditions.
Send alert notifications either to yourself, or to others in your organization. You can configure notifications to be sent via email or Microsoft Teams message.
Sample scenarios
Here are some examples of how you can use Activator alerts with KQL queries:
Monitor application logs for errors: Suppose you have a KQL database storing application logs. You can configure an alert to notify you if any records from the last five minutes contain the string
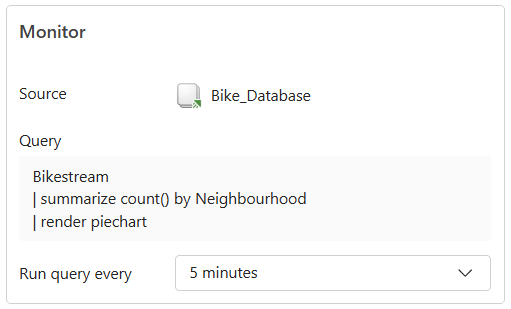
authorization errorin the message column.Track available bicycles in neighborhoods: Imagine you have streaming data for available bicycles in different neighborhoods. You create a KQL query to render a pie chart showing the number of available bicycles per neighborhood. You can set up an alert to notify you when the number of available bicycles in any neighborhood falls below a specified threshold.
Prerequisites
- A workspace with a Microsoft Fabric-enabled capacity.
- A KQL database with data.
- A KQL Queryset connected to the KQL database. For more information, see Query data in a KQL queryset.
Important
Only queries against KQL databases within an Eventhouse are supported. If your KQL queryset is connected to an external Azure Data Explorer cluster, creating an alert isn't supported.
The impact of an alert rule on Eventhouse depends on the query’s complexity. Simple queries and aggregations are lightweight, while joins, transformations, and sorts are more resource-intensive. If a query runs every 1 or 5 minutes, it effectively keeps Eventhouse in an always-on state. Without queries or ingestion for more than 5 minutes, Eventhouse can go idle, which reduces costs. For more information, see Eventhouse Uptime.
The following steps show you how to create an alert on a query that creates a visualization, or on a query that doesn't create a visualization.
Choose the tab that corresponds to your desired workflow.
Set alert on a KQL Queryset
Important
Timechart visualizations aren't supported in this scenario. They're supported in Create Activator alerts from a Real-Time Dashboard.
Open the workspace that contains your KQL Queryset.
Browse to your KQL Queryset and select it to open.
Run a query that returns a visualization.
Once the query returns results, select Set Alert on the top ribbon.


Define alert conditions
In the Add Rule side pane, follow these steps to define your alert conditions:
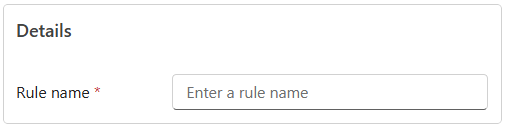
In the Details section, enter a name for your Activator alert rule.
In the Monitor section, set a time frequency for how often the query runs. The default value is 5 minutes.
In the Condition section, specify your alert conditions as follows:
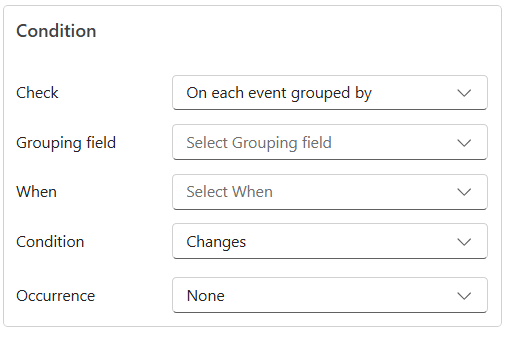
- If your visualization has no dimensions, select the On each event when condition to monitor changes in the data stream by choosing a specific field to monitor.
- In the When dropdown, set the value to evaluate.
- In the Condition dropdown, set the condition to evaluate. For more information, see Conditions.
- In the Occurrence field, set the number of times the condition must be met before an alert triggers.
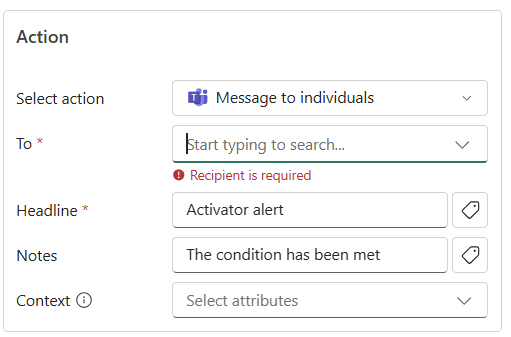
In the Action section, select one of the following actions:
Send email notification:
- For Select action, select Send email.
- For To, enter the email address of the receiver or use the drop-down list to select a property whose value is an email address. By default, your email address is populated here.
- For Subject, enter the subject of the email notification.
- For Headline, enter the headline of the email notification.
- For Notes, enter notes for the email notification.
Note
When entering subject, headline, or notes, you can refer to properties in the data by typing
@or by selecting the button next to the text boxes. For example,@BikepointID. - For Context, select the values from the drop-down list you want to include in the email notification.

Send Microsoft Teams notification: Sends a Microsoft Teams notification to individuals, a group chat, or a channel. You can customize the title and message content.
- For Select action, select Teams --> Message to individuals, Group chat message, or Channel post.
- Follow one of these steps depending on your selection:
- If you select the Message to individuals option, enter email addresses of receivers or use the drop-down list to select a property whose value is an email address. When the condition is met, a Teams message is sent to the specified individuals.
- If you select the Group chat message option, select a group chat from the drop-down list. When the condition is met, a message is posted to the group chat.
- If you select the Channel post option, select a team and channel from the drop-down lists. When the condition is met, a message is posted to the selected channel.
- For Headline, enter the headline of the Teams notification.
- For Notes, enter notes for the Teams notification.
Note
When entering subject, headline, or notes, you can refer to properties in the data by typing
@or by selecting the button next to the text boxes. For example,@BikepointID. - For Context, select the values from the drop-down list you want to include in the Teams notification.
Run Fabric activities: To configure the alert to launch a Fabric pipeline, Dataflow, Spark job, notebook, User Data Function, Copy job (preview), or publish a business event (preview) when the condition is met, follow these steps:
- For Select action, select the appropriate Fabric item type within the Run Fabric Activities section.
- On Select Fabric item to run, select the Fabric item from the list.
- Select Add parameter and specify the name of the parameter for the Fabric item and a value for it. You can add more than one parameter.
You can pass parameters from the alert data by typing
@or by selecting the button next to the text box. For example,@BikepointID. Copy jobs (preview) don't accept parameters, so this step doesn't apply to them.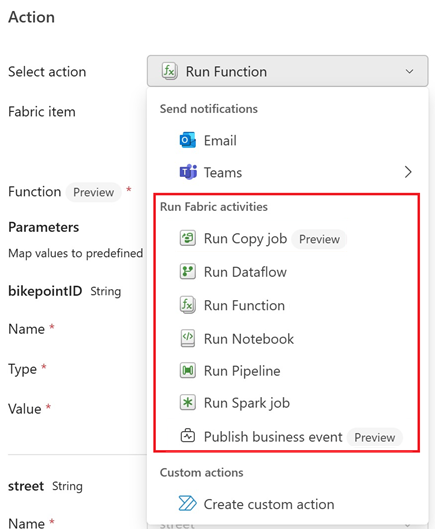
Custom actions: To configure the alert to call a custom action when the condition is met, follow these steps:
For Select action, select Create custom action.
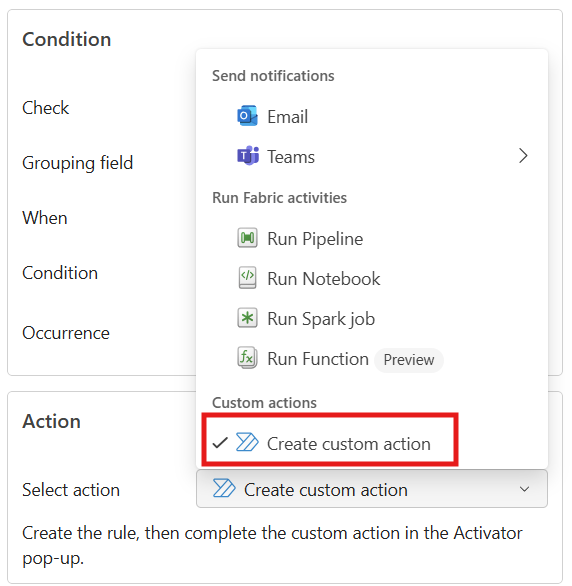
As mentioned in the Action section, create the rule first. Then, complete the custom action setup by following the steps from Trigger custom actions (Power Automate flows).
After you create the custom action, in the Definition pane of the rule, select the custom action you created from the Action drop-down list.
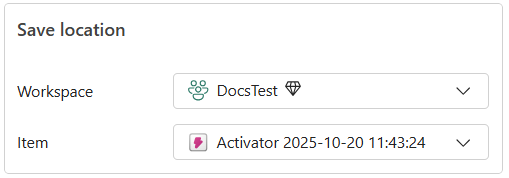
In Save location, specify where to save your Activator alert. Choose an existing workspace, and save either in an existing activator or a new one.
Select Create to create your Activator rule.
Rules pane
After the rule creation is successful, you see the Rules pane with the list of rules. In the Rules pane, you can perform the following tasks:
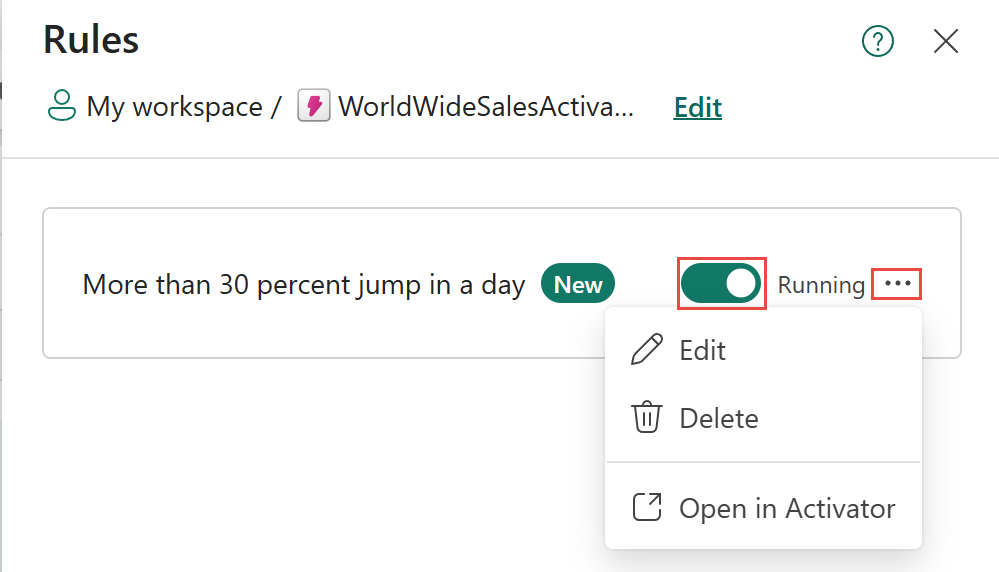
Use the toggle button to start or stop the rule. When the rule is stopped, it doesn't run, and no alerts are sent. If you are testing, once you see a couple of sample alerts, stop the rule to avoid sending too many alerts. You can start the rule again when you want to receive alerts.
Select ... to see the following three options:
Select Edit to edit the rule without leaving the current page. You can edit the rule's details, conditions, actions, and save location.
Select Delete to delete the rule. Once deleted, the rule is removed from the Fabric item on which it was created and from the activator.
Select View in Activator to open the rule in Activator. You can view the rule's details, edit it, or delete it in Activator. When you view in Activator, you can also see the rule's history, including when it was triggered and the alerts that were sent.
Select Add rule to add another rule to the Fabric item and to the Activator.
View queryset associated with the alert
In the Rules pane, select ..., and then select View in Activator to view the rule in the Activator page.
In the Activator page, select the event name, and then select Manage source to view the KQL Queryset that triggers the alert. If you select the queryset link, you navigate back to the KQL Queryset page.
