SharePoint Intranet Farm in Azure Phase 5: Create the availability group and add the SharePoint databases
APPLIES TO:  2013
2013  2016 2019 Subscription Edition SharePoint in Microsoft 365
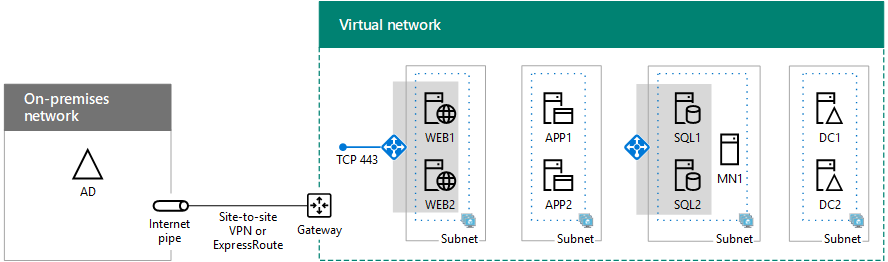
In this final phase of deploying an intranet-only SharePoint Server 2016 farm in Azure infrastructure services, you create a new SQL Server Always On Availability Group with the databases of the SharePoint farm, create the availability group listener, and then complete the SharePoint farm configuration.
See Deploying SharePoint Server with SQL Server Always On Availability Groups in Azure for all of the phases.
Configure the availability group
SharePoint creates two databases as part of the initial configuration. Those databases must be prepared with the following steps:
Database Recovery Model must be set to FULL.
Take a full backup and a transaction log backup of the database on the primary machine. Restore the full and log backups on the backup machine.
Once the databases have been both backed up and restored, they can be added to the availability group. SQL Server allows only databases that have been backed up (at least once), and restored on another machine, to be in the group.
Make the backup files (.bak) accessible from the secondary SQL Server virtual machine with these steps:
Connect to the primary SQL Server virtual machine with the <your domain>\sp_farm_db account credentials.
Open File Explorer and navigate to the H: disk.
Right-click the Backup folder, click Share with, and then click Specific people.
In the File sharing dialog, type <your domain name>\sqlservice, and then click Add.
Click the Permission Level column for the sqlservice account name, and then click Read/Write.
Click Share, and then click Done.
Perform the previous procedure on the secondary SQL Server host, except grant the sqlservice account Read permission for the H:\Backup folder in step 5.
Perform the following steps for every database that you are adding to the availability group:
From the primary SQL Server virtual machine, click Start, type SQL Studio, and then click SQL Server Management Studio.
Click Connect.
In the left pane, expand the Databases node.
Right-click a database and select properties.
Select the Options item from the left navigation.
Ensure that Recovery Model is set to FULL. If it is not, change it to support Always On Functionality.
The following procedures must be repeated for every database that needs to be added to the availability group. Some SharePoint Server 2016 databases do not support SQL Server Always On Availability Groups. For more information, see Supported high availability and disaster recovery options for SharePoint databases.
To back up a database
Connect to the first SQL Server virtual machine.
Click Start, type SQL Studio, and then click SQL Server Management Studio.
Click Connect.
In the left pane, expand the Databases node.
Right-click a database to back up, point to Tasks, and then click Back up.
In the Destination section, click Remove to remove the default file path for the backup file.
Click Add. In File name, type \<machineName>\backup<databaseName> .bak, where machineName is the name of the primary SQL Server computer and databaseName is the name of the database. Click OK, and then click OK again after the message about the successful backup.
In the left pane, right-click <databaseName>, point to Tasks, and then click Back Up.
In Backup type, select Transaction Log, and then click OK twice.
Keep the Remote Desktop session to the first SQL Server virtual machine open.
To restore a database
Connect to the secondary SQL Server virtual machine with the <your domain>\sp_farm_db account credentials.
From the secondary SQL Server virtual machines, click Start, type SQL Studio, and then click SQL Server Management Studio.
Click Connect.
In the left pane, right-click Databases, and then click Restore Database.
In the Source section, select Device, and then click the ellipsis ( ...) button.
In Select backup devices, click Add.
In Backup file location, type \<machine name>\backup, press Enter, select <databaseName>.bak, and then click OK twice. You should now see the full backup and the log backup in the Backup sets to restore section.
Under Select a page, click Options. In the Restore options section, in Recovery state, select RESTORE WITH NORECOVERY, and then click OK.
Click OK when prompted.
After at least one database is prepared (using the backup and restore method), you create an availability group with these steps:
Return to the Remote Desktop session for the first SQL Server virtual machine.
In SQL Server Management Studio, in the left pane, right-click Always On High Availability, and then click New Availability Group Wizard.
On the Introduction page, click Next.
On the Specify Availability Group Name page, type the name of your availability group in Availability group name (example: AG1), and then click Next.
On the Select Databases page, select the databases for the SharePoint farm that were backed up, and then click Next. These databases meet the prerequisites for an availability group because you have taken at least one full backup on the intended primary replica.
On the Specify Replicas page, click Add Replica.
In Connect to Server, type the name of the secondary SQL Server virtual machine, and then click Connect.
On the Specify Replicas page, the secondary SQL Server virtual machine is listed in Availability Replicas. For both instances, set the following option values:
| Initial role | Option | Value |
|---|---|---|
| Primary |
Automatic Failover (Up to 2) |
Selected |
| Secondary |
Automatic Failover (Up to 2) |
Selected |
| Primary |
Synchronous Commit (Up to 3) |
Selected |
| Secondary |
Synchronous Commit (Up to 3) |
Selected |
| Primary |
Readable Secondary |
Yes |
| Secondary |
Readable Secondary |
Yes |
Click Next.
On the Select Initial Data Synchronization page, click Join only, and then click Next. Data synchronization is executed manually by taking the full and transaction backups on the primary server, and restoring it on the backup. You can instead choose to select Full to let the New Availability Group Wizard perform data synchronization for you. However, Microsoft does not recommend Full automatic synchronization for large databases that are found in some enterprises.
On the Validation page, click Next. There is a warning for a missing listener configuration because an availability group listener is not configured. We will do this step manually in a later procedure in this article.
On the Summary page, click Finish. Once the wizard is finished, inspect the Results page to verify that the availability group is successfully created. If so, click Close to exit the wizard.
Click Start, type Failover, and then click Failover Cluster Manager. In the left pane, open the name of your cluster, and then click Roles. A new role with the name of your availability group should be present.
Configure the availability group listener
The Availability Group listener is an IP address and DNS name that the SQL Server Availability Group listens on. Use these steps to create the Availability Group listener for the SQL Server cluster:
- Determine the Cluster Network Resource Name with these steps.
Click Start, type Failover, and then click Failover Cluster Manager.
Click the Networks node and note the cluster network name. You will need this name for the $ClusterNetworkName variable in the PowerShell command block in step 6 of this procedure.
- The client access point is the network name that applications use to connect to the databases in an availability group. Add the client access point with these steps.
From Failover Cluster Manager, expand the cluster name, and then click Roles.
In the Roles pane, right-click the Availability Group name and then select Add Resource > Client Access Point.
In Name, specify a name for this new listener.
The name for the new listener is the network name that applications use to connect to databases in the SQL Server Availability Group.
Click Next twice, and then click Finish. Do not bring the listener or resource online at this time.
- Configure the IP resource for the Availability Group with these steps:
Click the Resources tab, then expand the client access point you created. The client access point is offline.
Right-click the IP resource, and then click Properties. Note the name of the IP address. You will need this name for the $IPResourceName variable in the PowerShell command block in step 6 of this procedure.
Under IP Address, click Static IP Address. Set the IP address to the value of Table I - Item 4.
- Make the SQL Server availability group resource dependent on the client access point with these steps:
In Failover Cluster Manager, click Roles, and then click your Availability Group.
On the Resources tab, right-click the availability resource group under Server Name, and then click Properties.
On the Dependencies tab, add the name resource. This resource is the client access point.
Click OK.
- Make the client access point resource dependent on the IP address with these steps:
In Failover Cluster Manager, click Roles, and then click your Availability Group.
On the Resources tab, right-click the client access point resource under Server Name, and then click Properties.
Click the Dependencies tab. Set a dependency on the listener resource name. If there are multiple resources listed, verify that the IP addresses have OR, not AND, dependencies. Click OK.
Right-click the listener name and click Bring Online.
- Set the cluster parameters with these steps:
Connect to one of the SQL Server virtual machines with the <domain name>\sp_farm_db account credentials.
Open an administrator-level PowerShell command prompt, specify the variable values, and then run these commands:
$ClusterNetworkName = "<MyClusterNetworkName>"
$IPResourceName = "<IPResourceName>"
$ILBIP = "<Table I - Item 4 - Value column>"
[int]$ProbePort = <nnnnn>
Import-Module FailoverClusters
Get-ClusterResource $IPResourceName | Set-ClusterParameter -Multiple @{"Address"="$ILBIP";"ProbePort"=$ProbePort;"SubnetMask"="255.255.255.255";"Network"="$ClusterNetworkName";"EnableDhcp"=0}
Use these steps to configure the listener port:
Connect to the first SQL Server virtual machine, launch SQL Server Management Studio, and connect to the local computer.
Navigate to Always On High Availability > Availability Groups > Availability Group Listeners.
You should now see the listener name that you created in Failover Cluster Manager.
Right-click the listener name, and then click Properties.
In the Port box, specify the port number for the availability group listener by using the $ProbePort you used earlier (1433 was the default), then click OK.
Use these steps to test the connection to the listener:
Connect to the second SQL Server virtual machine and open an administrator-level command prompt.
Use the sqlcmd tool to test the connection. For example, the following command establishes a sqlcmd connection to the primary replica through the listener with Windows authentication:
sqlmd -S <listenerName> -E
If the listener is using a port other than the default port (1433), specify the port in the connection string. For example, the following sqlcmd command connects to a listener at port 1435:
sqlcmd -S <listenerName>,1435 -E
The sqlcmd connection automatically connects to whichever instance of SQL Server hosts the primary replica.
You use the health dashboard to check the Always On Availability Group for successful operation with these steps:
On the first SQL Server virtual machines, in the left pane of SQL Server Management Studio, expand Always On High Availability > Availability Groups.
Right-click your Availability Group, and then click Show Dashboard.
The dashboard status should show all green for Synchronization State.
Complete the SharePoint farm configuration
Now that the SharePoint configuration and admin content databases have been added to the Availability Group and are synchronizing correctly, the next step is to ensure they are accessible in the event of a SQL Server node failure. To do this, the SQL Server database connection string for the SharePoint farm needs to be updated to match the DNS name of the SQL cluster internal load balancer.
Note
With an on-premises SQL Server Always On deployment, the Availability Groups would use Listeners to present a connection point to the SharePoint Servers. In Azure IaaS there are network limitations which prevent this and so the internal load balancer DNS name must be used instead. Because of this situation, the SharePoint PowerShell cmdlets for managing availability group membership cannot be used. You must use database object method calls instead.
Use these steps to update the SharePoint database connection strings:
Connect to one of the SharePoint servers in the farm and launch an administrator-level PowerShell command prompt.
Check the current connection string settings for each database in the farm with these commands:
Add-psnappin Microsoft.SharePoint.PowerShell -EA 0
Get-Spdatabase | select name, server
The display of the Get-Spdatabase command shows the database name and the server property value from the connection string.
- For each database in an availability group having a server property that matches a SQL node in the cluster, you must update this property value to match the load balancer DNS name with PowerShell. This example is for the SharePoint_Config Database.
Get-SPDatabase  #Lists all available SharePoint Databases
$agName = "<Availability Group Listener DNS name>"
$db = Get-SPDatabase -Name "Sharepoint_Config"
$db.ChangeDatabaseInstance("$agName")
$db.update()
After completing this task for each database in the availability group, you can conduct a failover test.
Use these steps to conduct a failover of the SQL Server Availability Group to ensure that the Central Administration Web Site remains operational:
Connect to one of the SharePoint servers in the farm.
Launch SharePoint Central Administration and browse around the web site and ensure that you get no errors.
Connect to the first SQL Server virtual machine and launch SQL Server Management Studio.
Expand the Availability Groups node, right-click on the Availability Group name, and then click Failover.
The Availability Group Failover wizard starts. Click Next.
On the Select new primary replica for this availability group page, select the second SQL Server virtual machine, and then click Next.
Click on Connect to authenticate against the secondary node, and then click Next.
Click Finish to verify the action and manual failover will start.
Review the failover wizard summary information for errors or warnings.
Return to the SharePoint server where you were browsing the Central Administration website and ensure you can still browse the site without error.
Your high availability SharePoint Server 2016 farm in Azure is complete.
See also
Other Resources
Deploying SharePoint Server with SQL Server Always On Availability Groups in Azure
SharePoint Server in Microsoft Azure