Dear @Matekuare, Jennifer,
Welcome to Microsoft Q&A Forum!
Based on your descriptions, the text in the border is usually part of the Slide Master or a placeholder in the template design. Regular slides only inherit these elements, so you can’t delete them from Normal view. So, may I know that you can see the steps of the Q&A Assist AI for details to fix it in Slide Master. If yes, please follow it.
(Note: As a forum moderator, I have limitations in my testing resources, so I do not have an android tablet. Therefore, this image is from Windows environment. However, you will see the similar feature like this in your device).
In case that, you don't see the steps from it, here are detailed steps:
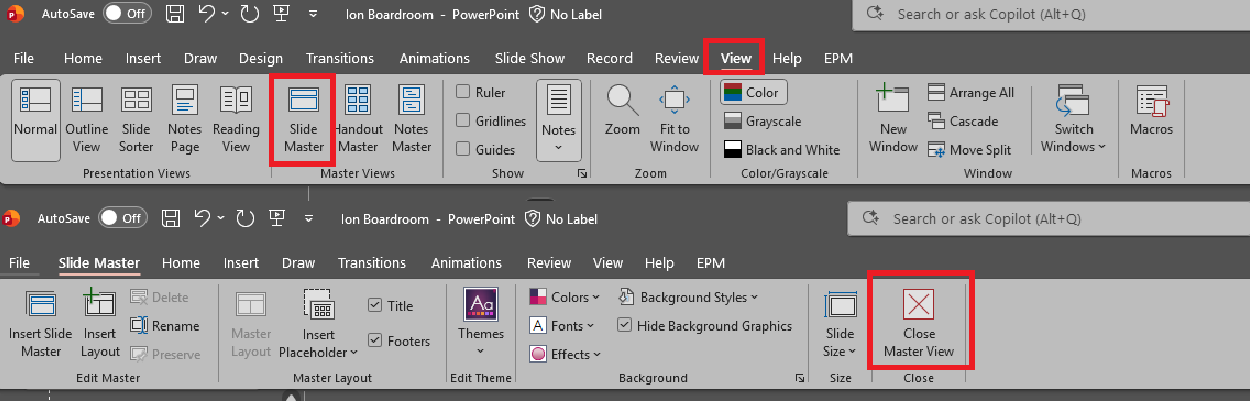
1.Open Slide Master View: go to View > Slide Master.
2.Locate the layout with the border text: in the left pane, select the master slide or the specific layout that contains the text at the bottom.
3.Select and delete the text box: click the text box in the border area and press Delete.
4.Close Slide Master: click Close Master View on the ribbon.
5.Apply the updated layout to ensure your slides use the updated layout so the border text is gone.
I also have an important note for you: if the template is locked by your organization, you won’t be able to edit the Slide Master. In that case, you should contact your IT or branding team for an editable version.
If you cannot reach to your IT team, here is an alternative solution: Cover the Text with a Shape
1.Go to the Slide with the Footer Text: open your presentation and navigate to the slide where the bottom border text appears.
2.Insert a Shape:
- On the ribbon, select Insert > Shapes.
- Choose Rectangle (or a banner shape if you prefer).
3.Draw the Shape over the Text:
- Click and drag to draw the rectangle so it completely covers the text in the bottom border.
4.Match the Shape’s Fill Color:
- With the shape selected, go to Shape Format > Shape Fill.
- Choose the same color as your slide background for a seamless look.
- If the background is a gradient or image, use Eyedropper (under Shape Fill) to pick the exact color.
5.Remove Shape Outline: go to Shape Outline and select No Outline for a cleaner appearance.
6.Send Shape to Back (Optional): if the shape hides other content, right-click the shape and choose Send to Back or Send Backward until it only covers the footer text.
Additional tips for you:
- If the slide background is complex (image or gradient), consider duplicating the background as a picture and cropping it to cover the text instead.
- This method doesn’t alter the template, so it’s safe for locked company templates.
Hope this helps and please feel free to give me any feedback in comment section. Wish you a nice day!
If the answer is helpful, please click "Accept Answer" and kindly upvote it. If you have extra questions about this answer, please click "Comment".
Note: Please follow the steps in our documentation to enable e-mail notifications if you want to receive the related email notification for this thread.
' cx='32' cy='32' r='32' /%3E%3Ctext x='50%25' y='55%25' dominant-baseline='middle' text-anchor='middle' fill='%23FFF' %3EMJ%3C/text%3E%3C/svg%3E)
' cx='32' cy='32' r='32' /%3E%3Ctext x='50%25' y='55%25' dominant-baseline='middle' text-anchor='middle' fill='%23FFF' %3ETT%3C/text%3E%3C/svg%3E)
