How to Update Certificates in D365 CE, SP, ADFS, and WAP
Here's a lengthy guide on how to update X.509 certificates in Microsoft Dynamics 365 Customer Engagement (CE/CRM), SharePoint (SP), Active Directory Federation Services (ADFS), Web Application Proxy (WAP) servers, and SQL Server Reporting Services (SSRS). The corresponding scripts refer to the following customer scenario. YMMV.
Customer Scenario
CONTOSO has selected a Microsoft solution named "TMS" to leverage for business critical operations that resides on Dynamics 365 Customer Engagement (CE/CRM) and Microsoft SharePoint (SP) platforms in an on-prem datacenter configuration. The authentication of the solution stack requires claims-based authentication in an Internet Facing Deployment (IFD) scenario where Microsoft Active Directory Federation Services (ADFS) and Microsoft Web Application Proxy (WAP) servers are utilized in the solution stack as well. This document provides instructions on how to update the X.509 certificates implemented within the solution environment; specifically for the ADFS, SP, CRM, WAP, and SSRS components. The following diagram depicts the common PKI hierarchy and scenario and server names that will be referenced throughout this guide.
[caption id="attachment_136" align="alignnone" width="694"]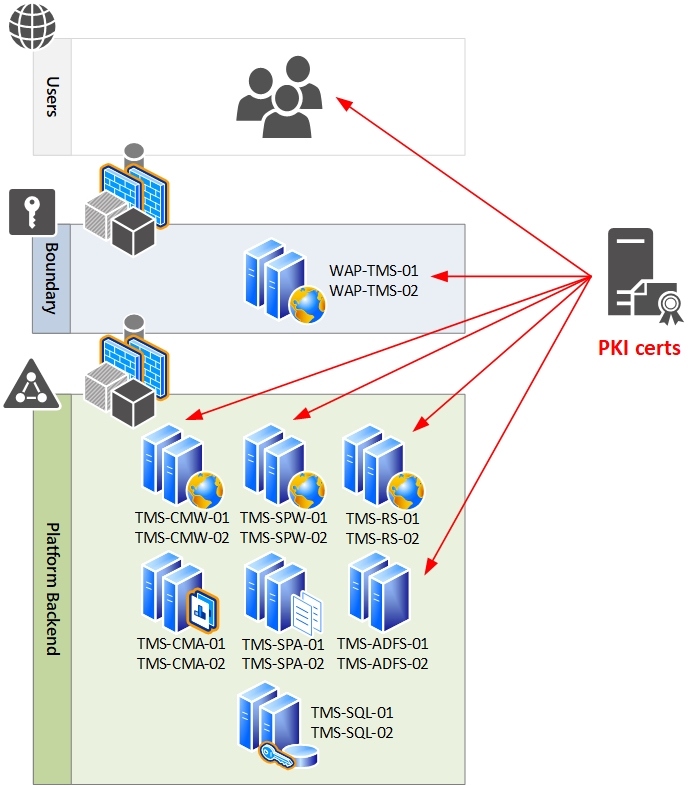 Logical Design[/caption]
Procedures
Install Server Certificates
SQL
- Logon to the first SSRS instance (TMS-RS-01) with complete admin privileges on the server and database tiers. Edit the .\scripts\Certs\Request-Cert-SSRS.ps1 script on the installation source and change the Subject ( $_name variable) to match the target environment: ssrs.tms.local.

- Run the script. It will provide a certificate request in C:\Certificates folder on the server. Issue the certificate request(s) to the CA. Receive the certificate and import to local server’s certificate store. Export with private key and apply to remaining server(s): TMS-RS-02.
SharePoint
- Logon to the first SharePoint front end server instance (TMS-SPW-01) with complete admin privileges on the server, SP, and database tiers. Edit the .\scripts\Certs\Request-Cert-SP.ps1 script on the installation source and change the Subject ( $_name variable) and Subject Alternative Names (-SANs) to match the target environment. Important: The certificate will be invalid if the FQDN in Subject does not match first line in the Subject Alternative Name (SAN) field.

- Run the script. It will provide a certificate request in C:\Certificates folder on the server. Issue the certificate request(s). Receive the certificate and import to local server’s certificate store. Export with private key and apply to remaining server(s) in the farm: TMS-SPW-02, TMS-SPA-01, and TMS-SPA-02.
- Install this certificate on the two WAP servers for the farm: WAP-TMS-01 and WAP-TMS-02.
CRM
- Log on the first CRM Front End Server (TMS-CMW-01) ) with complete admin privileges on the server and CRM. Edit the .\scripts\Certs\Request-Cert-CRM.ps1 script on the installation source and change the ( $_name variable) and Subject Alternative Names (-SANs) to match the target environment. Important: The certificate will be invalid if the FQDN in Subject does not match first line in the Subject Alternative Name (SAN) field.

- Change the names to reflect the CRM front-end server URLs that match your environment for IFD:
- TMS.xrm.tms.local
- auth.xrm.tms.local
- dev.xrm.tms.local
- internalcrm.xrm.tms.local
- Run the script. It will provide a certificate request in C:\Certificates folder on the server. Issue the certificate request(s). Receive the certificate and import to local server’s certificate store. Export with private key and apply to remaining server(s): TMS-CMW-02, TMS-CMA-01, and TMS-CMA-02.
- Install this certificate on the two WAP servers for the farm: WAP-TMS-01 and WAP-TMS-02.
ADFS
- Logon to the primary ADFS server (TMS-ADFS-01) with complete admin privileges on the server and ADFS. Edit the .\scripts\Certs\Request-Cert-ADFS.ps1 script on the installation source and change the ( $_name variable) to match the target environment: adfs.tms.local.

- Run the script. It will provide a certificate request in C:\Certificates folder on the server. Issue the certificate request(s). Receive the certificate and import to local server’s certificate store. Export with private key and apply to remaining secondary server(s): TMS-ADFS-02.
- Install this certificate on the two WAP servers for the farm: WAP-TMS-01 and WAP-TMS-02.
WAP
- Logon to the first WAP instance (WAP-TMS-01) as the local Administrator.
- Ensure that each of the trust chains for the enterprise and the enclave are both installed in the local server’s certificate store under the Certificates (Local Computer) > Trust Root Certification Authorities > Certificates node.
- Ensure that CRM, SP, and ADFS certificates (from previous sections) are also in the local server’s certificate store under the Certificates (Local Computer) > Personal > Certificates node.
- Repeat these steps on the second WAP instance (WAP-TMS-02).
Update SQL Reporting Services
SQL Server Reporting Services (SSRS) is configured in a scale-out cluster on TMS-RS-01 and TMS-RS-02 with the ReportServer and ReportServerTempDB hosted in a SQL AlwaysOn Availability Group (AOAG). These procedures will focus on just to the two front-end Report Servers.
- Logon to the first SSRS instance (TMS-RS-01) with the SharePoint installation account (SP-Install-SVC). Open Reporting Services Configuration Manager and connect to TMS-RS-01.
- Web Service URL: Select the previously imported SSRS certificate (ssrs.tms.local) in the SSL certificate drop-down menu and then click the Apply button.
- Web Service URL: Click the Advanced button and select TCP Port 80 and then click the Remove button. Click the OK button. You should now only see a single URL listed for Report Server Web Service URLs: https://ssrs.tms.local:443/ReportServer.
- Report Manager URL: Click the Advanced button and select TCP Port 80 and then click the Remove button. Click the OK button. You should now only see a single URL listed for Report Manager Site URLs: https://ssrs.tms.local:443/Reports.
- Restart SQL Reporting Services service.
- Verify the Report Server and Report Manager URLs in IE.
- Delete the old certificate in the server’s certificate store.
- Repeat these procecures on the second SSRS instance (TMS-RS-02).
Update CRM
Grant CRMAppPool Certificate Access and Update IIS
The certificate you specify in the Configure Claims-Based Authentication Wizard is used by ADFS to encrypt security tokens issued to the Microsoft Dynamics CRM Server client. The CRMAppPool account (DOMAIN\CRM-AppPool-SVC) of each Microsoft Dynamics CRM web application must have read permission to the private key of the encryption certificate. These steps address that requirement and will need to be completed on both CRM Front End Servers (TMS-CMW-01 and TMS-CMW-02).
- While logged on the first CRM Front End Server (TMS-CMW-01) with complete admin privileges on the server and CRM, open an elevated command-prompt (WinKey + X > Command Prompt (Admin) ) and execute MMC and load the Certificates snap-in for the Local computer.
- In the navigation pane, select Certificates (Local Computer) > Personal > Certificates node. In the details pane, right-click the tms.xrm.tms.local certificate and select All Tasks > Manage Private Keys in the shortcut menu.
- Click the Add button and add the CRMAppPool account (DOMAIN\CRM-AppPool-SVC) and grant Read permissions. Click the OK button.
- Open IIS Manager (WinKey + R > inetmgr) and right-click the Sites > Microsoft Dynamics CRM node in the navigation pane and select Edit Bindings in the shortcut menu.
- In the Site Bindings dialog box, select https and then click the Edit button. In the Edit Site Binding dialog box, click the Select button and pick the new certificate. Click the OK button. Click the Close button.
- Perform an iisreset.
- Repeat these steps the second CRM Front End Server (TMS-CMW-02).
Verify SSL
- Log on the first CRM Front End Server (TMS-CMW-01) with complete admin privileges on the server and CRM. Open Microsoft Dynamics CRM Deployment Manager.
- Right click on Microsoft Dynamics CRM in the navigation pane and select Properties in the shortcut menu.
- Click on the Web Address tab.
- Select the radio button in front of HTTPS and enter internalcrm.xrm.tms.local:443 in each of the fields. (Important: Do not put https:// in front of the addresses.) Click the OK button.
Configure Claims for Internal Access
- While logged on the first CRM Front End Server (TMS-CMW-01) with complete admin privileges on the server and CRM, open Microsoft Dynamics CRM Deployment Manager. Click the Configure Claims-Based Authentication link.
- On the Welcome page, click the Next button.
- On the Specify Security Token Service page, enter https://adfs.tms.local/federationmetadata/2007-06/federationmetadata.xml in the Federation metadata URL field and then click the Next button.
- On the Specify Encryption Certificate page, click the Select button and select the TMS.xrm.tms.local certificate and click the OK button. Click the Next button.
- On the System Checks page, review and correct any Errors or Warnings before proceeding. Click the Next button when ready.
- On the Review page, click the Apply button.
- Log on to the primary ADFS server (TMS-ADFS-01) and open AD FS Management snap-in.
- In the navigation pane of the AD FS Management snap-in, select the AD FS > Trust Relationships > Relying Party Trusts node. In the details pane, right-click Internal CRM and select Update from Federation Metadata in shortcut menu and then click the Update button.
- Log onto another server and view https://internalcrm.xrm.tms.local/TMS. in Internet Explorer to verify no errors.
Configure IFD
- While logged on the first CRM Front End Server (TMS-CMW-01) with complete admin privileges on the server and CRM, open Microsoft Dynamics CRM Deployment Manager. Click Configure Internet-Facing Deployment. The Configure Internet-Facing Deployment Wizard will launch.
- On the Welcome page, click the Next button.
- On the Server Roles page, enter the following values in the corresponding fields:
- Web Application Server Domain: xrm.tms.local
- Organization Web Service Domain: xrm.tms.local
- Discovery Web Service Domain: dev.xrm.tms.local
- Click the Next button.
- On the External Domain page, enter the following value in the corresponding field:
- External Domain: auth.xrm.tms.local
- Click the Next button.
- On the System Checks page, review and correct any Errors or Warnings before proceeding. Click the Next button when ready.
- On the Settings Review page, click the Apply button.
- When the configuration successfully completes, click the Finish button.
Configure Claims for External Access
- Log on to the primary ADFS server (TMS-ADFS-01) and open AD FS Management snap-in.
- In the navigation pane of the AD FS Management snap-in, select the AD FS > Trust Relationships > Relying Party Trusts node. In the details pane, right-click Internal CRM and select Update from Federation Metadata in shortcut menu and then click the Update button.
- Perform an iisreset on both CRM Front End Server (TMS-CMW-01 and TMS-CMW-02).
Republish CRM to WAP
- Log onto the WAP server (WAP-TMS-01) with the local Administrator account and open the Remote Access Management snap-in. Remove the CRM IFD published apps: CRM TMS, CRM AUTH, CRM DEV.
- Open PowerShell ISE elevated and edit and run the following script: .\scripts\WAP\Update-WAP-CRM.ps1
Post-Configuration
Delete the old CRM certificate from the two CRM Front End Servers’ local certificate store. Then, delete the old CRM certificate from the two WAP servers’ local certificate store.
Update ADFS
Grant ADFS Read Access to the New Certificate
- Logon to the primary ADFS server (TMS-ADFS-01) as an ADFS administrator. Open an elevated command-prompt (WinKey + X > Command Prompt (Admin) ) and execute MMC and load the Certificates snap-in for the Local computer.
- In the navigation pane, select Certificates (Local Computer) > Personal > Certificates node. In the details pane, right-click the adfs.tms.local certificate and select All Tasks > Manage Private Keys in the shortcut menu.
- Click the Add button and add the ADFS domain service account (DOMAIN\FsGmsa$ ) and grant Read permissions. Click the OK button.
- Restart adfssrv service.
- Repeat these steps the secondary ADFS server (TMS-ADFS-02).
Update ADFS Bindings
- While logged on the primary ADFS server (TMS-ADFS-01), open AD FS Management snap-in. In the navigation pane of the AD FS Management snap-in, select the AD FS > Service > Certificates node. In the actions pane, click the Add Token-Signing Certificate link and select the new certificate. Then, notify all Relying Parties of the change. Once configuration updates have been made (if any) on the RP ends, then promote the Token Signing certificate to be the primay by right-clicking it and selecting Set as Primary in the shortcut menu. Remove the secondary Token Signing certificate.
- In the actions pane, click the Add Token-Decrypting Certificate link and select the new certificate. Promote the Token Descrypting certificate to be the primay by right-clicking it and selecting Set as Primary in the shortcut menu. Remove the secondary Token Decrypting certificate.
- Open PowerShell ISE elevated and edit and run the following script: .\scripts\ADFS\Update-ADFS-Primary.ps1
- Logon to the secondary ADFS server (TMS-ADFS-02) as an ADFS administrator. Open PowerShell ISE elevated and edit and run the following script: .\scripts\ADFS\Update-ADFS-Secondary.ps1
Update ADFS Proxy Trust on WAP
- Log onto the WAP server (WAP-TMS-01) and open PowerShell ISE elevated and edit and run the following script: .\scripts\WAP\Update-WAP-Certs.ps1
Post-Configuration
Delete the old ADFS certificate from the two ADFS servers’ local certificate store. Then, delete the old ADFS certificate from the two WAP servers’ local certificate store.
Update SharePoint
Configure IIS
- Logon to the first SharePoint front end server instance (TMS-SPW-01) with complete admin privileges on the server and SP.
- Open IIS Manager (WinKey + R > inetmgr) and right-click the Sites > Extended Zone for HNSC Web App node in the navigation pane and select Edit Bindings in the shortcut menu. In the Site Bindings dialog box, select https and then click the Edit button. In the Edit Site Binding dialog box, click the Select button and pick the new certificate. Click the OK button. (Repeat for all applicable sites supporting the SharePoint farm.) Click the Close button.
- Perform an iisreset.
- Repeat these steps the remaining servers: TMS-SPW-02, TMS-SPA-01, and TMS-SPA-02.
Acquire Token-Signing Certificate from ADFS
- Log on to the primary ADFS server (TMS-ADFS-01) and open AD FS Management snap-in.
- In the navigation pane of the AD FS Management snap-in, select the AD FS > Service > Certificates node. In the details pane, double-click the Token Signing certificate. In the Certificate dialog, click the Details tab and then click the Copy to File button. Export the certificate in .cer format (without the private key and in DER encoded binary X.509) as it will be needed in subsequent steps to update the Trusted Root Authority in the SharePoint farm.
Configure SharePoint
- Logon to the first SharePoint back end server instance (TMS-SPA-01) with complete admin privileges on the server and SP.
- Copy the aforementioned ADFS token-signing certificate to the server.
- Open PowerShell ISE elevated and edit and run the following script: .\scripts\SP\ADFS\Update-SP-Certs.ps1
- Perform iisreset on all SP farm servers.
Republish SharePoint to WAP
- Log onto the WAP server (WAP-TMS-01) with the local Administrator account and open the Remote Access Management snap-in. Remove the SharePoint published apps: SP Team Site (team.tms.local) and TMS SP Content Site.
- Open PowerShell ISE elevated and edit and run the following script: .\scripts\WAP\Update-WAP-SP.ps1
Post-Configuration
Delete the old SP certificate from the SP servers’ local certificate store. Then, delete the old SP certificate from the two WAP servers’ local certificate store.