HLSL in Office
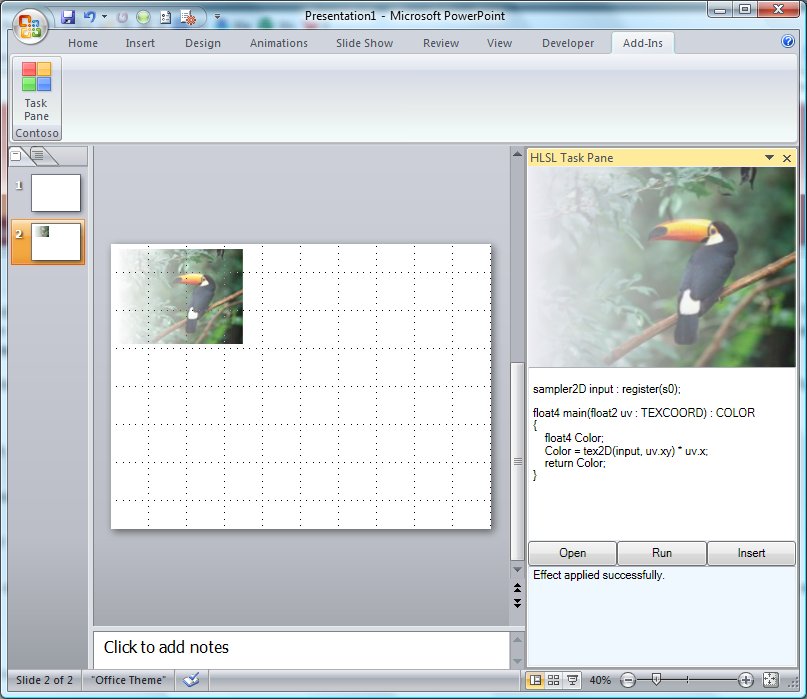
HLSL is the High Level Shading Language for DirectX, documented here. I was wondering the other day how you might use shaders in Office, and this led me to build a little proof-of-concept that allows you to experiment with HLSL within the context of an Office application. I built a PowerPoint add-in that provides a custom task pane which displays a WPF usercontrol. The task pane allows the user to select an image file, type in arbitrary HLSL code to build a shader, and apply that shader to the image before inserting it into the slide. Here’s a screenshot:

The user can type in any HLSL they like, and hit the Run button to apply the resulting shader to the image. My prototype has 2 projects: a WPF UserControl, and a VSTO PowerPoint 2007 add-in. The UserControl visuals are pretty straightforward: as you can see from the screenshot, I have an Image control, a TextBox for the HLSL source-code, 3 Buttons, and another TextBox for any diagnostic output. Note that I wrap my Image control in a Border to workaround the offsetting issue described in Jaime Rodriguez’s post:
<Border x:Name="ImageBorder" Width="Auto" Height="Auto">
<Image Name="ImageSource" />
</Border>
My 3 Button Click handlers open an image file, compile the HLSL source into a shader, and insert the resulting image into the slide, respectively. The Open handler is very simple – it just displays an OpenFileDialog and then sets the user’s image selection into the Image control:
private void buttonOpen_Click(object sender, RoutedEventArgs e)
{
OpenFileDialog dlg = new OpenFileDialog();
dlg.Filter = "Images|*.jpg;*.png;*.bmp;*.gif|All Files|*.*";
if (dlg.ShowDialog() == true)
{
ImageSource.Source = new BitmapImage(new Uri(dlg.FileName));
}
}
The Run handler is a little more involved. First, I get the HLSL source-code, and write it out to a temporary file on disk:
private void buttonRun_Click(object sender, RoutedEventArgs e)
{
string codePath = System.IO.Path.GetTempFileName();
using (FileStream stream =
new FileStream(codePath, FileMode.Create))
{
byte[] data = Encoding.ASCII.GetBytes(HlslSource.Text);
stream.Write(data, 0, data.Length);
}
Then, I get the path to the DirectX effect compiler (fxc.exe). To figure out where this is on the filesystem, I have a couple of choices. I could get the InstallPath for the DirectX SDK from the registry, as a versioned sub-key of [HKLM\software\Microsoft\DirectX]. Alternatively (and more simply), I can fetch the DXSDK_DIR environment variable. With this path, I can set up a Process object to launch the compiler, and pass in the path to the new HLSL source file, again saving the output to a temporary file:
string fxcPath = System.IO.Path.Combine(
Environment.GetEnvironmentVariable("DXSDK_DIR"),
"Utilities\\bin\\x86\\fxc.exe");
ProcessStartInfo startInfo = new ProcessStartInfo(fxcPath);
startInfo.CreateNoWindow = true;
startInfo.UseShellExecute = false;
startInfo.RedirectStandardError = true;
string shaderPath = System.IO.Path.GetTempFileName();
startInfo.Arguments = String.Format(
"/T ps_2_0 /E main /Fo\"{0}\" \"{1}\"",
shaderPath, codePath);
When I start the effect compiler process, I’ll handle any error output by displaying it nicely in my diagnostic TextBox. If there were no errors, I can set up a new pixel shader from the compiled HLSL, and apply it to the selected image.
using (Process proc = Process.Start(startInfo))
{
proc.WaitForExit();
StreamReader reader = proc.StandardError;
string errors = reader.ReadToEnd();
if (!String.IsNullOrEmpty(errors))
{
string errorMessage =
errors.Replace(codePath, "Line ");
string[] messageParts = errorMessage.Split(':');
if (messageParts.Length == 3)
{
CompilerOutput.Text = String.Format(
"{1}{0}{2}{0}{3}",
Environment.NewLine,
messageParts[0].Trim(),
messageParts[1].Trim(),
messageParts[2].Trim());
}
else
{
CompilerOutput.Text = errorMessage;
}
}
else
{
PixelShader pixelShader = new PixelShader();
pixelShader.UriSource = new Uri(shaderPath);
CustomShaderEffect shaderEffect =
new CustomShaderEffect(pixelShader);
ImageSource.Effect = shaderEffect;
CompilerOutput.Text = "Effect applied successfully.";
}
}
}
Note that I’m using a custom ShaderEffect class. You can derive from the ShaderEffect class to implement a custom effect based on a single pixel shader, as documented here.
The Insert handler uses RenderTargetBitmap and PngBitmapEncoder to create a bitmap from the image and save it to a PNG-format temporary file on disk:
private void buttonInsert_Click(object sender, RoutedEventArgs e)
{
try
{
RenderTargetBitmap renderTarget = new RenderTargetBitmap(
(int)ImageBorder.ActualWidth,
(int)ImageBorder.ActualHeight,
96, 96, PixelFormats.Pbgra32);
renderTarget.Render(ImageBorder);
PngBitmapEncoder encoder = new PngBitmapEncoder();
encoder.Frames.Add(BitmapFrame.Create(renderTarget));
string imagePath = System.IO.Path.GetTempFileName();
using (FileStream stream =
new FileStream(imagePath, FileMode.Create))
{
encoder.Save(stream);
}
ImageEventArgs ie = new ImageEventArgs(imagePath);
if (ImageSavedEvent != null)
{
ImageSavedEvent(sender, ie);
}
}
catch (Exception ex)
{
MessageBox.Show(ex.ToString());
}
}
You can see from the foregoing that when I’ve saved the final image, I fire a custom event. This is because I’ll be using my WPF UserControl within the context of an Office custom taskpane, and I want my Office add-in code to be notified when the image has been successfully processed. So, I have a custom ImageEvent event type, and corresponding custom ImageEventArgs type. I declare an ImageEvent as an event field in my UserControl class. Then, at the end of the Insert handler above, I fire this event.
public delegate void ImageEvent(object source, ImageEventArgs e);
public class ImageEventArgs : EventArgs
{
public String ImagePath;
public ImageEventArgs(String name)
{
ImagePath = name;
}
}
public partial class HlslControl : UserControl
{
public event ImageEvent ImageSavedEvent;
// …etc as above.
Next, I create a VSTO PowerPoint add-in project, and add a reference to my WPF UserControl project. I also add a custom Ribbon with one Button: the Button handler simply toggles the visibility of my custom task pane. To create the custom task pane, I create a (Windows Forms) UserControl in my add-in project, add a Windows.Forms.Integration.ElementHost, fully-docked. I set the ElementHost.Child to a new instance of my WPF UserControl, and sink the custom ImageSavedEvent. In the event handler, I call out to a custom InsertImage method in my main add-in class:
public partial class HlslTaskPane : UserControl
{
WpfControls.HlslControl hlslControl;
public HlslTaskPane()
{
InitializeComponent();
this.hlslControl = new WpfControls.HlslControl();
this.hlslControl.ImageSavedEvent += new WpfControls.ImageEvent(hlslControl_ImageSavedEvent);
this.elementHost.Child = this.hlslControl;
}
void hlslControl_ImageSavedEvent(object source, WpfControls.ImageEventArgs e)
{
Globals.ThisAddIn.InsertImage(e.ImagePath);
}
}
The custom InsertImage method in my add-in class gets hold of the current presentation, and adds a new slide. Then, I insert the image into the slide:
public void InsertImage(string imagePath)
{
PowerPoint.Slides slides =
this.Application.ActivePresentation.Slides;
PowerPoint.Slide slide = slides.Add(slides.Count + 1,
PowerPoint.PpSlideLayout.ppLayoutBlank);
PowerPoint.Shapes shapes = slide.Shapes;
shapes.AddPicture(
imagePath,
Office.MsoTriState.msoFalse,
Office.MsoTriState.msoTrue,
10, 10, 240, 180);
slide.Select();
}
That’s it. Bear in mind this is a simple proof-of-concept exercise, not production code, and I’ve taken a number of short-cuts. For instance, I’m not too happy about saving temporary files to disk, but this approach is partly forced on me by my choice of technologies (WPF and Windows Forms, managed code and native Office) and tools (fxc.exe). The project also serves as a useful experimentation pad for learning HLSL. If you’re serious about shaders, you’ll probably want to look at the Shazzam tool, the WPF Pixel Shader Effects Library, and the Shader Effects BuildTask and Templates.