How to: Create a Site Directory for SharePoint 2013 and Office 365
Back in MOSS 2007, there was an enterprise template called Site Directory which was a site for listing and categorizing important sites in the organization that included different views for categorized sites, top sites, and a site map. Starting with SharePoint 2010, this template was deprecated and no longer available.
Does this mean you cannot have a site directory anymore? No! It doesn’t mean that at all – you just need to use out-of-the-box web parts to create your site directory. This post will show you how to create your own site directory.
We will be using the search results webpart, so users can search for a site to narrow the results down. This is especially useful if there are a large number of sites in the web application. We will also be copying and modifying an out-of-the-box display template to see the results.
And, another good thing is that when new sites are created, the Result Source automatically picks them up!
NOTE: You need to have an enterprise Search Center for this solution to work.
While there are several articles/posts/blogs on the Internet, this was a solution one of my customers wanted.
- Download the Item_2LinesNoIcon file to your local machine and rename the file extension to html
- Go to the Search Center, click on the Gear icon, then choose Site Settings
[caption id="attachment_735" align="alignnone" width="1024"] Figure 1: SearchSiteSettings.jpg[/caption]
- Under Site Collection Administration, choose Site Collection Features
[caption id="attachment_725" align="alignnone" width="208"]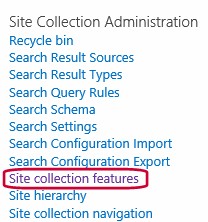 Figure 2: SearchSiteCollectionFeatures.jpg[/caption]
- Activate the SharePoint Server Publishing Infrastructure feature if it’s not already activated.
- Note in the screenshot this feature is activated
[caption id="attachment_745" align="alignnone" width="1024"] Figure 3: SharePointServerPublishingInfrastructure.jpg[/caption]
- From the Manage Features page, select Site Settings at the top, then select Manage Site Features under Site Actions
[caption id="attachment_667" align="alignnone" width="300"] Figure 4: ManageFeatures_SiteSettings.jpg[/caption]
[caption id="attachment_675" align="alignnone" width="153"]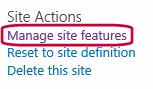 Figure 5: ManageSiteFeatures.jpg[/caption]
- From the Site Features page, activate the SharePoint Server Publishing feature if it’s not already activated.
[caption id="attachment_736" align="alignnone" width="1024"] Figure 6: SharePointServerPublishing.jpg[/caption]
- Go back to Site Settings, under Web Designer Galleries, select Master pages and page layouts
[caption id="attachment_676" align="alignnone" width="198"] Figure 7: MasterPage.jpg[/caption]
- Select the Display Templates folder, then the Search folder
[caption id="attachment_595" align="alignnone" width="661"]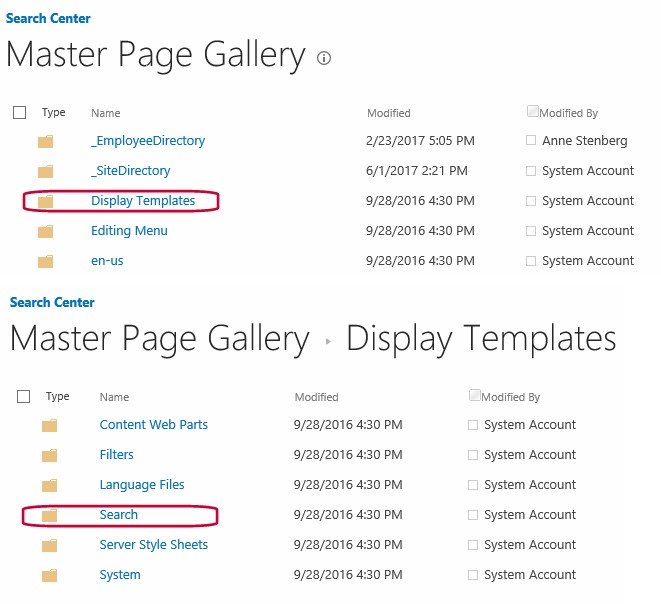 Figure 8: DisplayTemplates_Search.jpg[/caption]
- On the Ribbon, click File, Upload Document, then Browse and select the Item_2LinesNoIcon.html file downloaded earlier then click OK.
[caption id="attachment_785" align="alignnone" width="640"]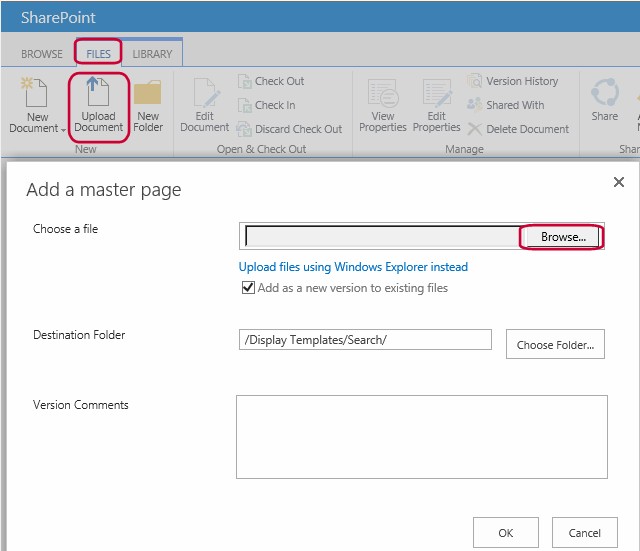 Figure 9: FileUploadBrowse.jpg[/caption]
- When the dialog box opens for the Master Page Gallery – Item_2LinesNoIcon.html, make sure the Content Type = Item Display Template and check Search Results box for the Target Control Type (Search) and Save.
[caption id="attachment_795" align="alignnone" width="602"]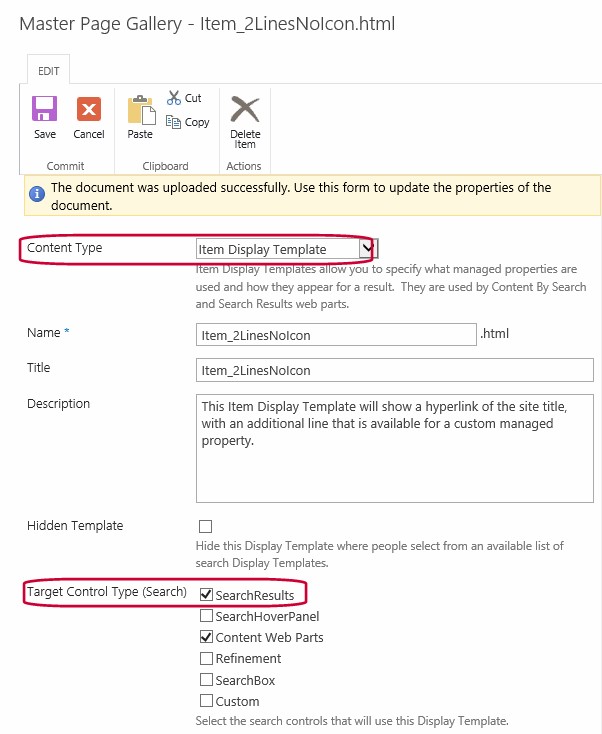 Figure 10: ItemDisplayTemplate.jpg[/caption]
- You’ll now see two (2) files, the Item_2LinesNoIcon.html and Item_2LinesNoIcon.js. Click the Site Contents link.
[caption id="attachment_626" align="alignnone" width="917"]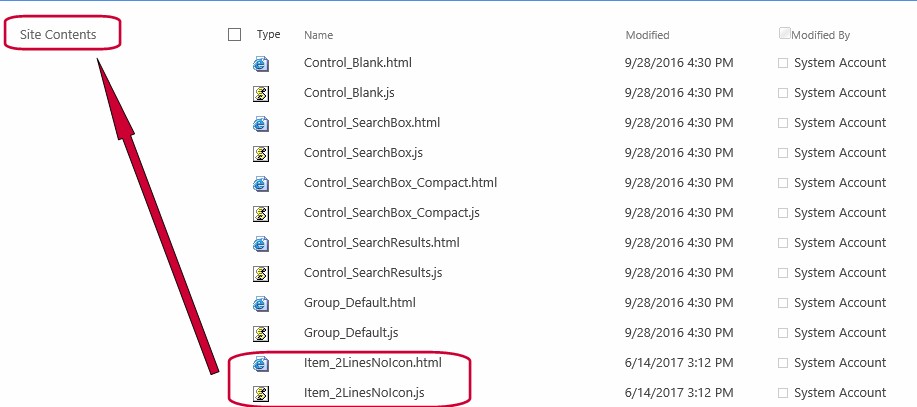 Item 11: FilesUploaded.jpg[/caption]
- On the Site Contents page, click Pages
[caption id="attachment_695" align="alignnone" width="567"]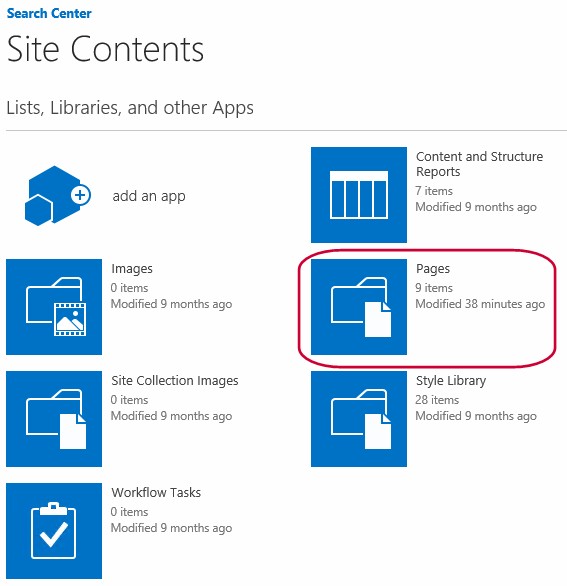 Figure 12: Pages.jpg[/caption]
- On the Pages page, click Files, click the down arrow next to New Document, then choose Page.
[caption id="attachment_687" align="alignnone" width="734"]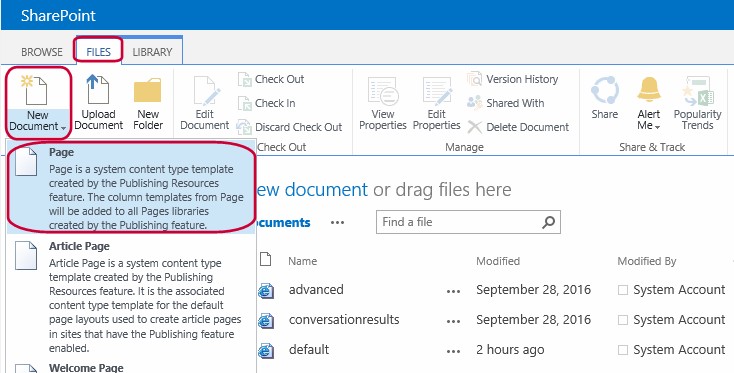 Figure 13: NewPage.jpg[/caption]
- On the Create Page, give the directory a title (i.e. Directory), the URL Name will be automatically populated but you can change this, then select (Welcome Page) Search results and click Create
[caption id="attachment_586" align="alignnone" width="1024"]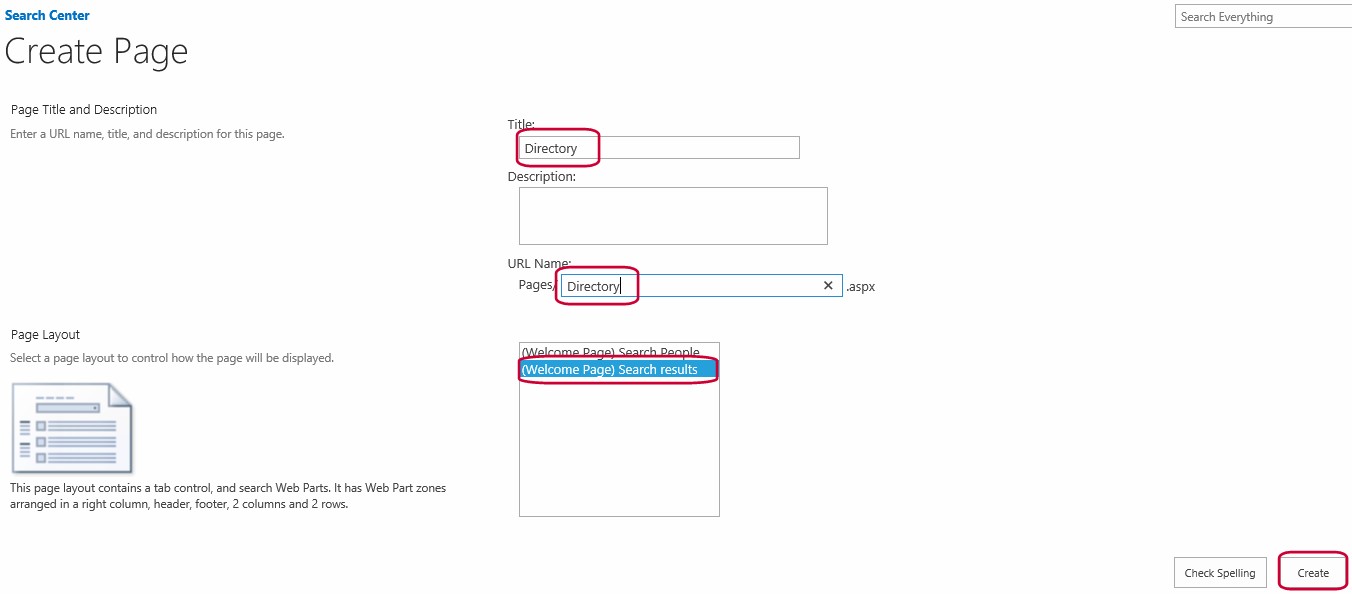 Figure 14: CreateDirectoryPage.jpg[/caption]
- Back on the Pages page, check-in the Directory page
[caption id="attachment_566" align="alignnone" width="1024"]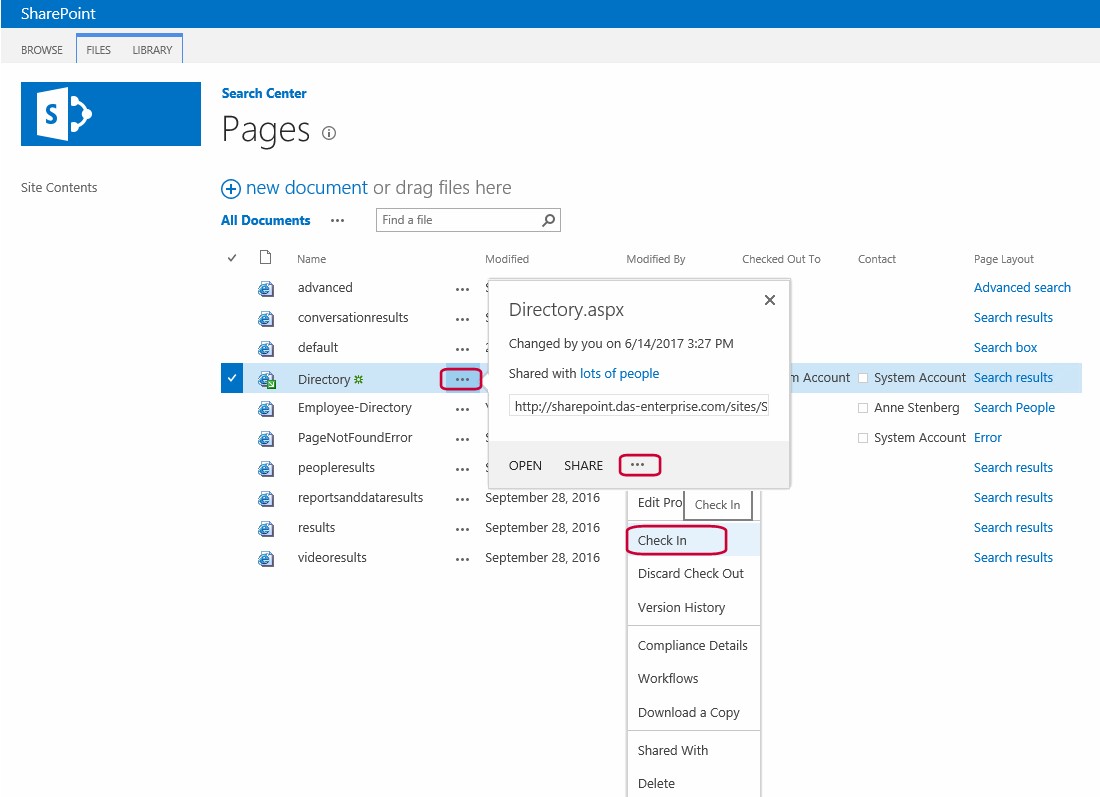 Figure 15: CheckIn.jpg[/caption]
- In the pop-up dialog Check in box, select Major version (publish) and No to retain checkout then click OK
[caption id="attachment_665" align="alignnone" width="636"]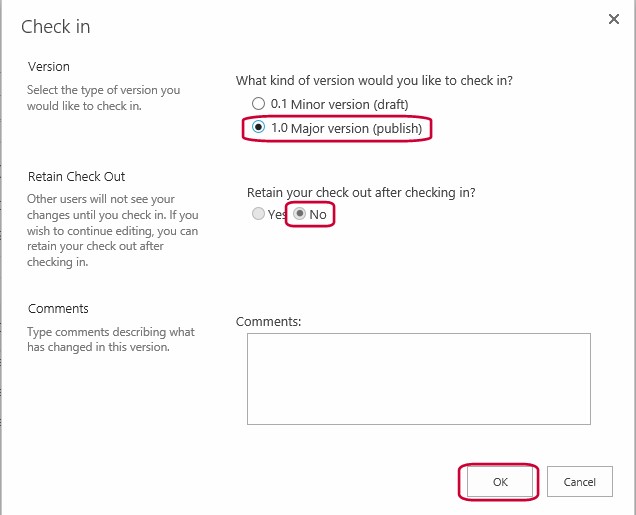 Figure 16: MajorVersion.jpg[/caption]
- While still on the Pages library, click the Directory document to open it and it will open a Search site
[caption id="attachment_645" align="alignnone" width="742"]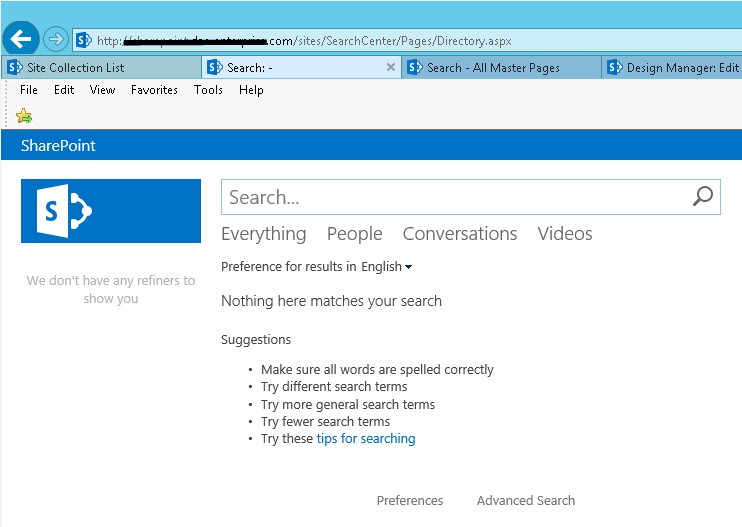 Figure 17: InitialSearchCenter.jpg[/caption]
- Now to filter this to our sites. Click the Gear icon and choose Edit Page
[caption id="attachment_615" align="alignnone" width="1024"]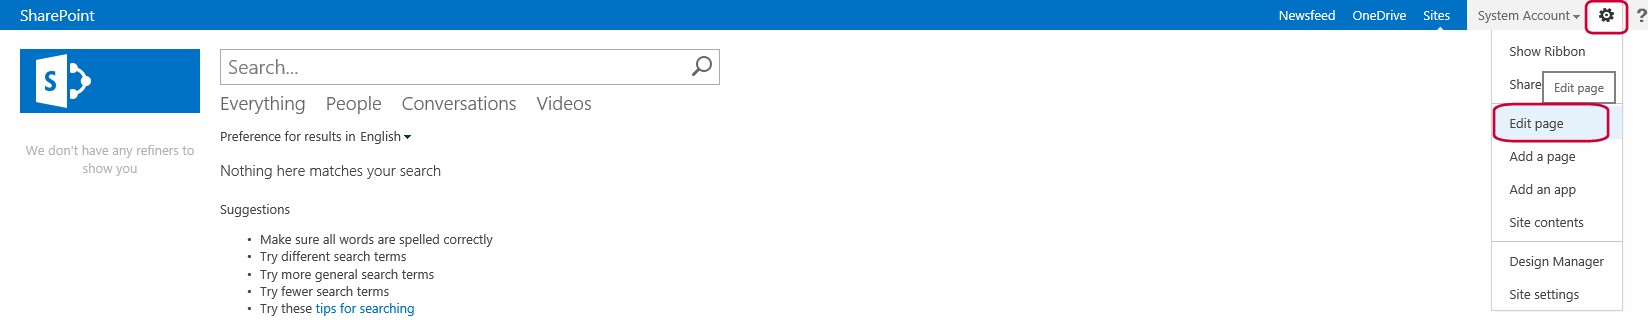 Figure 18: EditPage.jpg[/caption]
- In the Search Results section, click the down arrow and choose Edit Web Part
[caption id="attachment_617" align="alignnone" width="967"]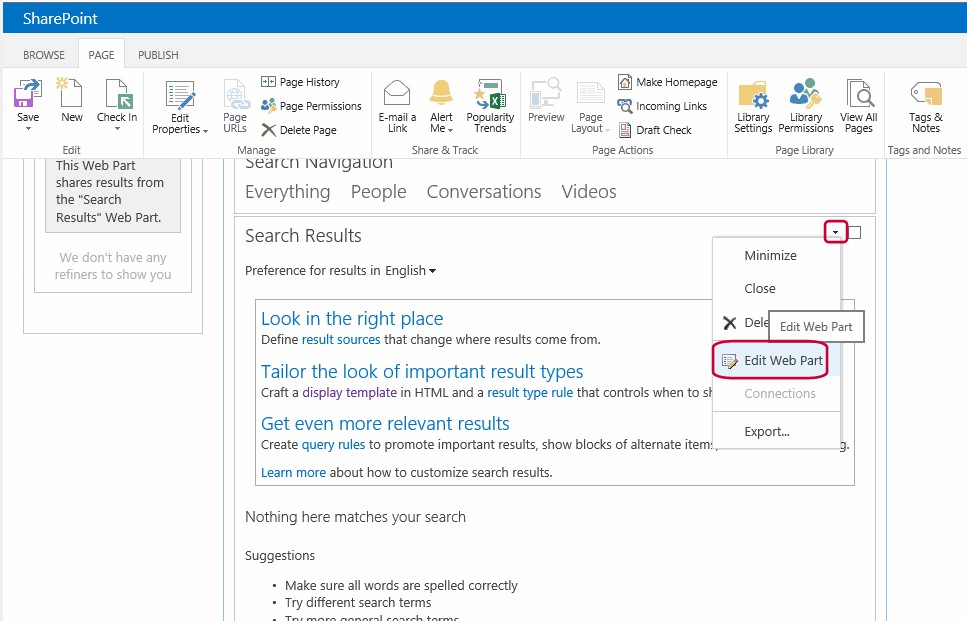 Figure 19: EditWebPart.jpg[/caption]
- In the Properties for Search Results web part, click Change Query
[caption id="attachment_556" align="alignnone" width="238"] Figure 20: ChangeQueryButton.jpg[/caption]
- In the Build Your Query dialog screen, Switch to Advanced Mode
[caption id="attachment_525" align="alignnone" width="626"]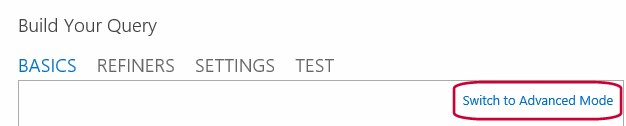 Figure 21: AdvancedModeQuery.jpg[/caption]
- Under Query text, type the following:
- {searchboxquery}(contentclass:”STS_Site”) path:https://sharepoint.domain.com/*
- Use the name of your site for the path variable
- Click the Test Query button
[caption id="attachment_715" align="alignnone" width="1024"]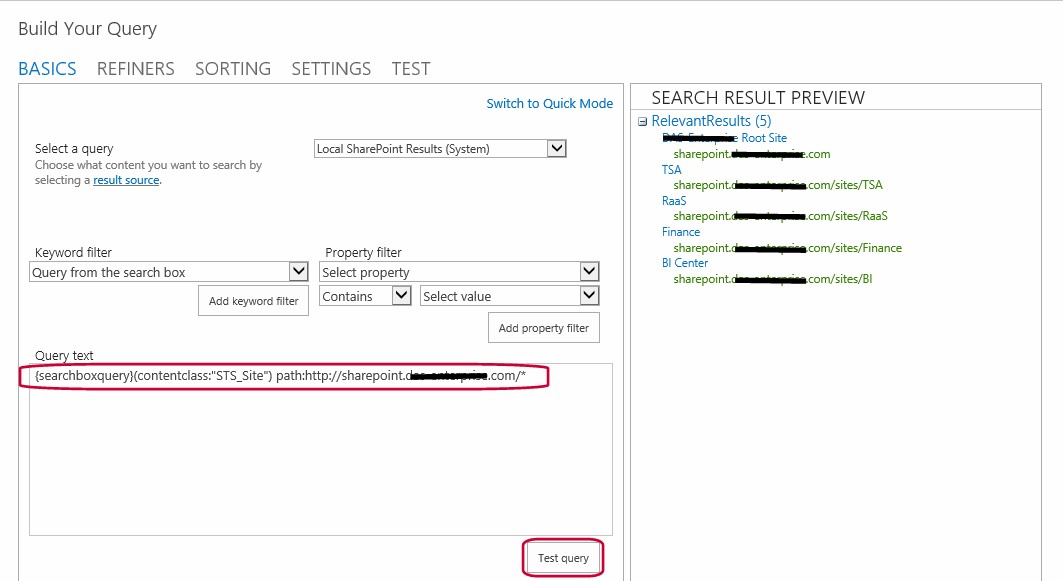 Figure 22: QueryText.jpg[/caption]
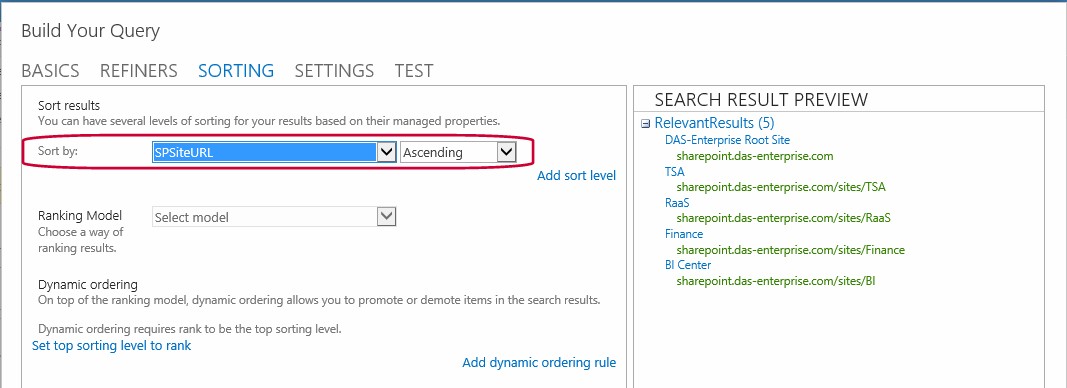
- Next, select the Sorting heading and choose SPSiteURL Ascending then click OK
[caption id="attachment_825" align="alignnone" width="1024"]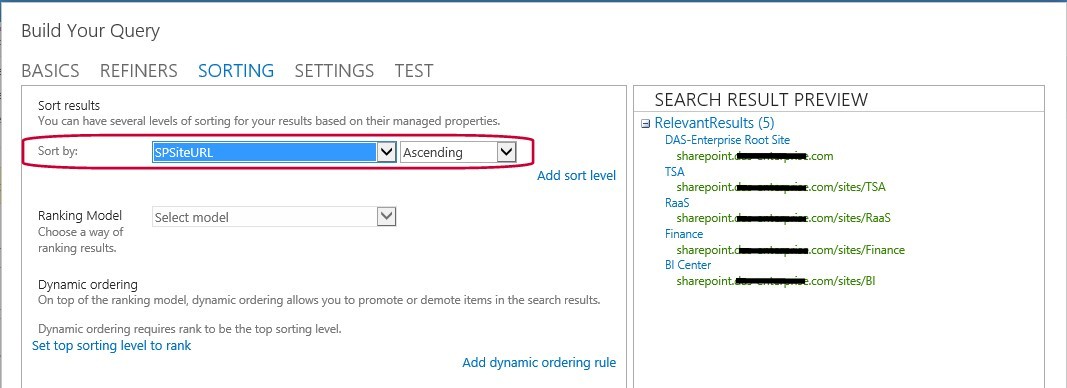 Figure 23: Sorting.jpg[/caption]
- Back at the Properties for Search Results web part, expand Display Templates and select Use a single template to display items and choose the Item_2LinesNoIcon template, then click Apply
[caption id="attachment_535" align="alignnone" width="241"]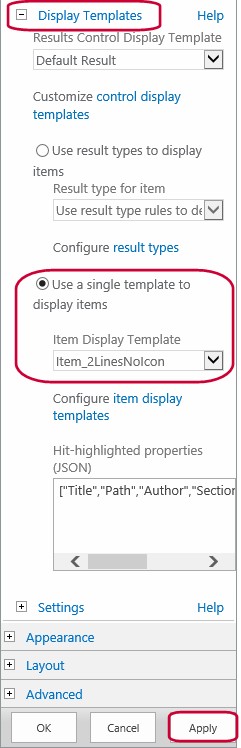 Figure 24: ApplyDisplayTemplate.jpg[/caption]
- You should now be able see results in the Search Results web part on the page
[caption id="attachment_706" align="alignnone" width="621"]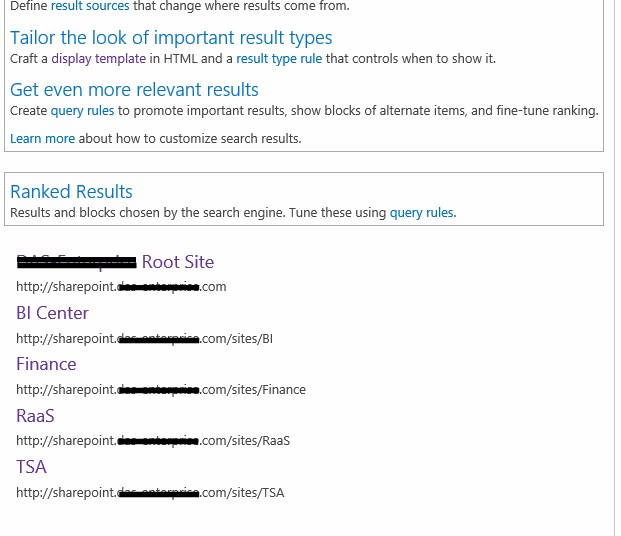 Figure 25: QueryResults.jpg[/caption]
- Click OK to close the web part
- Check-in the page
[caption id="attachment_577" align="alignnone" width="700"]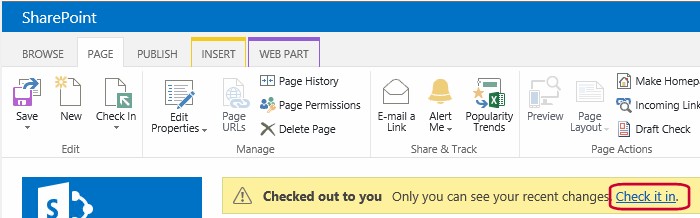 Figure 26: CheckInPage.jpg[/caption]
- On the Check In dialog box, add comments if you want then click Continue
[caption id="attachment_575" align="alignnone" width="436"]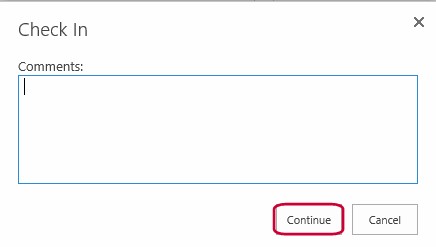 Figure 27: CheckInDialog.jpg[/caption]
[caption id="attachment_755" align="alignleft" width="521"]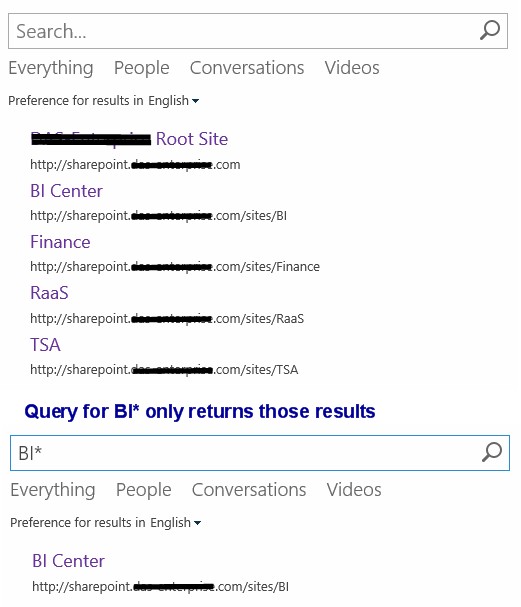 Figure 29: SiteQuery.jpg[/caption]
- Finally, if you want a navigation link to the Site Directory page, click the Gear icon and choose Site Settings. Under the Search heading, select Search Settings
[caption id="attachment_716" align="alignnone" width="141"]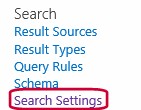 Figure 30: SearchSettings.jpg[/caption]
- On the Search Settings page, in the Configuration Search Navigation, click Add Link. In the Navigation Link dialog box, add a Title and either type in the URL of the Directory page or click Browse and select the page from the Pages library then click OK
[caption id="attachment_677" align="alignnone" width="1012"]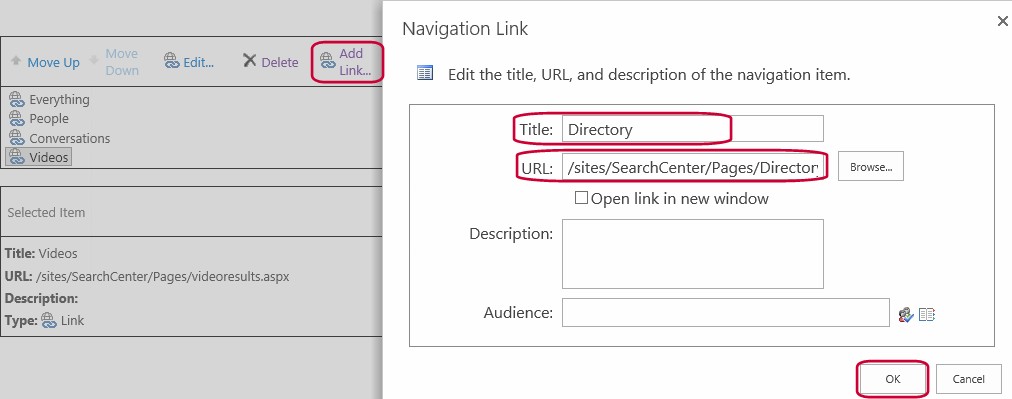 Figure 31: NavigationLink.jpg[/caption]
- Click OK to close the Search Settings page then go back to the Search Center
- In the Search Center, type a word or phrase to search then view the results
[caption id="attachment_805" align="alignnone" width="511"]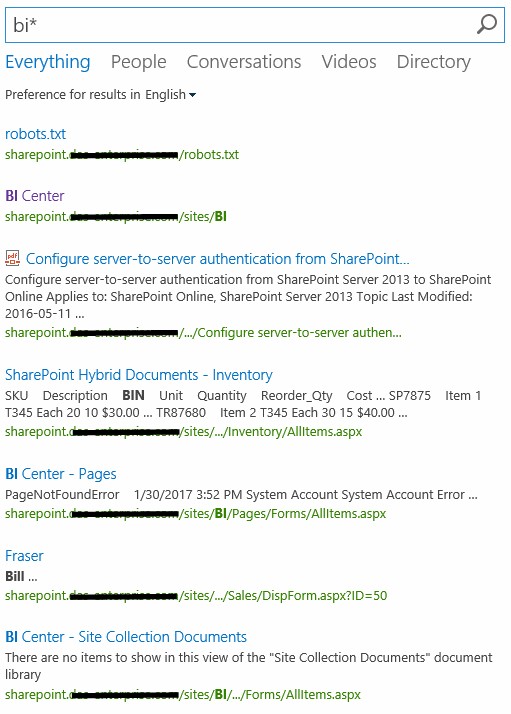 Figure 32: BIResultsEverything.jpg[/caption]
- Notice the word “Everything” is highlighted showing all results. Now, click the Directory link and only sites that start with BI will be shown.
[caption id="attachment_815" align="alignnone" width="517"]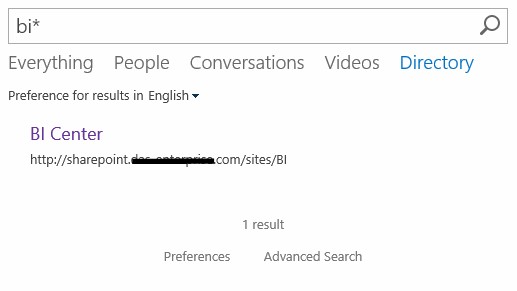 Figure 33: BISite.jpg[/caption]
As I said before, there are many ways to accomplish creating a site directory but this solution doesn’t require any 3rd party tools or utilities.
Resources: