Building a simple ASP.Net page based SharePoint application in Visual Studio with the Visual Studio Extensions for WSS CTP 1.1
UPDATE: I HAVE RE-WRITTEN THIS POST FOR VS2008 and VSeWSS 1.2 HERE
Introduction
This is the first in a series of posts on how to build various types of applications on SharePoint.
In this post we will use Visual Studio 2005 & the Windows SharePoint Services 3.0 Tools: Visual Studio 2005 Extensions, Version 1.1 CTP (VSeWSS)to build a very simple 2 page ASP.Net page based application and deploy & run it in SharePoint.
My goal/hope is that it will show regular ASP.Net developers how to start out building some of the same things they do today but on SharePoint.
SharePoint can look like a big scary black box to people looking at it for the first time. I started out that way too, but with a little understanding on how to get things done and a little insight on how things work SharePoint is not all that scary. At least I dont think so anyway :) Admittedly I am bias too :)
Tip: Click on the images for a better view if they are being cut off on the right.
Background
In previous post of mine Application Development on MOSS 2007 & WSS V3 I called the technique we will use "Option 4: Adding ASPX pages to SharePoint Site". I documented some steps to try this method out. However, many readers emailed me expressing problems they were having with it as it required some tricky steps. Another problem was that it didn't package up the solution using the SharePoint Solution packaging technology (.WSP files). That meant it was manual to deploy, and not very easy.
Based on the level of feedback I got on the original post I thought it would be worth while tidying up the technique and introducing the use of some tools that make it much easier.
VSeWSS is a toolkit we put out that helps developers build a solution to deploy to SharePoint. There has been quite a bit of criticism of the tools and we are working hard to keep building on them to fix that. The tools are currently version 1.1 CTP and we will be releasing the final version of that in the not too distant future. For some more background on VSeWSS Chris O'brien has a good post: VSeWSS 1.1. CTP - a look at the nuts and bolts.
The Solution
We will create a very simple application comprised of 2 pages that allow a user to type a string into a text box, press a button & have what they typed displayed on a different ASP.Net page. As I said ... very simple.
The point here is not to build out a super complex application, but show a method that you can use to build this kind of application.
Full source for this solution can be found here: DataEntryApp.zip
Pre-Requisites
The first thing to do is make sure you have VS 2005 & VSeWSS installed from the link above on a machine that has WSS V3 installed & configured. You should be able to navigate to https://<your server name>/ and see a WSS site. Make sure you can do this first, before moving on.
For help with installing WSS see: Install Windows SharePoint Services 3.0 on a stand-alone computer
1. Create the project
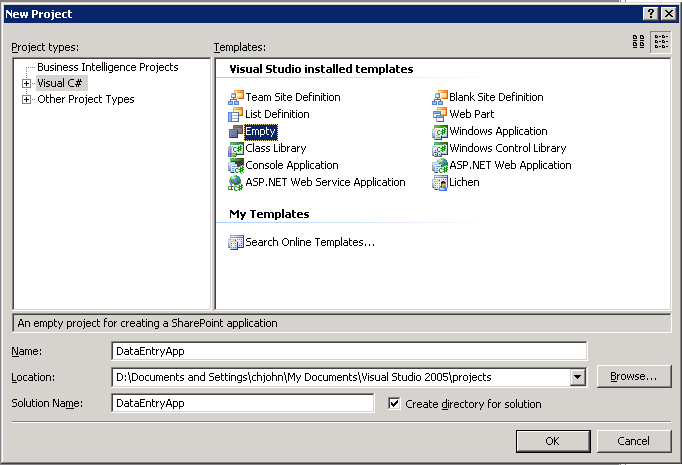
First up create a new blank VSeWSS project.
File -> New -> Project
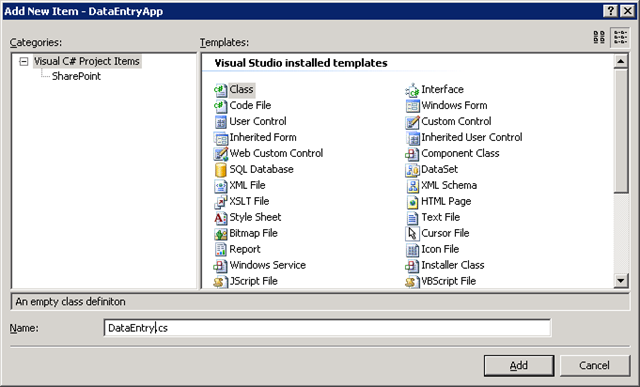
Choose the "Empty" template and call it "DataEntryApp". This will create a new VSeWSS blank project for us.
Your Solution Explorer should now look like this

Now add the following references to your project
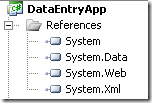
Now you have created the skeleton of the project we are ready to move on and start creating the pages & code that make up the solution.
2. Create ASP.Net pages
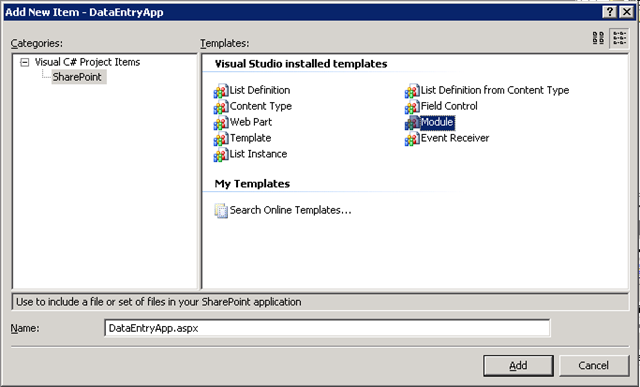
This is the part where we will create the ASPX pages. To do this we will a Module to our solution. Modules allow you to deploy files to various locations in a SharePoint site in which the your Feature is activated. We are going to add two files to the Module. The first will allow someone to enter some text and click a button to submit it. The next will show that text that the user typed.
Create a new "Module" (right click the project and choose Add -> New Item).
Call it "DataEntryApp.aspx"
This will create a new file in a Module file in your project under the Modules folder.
Add another called "DataDisplayApp.aspx".
Your Solution Explorer should now look like this
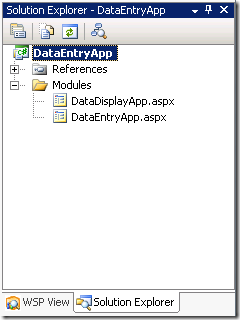
The next thing we need to do is add a couple of C# files that will have the code that sits behind our ASPX pages. These will house the logic behind the submit button and the display form.
Add a class file called "DataEntryApp.cs" and "DataDisplayApp.cs" to the root of your project.
We are now ready to start fleshing out the content of the pages and the code.
Open up "DataEntryApp.aspx" and add the following HTML (at the bottom of this post you will find a zip file with the full contents of the project, so you dont have to type all this in if you dont want to)
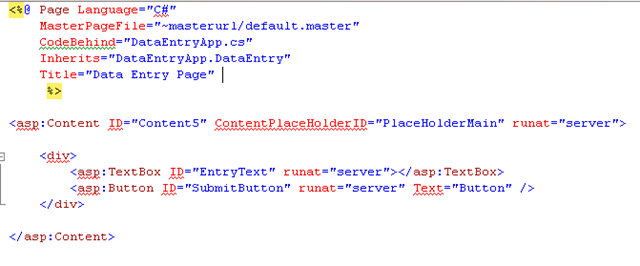
Open up "DataEntry.cs" and add code behind for it like this

Open up "DataDisplayApp.aspx" and add the following HTML.
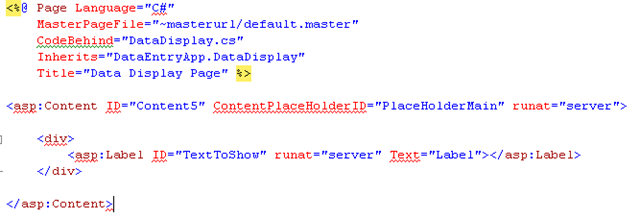
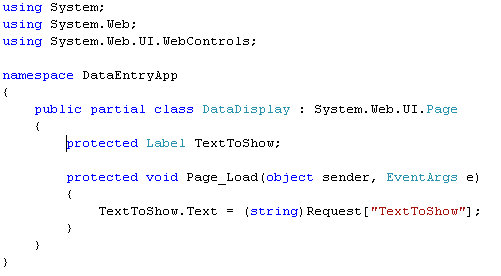
Open up "DataEntry.cs" and add code behind for it like this
3. Build & Deploy
We are now ready to build and deploy the solution to SharePoint. Couple of things before we do that however.
Open up the "WSP View" panel. If you dont see this you can find it under View -> Other Windows -> WSP View.
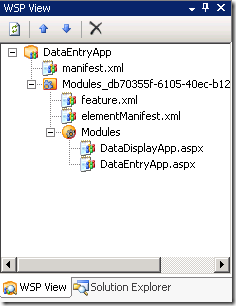
The WSP View shows you how your solution is going to be packaged into the WSP. It allows you to drag and drop your Features around to get the model you want. It also allows you to open the XML files and tweak with them if you want to. This is a HUGE improvement over VSeWSS 1.0 where this was not possible.
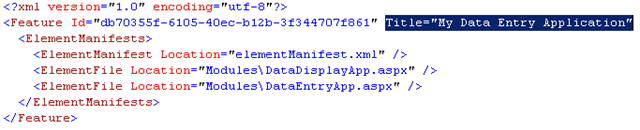
Open "feature.xml" and modify the name of our solution to something more meaningful like "My Data Entry Application". This is the name of the Feature in SharePoint. (By default in the CTP of VSeWSS this has a GUID and does not read very well. That will be fixed for the final release too).
Now we are ready to build the solution
Build -> Build DataEntryApp
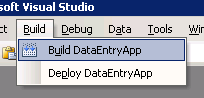
This will compile your projects code. However we also need to package the solution into a WSP and deploy it to SharePoint. Fortunately, VSeWSS does this for us so we dont need to do any of this by hand like we had to in the past with scripts and nasty batch files.
Deploy -> DataEntryApp
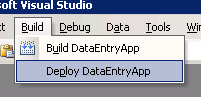
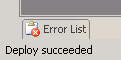
If your deployment was successful you should see "Deploy succeeded" in the lower left of the Visual Studio window.
4. Try it out!
Navigate to https://<your server name>/DataEntryApp.aspx You should see an error like the one below.
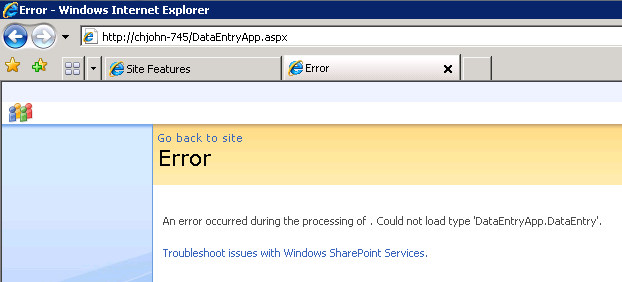
The reason this error occurs is because our page was not able to load the DataEntryApp.DataEntry type from our DLL. Why was it not able to do this you might ask? Well, actually it is due to our DLL with our compiled code not being packaged and deployed into the correct place :(
BUG!
There is a bug in the CTP of VSeWSS 1.1 which will not package up your DLL into the WSP unless there is a WebPart or an Event Receiver in your project. This will be fixed in the final version of VSeWSS 1.1.
As a workaround for now we have to have a event receiver added to our project.
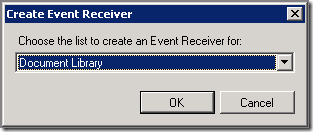
Add -> New Item -> Event Receiver
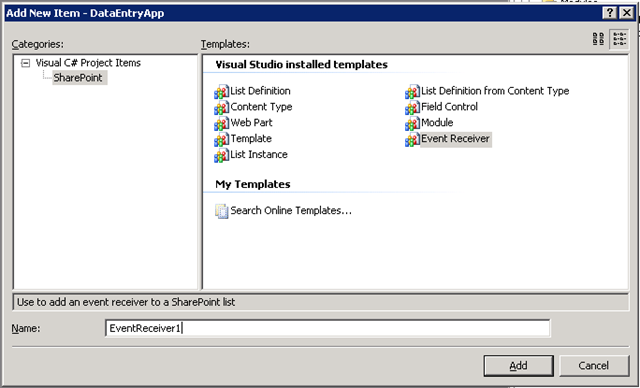
Change the name if you like and when you click "Add", choose "Document Library".
By default VSeWSS will deploy the DLL to the GAC. Typically this is not the best solution and you might like to deploy your DLL to the /Bin directory instead. GAC deployed code runs with Full Trust. Unless you need that full trust it is better to deploy the DLL to the /bin directory ... just like regular ASP.Net applications.
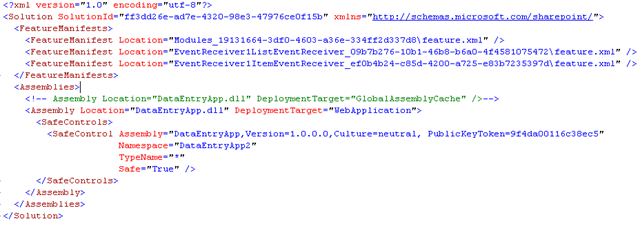
To do this, go into the WSP View panel and open up "manifest.xml".
Make sure your <Assemblies> section looks like the one below. You may need to change your PublicKeyToken if you used a different key file to sign the assembly with.
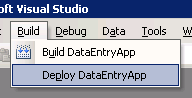
Now we can deploy again.
Build -> Deploy DataEntryApp
This will retract the solution, remove the solution, add the solution & deploy the solution again for you automatically. It will also recycle the IIS application pool for you. No need to do an IISRESET in most cases!!
Make sure it was a success
![clip_image015[1]](https://msdntnarchive.blob.core.windows.net/media/TNBlogsFS/BlogFileStorage/blogs_msdn/cjohnson/WindowsLiveWriter/BuildingasimpleASP.Netpagebasedapplica.1_F7CC/clip_image015%5B1%5D.png)
Now refresh the page in the browser again and your page should spring into life

Enter some text and click the "Button". If everything has gone correctly you should see the text you typed in echoed back to you on the DataDisplayApp.aspx page.

I hope this illustrates how simple it is to start creating a ASPX page based application in SharePoint. Of course there are other ways to build applications in SharePoint (WebParts etc...) so you should pick which method suits your needs. For more info on that see: Application Development on MOSS 2007 & WSS V3
I am going to repost this when the final version of VSeWSS 1.1 is released as some of the steps will have changed & bugs removed :)
If you have suggestions for future topics you would like me to post about on Development with SharePoint please comment.
Thanks,
-Chris.