Yet more on Data Binding with C# and XAML: Refreshing your views
I’ve touched on the awesomeness of data binding a few times in this blog. Data binding is one of those things that still seems a little bit like magic: tell a control about some data, and the control will automagically display it, reformatting as required.
It’s something which works in a very different way from iOS and – for example – UITableView, which uses callbacks you need to deal with in order to generate the data to be displayed, on a row-by-row or cell-by-cell basis. The most magical part of data binding is the link between control and data can stay in sync, all by themselves.
OK, so you might not think of using data binding in that awesome game you are working on in MonoGame, but if you ever need to display a table or other collection of data, I can guarantee that you’ll love it.
I was most recently talking like a giddy schoolgirl on data binding in a blog entry More on ListBoxes: Using databinding to control appearance which used data convertors to alter the appearance of entries in the XAML ListBox. For example, you can data-bind a Foreground color to a variable (say, ‘deadliness of a given animal’) and use a data converter to swap a value (the deadliness, on a scale of 1 (tickles) to 10 (the remains were never found)) to a color. It’s fun stuff, and only requires you write a little extra Class to handle it.
Unfortunately, although I managed to explain that part pretty well (I thought) I completely messed up something rather important: what do you have to do to make the list view (or other control) magically update itself if one of those properties changes.
As an example, here’s a GridView which displays a list of names. It unhides a gold star when the scores are over 90.
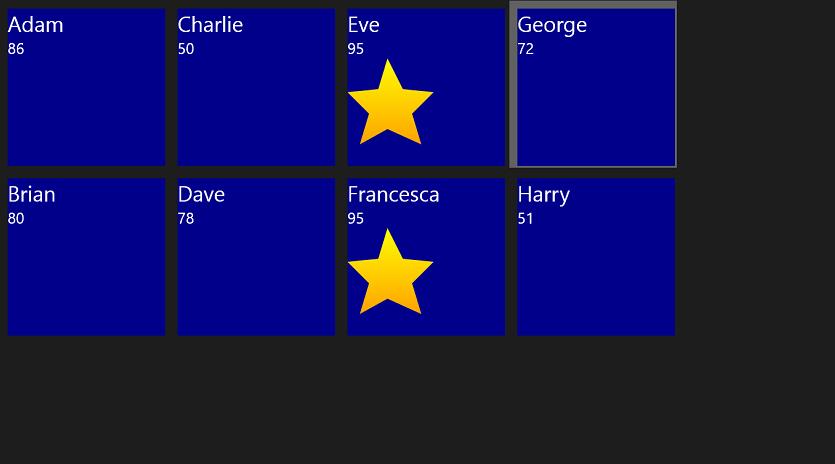
What happens when the scores are all increased? Will the stars appear by themselves?
At the time I casually said I wasn’t sure, but setting the ItemSource to null and re-assigning it would take care of it. And it did. What I didn’t notice was that it also caused the control to completely redraw itself, and as I had Windows animation effects turned off, I didn’t realize just how ugly that looks. As in, very ugly indeed. Now is the time to correct this heinous error.
All hail, INotifyPropertyChanged !
In a nutshell, no: the stars will not appear by themselves. You need to tell the control that when a specific bound piece of data changes, it needs to take another look at the data and redraw it as necessary. And this means you need to implement something called the INotifyPropertyChanged interface on the data that you are binding to the control (drop that sentence into a conversation at a party and you’ll be an instant hero).
Let’s see that in practice, with my amazing app which will display names of students and award them a gold star if they get 90 or higher.
First of all, let’s create a class which defines what a Student looks like, and straightaway define that INotifyPropertyChanged stuff.
public class Student : INotifyPropertyChanged
{
// Pupil's name
public string Name { get; set; }
// Pupil's score. This is the property which can trigger the redraw of the control, so
// its definition is a little different from Name, as it implements the INotifyPropertyChanged interface.
private int m_score; // Private variable to store the score
// Some standard code for the INotifyPropertyChanged interface
public event PropertyChangedEventHandler PropertyChanged;
private void NotifyPropertyChanged(String updateScore)
{
if (PropertyChanged != null)
{
PropertyChanged(this, new System.ComponentModel.PropertyChangedEventArgs(updateScore));
}
}
public int Score
{
get
{
return m_score;
}
set
{
m_score = value;
NotifyPropertyChanged("Score"); // Trigger the change event if the value is changed!
}
}
public Student(string name, int score)
{
Name = name;
m_score = score;
}
}
As you can see, we need to do some extra work on the getter/setter of the Score field, as this is the variable that will trigger refreshing the data-bound control. We also need to implement the PropertyChanged event handler, using some very boiler-plate code you'll end up using time and time again.
Now let’s define a class which represents the school of students for our app. We’ll create an ObservableCollection list to store a bunch of students, like this:
public class SchoolDataType
{
public ObservableCollection<Student> students = new ObservableCollection<Student>();
}
And then, in the App.cs file, let’s declare an instance of that school. Putting this variable in App.cs means that every other class we add to the project can access it.
sealed partial class App : Application
{
public static SchoolDataType SchoolData { get; set; }
public App()
{
this.InitializeComponent();
this.Suspending += OnSuspending;
SchoolData = new SchoolDataType();
}
…
}
All we have left is the XAML and the code behind page. First the XAML. We declare a GridView, and inside it, bind a grid's DataTemplate it to the SchoolData’s student’s score. We tweak this binding via the Data Convertor to control the Visibility of the grid, and inside that grid we draw a gold star. The end result is that the star will be visible or hidden depending on the score.
<Page
x:Class="GoldStar.MainPage"
xmlns="https://schemas.microsoft.com/winfx/2006/xaml/presentation"
xmlns:x="https://schemas.microsoft.com/winfx/2006/xaml"
xmlns:local="using:GoldStar"
xmlns:d="https://schemas.microsoft.com/expression/blend/2008"
xmlns:mc="https://schemas.openxmlformats.org/markup-compatibility/2006"
mc:Ignorable="d">
<Page.Resources>
<local:StarDataConverter x:Key="DrawStar"></local:StarDataConverter>
</Page.Resources>
<Grid Background="{ThemeResource ApplicationPageBackgroundThemeBrush}" Tapped="Tap_UpdateScores">
<GridView x:Name="myGridView" >
<GridView.ItemTemplate>
<DataTemplate>
<StackPanel Orientation="Vertical" Margin="10,10,0,0" Width="256" Height="256" Background="DarkBlue">
<TextBlock Text="{Binding Name}" FontSize="35" />
<TextBlock Text="{Binding Score}" FontSize="25"/>
<Grid Visibility="{Binding Score, Converter={StaticResource DrawStar}}">
<Polygon Points="65,0,90,50,140,55, 105,90,120,140,65,115,20,140,35,90,0,55,50,50">
<Polygon.Fill>
<LinearGradientBrush StartPoint="0,0" EndPoint="0,1">
<GradientStop Color="Yellow" Offset="0.0" />
<GradientStop Color="Orange" Offset="1.0" />
</LinearGradientBrush>
</Polygon.Fill>
</Polygon>
</Grid>
</StackPanel>
</DataTemplate>
</GridView.ItemTemplate>
</GridView>
</Grid>
</Page>
The XAML is quite straightforward. The DataTemplate is the design of the cell that will be displayed, containing two text boxes (one for the name, one for the score) and an extra grid which contains the gold star image. Rather than using a bitmap, I use XAML's drawing abilities to quickly create a filled shape. This star's parent grid is the part that's bound to the data converter that can show it, or hide it. I think you will have to agree there's actually a surprisingly small amount of XAML required to create a complete grid control and populate it! Obviously you would spend more time on appearance, and thus the XAML would quadruple in size :-)
The code behind page is very simple. There are two parts:
- We create some default data for the grid to display, and
- We handle a touch event.
First the data initialization:
public MainPage()
{
this.InitializeComponent();
App.SchoolData.students.Add(new Student("Adam", 86));
App.SchoolData.students.Add(new Student("Brian", 80));
App.SchoolData.students.Add(new Student("Charlie", 50));
App.SchoolData.students.Add(new Student("Dave", 78));
App.SchoolData.students.Add(new Student("Eve", 95));
App.SchoolData.students.Add(new Student("Francesca", 95));
App.SchoolData.students.Add(new Student("George", 72));
App.SchoolData.students.Add(new Student("Harry", 51));
myGridView.ItemsSource = App.SchoolData.students;
}
Notice how we can access the SchoolData by prepending it with App.SchoolData. This is a good way to deal with the evil that is global variables, IMHO.
And now the touch event. This is added purely to demonstrate that the GridView will update itself when the values change. If you touch anywhere on the grid, this method will increase all the scores and so display more stars. The foreeach loop makes quick work of cycling through all the student objects in the list. You could of course use LINQ if you wanted to apply changes to only specific pupils.
private void Tap_UpdateScores(object sender, TappedRoutedEventArgs e)
{
// Go through all the students and increase their scores.
// Watch in wonder as the stars appear automatically!
foreach (Student pupil in App.SchoolData.students)
{
pupil.Score += 5;
}
}
And here's what it looks like. After a couple of taps..
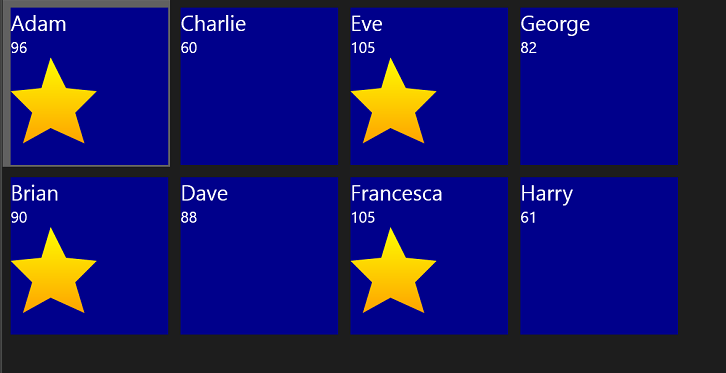
And some more..
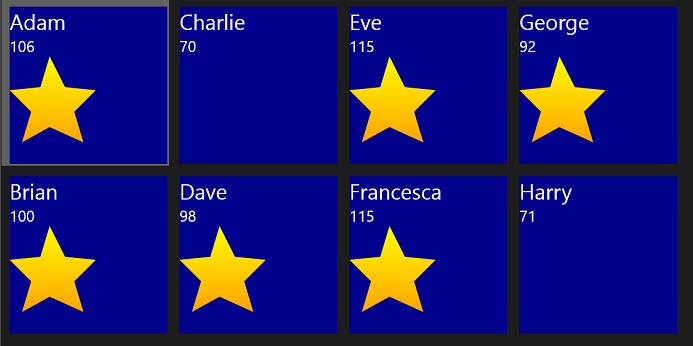
There you go: it's practically magic!