Azure Functions での App Service 認証/承認
こんにちは。Azure サポートの板垣です。
Azure App Service では、組み込みの認証/承認機能がサポートされています。
この機能は、Azure Functions でも利用することができ、HTTP トリガーで起動する Function に、任意の認証プロバイダーによる認証機能を付加することができます。
これにより、認証されたクライアントのみを Function にアクセスできるようにさせることができます。
今回は、認証プロバイダーとして Azure Active Directory を利用する場合の手順をご紹介します。
概要
認証/承認機能が有効化された Function App にアクセスするためには、認証プロバイダーから取得した認証トークンを Function App に提示します。
このため、Function App へのアクセス前に、認証プロバイダーから認証トークンを取得する必要があります。
以下より、認証トークンを取得するための構成と、認証トークンの取得、使用方法を記載します。
Function App で認証/承認を構成する
Function App を作成し、プラットフォーム機能の [認証/承認] をクリックします。
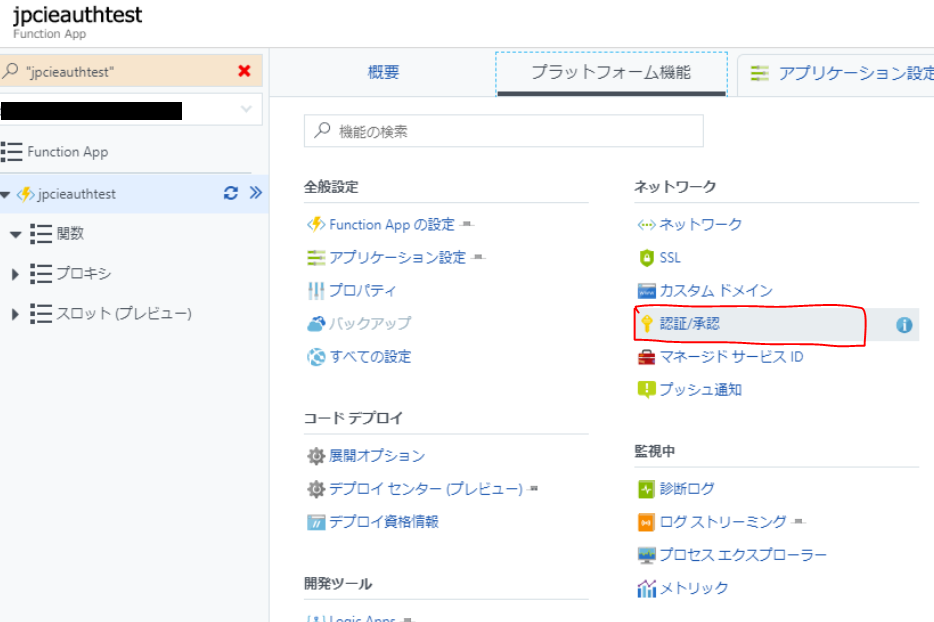
App Service 認証をオンにして "Azure Active Directory でのログイン" を選択し、認証プロバイダーとして Azure Active Directory を選択します。
管理モードを "簡易" とし、新しい AD アプリを作成します。
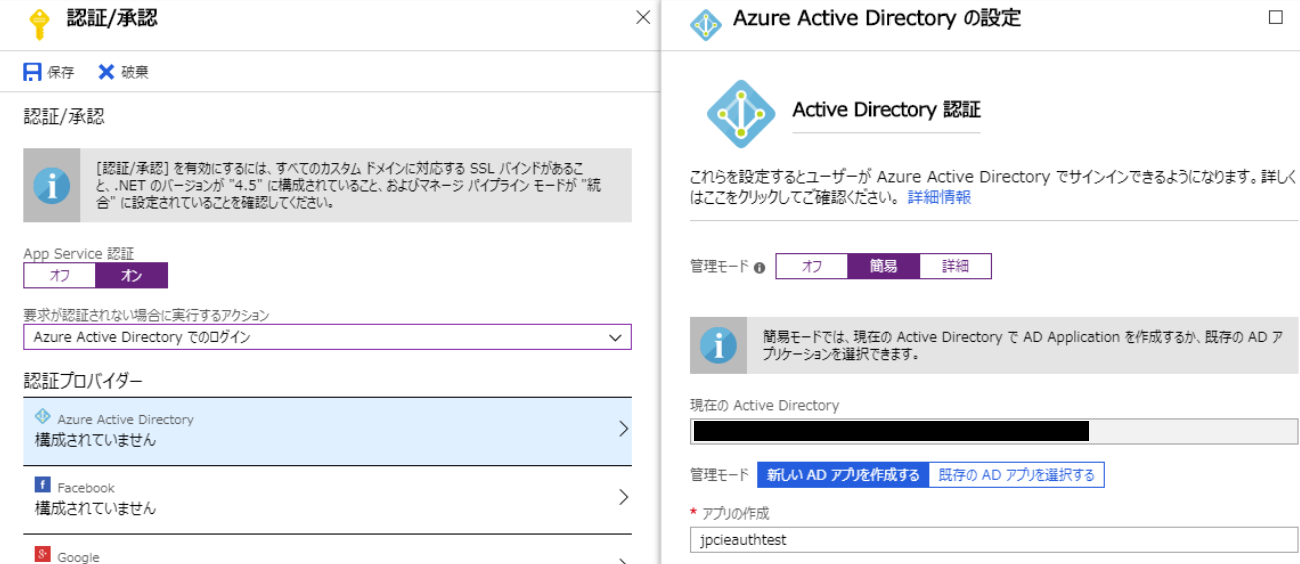
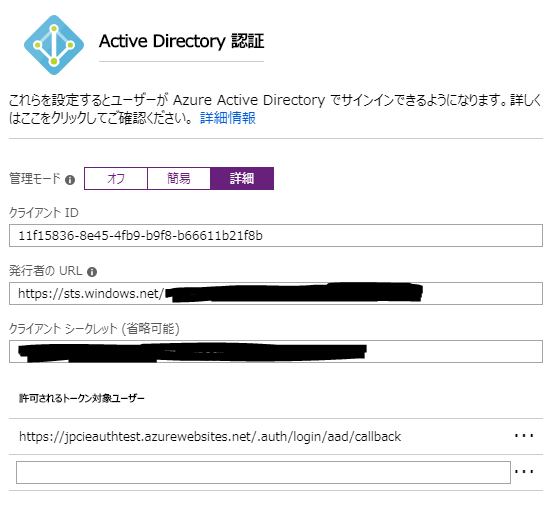
作成完了後、管理モードを "詳細" に切り替えると、作成された AD アプリの詳細を参照することができます。
ここで、"クライアント ID" はこの AD アプリのリソースを表す ID となります。この ID を控えておきます。
[関数の URL の取得] をクリックして、実行したい Function の URL を控えておきます。
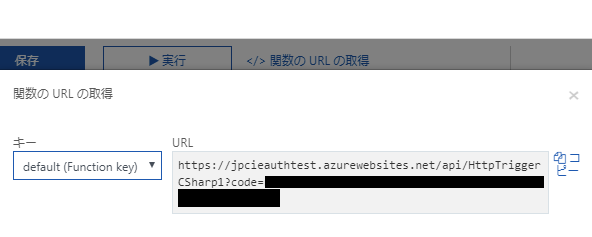
なお、HTTP トリガーで起動する Function は、既定では要求を承認するために API キーを必要とします(上図の code 値)。
この設定は function.json で変更可能であり、authLevel プロパティを anonymous に設定すると、API キー無しでアクセス可能になります。
API キーによる承認は Function ごとであるのに対して、本稿でご案内している Azure AD トークンによる承認は Function App 全体に対して適用されるという違いがあります。セキュリティ要件にあわせてそれぞれご利用ください。
Azure Functions における HTTP と Webhook のバインド - トリガー - 構成
Azure Active Directory にアプリケーションを登録する
Function にアクセスするクライアント アプリケーションの定義を Azure AD に登録します。
Azure AD アプリケーションは、Azure AD を利用するアプリケーションの定義です。Azure AD アプリケーションを登録することで、アプリケーションに対してトークンを発行する方法を定義します。
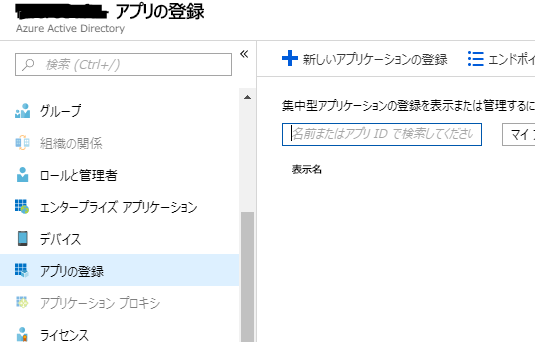
Azure AD テナントで、[アプリの登録] - [新しいアプリケーションの登録] をクリックします。
以下、ネイティブ アプリケーション、Web アプリ/API のそれぞれを登録した場合について記載します。
# 2018/09/19 アクセス許可の設定を追記しました。
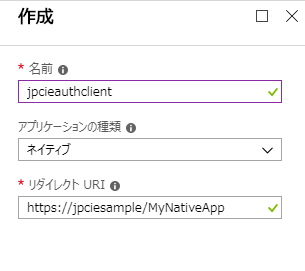
ネイティブ アプリケーション
ネイティブ アプリケーションでは、クライアントに配布されるようなアプリケーションが想定されます。トークンを取得するために、基本的にユーザーが対話形式でサインインして、資格情報を提供します。
アプリケーションの種類を "ネイティブ" とします。リダイレクト URI は物理的に存在するものである必要はありませんが、アプリケーションに固有の値を設定しておきます。
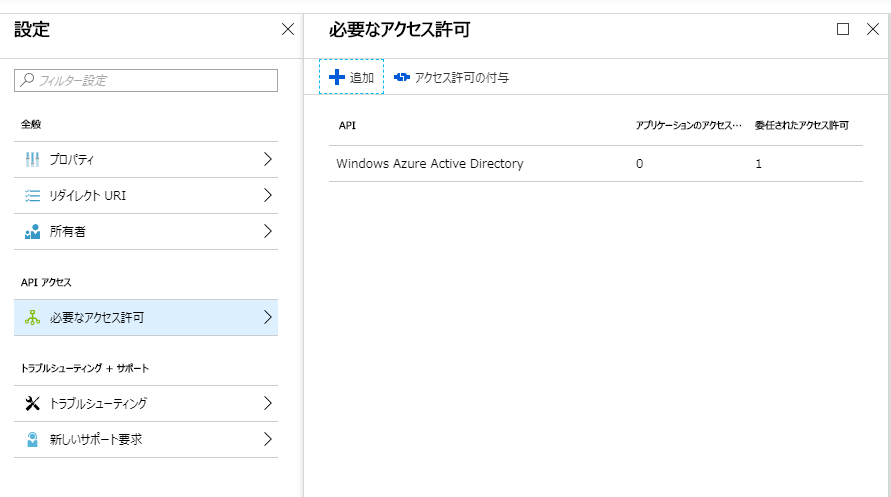
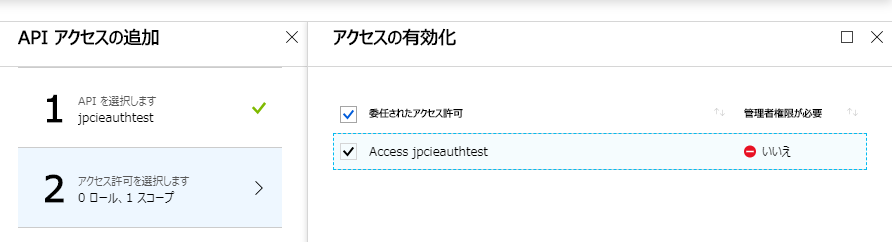
次に、アクセス許可の設定を追加します。この設定により、このアプリケーションで発行されるトークンが、Function App に対するアクセス許可を持つことを定義します。
[必要なアクセス許可] で [追加] をクリックします。
API として、Function App で簡易作成した Azure AD アプリケーションを指定します。
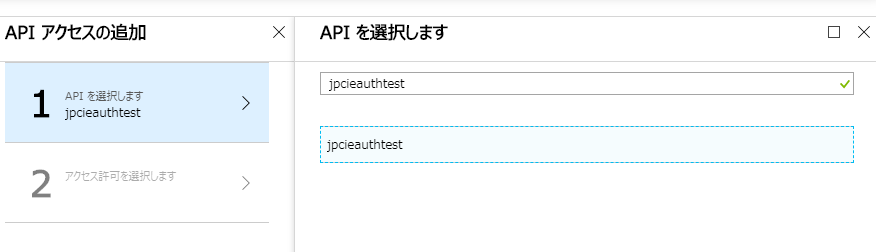
その Azure AD アプリケーションへのアクセスを許可するように設定し、完了します。
最後に、登録したアプリケーションのアプリケーション ID を控えておきます。

Web アプリ/API アプリケーション
Web アプリ/API アプリケーションでは、サーバーでホストされるようなアプリケーションが想定されます。アプリケーション コードがユーザーからは機密となるため、トークンを取得するために、シークレット キーを使用して資格情報を提供することができます。
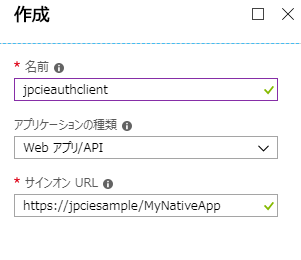
アプリケーションの種類を "Web アプリ/API" とします。サインオン URL は物理的に存在するものである必要はありませんが、アプリケーションに固有の値を設定しておきます。
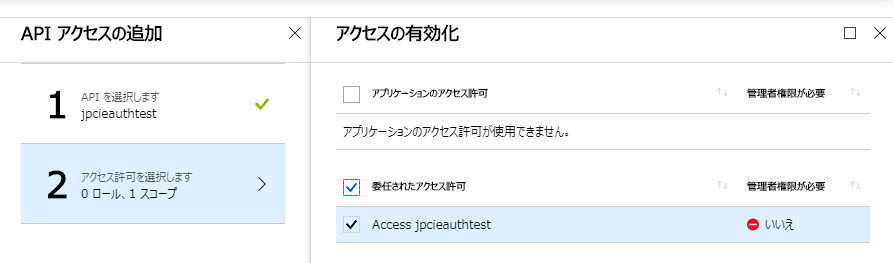
次に、ネイティブ アプリケーションと同様に、アクセス許可の設定を追加します。
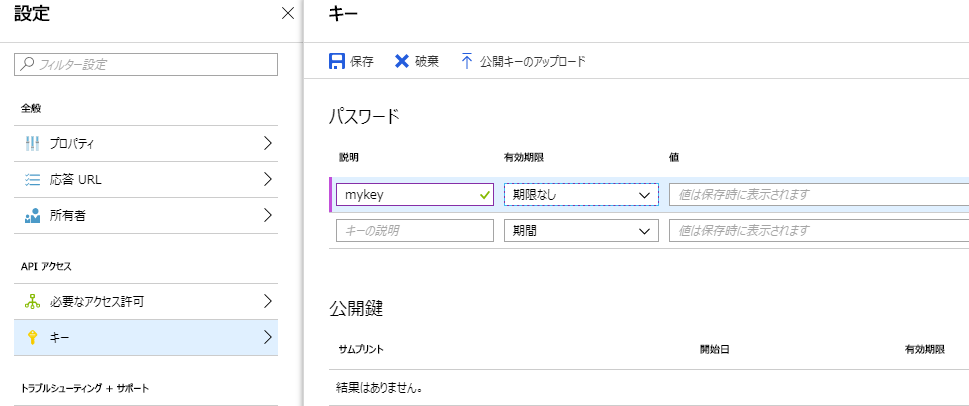
キーを生成します。"説明" と "有効期限" を設定後、[保存] をクリックすると、キー値が表示されます。
キー値が表示されるのは保存後のみですので、このタイミングで必ずキー値を控えておきます。
最後に、登録したアプリケーションのアプリケーション ID を控えておきます。

以上で Azure AD アプリケーションの登録は完了です。最後に、Azure AD テナントのプロパティからディレクトリ ID を控えておきます。

クライアント アプリケーションを実装する
以下は、PowerShell スクリプトと C# アプリケーションで、 Function を実行する場合のサンプルです。
Azure AD からトークンを取得するために ADAL.NET を使用していますので、適宜ダウンロードしてください。
# 2018/09/19 コードを一部修正しました。
ネイティブ アプリケーション
[PowerShell]
[powershell]
### ADAL.NET をロード ###
$adal = "C:\ADAL\Microsoft.IdentityModel.Clients.ActiveDirectory.dll"
[System.Reflection.Assembly]::LoadFrom($adal)
### Azure AD テナントの設定 ###
# Azure AD テナントのディレクトリ ID
$adId = "xxxxxxxx-xxxx-xxxx-xxxx-xxxxxxxxxxxx"
# トークン発行元
$authority = "https://login.microsoftonline.com/$adId"
### Function App で作成した AD アプリ ###
# クライアント ID
$resourceApplicationId = "11f15836-8e45-4fb9-b9f8-b66611b21f8b"
### クライアント用に作成した AD アプリ ###
# アプリケーション ID
$clientApplicationId = "dbcb7ba3-c667-4323-a310-a5e834b32675"
# リダイレクト URI
$redirectUri = "https://jpciesample/MyNativeApp"
### トークン生成 ###
# ADAL の AuthenticationContext オブジェクト
$authContext = New-Object Microsoft.IdentityModel.Clients.ActiveDirectory.AuthenticationContext -ArgumentList $authority
# トークン要求 (資格情報がキャッシュされていない場合、資格情報プロンプトが起動します)
$platformParameters = New-Object "Microsoft.IdentityModel.Clients.ActiveDirectory.PlatformParameters" -ArgumentList "Auto"
$authResult = $authContext.AcquireTokenAsync($resourceApplicationId, $clientApplicationId, $redirectUri, $platformParameters)
# Bearer トークン
$bearerToken = $authResult.Result.CreateAuthorizationHeader()
### Function の呼び出し###
# Function の URL
$functionUri = "https://jpcieauthtest.azurewebsites.net/api/HttpTriggerCSharp1?code=xxxxxxxxxxxxxxxxxxxxxxxxxxxxxxxx"
# 要求 Body
$body="{'name': 'Azure'}"
# HTTP 要求ヘッダの Authorization ヘッダに Bearerトークンを設定
$requestHeader = @{
"Authorization" = $bearerToken
}
# HTTPS のセキュリティ プロトコルを TLS 1.2 に設定
[Net.ServicePointManager]::SecurityProtocol = [Net.SecurityProtocolType]::Tls12
# Function に HTTP 要求を送信
try{
$response = Invoke-RestMethod -Uri $functionUri -Method Post -Headers $requestHeader -Body $body -ContentType "application/json"
echo $response
}catch{
Write-Error($_.Exception);
}
[/powershell]
[C#]
[csharp]
/* Azure AD テナントの設定 */
// Azure AD テナントのディレクトリ ID
string adId = "xxxxxxxx-xxxx-xxxx-xxxx-xxxxxxxxxxxx";
// トークン発行元
string authority = "https://login.microsoftonline.com/" + adId;
/* Function App で作成した AD アプリ */
// クライアント ID
string resourceApplicationId = "11f15836-8e45-4fb9-b9f8-b66611b21f8b";
/* クライアント用に作成した AD アプリ */
// アプリケーション ID
string clientApplicationId = "dbcb7ba3-c667-4323-a310-a5e834b32675";
// リダイレクト URI
string redirectUri = "https://jpciesample/MyNativeApp";
/* トークン生成 */
// ADAL の AuthenticationContext オブジェクト
AuthenticationContext authContext = new AuthenticationContext(authority);
// トークン要求 (資格情報がキャッシュされていない場合、資格情報プロンプトが起動します)
var authResult = authContext.AcquireTokenAsync(resourceApplicationId, clientApplicationId, new Uri(redirectUri), new PlatformParameters(PromptBehavior.Auto, null));
// Bearer トークン
string bearerToken = authResult.Result.CreateAuthorizationHeader();
/* Function の呼び出し */
// Function の URL
string functionUri = "https://jpcieauthtest.azurewebsites.net/api/HttpTriggerCSharp1?code=xxxxxxxxxxxxxxxxxxxxxxxxxxxxxxxx";
// 要求 Body
string bodydata = "{\"name\": \"Azure\"}";
// Function に HTTP 要求を送信
HttpWebRequest request = WebRequest.Create(functionUri) as HttpWebRequest;
request.Method = "POST";
request.Headers["Authorization"] = bearerToken;
request.ContentType = "application/json";
Stream reqstr = request.GetRequestStream();
reqstr.Write(Encoding.ASCII.GetBytes(bodydata), 0, bodydata.Length);
reqstr.Close();
HttpWebResponse response = request.GetResponse() as HttpWebResponse;
Stream resstr = response.GetResponseStream();
StreamReader sr = new StreamReader(resstr);
string resresult = sr.ReadToEnd();
Console.WriteLine(resresult);
[/csharp]
Web アプリ/API アプリケーション
[PowerShell]
[powershell]
### ADAL.NET をロード ###
$adal = "C:\ADAL\Microsoft.IdentityModel.Clients.ActiveDirectory.dll"
[System.Reflection.Assembly]::LoadFrom($adal)
### Azure AD テナントの設定 ###
# Azure AD テナントのディレクトリ ID
$adId = "xxxxxxxx-xxxx-xxxx-xxxx-xxxxxxxxxxxx"
# トークン発行元
$authority = "https://login.microsoftonline.com/$adId"
### Function App で作成した AD アプリ ###
# クライアント ID
$resourceApplicationId = "11f15836-8e45-4fb9-b9f8-b66611b21f8b"
### クライアント用に作成した AD アプリ ###
# アプリケーション ID
$clientApplicationId = "3cd3551e-fc68-4510-b236-64c207b353fb"
# リダイレクト URI
$redirectUri = "https://jpciesample/MyNativeApp"
# シークレット キー
$secretKey = "xxxxxxxxxxxxxxxxxxxxxxxxxxxxxxxx"
### トークン生成 ###
# ADAL の AuthenticationContext オブジェクト
$authContext = New-Object Microsoft.IdentityModel.Clients.ActiveDirectory.AuthenticationContext -ArgumentList $authority
# クライアント資格情報
$clientCredential = New-Object -TypeName Microsoft.IdentityModel.Clients.ActiveDirectory.ClientCredential ($clientApplicationId, $secretKey)
# トークン要求
$authResult = $authContext.AcquireTokenAsync($resourceApplicationId, $clientCredential)
# Bearer トークン
$bearerToken = $authResult.Result.CreateAuthorizationHeader()
### Function の呼び出し###
# Function の URL
$functionUri = "https://jpcieauthtest.azurewebsites.net/api/HttpTriggerCSharp1?code=xxxxxxxxxxxxxxxxxxxxxxxxxxxxxxxx"
# 要求 Body
$body="{'name': 'Azure'}"
# HTTP 要求ヘッダの Authorization ヘッダに Bearerトークンを設定
$requestHeader = @{
"Authorization" = $bearerToken
}
# HTTPS のセキュリティ プロトコルを TLS 1.2 に設定
[Net.ServicePointManager]::SecurityProtocol = [Net.SecurityProtocolType]::Tls12
# Function に HTTP 要求を送信
try{
$response = Invoke-RestMethod -Uri $functionUri -Method Post -Headers $requestHeader -Body $body -ContentType "application/json"
echo $response
}catch{
Write-Error($_.Exception);
}
[/powershell]
[C#]
[csharp]
/* Azure AD テナントの設定 */
// Azure AD テナントのディレクトリ ID
string adId = "xxxxxxxx-xxxx-xxxx-xxxx-xxxxxxxxxxxx";
// トークン発行元
string authority = "https://login.microsoftonline.com/" + adId;
/* Function App で作成した AD アプリ */
// クライアント ID
string resourceApplicationId = "11f15836-8e45-4fb9-b9f8-b66611b21f8b";
/* クライアント用に作成した AD アプリ */
// アプリケーション ID
string clientApplicationId = "3cd3551e-fc68-4510-b236-64c207b353fb";
// シークレット キー
string secretKey = "xxxxxxxxxxxxxxxxxxxxxxxxxxxxxxxx";
/* トークン生成 */
// ADAL の AuthenticationContext オブジェクト
AuthenticationContext authContext = new AuthenticationContext(authority);
// クライアント資格情報
var clientCredential = new ClientCredential(clientApplicationId, secretKey);
// トークン要求
var authResult = authContext.AcquireTokenAsync(resourceApplicationId, clientCredential);
// Bearer トークン
string bearerToken = authResult.Result.CreateAuthorizationHeader();
/* Function の呼び出し */
// Function の URL
string functionUri = "https://jpcieauthtest.azurewebsites.net/api/HttpTriggerCSharp1?code=xxxxxxxxxxxxxxxxxxxxxxxxxxxxxxxx";
// 要求 Body
string bodydata = "{\"name\": \"Azure\"}";
// Function に HTTP 要求を送信
HttpWebRequest request = WebRequest.Create(functionUri) as HttpWebRequest;
request.Method = "POST";
request.Headers["Authorization"] = bearerToken;
request.ContentType = "application/json";
Stream reqstr = request.GetRequestStream();
reqstr.Write(Encoding.ASCII.GetBytes(bodydata), 0, bodydata.Length);
reqstr.Close();
HttpWebResponse response = request.GetResponse() as HttpWebResponse;
Stream resstr = response.GetResponseStream();
StreamReader sr = new StreamReader(resstr);
string resresult = sr.ReadToEnd();
Console.WriteLine(resresult);
[/csharp]
今回は、Azure Functions を例としてご案内しましたが、同じ方法で Azure Web Apps、Azure API Apps で公開する API に対して認証/承認アクセスを行うこともできます。
実行する API をパブリック アクセスから制限したいような場合に、有効なソリューションとなりますので、ご参考ください。