Generate workload on your Azure SQL Database
At the end of last year, we have announced the Azure SQL Database Index Advisor which recommends new indexes for your existing SQL Databases that can improve your query performance. One of the prerequisites to get index recommendations is to have database usage of course. This blog post will explain how you can generate SQL load on your Azure SQL Database. I’m going to use the AdventureWorks database as an example.
Create your Azure SQL Sample Database
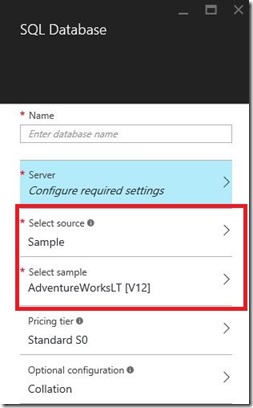
There are several possibilities to create a sample database. You can migrate your on-premise database to an Azure Database. There are various approaches to migrate your database. Checkout our Migration cookbook. Another possibility is using a light version of the AdventureWorks database. Microsoft currently provides this database as a sample database in the Azure Portal.
I’ve used the AdventureWorks2014 database for my tests.
Generate SQL Workload Script
Next to the database you need to have sample queries that you can execute against the database. You can find a lot of sample queries on Books Online. The idea is to randomly execute the queries against the database. Jonathan Kehayias (blog | twitter) created a very nice solution a few years ago to generate random workload. He created a large T-SQL script file with all the sample queries in it. A PowerShell script selects randomly one of the queries and executes it against the database. I really liked the idea and tried to run Jonathan’s solution against my Azure SQL Database. I just had to modify a few of the T-SQL statements because some of the syntax is not supported on Azure DB, like USE and GO. I also modified the PowerShell script a bit so that I was able to connect to my Azure database.
You can download the modified PowerShell and the large T-SQL file here.
Generating the workload
One of the possibilities is running the above mentioned scripts locally. However, before you can get index recommendations on your Azure DB, the load has to be running at least for a few days. In my situation, I couln’t leave my laptop open for 24/7. I decided to spin up an Azure VM and run the scripts from that virtual machine. That solution worked perfectly but I had use a VM which will give an additional cost. So, I have worked out another way to schedule the SQL workload, without the Azure VM. And when you say *schedule*, you think immediatly about Azure Automation, right? I’ve created a solution that is based on an Azure Runbook and Azure Table. The Runbook is going to replace the PowerShell script and the Azure Table will contain the sample queries of the large T-SQL script.
Create the Azure Table
The first step is creating the Azure Table, which has to be done with another PowerShell script. In the Azure documentation you can find some very usefull examples how to manage Azure tables and table entities. The Azure Table will contain all the AdventureWorks sample queries and exists out of 2 columns which is an ID and the query to execute. You can download the scripts to create and to load the Azure table here.
To verify the content of your Azure Table, you have to use the Microsoft.WindowsAzure.Storage.Table.TableQuery class or use the Azure Storage Explorer if you prefer a GUI.
Create the Runbook
By creating a Runbook, you can radomly select one of the queries that are stored in the Azure Table and execute it against your Azure SQL Database.
Before you can create the Runbook, you first have to create an new Azure Automation Account. Go to the Azure Portal, select Automation Accounts and click the Add button. Specify the Name, Resource Group, Subscription and the Region.
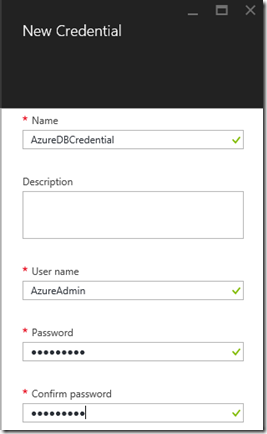
Once your Automation Account is created, you have to create a credential Asset. It contains the username and password for the target Azure SQL Database logical server.
Go to the Automation Account you’ve just created and select Assets – Credentials
Click on the button Add a Credential and specify the Credential Name, User name and password.
We have now setup all the prerequisites so we can start with creating a runbook in our Azure Automation account. A runbook is a PowerShell Workflow that needs to be created or imported. The runbook contains the script to randomly get a query from the Azure Table and execute it against the Azure Database. Select your Automation Account and click on Runbook.
Click on the button Add a runbook. Below you can find the runbook that I’ve created. You can either copy/paste it into a new runbook or save it locally and then import it.
 <#
.SYNOPSIS  Generate SQL Workload on AdventureWorks   .DESCRIPTION  Generate SQL Workload on AdventureWorks    .EXAMPLE  SQLWorkload    .NOTES  AUTHOR: Pieter Vanhove  LAST EDIT: December 31, 2015  #>
  workflow SQLWorkload
{  param
 (  # Fully-qualified name of the Azure DB server
 [parameter(Mandatory=$true)]   [string] $SqlServerName,
   # Fully-qualified name of the Azure DB server
 [parameter(Mandatory=$true)]   [string] $SqlDatabaseName,
   # Credentials for $SqlServerName stored as an Azure Automation credential asset
 # When using in the Azure Automation UI, please enter the name of the credential asset for the "Credential" parameter
 [parameter(Mandatory=$true)]   [PSCredential] $Credential,
   # The storage account where the Azure Table is stored
 [parameter(Mandatory=$true)]   [string] $StorageAccount,
   # Define the Storage Account Key
 [parameter(Mandatory=$true)]   [string] $StorageKey
    )     inlinescript{     # Setup credentials and parameters
 $ServerName = $Using:SqlServerName
 $DatabaseName = $Using:SqlDatabaseName
 $UserId = $Using:Credential.UserName  $Password = ($Using:Credential).GetNetworkCredential().Password  $StorageAccountName=$Using:StorageAccount
 $StorageAccountKey=$Using:StorageKey
   # Create connection for the database
 $DatabaseConnection = New-Object System.Data.SqlClient.SqlConnection
 $DatabaseCommand = New-Object System.Data.SqlClient.SqlCommand
   #Create Azure Storage Context
 $Ctx = New-AzureStorageContext $StorageAccountName -StorageAccountKey $StorageAccountKey
 $TableName = "SQLWorkload"
   #Get a reference to a table.
 $table = Get-AzureStorageTable –Name $TableName -Context $Ctx
   #Create a table query.
 $TableQuery = New-Object Microsoft.WindowsAzure.Storage.Table.TableQuery
  #Define columns to select.
 $list = New-Object System.Collections.Generic.List[string]
 $list.Add("Query")


WHILE(1 -eq 1)   {      # Pick a Random Query from the input object
    $ID = Get-Random -Minimum 1 -Maximum 38;     Write-Output $ID
    #Set query details.
    $TableQuery.FilterString = "ID eq $ID"
    $TableQuery.SelectColumns = $list
         #Execute the query.
    $Query = $table.CloudTable.ExecuteQuery($TableQuery)          #Exectute the query against the database
    $DatabaseConnection.ConnectionString = "Server=$ServerName; Database=$DatabaseName; User ID=$UserId; Password=$Password;Connection Timeout=300"
    $DatabaseConnection.Open();     # Create command for a specific database $DBName
    $DatabaseCommand.Connection = $DatabaseConnection
    $DatabaseCommand.CommandText = $Query.Properties["Query"].StringValue          $NonQueryResult = $DatabaseCommand.ExecuteNonQuery()                                              # Close connection
    $DatabaseConnection.Close()     #Write-Output $Query.Properties["Query"].StringValue
          # Sleep for 250 miliseconds between loops
    Start-Sleep -Milliseconds 250    }
}
}
I’ve tried to make the runbook as dynamic as possible, I have specified several parameters in the “param” section.
- $SqlServerName = The fully qualified name of your logical SQL Server
- $SqlDatabaseName = The name of your database, in my example AdventureWorks2014
- $Credential = This is the Azure Credential that you have just created to authenticate against your logical SQL Server
- $StorageAccount = The storage account that has been used for your Azure Table
- $StorageKey = The Storage Account Key to connect to your storage account
In the while loop, I’m first picking a random number and select the query with the ID that is equal to the random number.
The result is stored in the $query parameter. Secondly, I open a connection to my database and execute the query that I have just stored in the $query parameter
After the runbook creation, you can test it. Click on the edit button and click Test.
If your tests are OK (you should see the ID’s in the output screen), you can Publish your runbook by clicking the Publish button.
Launch the SQL Workload
To launch the workload, just start the runbook.
As a result, you will notice that a job is created. Verify the errors and warnings in case you encounter issues with the load
The job can run for maximum 9 hours. We put a limit on this. If the runbook restarts from the same checkpoint or from the beginning of the runbook three consecutive times, it will be terminated with a status of Failed, waiting for resources. This is to protect from runbooks running indefinitely without completing. More information can be found on Runbook execution in Azure Automation 
If you want a continues load, I suggest to created a schedule for the runbook that is launched every 12 hours.
Also make sure that you select the Basic pricing tier of your Automation account. If you choose Free, you only get 500 job minutes, which means that after these minutes, your job will stop.
Monitoring the workload
You can verify the workload by using some of the monitoring charts in the portal. If you select the database in the Azure Portal, you can see an overview of the average DTU usage of the past hour. If you click on the “Edit” link, you can modify the graph style and add multiple counters like Data IO Percentage, CPU Percentage, …
If you want to have a more detailed overview, you can use the new functionality called Query Performance Insight. If you want to start using the insight, you just have to switch on the Query Store on the Azure Database.
Last but not least, most of the DMV’s are also working on the Azure Database. With the query below, you can determine the most consuming queries of your workload
Conclusion
If you run the SQL Workload for a few days, you will notice that the Index Advisor will give you index recommendations!


