Efficient IoT With Azure
[caption id="attachment_16935" align="alignnone" width="800"]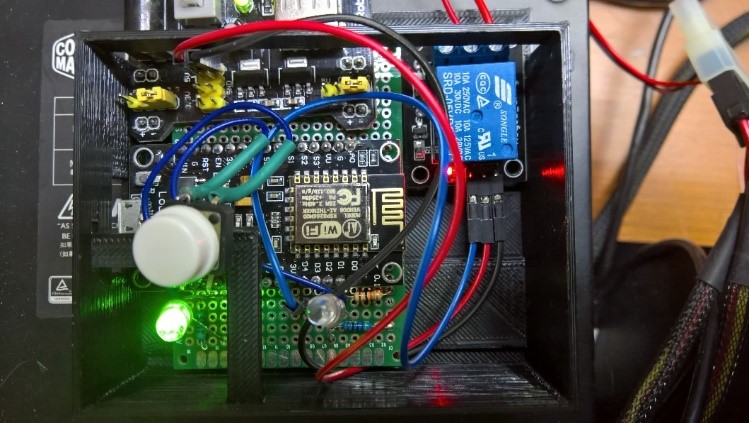 The IoT device Alon has designed and printed.[/caption]
Editor's note: The following post was written by Visual Studio and Development Technologies MVP Alon Fliess as part of our Technical Tuesday series with support from his technical editor, Microsoft Azure MVP Eran Stiller.
The Internet of Things (IoT) continues to evolve. Last year I wrote an introduction article about the subject and showed how you can use the Azure foundation to build a complete IoT system.
In that article, I defined an IoT system in the following way:
A large IoT system includes one or more of the following elements:
- Many different devices with sensors and actuators
- Local gateways
- A collection of cloud services that enable:
- Registration of devices
- Management of devices
- Different communication protocols that provide reliability and security
- The ability to collect a vast amount of data at a very high input rate
- The ability to analyze the stream of information in a near real-time manner
- The ability to analyze the current and historical collected information
- The ability to show the resulting conclusion and the collected data
However, a lot has changed since writing my last article for the MVP Award Blog.
Microsoft now provides new capabilities, that make building an IoT system much simpler. Last year, I had to use the Azure Event Hub as the main event transfer channel from the devices, to the cloud services. Event Hub is a mechanism that was built to provide high scale, fast event delivery for applications that need to gather huge amounts of data. As such, it was the best tool available for an IoT system.
However, Event Hub is not intended to serve as an IoT device management platform. For this purpose, Microsoft has now built a new IoT Hub mechanism, that perfectly fits the IoT device and cloud service relationship. The Azure IoT solution provides:
- An IoT Hub, which has the ability to handle a vast amount of event information in a scalable way, very similar to what Event Hub does.
- The ability to register a device, creating a specific security access credential for each device.
- The ability to send information using industry standard protocols from the device to the cloud and vice versa.
- A new (still in preview) ability to manage devices – update firmware, activate maintenance actions and even remote reboot a device.
- Microsoft provides several SDK families that ease the device application development:
- Azure IoT device SDKs – these SDKs can be used on most IoT devices, from cheap Arduino based IoT devices to Linux or Windows IoT based devices. The various SDKs support many modern development languages and environments such as C, Node.js, Java, .NET and Python.
- Azure IoT service SDKs – these SDKs assist in building applications that interact with devices and help in device management. There is a version of the SDK for .NET, Node.js and Java.
- Azure IoT Gateway SDK – this is a new (still in preview) SDK that provides the foundation for developing a local gateway device. A local gateway serves as a mediator between cloud services such as Azure IoT Hub and local simple devices that do not have the capability of connecting directly to the cloud.
- A pre-configured solution for an IoT system called Azure IoT Suite. With just a few clicks you can deploy a bunch of IoT related services that can simply be your IoT solution, or can be customized to fit your needs. The IoT suite provides two IoT system scenarios:
- A remote monitoring system – a typical IoT system that collects information from devices which reside in different geolocations, with the ability to register devices as well as sending commands to each device.
- A predictive maintenance system – an IoT system that collects information from sensors and devices and uses Microsoft machine learning services to predict hardware failure.
- A new Azure Certified for IoT device catalog, which is a portal that lets you find the best hardware to meet your project requirements. It also enables hardware providers to register and publish their hardware in the catalog.
- Mature complementary Cloud services. Azure has evolved to be a one stop shop for any kind of service you need for your IoT data analysis requirements. Beside the ability to analyze the data using Stream Analytics and Azure Machine Learning, you can use any open source Big Data solution, as well as consume the amazing Microsoft Cognitive Services.
Into the Details
To demonstrate the Azure IoT capabilities, I chose to build an IoT electrical switch - the basis of any home automation system. I wanted to use this switch to turn on and off a new led light for my 3D printer, as well as control my yard car gate. I wanted to have a very simple hardware solution.
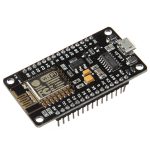 The device is built around the NodeMCU V3, a very cheap device based on the ESP8226 Wi-Fi module. The NodeMCU can be programmed in LUA, however I preferred to use Visual Studio's C++ 14 with the Visual Micro add-in, that lets you develop Arduino solutions in Visual Studio 2015. Azure IoT Hub device SDK provides a C based library that is easily consumed from a C++ project.
Here is the electrical diagram of the device: 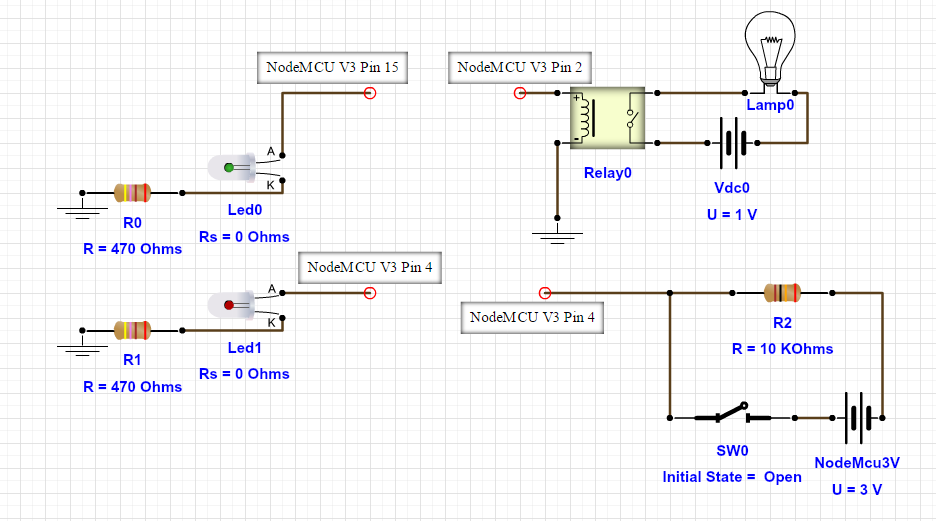
I used two LEDs -green and red - as status indicators. The switch is used to activate the device locally and the relay is used to close the LED light circuit and turn on the lights.
You can download the 3D files as well as the project instructions from here.
The project source code is in GitHub.
And if you want to learn more, I encourage you to watch my CodeValue colleague's, Dror Helper, NDC lecture – Electronics 101 for software developers.
Before connecting the device to the Azure IoT Hub, I created a very simple Web Server. The Web Server provides a single page, that lets you control the switch. If you know the device IP, and you surf from within the same network, you can activate the device just by browsing to this address. Although the ESP8266 Web Server Arduino library has built-in authentication support (in order to have a simpler access control without the need to deal with users and passwords) I used an access key that needs to be provided as part of the URL path.
* For those who are familiar with URL encoding and Web resources, usually one encodes arguments in the query string. The main reason I encoded the AppKey and other parameters in the path, is the built-in path based routing support that I get from the on(path) method of the Arduino ESP8266WebServer class. Otherwise, I would have to invest in parsing the query string. If you insist on doing that, you can use the arg("AppKey") method to extract the AppKey argument.
To configure the solution edit the configuration file: 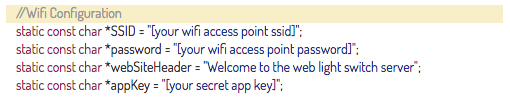
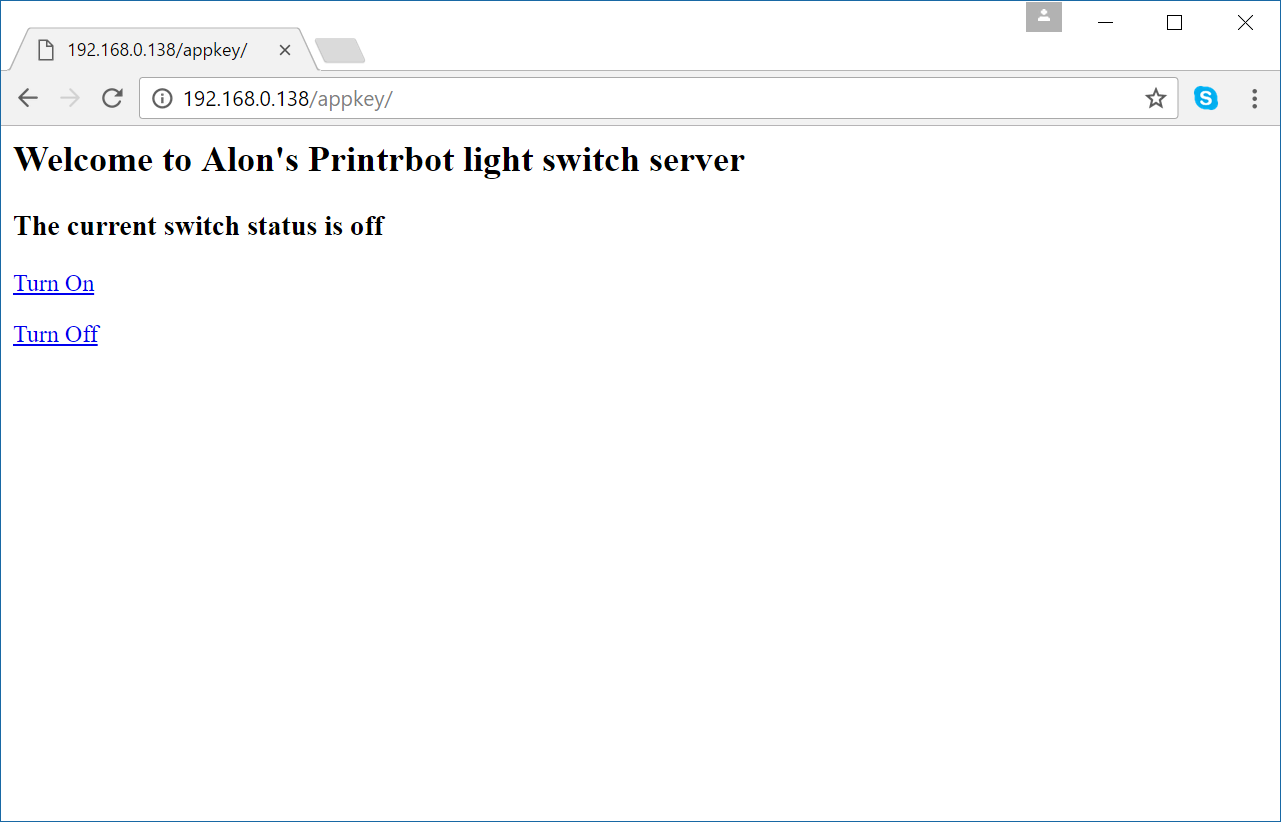
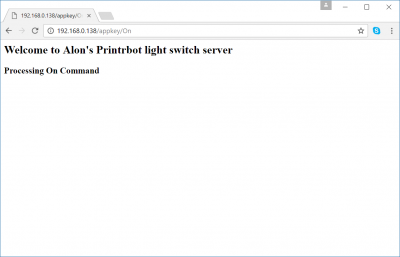
Just by browsing to the URL containing the "on" or "off" keywords, the NodeMCU changes the device state.
To reach the Web Controlled Switch from the internet, you can use a static IP or a Dynamic DNS for your network, and configure the router NAT table to forward the traffic to the Web Controlled Switch assigned IP. However, this has several drawbacks:
- You need to assign a specific external port and route the traffic to each of the devices' IP address.
- It is a security risk, since you provide external access to a device within your network.
- If you want to deploy the device in another network, such as your organization's network, you need to ask your network admin to setup the router for you, including opening the port in the firewall. However, most of the IT guys that I know will refuse (and rightfully so!)
The best approach is to use Azure's IoT Hub as the means of communication with the device. Azure IoT Hub has the following advantages:
- You don't need to configure anything in the environment. Once the device is connected to the Internet, assuming outgoing ports are open, it can send events to the IoT Hub and receive commands.
- The IoT Hub can handle many devices on many different locations and networks.
- You have Device SDKs and Client SDKs that ease application development.
* Note: In the current project solution, I put the SSID, WiFi Password and Azure IoT Hub connection string in the configuration file. This is a simple solution but it does not scale. If you need to install and deploy many devices, this information must be configured during deployment. Later I will describe a method to do that.
As I mentioned above, the source code is on GitHub. Here is the class diagram: 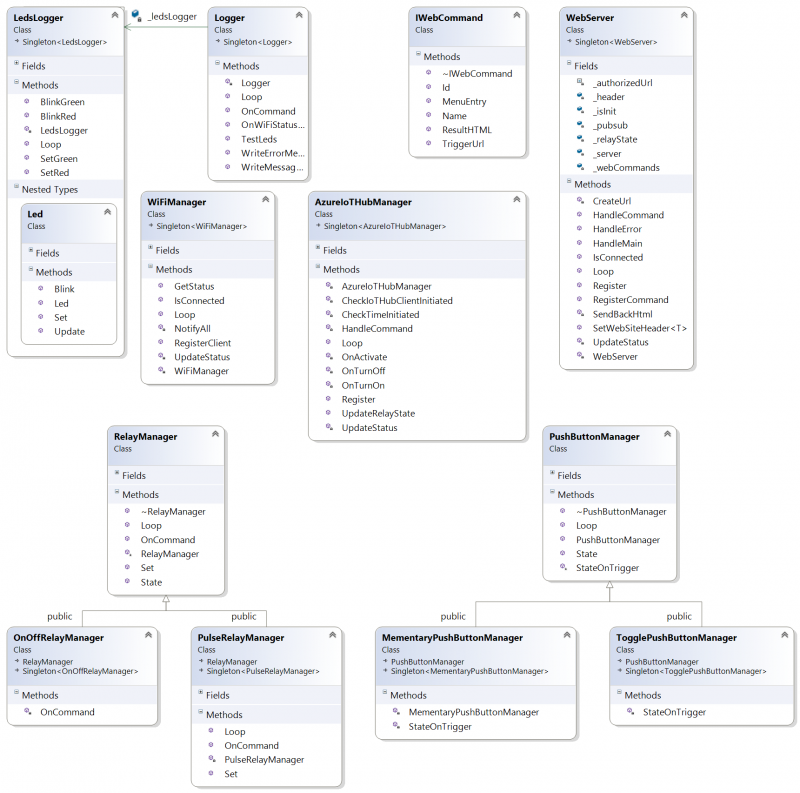
To see how I use the IoT Device SDK, take a look at this file. I will not get into every step that you need to do to use the SDK, however I will show the main building blocks. If you'd like a more detailed explanation, you can refer to this excellent walkthrough to do that. The walkthrough also points you to other instructions that show how to create an IoT Hub instance and how to register a device.
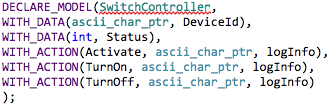
The first thing in the client code is to define the serialization protocol. I do that with the Macros that the SDK provides: 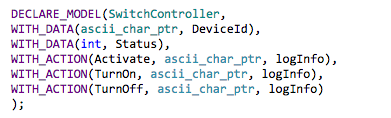 The model defines one event, that the device sends to the IoT Hub – the status of the device as an integer. In addition, the model defines two actions: the first one is activating a device, a command that is used to create a pulse. The second one is that the device will turn on and after few seconds will turn off. This is a common activation and deactivation scenario for home appliances. For example, this is the method a TV set remote control uses. My yard car gate remote control also uses that method. The two other commands are TurnOn and TurnOff, perfectly fit for the LED light scenario. With each command the cloud also sends log information, so if the device is capable of presenting logs to an LCD screen or via serial monitor, this text can be presented.
After having the model, we need to provide the function that will be called once a command is received from the IoT Hub: 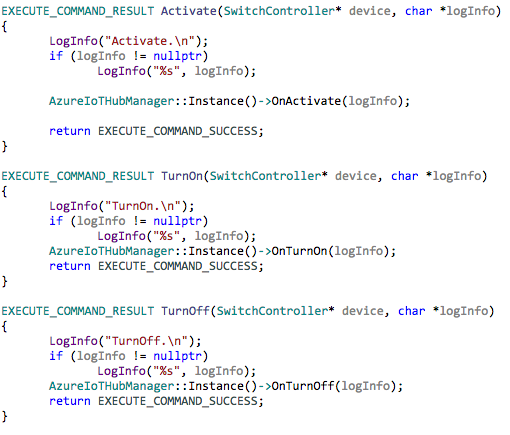
These functions handle the command by forwarding it to the AzureIoTHubManager, a singleton instance I wrote that takes care of commands originating from the Azure IoT Hub. The main reason I split the code that handles the IoT Hub communication is that I wanted to have the C language code in a separate file and have a C++ class handle everything else. The AzureIoTHubManager enables other components to register and to be notified when a specific command has arrived. Whenever the C code above redirects a command execution to the AzureIoTHubManager, it in turn notifies the RelayManager and the Logger about the received command: 
The following function initiates the IoT Hub client:

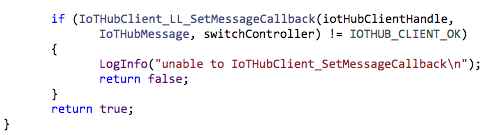
The Device SDK has two families of functions, with "LL" in their name and without it. The "LL" indicates a low-level API. APIs with the "LL" are blocking APIs and can be used on devices that do not support threads. On top of that, the iothub_client.h header file extends the iothub_client_ll.h and adds higher level asynchronous non-blocking functions. To support the high-level API, the device run-time environment and the compiler must support threads. Since the NodeMCU device does not support threads, the LL functions are in used. You can read this article to get better understanding of these APIs.
Note: The NodeMCU does not support threads, but the Web Controlled Switch code is built with cooperative multitasking. Every time the Arduino loop is running, each sub system manager gets called to do its own non-blocking work and return. For example, blinking the LEDs ( LedsLogger.cpp ) is done by checking the time that elapsed since the last time change using the Arduino millis () function and not using the delay () function.
To respond to incoming commands and to handle the client side of the IoT Hub, we need to call the IoTHubClient_LL_DoWork() function, in the main Arduino loop: 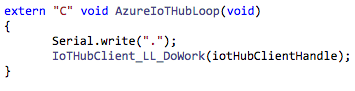
To send events to the IoT Hub, we use this code:
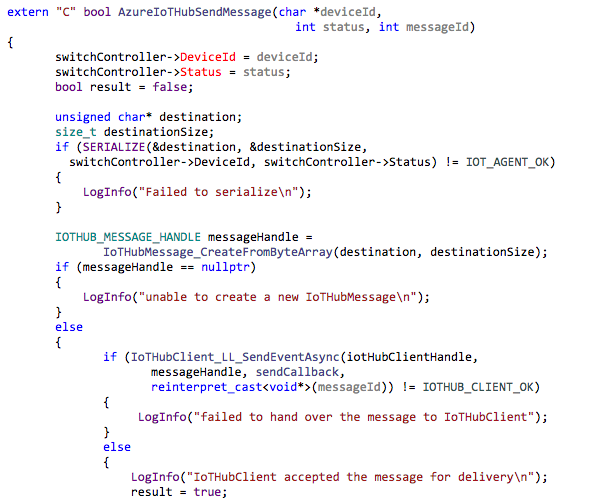
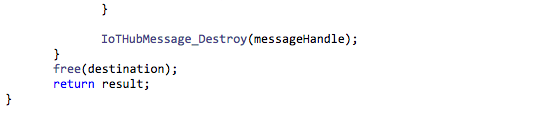
As you can see, the C Client SDK provides all the means that one needs to build the communication model, send events to the IoT Hub and receive commands. The actual message is serialized into JSON. You can read this article to learn more about the SDK API, this article to understand the different message transfer options and protocols, and this one to understand the serialization mechanism.
Device Registration
For my simple solution, I created the IoT Hub connection string using the supplied IoT Device Explorer. However, you can use the device registration API to do it automatically. For example, here is a C# code snippet that I took from another project, which provides a cloud hosted API for registering a device:

Now we have a Web API that our device can call, in order to register itself.
But wait, how do we know the device is allowed to be registered? One way is to implement an API key or any other means of authentication. Any device can use this to connect to the registration service. Another way is to use the NodeMCU. This will serve as an Access Point. When the NodeMCU starts, it can check if it has been configured. If the NodeMCU has no SSID & Wi-Fi password, it switches itself to Access Point mode. You can than connect to the access point from any computer or mobile phone and point your browser to a well-known IP address. In this address, the NodeMCU presents a portal that accepts the needed information: SSID, Wi-Fi password and Azure IoT Hub Registration authentication information, or even the IoT Hub connection string. The information can then be saved into the device's non-volatile memory using the EEPROM Library functions. Once you finish configuring the device, the NodeMCU switches back to normal mode, connects to the internet, and calls the device registration service with the credential you’ve given it. Or, just use the IoT Hub connection string of that device.
When you think about it, it is amazing – you can deploy the same application to many devices and configure each of them when you deploy them. You don't need an IT guy. You can even deploy your IoT device using the nearest public Wi-Fi network, and send commands to that device.
Using a Client Side Xamarin Application to Control the Yard Car Gate
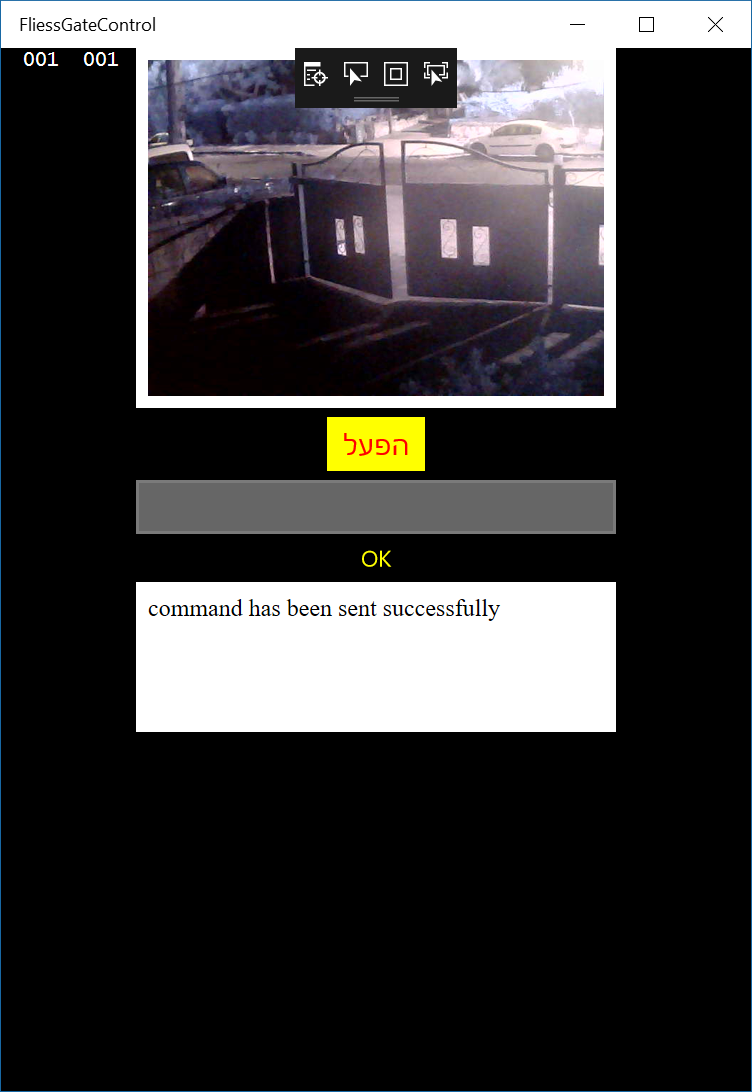
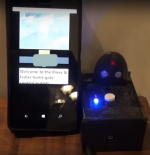 In addition to controlling a light, I used the same device to control the car gate. But instead of turning on and off a LED lamp, I used the Activate command to short-circuit the gate remote control button. You can watch this video that demonstrates it. I chose to use Xamarin to enable any mobile phone, as well as my Windows 10 desktop and laptop to control the gate. I also provided a feed from my Yard Camera so people will know that it is safe to open the gate. The backend code that calls the cloud service to open and close the gate, is developed as a .NET Portable Class Library (PCL).
To send a command through the Azure IoT Hub, it is best to deploy a cloud service and communicate with it. There are many advantages to that approach. It gives you a better control, and you can easily audit the originator of the command and when the command was issued. You can also choose any authentication and authorization schema and access policy. For example, you can use a policy allowing or prohibiting a person to open the gate in certain hours. The cloud service can be hosted on the same cloud region where the IoT Hub service is hosted and can handle many events and commands for many different devices.
Below is a diagram that describes the system: 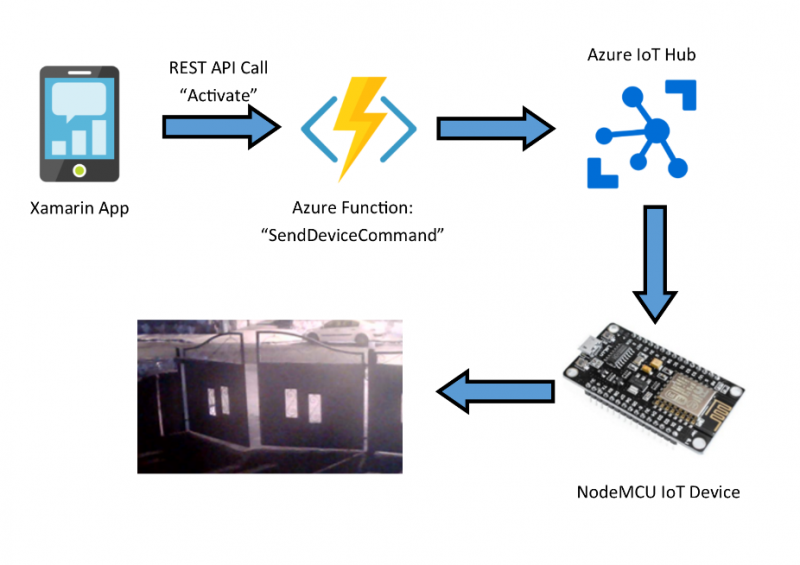
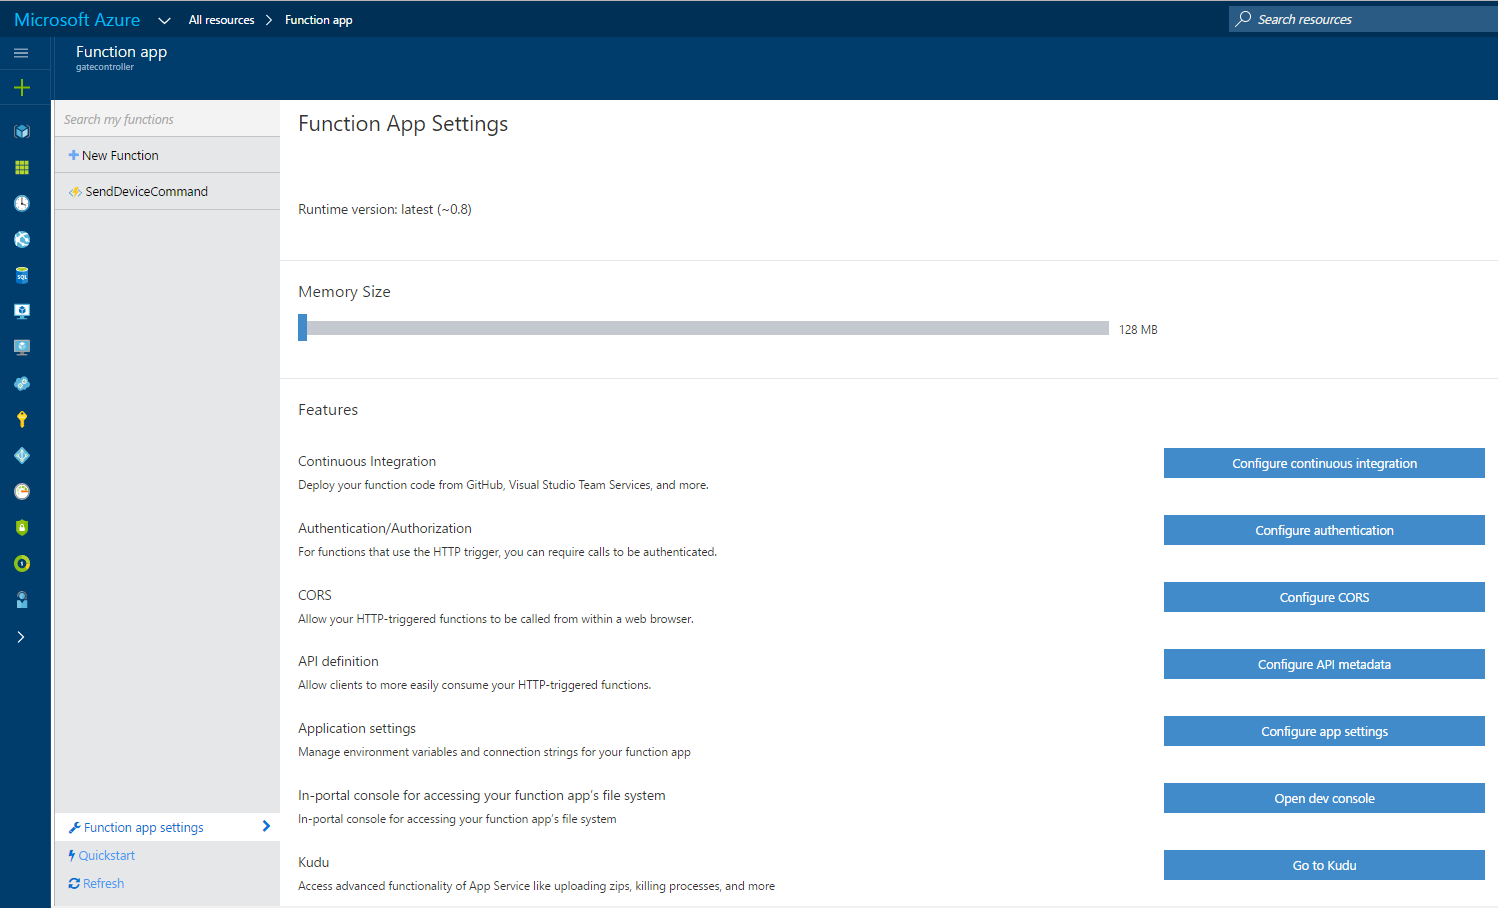
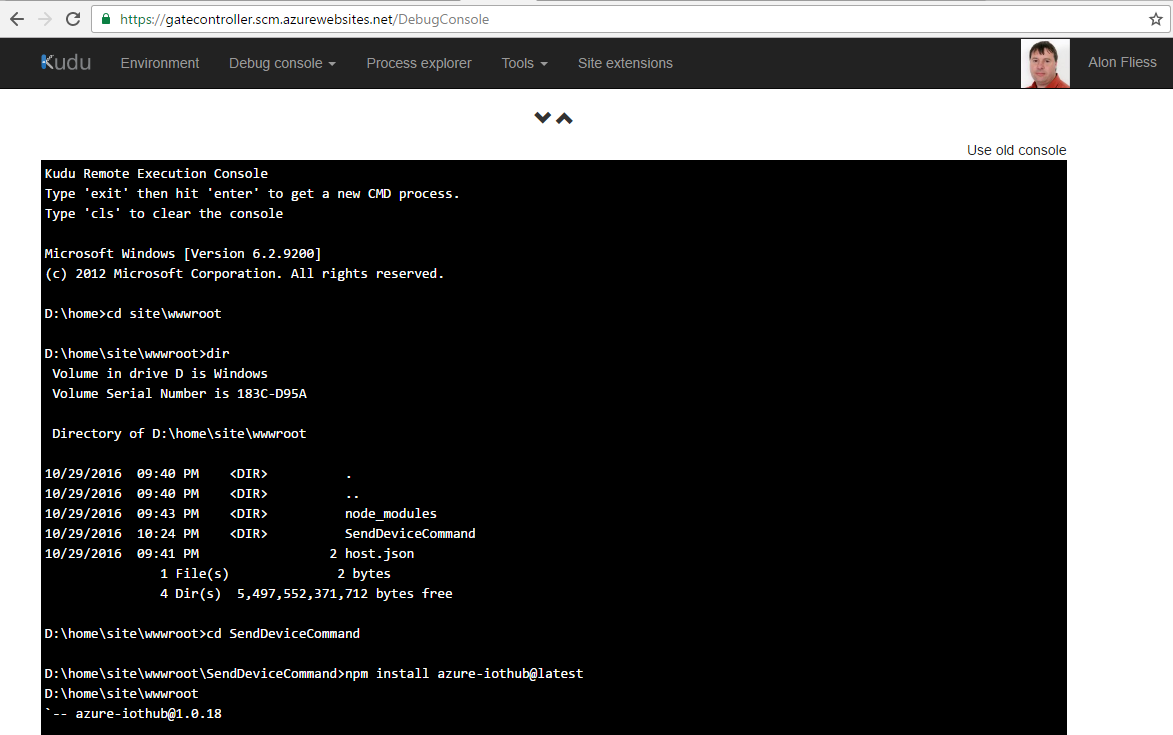
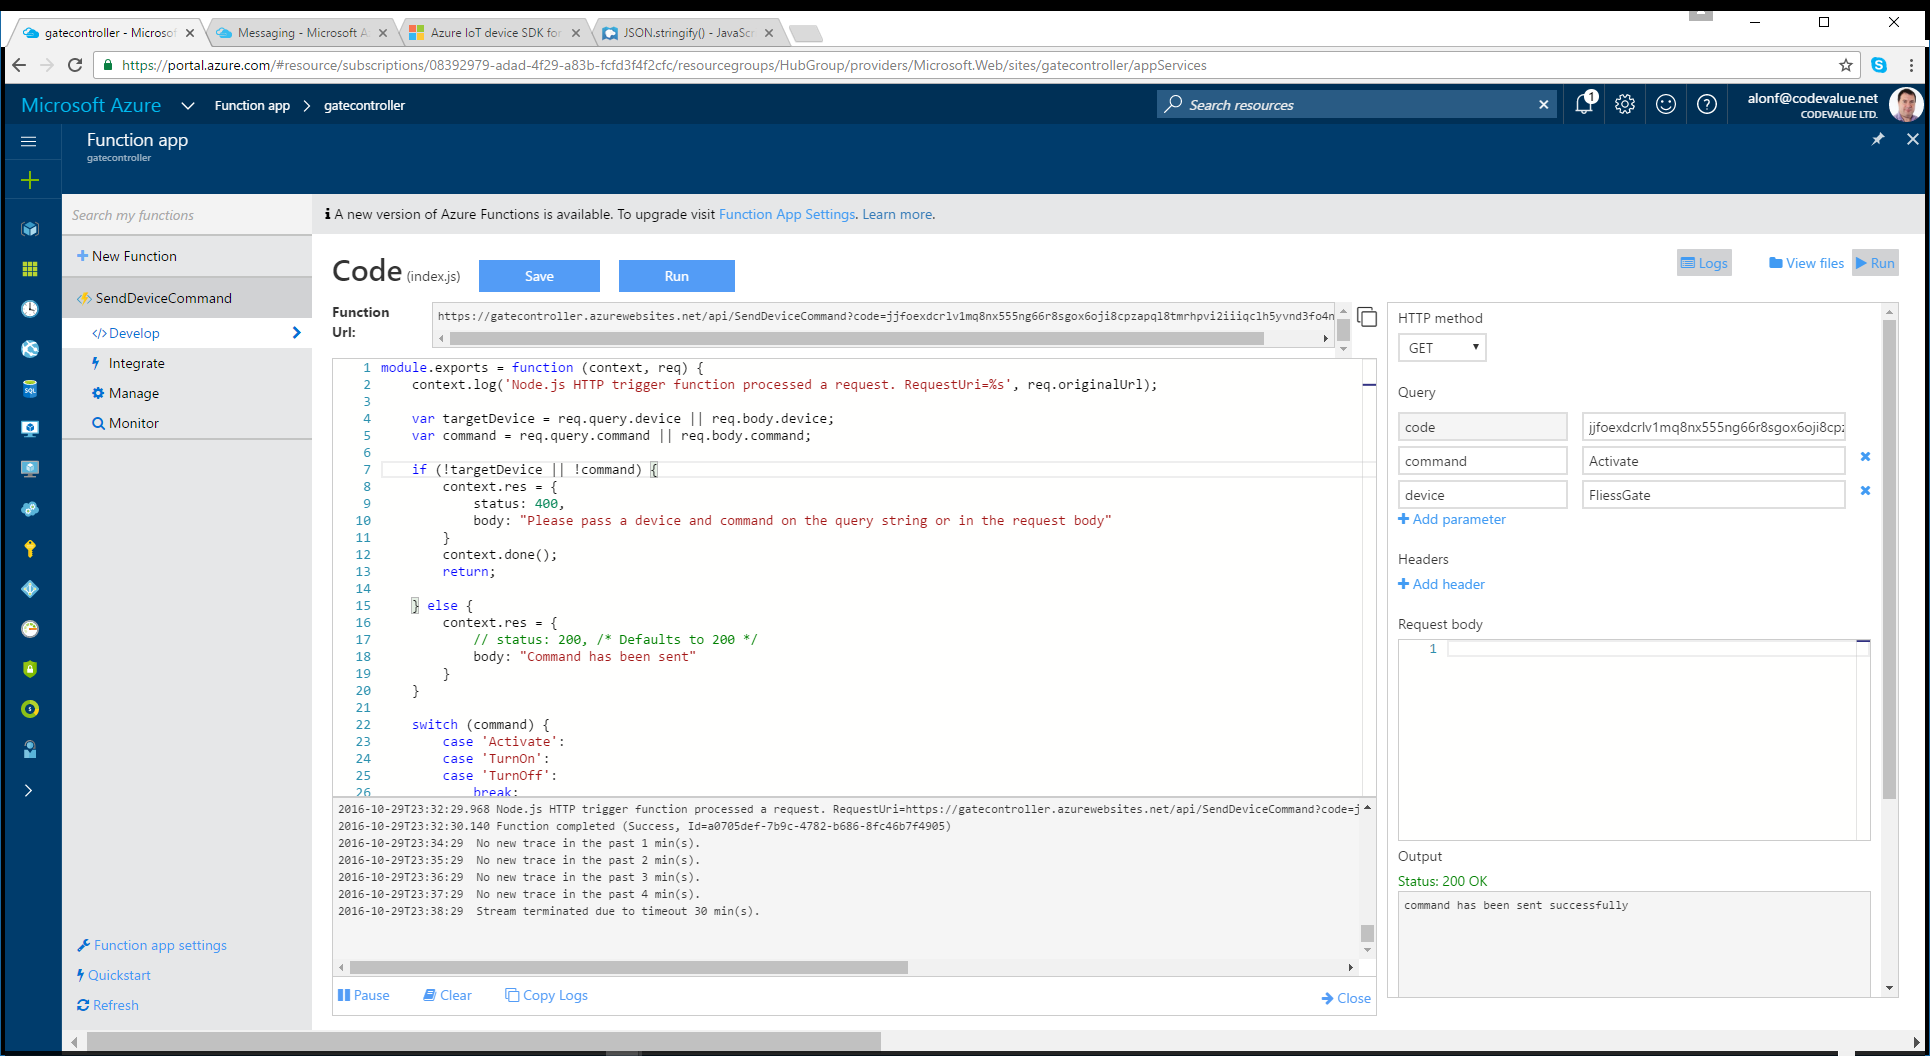
One of the easier ways of doing so is to use Azure Functions. I decided to use the Node.JS Service SDK to handle the application requests. To install the Node IoT Service SDK, go to the Function App Settings and open Kudu. Then run: 
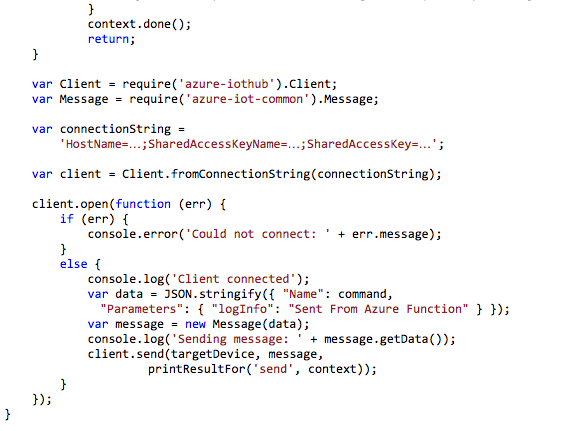
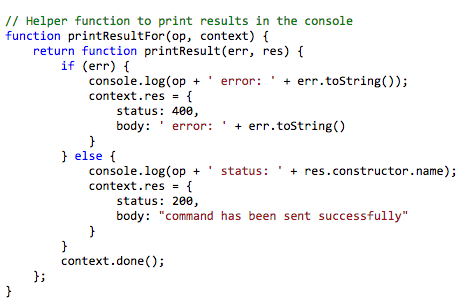
Here is my Azure function: 
The code on the client side (which is a Xamarin app) is very simple: 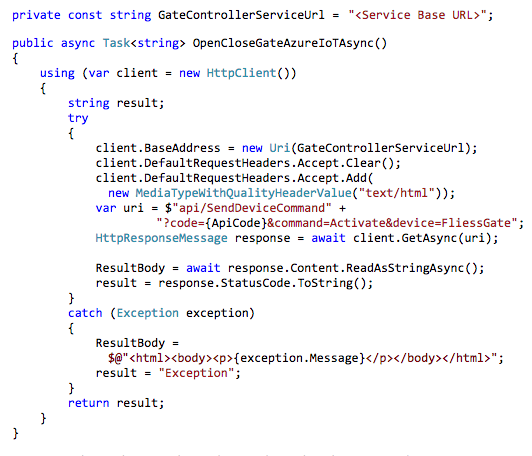
In running the application, the NodeMCU device has the command:
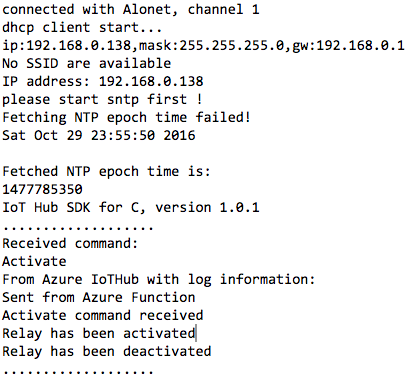
This is the log information from the NodeMCU:
Summary
The Azure IoT team are working hard to provide the best foundation for developing IoT systems. All that is left for us to do is choose our favorite development language and devices, and start coding!
Acknowledgment
I would like to thank Hande Kayadeniz Torkan and Victoria Stunt for inviting me to write this article. Many thanks to Eran Stiller for great technical reviewing work and to Moaid Hathot for his helpful feedback.
 Alon Fliess is the Chief Architect and founder of CodeValue. CodeValue is a leading software company, consisting of locally and internationally acclaimed technology experts. CodeValue delivers a full-spectrum of software services - it builds and designs software tools, foundations and products. Our flagship product is OzCode, an Amazing debugging add-on for Visual Studio. CodeValue is a Microsoft Partner in two domains - Software Development and Cloud Platform.
With more than 25 years of experience Alon has worked on many major software development projects, designs and architectures for global leading, and cutting edge companies.
Alon has been a Microsoft Regional Director since 2010 and a Visual Studio and Development Technologies MVP since 2005. Alon serves as a focal point between Microsoft product teams and their customers, helping product teams to better understand their customers' needs, as well as assisting customers in leveraging Microsoft's technologies. In 2013 Alon was awarded the MVP of the year.
Alon has expertise in many technologies, be it Microsoft Azure Development, Windows internals, C++ Windows programming (Win32/UWP), .NET with C#, and Internet of Things – this includes hardware & software development and cross-platform development (Windows & Linux).
Alon is known within the international community of software developers and considered to be a trusted advisor for all software development related issues.
Alon is a co-author and technical reviewer of several books. He's a frequent “Developer course” instructor and often speaks at conferences. Alon is a co-leader of Azure Israel –the Israeli Azure developer community - together with Eran Stiller, an Azure MVP.
Most of all, Alon loves working at night, He enjoys sitting in front of the computer, learning and testing new technologies, writing code, designing and printing 3D items with his DIY upgraded 3D printer.
Alon's Open Source Projects: https://github.com/alonf https://www.codeplex.com/site/users/view/alon
 Eran Stiller is a software architect, consultant, instructor and technology addict. With many years of experience in software development and architecture, Eran is recognized as a Microsoft Azure MVP for his contribution and commitment to technical communities worldwide. He most enjoys architecting, designing and developing large-scale software solutions, ranging from simple on-premise systems to highly-distributed highly-available cloud scale web & mobile applications.
A Founder at CodeValue Ltd., Eran practices software architecture for various clients on an almost daily basis, reviewing tons of designs various professional fields. As the leader of CodeValue’s Cloud Division, Eran is in charge of learning and promoting the usage of public cloud platforms throughout CodeValue’s projects and customer solutions.
Eran is a frequent speaker at various events and user groups on topics he finds especially interesting, and he is a co-organizer of Azure Israel, which meets every once in a while, to discuss all things related to Microsoft Azure.