Setting up FBA Claims in SharePoint 2010 with Active Directory Membership Provider
This is a walk-through on setting up FBA Claims in SharePoint 2010 using the Active Directory Membership Provider.
The very first step is to create a web application AND create that with claims authentication mode. I am going to provision a web application with claims auth mode enabled at a URL https://moss.claims.contoso.com.

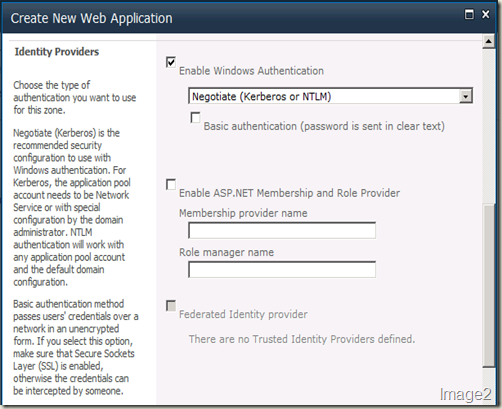
Another important section in this “Create New Web Application” screen is the “Identity Providers” section. Once we select the authentication mode to be claims, Windows Authentication is also plugged in as one of the provider. Check the “Enable Windows Authentication” check box if you’d like Windows Authentication ALSO enabled for this web application.
We can also choose to enable ASP.NET Membership and Role Provider here. In this case, we’ll need to provide the corresponding provider names in the text boxes. The web.config file entries can be added later.

Those are the important parts. You can choose the other values as you’d normally would and create the new web application.
Once the web application is created, we’ll first configure this web application for claims authentication using Active Directory Membership Provider and then create a site collection.
There are 3 web.config files we need to edit for enabling claims:
- The config file of the Central Administration site.
- The config file of the Web Application.
- The config file of the STS (SecurityTokenService) Application. This is important because it is this service that will ensure claims tokens are being passed correctly between the provider (in our case AD) and the consumer (CA and our Web Application). Further, we can have multiple providers plugged in. STS Application manages all of these interaction for us.
Central Administration web.config changes
Open the web.config file of your SharePoint 2010 Central Administration site and add the following entries (NOTE: The value you need to change according to your environment are presented in red).
First the connection string:
<connectionStrings>
<add name="adconn"
connectionString="LDAP://anomaly.com/DC=anomaly,DC=com" />
</connectionStrings>
And then the provider:
<membership defaultProvider="admembers">
<providers>
<add name="admembers"
type="System.Web.Security.ActiveDirectoryMembershipProvider, System.Web, Version=2.0.0.0, Culture=neutral, PublicKeyToken=b03f5f7f11d50a3a"
connectionStringName="adconn"
enableSearchMethods="true"
attributeMapUsername="sAMAccountName" />
</providers>
</membership>
NOTE: The connection string element should be present outside of the <system.web></system.web> section and the provider element should be present within <system.web></system.web> section of the web.config file.
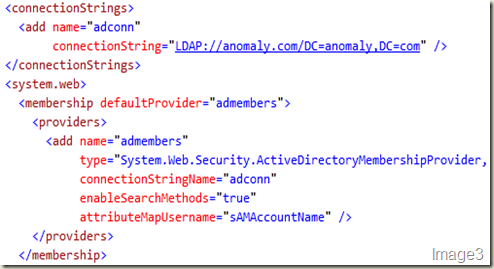
After this change, the web.config file of the Central Administration site should look like what’s shown in Image3.
Web Application web.config changes
Open the web.config file of the newly created web application and add the following entries
First the connection string:
<connectionStrings>
<add name="adconn" connectionString=LDAP://anomaly.com/DC=anomaly,DC=com />
</connectionStrings>
NOTE: This entry should be made outside of <system.web></system.web> section in the web application’s web.config file. Just like the one for Central Administration site.
And then the provider:
<membership defaultProvider="admembers">
<providers>
<add name="admembers"
type="System.Web.Security.ActiveDirectoryMembershipProvider, System.Web, Version=2.0.0.0, Culture=neutral, PublicKeyToken=b03f5f7f11d50a3a"
connectionStringName="adconn"
enableSearchMethods="true"
attributeMapUsername="sAMAccountName" />
</providers>
</membership>
NOTE: This one is a bit different. In the web application’s web.config file search for “<membership” (without “”).
You will find there’s already a membership and role provider plugged in (shown in Image4). SPClaimsAuthMembershipProvider & SPClaimsAuthRoleProvider in Microsoft.SharePoint.Administration. Claims implements the default claims provider and Windows authentication type is plugged in through HTTPModule (shown in Image5).


Now, we will plug in our Active Directory membership provider to this by adding our provider entry shown above to the <providers> element (shown in Image4). The result should look like Image6.

Save and close this web.config file.
STS Application web.config changes
The next thing to do is to get your provider entry in the STS application’s web.config file. Open Internet Information Services (IIS) Manager on your SharePoint 2010 box. And find the STS application (shown in Image7).

Right-click > Explore to open the files within this application in explorer.
You should now be in this path: C:\Program Files\Common Files\Microsoft Shared\Web Server Extensions\14\WebServices\SecurityToken. And you will find a web.config file in there. That’s the Security Token Service Application’s web.config you need to add your provider and connection information to.
Open this web.config file. If this is the first time you are configuring claims, you’ll not find <system.web></system.web> section in it. That’s not a problem, just add that section yourself. What works out for me, is to go to the end of this web.config file and do the following:
First add the connection information just before </configuration>. And then after the <connectionStrings></connectionStrings> section, add a <system.web></system.web> section and add our provider information into it. The result should look like Image8.

After this doing an IISRESET might be a good idea.
You are good now with regards to web.config file entries. Now you have to get some configuration done through UI to wire-up our provider to the web application. First, go to the Web Applications Management page in Central Administration site, click the web application you want to enable FBA claims on and choose Authentication Providers from the ribbon. From the Authentication Providers dialog, choose Default. Scroll a bit down to find Identity Providers section. Check Enable ASP.NET Membership and Role Provider (NOTE: You can also do this at the time of creating this web application) and type in the name of your provider. In my case, it is admembers. After you do this, UI should like Image9. Hit Save.
Close the Authentication Providers Dialog UI.

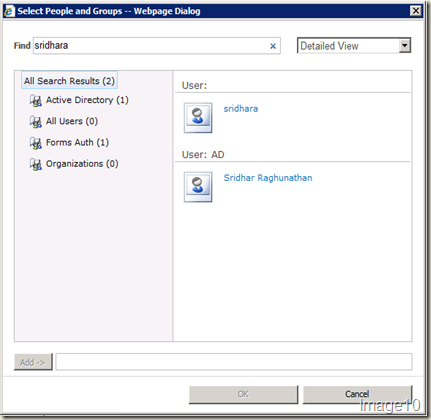
Now, hit User Policy ribbon option in the Web Applications Management page having selected your web application. Hit Add Users in the Policy for Web Application dialog. Hit Next in Add Users dialog. Use the Browse button in the Choose Users people picker control. Notice the Select People and Groups dialog that comes up is changed. Noticeable difference is that there are sections like Active Directory, All Users, Forms Auth & Organizations. Type in an active directory user alias and search. There should be 2 results for the same user. One identified through NTLM authentication and the other through FBA Claims authentication that’s using Active Directory membership provider (refer Image10).
Select the user from Forms Auth result. In my case, it’s the first user displayed in Image10. Hit Add and then OK in the Select People and Groups dialog. In the Add Users dialog, check Full Control - Has full control for the Choose Permissions section and hit Finish. NOTE: If you want to provide full control to other users either from FBA Claims authentication or NTLM authentication, you can do that here.
Now, your Policy for Web Application dialog should look like Image11. Hit OK.

Now, you can create your top-level site collection in this web application. Click Application Management from the left navigation in Central Administration site. Click Create Site Collections. Ensure that your web application plugged in with FBA Claims is selected in the Web Applications drop-down. Provide a title, description and pick up a template of your choice. In the Primary Site Collection Administrator section, type in the alias of the site collection administrator. This should be the NTLM authenticated user. The entries should look like Image12. Hit OK to create the site collection.

Once the site collection is created, browse to it. A page as shown in Image13 will be displayed.

Choose Windows Authentication from the drop-down and you’ll log into the newly created site collection using Windows Authentication. Now, you need to add another site collection administrator. But this must be from the active directory membership provider. You can login through forms authentication using the user you added with full control in user policy settings above. If you choose to not do that (which most customers do), you can do one of the following steps to add another site collection administrator to this FBA Claims Authentication enabled site.
- Go to Central Administration site > Application Management from left navigation > Change site collection administrators > add the alias of the user from FBA Claims Authentication as the secondary site collection administrator and click the Check Names button to resolve it.
- Login to the Claims Authentication enabled site using Windows Authentication. Site Actions > Site Settings > Site collection administrators > type the alias of the user from FBA Claims Authentication in the Site Collection Administrators and click the Check Names button to resolve it. This is shown in Image 14.

After this, you should be able to login to this site using the same URL with both Windows and Forms Authentication (Forms Authentication login shown in Image15)
WARNING: Take utmost care when making the web.config file entries because that’s where thing go wrong. And if it does, identifying and fixing it might be a herculean task – trust me :) Hope this post was helpful! In my next post on FBA Claims, I’ll cover configuring Office LDAP Claims with some tips on Claims itself.

