Installing and Configuring Test Agent
This is Syed Aslam Basha here from Information security and risk management team.
In continuation with my earlier blog posts on automation using VS2010, I will show “Installing and configuring test agent” which will help in running the CUITs from Microsoft Test Manager.
- Install the test agent by going through the installation wizard
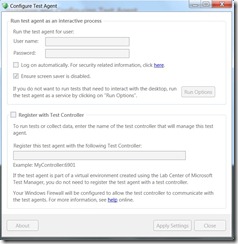
- Launch configure test agent from start –> All programs –> Microsoft Visual Studio 2010 –> Microsoft Visual Studio Test Agent 2010 Configuration Tool

- Enter domain\username in username and password in password text box
- Logon automatically: If this is checked it logs on automatically using the credentials provided, after computer restarts (due to windows updates or any other reason)
- Click on “Ensure screensaver is disabled” checkbox to disable screensaver
- Click on run options button, make a selection to run the test agent as
- Service: The test agent will run as windows service, this is recommended mode when you need to run the automated tests that do not need to interact with desktop
- Interactive process: The test agent will run as interactive process, this is the you will not to select interactive process for coded UI tests
- Click on checkbox “Register with test controller” and enter the controller name with port as 6901. Ex Controllername:6901, the agent will be registered with the controller and the controller can manage the agent
- Click on Apply Settings button
- This will configure the windows firewall to allow the test controller to communicate with the test agent
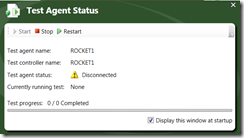
- The Test Agent Status will be shown near system tray, it will show the test progress ( test case execution) while running the tests

- Syed Aslam Basha ( syedab@microsoft.com )
Microsoft Information Security Tools (IST) Team
Test Lead
---------------------------------------------------------
Please leave a comment if the blog post has helped you.