Deploying and scaling an ASP.NET Core app on Azure Container Apps
Apps deployed to Azure that experience intermittent high demand benefit from scalability to meet demand. Scalable apps can scale out to ensure capacity during workload peaks and then scale down automatically when the peak drops, which can lower costs. Horizontal scaling (scaling out) adds new instances of a resource, such as VMs or database replicas. This article demonstrates how to deploy a horizontally scalable ASP.NET Core app to Azure container apps by completing the following tasks:
- Set up the sample project
- Deploy the app to Azure Container Apps
- Scale and troubleshoot the app
- Create the Azure Services
- Connect the Azure services
- Configure and redeploy the app
This article uses Razor Pages, but most of it applies to other ASP.NET Core apps.
In some cases, basic ASP.NET Core apps are able to scale without special considerations. However, apps that utilize certain framework features or architectural patterns require extra configurations, including the following:
Secure form submissions: Razor Pages, MVC and Web API apps often rely on form submissions. By default these apps use cross site forgery tokens and internal data protection services to secure requests. When deployed to the cloud, these apps must be configured to manage data protection service concerns in a secure, centralized location.
SignalR circuits: Blazor Server apps require the use of a centralized Azure SignalR service in order to securely scale. These services also utilize the data protection services mentioned previously.
Centralized caching or state management services: Scalable apps may use Azure Cache for Redis to provide distributed caching. Azure storage may be needed to store state for frameworks such as Microsoft Orleans, which can help write apps that manage state across many different app instances.
The steps in this article demonstrate how to properly address the preceding concerns by deploying a scalable app to Azure Container Apps. Most of the concepts in this tutorial also apply when scaling Azure App Service instances.
Set up the sample project
Use the GitHub Explorer sample app to follow along with this tutorial. Clone the app from GitHub using the following command:
git clone "https://github.com/dotnet/AspNetCore.Docs.Samples.git"
Navigate to the /tutorials/scalable-razor-apps/start folder and open the ScalableRazor.csproj.
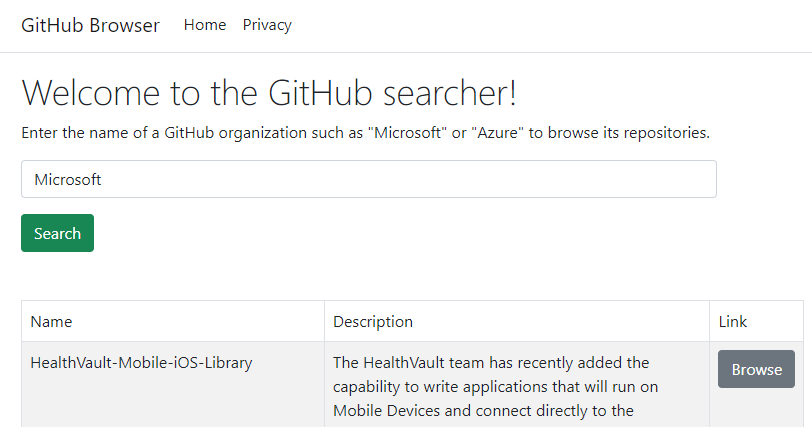
The sample app uses a search form to browse GitHub repositories by name. The form relies on the built-in ASP.NET Core data protection services to handle anti-forgery concerns. By default, when the app scales horizontally on Container Apps, the data protection service throws an exception.
Test the app
- Launch the app in Visual Studio. The project includes a Docker file, which means that the arrow next to the run button can be selected to start the app using either a Docker Desktop setup or the standard ASP.NET Core local web server.
Use the search form to browse for GitHub repositories by name.
Deploy the app to Azure Container Apps
Visual Studio is used to deploy the app to Azure Container Apps. Container apps provide a managed service designed to simplify hosting containerized apps and microservices.
Note
Many of the resources created for the app require a location. For this app, location isn't important. A real app should select a location closest to the clients. You may want to select a location near you.
In Visual Studio solution explorer, right click on the top level project node and select Publish.
In the publishing dialog, select Azure as the deployment target, and then select Next.
For the specific target, select Azure Container Apps (Linux), and then select Next.
Create a new container app to deploy to. Select the green + icon to open a new dialog and enter the following values:
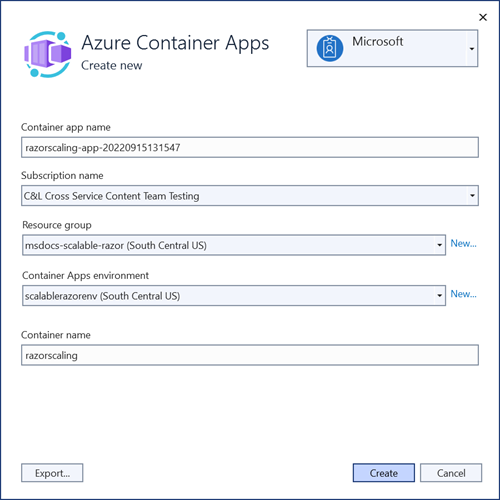
- Container app name: Leave the default value or enter a name.
- Subscription name: Select the subscription to deploy to.
- Resource group: Select New and create a new resource group called msdocs-scalable-razor.
- Container apps environment: Select New to open the container apps environment dialog and enter the following values:
- Environment name: Keep the default value.
- Location: Select a location near you.
- Azure Log Analytics Workspace: Select New to open the log analytics workspace dialog.
- Name: Leave the default value.
- Location: Select a location near you and then select Ok to close the dialog.
- Select Ok to close the container apps environment dialog.
- Select Create to close the original container apps dialog. Visual Studio creates the container app resource in Azure.
Once the resource is created, make sure it's selected in the list of container apps, and then select Next.
You'll need to create an Azure Container Registry to store the published image artifact for your app. Select the green + icon on the container registry screen.

Leave the default values, and then select Create.
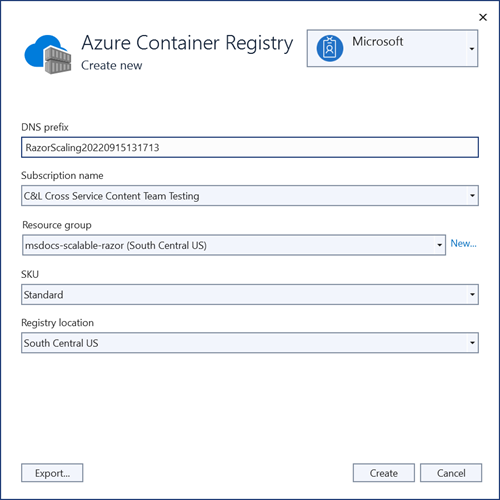
After the container registry is created, make sure it's selected, and then select finish to close the dialog workflow and display a summary of the publishing profile.
If Visual Studio prompts you to enable the Admin user to access the published docker container, select Yes.
Select Publish in the upper right of the publishing profile summary to deploy the app to Azure.


When the deployment finishes, Visual Studio launches the browser to display the hosted app. Search for Microsoft in the form field, and a list of repositories is displayed.
Scale and troubleshoot the app
The app is currently working without any issues, but we'd like to scale the app across more instances in anticipation of high traffic volumes.
- In the Azure portal, search for the
razorscaling-app-****container app in the top level search bar and select it from the results. - On the overview page, select Scale from the left navigation, and then select + Edit and deploy.
- On the revisions page, switch to the Scale tab.
- Set both the min and max instances to 4 and then select Create. This configuration change guarantees your app is scaled horizontally across four instances.
Navigate back to the app. When the page loads, at first it appears everything is working correctly. However, when a search term is entered and submitted, an error may occur. If an error is not displayed, submit the form several more times.
Troubleshooting the error
It's not immediately apparent why the search requests are failing. The browser tools indicate a 400 Bad Request response was sent back. However, you can use the logging features of container apps to diagnose errors occurring in your environment.
On the overview page of the container app, select Logs from the left navigation.
On the Logs page, close the pop-up that opens and navigate to the Tables tab.
Expand the Custom Logs item to reveal the ContainerAppConsoleLogs_CL node. This table holds various logs for the container app that can be queried to troubleshoot problems.
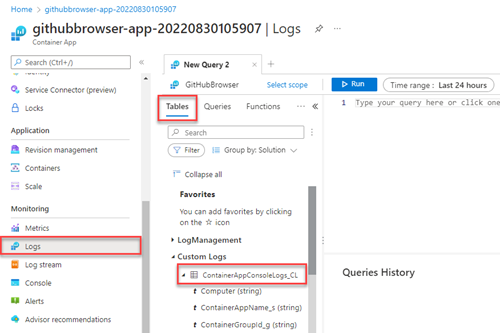
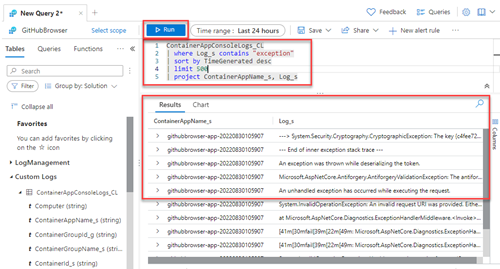
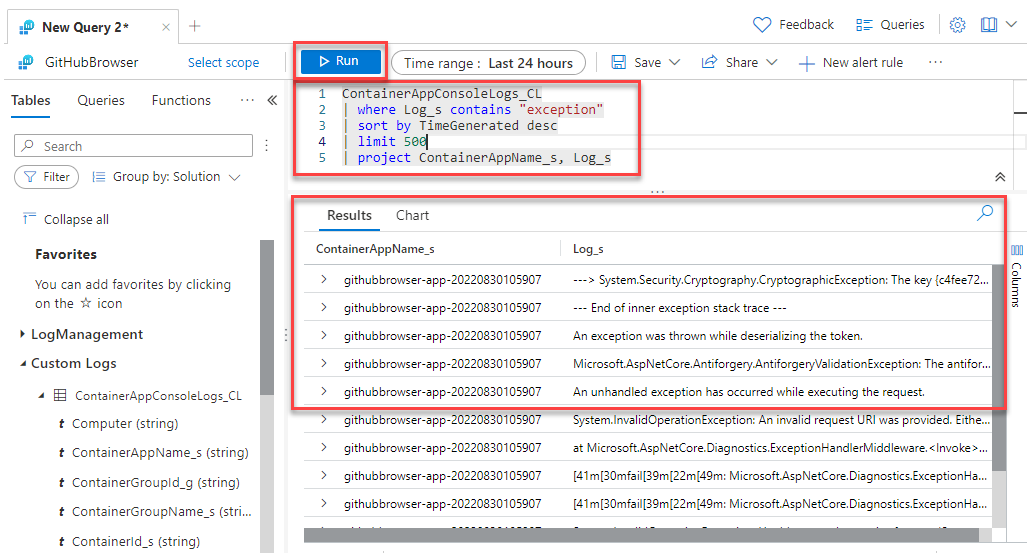
In the query editor, compose a basic query to search the ContainerAppConsoleLogs_CL Logs table for recent exceptions, such as the following script:
ContainerAppConsoleLogs_CL
| where Log_s contains "exception"
| sort by TimeGenerated desc
| limit 500
| project ContainerAppName_s, Log_s
The preceding query searches the ContainerAppConsoleLogs_CL table for any rows that contain the word exception. The results are ordered by the time generated, limited to 500 results, and only include the ContainerAppName_s and Log_s columns to make the results easier to read.
Select Run, a list of results is displayed. Read through the logs and note that most of them are related to antiforgery tokens and cryptography.
Important
The errors in the app are caused by the .NET data protection services. When multiple instances of the app are running, there is no guarantee that the HTTP POST request to submit the form is routed to the same container that initially loaded the page from the HTTP GET request. If the requests are handled by different instances, the antiforgery tokens aren't handled correctly and an exception occurs.
In the steps ahead, this issue is resolved by centralizing the data protection keys in an Azure storage service and protecting them with Key Vault.

Create the Azure Services
To resolve the preceding errors, the following services are created and connected to the app:
- Azure Storage Account: Handles storing data for the Data Protection Services. Provides a centralized location to store key data as the app scales. Storage accounts can also be used to hold documents, queue data, file shares, and almost any type of blob data.
- Azure KeyVault: This service stores secrets for an app, and is used to help manage encryption concerns for the Data Protection Services.
Create the storage account service
- In the Azure portal search bar, enter
Storage accountsand select the matching result. - On the storage accounts listing page, select + Create.
- On the Basics tab, enter the following values:
- Subscription: Select the same subscription that you chose for the container app.
- Resource Group: Select the msdocs-scalable-razor resource group you created previously.
- Storage account name: Name the account scalablerazorstorageXXXX where the X's are random numbers of your choosing. This name must be unique across all of Azure.
- Region: Select the same region you previously selected.
- Leave the rest of the values at their default and select Review. After Azure validates the inputs, select Create.
Azure provisions the new storage account. When the task completes, choose Go to resource to view the new service.
Create the storage container
Create a Container to store the app's data protection keys.
- On the overview page for the new storage account, select Storage browser on the left navigation.
- Select Blob containers.
- Select + Add container to open the New container flyout menu.
- Enter a name of scalablerazorkeys, leave the rest of the settings at their defaults, and then select Create.
The new containers appear on the page list.
Create the key vault service
Create a key vault to hold the keys that protect the data in the blob storage container.
- In the Azure portal search bar, enter
Key Vaultand select the matching result. - On the key vault listing page, select + Create.
- On the Basics tab, enter the following values:
- Subscription: Select the same subscription that was previously selected.
- Resource Group: Select the msdocs-scalable-razor resource group previously created.
- Key Vault name: Enter the name scalablerazorvaultXXXX.
- Region: Select a region near your location.
- Leave the rest of the settings at their default, and then select Review + create. Wait for Azure to validate your settings, and then select Create.
Azure provisions the new key vault. When the task completes, select Go to resource to view the new service.
Create the key
Create a secret key to protect the data in the blob storage account.
- On the main overview page of the key vault, select Keys from the left navigation.
- On the Create a key page, select + Generate/Import to open the Create a key flyout menu.
- Enter razorkey in the Name field. Leave the rest of the settings at their default values and then select Create. A new key appears on the key list page.
Connect the Azure Services
The Container App requires a secure connection to the storage account and the key vault services in order to resolve the data protection errors and scale correctly. The new services are connected together using the following steps:
Important
Security role assignments through Service Connector and other tools typically take a minute or two to propagate, and in some rare cases can take up to eight minutes.
Connect the storage account
- In the Azure portal, navigate to the Container App overview page.
- On the left navigation, select Service connector
- On the Service Connector page, choose + Create to open the Creation Connection flyout panel and enter the following values:
- Container: Select the Container App created previously.
- Service type: Choose Storage - blob.
- Subscription: Select the subscription previously used.
- Connection name: Leave the default value.
- Storage account: Select the storage account created previously.
- Client type: Select .NET.
- Select Next: Authentication to progress to the next step.
- Select System assigned managed identity and choose Next: Networking.
- Leave the default networking options selected, and then select Review + Create.
- After Azure validates the settings, select Create.
The service connector enables a system-assigned managed identity on the container app. It also assigns a role of Storage Blob Data Contributor to the identity so it can perform data operations on the storage containers.
Connect the key vault
- In the Azure portal, navigate to your Container App overview page.
- On the left navigation, select Service connector.
- On the Service Connector page, choose + Create to open the Creation Connection flyout panel and enter the following values:
- Container: Select the container app created previously.
- Service type: Choose Key Vault.
- Subscription: Select the subscription previously used.
- Connection name: Leave the default value.
- Key vault: Select the key vault created previously.
- Client type: Select .NET.
- Select Next: Authentication to progress to the next step.
- Select System assigned managed identity and choose Next: Networking.
- Leave the default networking options selected, and then select Review + Create.
- After Azure validates the settings, select Create.
The service connector assigns a role to the identity so it can perform data operations on the key vault keys.
Configure and redeploy the app
The necessary Azure resources have been created. In this section the app code is configured to use the new resources.
Install the following NuGet packages:
- Azure.Identity: Provides classes to work with the Azure identity and access management services.
- Microsoft.Extensions.Azure: Provides helpful extension methods to perform core Azure configurations.
- Azure.Extensions.AspNetCore.DataProtection.Blobs: Allows storing ASP.NET Core DataProtection keys in Azure Blob Storage so that keys can be shared across several instances of a web app.
- Azure.Extensions.AspNetCore.DataProtection.Keys: Enables protecting keys at rest using the Azure Key Vault Key Encryption/Wrapping feature.
dotnet add package Azure.Identity
dotnet add package Microsoft.Extensions.Azure
dotnet add package Azure.Extensions.AspNetCore.DataProtection.Blobs
dotnet add package Azure.Extensions.AspNetCore.DataProtection.Keys
Update
Program.cswith the following highlighted code:using Azure.Identity; using Microsoft.AspNetCore.DataProtection; using Microsoft.Extensions.Azure; var builder = WebApplication.CreateBuilder(args); var BlobStorageUri = builder.Configuration["AzureURIs:BlobStorage"]; var KeyVaultURI = builder.Configuration["AzureURIs:KeyVault"]; builder.Services.AddRazorPages(); builder.Services.AddHttpClient(); builder.Services.AddServerSideBlazor(); builder.Services.AddAzureClientsCore(); builder.Services.AddDataProtection() .PersistKeysToAzureBlobStorage(new Uri(BlobStorageUri), new DefaultAzureCredential()) .ProtectKeysWithAzureKeyVault(new Uri(KeyVaultURI), new DefaultAzureCredential()); var app = builder.Build(); if (!app.Environment.IsDevelopment()) { app.UseExceptionHandler("/Error"); app.UseHsts(); } app.UseHttpsRedirection(); app.UseStaticFiles(); app.UseRouting(); app.UseAuthorization(); app.MapRazorPages(); app.Run();
The preceding changes allow the app to manage data protection using a centralized, scalable architecture. DefaultAzureCredential discovers the managed identity configurations enabled earlier when the app is redeployed.
Update the placeholders in AzureURIs section of the appsettings.json file to include the following:
Replace the
<storage-account-name>placeholder with the name of thescalablerazorstorageXXXXstorage account.Replace the
<container-name>placeholder with the name of thescalablerazorkeysstorage container.Replace the
<key-vault-name>placeholder with the name of thescalablerazorvaultXXXXkey vault.Replace the
<key-name>placeholder in the key vault URI with therazorkeyname created previously.{ "GitHubURL": "https://api.github.com", "Logging": { "LogLevel": { "Default": "Information", "Microsoft.AspNetCore": "Warning" } }, "AllowedHosts": "*", "AzureURIs": { "BlobStorage": "https://<storage-account-name>.blob.core.windows.net/<container-name>/keys.xml", "KeyVault": "https://<key-vault-name>.vault.azure.net/keys/<key-name>/" } }
Redeploy the app
The app is now configured correctly to use the Azure services created previously. Redeploy the app for the code changes to be applied.
- Right click on the project node in the solution explorer and select Publish.
- On the publishing profile summary view, select the Publish button in the upper right corner.
Visual Studio redeploys the app to the container apps environment created previously. When the processes finished, the browser launches to the app home page.
Test the app again by searching for Microsoft in the search field. The page should now reload with the correct results every time you submit.
Configure roles for local development
The existing code and configuration of the app can also work while running locally during development. The DefaultAzureCredential class configured previously is able to pick up local environment credentials to authenticate to Azure Services. You'll need to assign the same roles to your own account that were assigned to your app's managed identity in order for the authentication to work. This should be the same account you use to log into Visual Studio or the Azure CLI.
Sign-in to your local development environment
You'll need to be signed in to the Azure CLI, Visual Studio, or Azure PowerShell for your credentials to be picked up by DefaultAzureCredential.
az login
Assign roles to your developer account
- In the Azure portal, navigate to the
scalablerazor****storage account created previously. - Select Access Control (IAM) from the left navigation.
- Choose + Add and then Add role assignment from the drop-down menu.
- On the Add role assignment page, search for
Storage blob data contributor, select the matching result, and then select Next. - Make sure User, group, or service principal is selected, and then select + Select members.
- In the Select members flyout, search for your own user@domain account and select it from the results.
- Choose Next and then select Review + assign. After Azure validates the settings, select Review + assign again.
As previously stated, role assignment permissions might take a minute or two to propagate, or in rare cases up to eight minutes.
Repeat the previous steps to assign a role to your account so that it can access the key vault service and secret.
- In the Azure portal, navigate to the
razorscalingkeyskey vault created previously. - Select Access Control (IAM) from the left navigation.
- Choose + Add and then Add role assignment from the drop-down menu.
- On the Add role assignment page, search for
Key Vault Crypto Service Encryption User, select the matching result, and then select Next. - Make sure User, group, or service principal is selected, and then select + Select members.
- In the Select members flyout, search for your own user@domain account and select it from the results.
- Choose Next and then select Review + assign. After Azure validates your settings, select Review + assign again.
You may need to wait again for this role assignment to propagate.
You can then return to Visual Studio and run the app locally. The code should continue to function as expected. DefaultAzureCredential uses your existing credentials from Visual Studio or the Azure CLI.
Reliable web app patterns
See The Reliable Web App Pattern for.NET YouTube videos and article for guidance on creating a modern, reliable, performant, testable, cost-efficient, and scalable ASP.NET Core app, whether from scratch or refactoring an existing app.
ASP.NET Core
Feedback
Coming soon: Throughout 2024 we will be phasing out GitHub Issues as the feedback mechanism for content and replacing it with a new feedback system. For more information see: https://aka.ms/ContentUserFeedback.
Submit and view feedback for