Use .http files in Visual Studio 2022
The Visual Studio 2022 .http file editor provides a convenient way to test ASP.NET Core projects, especially API apps. The editor provides a UI that:
- Creates and updates
.httpfiles. - Sends HTTP requests specified in
.httpfiles. - Displays the responses.
This article contains documentation for:
- The
.httpfile syntax. - How to create an
.httpfile. - How to send a request from an
.httpfile. - Where to find
.httpfile options that can be configured.. - How to create requests in
.httpfiles by using the Visual Studio 2022 Endpoints Explorer.
The .http file format and editor was inspired by the Visual Studio Code REST Client extension. The Visual Studio 2022 .http editor recognizes .rest as an alternative file extension for the same file format.
Prerequisites
- Visual Studio 2022 version 17.8 or later with the ASP.NET and web development workload installed.
.http file syntax
The following sections explain .http file syntax.
Requests
The format for an HTTP request is HTTPMethod URL HTTPVersion, all on one line, where:
HTTPMethodis the HTTP method to use, for example:URLis the URL to send the request to. The URL can include query string parameters. The URL doesn't have to point to a local web project. It can point to any URL that Visual Studio can access.HTTPVersionis optional and specifies the HTTP version that should be used, that is,HTTP/1.1,HTTP/2, orHTTP/3.
A file can contain multiple requests by using lines with ### as delimiters. The following example showing three requests in a file illustrates this syntax:
GET https://localhost:7220/weatherforecast

###

GET https://localhost:7220/weatherforecast?date=2023-05-11&location=98006

###

GET https://localhost:7220/weatherforecast HTTP/3

###
Request headers
To add one or more headers, add each header on its own line immediately after the request line. Don't include any blank lines between the request line and the first header or between subsequent header lines. The format is HeaderName: Value, as shown in the following examples:
GET https://localhost:7220/weatherforecast
Date: Wed, 27 Apr 2023 07:28:00 GMT

###

GET https://localhost:7220/weatherforecast
Cache-Control: max-age=604800
Age: 100

###
Important
When calling an API that authenticates with headers, do not commit any secrets to a source code repository. See the supported methods for storing secrets later in this article, such as ASP.NET Core user secrets, Azure Key Vault and DPAPI encryption.
Request body
Add the request body after a blank line, as shown in the following example:
POST https://localhost:7220/weatherforecast
Content-Type: application/json
Accept-Language: en-US,en;q=0.5

{
    "date": "2023-05-10",
    "temperatureC": 30,
    "summary": "Warm"
}

###
Comments
Lines that start with either # or // are comments. These lines are ignored when Visual Studio sends HTTP requests.
Variables
A line that starts with @ defines a variable by using the syntax @VariableName=Value.
Variables can be referenced in requests that are defined later in the file. They're referenced by wrapping their names in double curly braces, {{ and }}. The following example shows two variables defined and used in a request:
@hostname=localhost
@port=44320
GET https://{{hostname}}:{{port}}/weatherforecast
Variables can be defined using values of other variables that were defined earlier in the file. The following example uses one variable in the request instead of the two shown in the preceding example:
@hostname=localhost
@port=44320
@host={{hostname}}:{{port}}
GET https://{{host}}/api/search/tool
Environment files
To give variables different values in different environments, create a file named http-client.env.json. Locate the file in the same directory as the .http file or in one of its parent directories. Here's an example of an environment file:
{
  "dev": {
    "HostAddress": "https://localhost:44320"
  },
  "remote": {
    "HostAddress": "https://contoso.com"
  }
}
The environment file is a JSON file that contains one or more named environments, such as "dev" and "remote" in the preceding example. Each named environment contains one or more variables, such as HostAddress in the preceding example. Variables from an environment file are referenced the same way as other variables, as shown in the following example:
GET {{HostAddress}}/api/search/tool
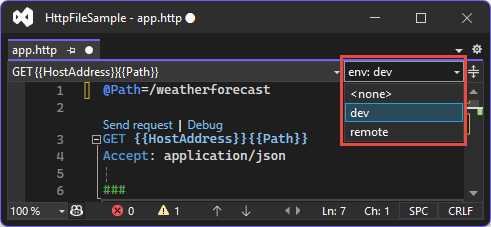
The value that is used for the variable when sending a request is determined by an environment selector dropdown at the upper right corner of the .http file editor. The following screenshot shows the selector:
The environment file doesn't have to be in the project folder. Visual Studio looks for an environment file in the folder where the .http file exists. If it's not in that folder, Visual Studio looks through the parent directories to find it. When a file named http-client.env.json is found, the search ends. The file found nearest to the .http file is used.
After creating or editing an .http file, you might have to close and reopen the project to see the changes reflected in the environment selector. Press F6 to select the environment selector.
Visual Studio displays warnings in the following situations:
- The
.httpfile references a variable that isn't defined in the.httpfile or in the environment file. - The environment file contains a variable that isn't referenced in the
.httpfile.
A variable defined in an environment file can be the same as one defined in the .http file, or it can be different. If a variable is defined in both the .http file and the environment file, the value in the .http file overrides the value in the environment file.
User-specific environment files
A user-specific value is any value that an individual developer wants to test with but doesn’t want to share with the team. Since the http-client.env.json file is checked in to source control by default, it wouldn’t be appropriate to add user-specific values to this file. Instead, put them in a file named http-client.env.json.user located in the same folder as the http-client.env.json file. Files that end with .user should be excluded from source control by default when using Visual Studio source control features.
When the http-client.env.json file is loaded, Visual Studio looks for a sibling http-client.env.json.user file. If a variable is defined in an environment in both the http-client.env.json file and the http-client.env.json.user file, the value in the http-client.env.json.user file wins.
Here's an example scenario that shows how a user-specific environment file works. Suppose the .http file has the following content:
GET {{HostAddress}}/{{Path}}
Accept: application/json
And suppose the http-client.env.json file contains the following content:
{
  "dev": {
    "HostAddress": "https://localhost:7128",
    "Path": "/weatherforecast"
  },
  "remote": {
    "HostAddress": "https://contoso.com",
    "Path": "/weatherforecast"
  }
}
And suppose there's a user-specific environment file that contains the following content:
{
  "dev": {
    "Path": "/swagger/index.html"
  }
}
When the user selects the "dev" environment, the request is sent to https://localhost:7128/swagger/index.html because the Path value in the http-client.env.json.user file overrides the value from the http-client.env.json file.
With the same environment files, suppose the variables are defined in the .http file:
@HostAddress=https://contoso.com
@Path=/weatherforecast

GET {{HostAddress}}/{{Path}}
Accept: application/json
In this scenario, the "dev" environment request is sent to https://contoso.com/weatherforecast because variable definitions in .http files override environment file definitions.
ASP.NET Core user secrets
To get a value from user secrets, use an environment file that is located in the same folder as the ASP.NET Core project. In the environment file, define a variable that has provider and secretName properties. Set the provider value to AspnetUserSecrets and set secretName to the name of the desired user secret. For example, the following environment file defines a variable named ApiKeyDev that gets its value from the config:ApiKeyDev user secret:
{
  "dev": {
    "ApiKeyDev": {
      "provider": "AspnetUserSecrets",
      "secretName": "config:ApiKeyDev"
    }
  }
}
To use this variable in the .http file, reference it like a standard variable. For example:
GET {{HostAddress}}{{Path}}
X-API-KEY: {{ApiKeyDev}}
When the request is sent, the value of the ApiKeyDev secret is in the X-API-KEY header.
As you type in the http file, the editor shows a completion list for the variable name but doesn't show its value.
Azure Key Vault
Azure Key Vault is one of several key management solutions in Azure that can be used for secrets management. Of the three secrets stores currently supported for .http files, Key Vault is the best choice for sharing secrets across different users. The other two options—ASP.NET User Secrets and DPAPI encryption—aren't easily shared.
To use a value from Azure Key Vault, you must be signed into Visual Studio with an account that has access to the desired Key Vault.
Define a variable in an environment file with the metadata to access the secret. The variable is named AKVSecret in the following example:
{
  "dev": {
    "AKVSecret": {
      "provider": "AzureKeyVault",
      "secretName": "SecretInKeyVault",
      "resourceId": "/subscriptions/3a914c59-8175a9e0e540/resourceGroups/my-key-vault-rg/providers/Microsoft.KeyVault/vaults/my-key-vault-01182024"
    }
  }
}
The variable AKVSecret pulls its value from Azure Key Vault. The following properties are defined on AKVSecret:
| Name | Description |
|---|---|
| provider | For Key Vault, always use AzureKeyVault. |
| secretName | Name of the secret to extract. |
| resourceId | Azure resource ID for the specific Key Vault to access. |
The value for the resourceId property can be found in the Azure portal. Go to Settings > Properties to find it. For secretName, use the name of the secret that appears on the Secrets page in the Azure portal.
For example, the following .http file has a request that uses this secret value.
GET {{HostAddress}}{{Path}}
X-AKV-SECRET: {{akvSecret}}
DPAPI encryption
On Windows, there is a Data Protection API (DPAPI) that can be used to encrypt sensitive data. When DPAPI is used to encrypt data, the encrypted values are always machine-specific, and they're also user-specific in .http files. These values can't be shared with other users.
To encrypt a value, use the following console application:
using System.Security.Cryptography;
using System.Text;

string stringToEncrypt = "Hello, World!";
byte[] encBytes = ProtectedData.Protect(Encoding.Unicode.GetBytes(stringToEncrypt), optionalEntropy: null, scope: DataProtectionScope.CurrentUser);
string base64 = Convert.ToBase64String(encBytes);
Console.WriteLine(base64);
The preceding console application references the System.Security.Cryptography.ProtectedData NuGet package. To enable the encrypted value to work in the .http file, encrypt with the scope set to DataProtectionScope.CurrentUser. The encrypted value is a base64 encoded string that can be copied and pasted into the environment file.
In the environment file, create a variable that has provider and value properties. Set provider to Encrypted, and set value to the encrypted value. For example, the following environment file defines a variable named dpapiValue that gets its value from a string that was encrypted with DPAPI.
{
  "dev": {
    "dpapiValue": {
      "provider": "Encrypted",
      "value": "AQAAANCMnd8BFdERjHoAwE/Cl+sBAAAA5qwfg4+Bhk2nsy6ujgg3GAAAAAACAAAAAAAQZgAAAAEAACAAAAAqNXhXc098k1TtKmaI4cUAbJVALMVP1zOR7mhC1RBJegAAAAAOgAAAAAIAACAAAABKu4E9WC/zX5LYZZhOS2pukxMTF9R4yS+XA9HoYF98GzAAAAAzFXatt461ZnVeUWgOV8M/DkqNviWUUjexAXOF/JfpJMw/CdsizQyESus2QjsCtZlAAAAAL7ns3u9mEk6wSMIn+KNsW/vdAw51OaI+HPVrt5vFvXRilTtvGbU/JnxsoIHj0Z7OOxlwOSg1Qdn60zEqmlFJBg=="
    }
  }
}
With the preceding environment file, dpapiValue can be used in the .http file like any other variable. For example:
GET {{HostAddress}}{{Path}}
X-DPAPI-Secret: {{dpapiSecret}}
When this request is sent, X-DPAPI-Secret has the decrypted secret value.
Environment variables
To get the value of an environment variable, use $processEnv. The following example puts the value of the USERNAME environment variable in the X-UserName header.
GET {{HostAddress}}{{Path}}
X-UserName: {{$processEnv USERNAME}}
If you try to use $processEnv to access an environment variable that doesn’t exist, the .http file editor displays an error message.
.env files
To get the value of a variable that is defined in a .env file, use $dotenv. The .env file must be in the project folder. The format for $dotenv is the same as for $processEnv. For example, if the .env file has this content:
USERNAME=userFromDotenv
And the .http file has this content:
GET {{HostAddress}}{{Path}}
X-UserName: {{$dotEnv USERNAME}}
The X-UserName header will have "userFromDotenv".
When $dotenv is entered in the editor, it shows completions for the variables defined in the .env file.
Note
.env files might not be excluded from source control by default, so be careful to avoid checking in any secret values.
Random integers
To generate a random integer, use $randomInt. The syntax is {{$randomInt [min max]}} where the min and max values are optional.
Dates and times
$datetimegenerates adatetimestring in UTC. The syntax is{{$datetime [format] [offset option]}}where the format and offset options are optional.$localDatetimegenerates adatetimestring in the local time zone. The syntax is{{$localDatetime [format] [offset option]}}where the format and offset options are optional.$timeStampgenerates atimestampin UTC. Thetimestampis the number of seconds since the Unix Epoch in UTC time. The syntax is{{$timestamp [offset option]}}where the offset option is optional.
The [format] option is one of rfc1123, iso8601, or a custom format in quotation marks. For example:
GET https://httpbin.org/headers
X-CUSTOM: {{$datetime "dd-MM-yyyy"}}
X-ISO8601: {{$datetime iso8601}}
X-ISO8601L: {{$localDatetime iso8601}}
X-RFC1123: {{$datetime rfc1123}}
X-RFC1123L: {{$localDatetime rfc1123}}
Here are some sample values that the preceding examples generate:
{
  "headers": {
    "X-Custom": "17-01-2024",
    "X-Iso8601": "2024-01-17T22:59:55.5345770+00:00",
    "X-Iso8601L": "2024-01-17T14:59:55.5345770-08:00",
    "X-Rfc1123": "Wed, 17 Jan 2024 22:59:55 GMT",
    "X-Rfc1123L": "Wed, 17 Jan 2024 14:59:55 -08"
  }
}
The [offset option] syntax is in the form number unit where number is an integer and unit is one of the following values:
unit |
Explanation |
|---|---|
ms |
Milliseconds |
s |
Seconds |
m |
Minutes |
h |
Hours |
d |
Days |
w |
Weeks |
M |
Months |
y |
Years |
For example:
GET https://httpbin.org/headers
X-Custom-Minus-1-Year: {{$datetime "dd-MM-yyyy" -1 y}}
X-RFC1123-Plus-1-Day: {{$datetime rfc1123 1 d}}
X-Timestamp-Plus-1-Year: {{$timestamp 1 y}}
Here are some sample values that the preceding examples generate:
{
  "headers": {
    "X-Custom-Minus-1-Year": "17-01-2023",
    "X-Rfc1123-Plus-1-Day": "Thu, 18 Jan 2024 23:02:48 GMT",
    "X-Timestamp-Plus-1-Year": "1737154968"
  }
}
Some of the preceding examples use the free open-source website <httpbin.org>. This is a third-party website not affiliated with Microsoft. In these examples it returns a response body with the headers that were sent in the request. For information about other ways to use this resource for API testing, see the httpbin.org site's home page.
Unsupported syntax
The Visual Studio 2022 .http file editor doesn't have all the features that the Visual Studio Code REST Client extension has. The following list includes some of the more significant features available only in the Visual Studio Code extension:
- Request line that spans more than one line
- Named requests
- Specify file path as body of the request
- Mixed format for body when using multipart/form-data
- GraphQL requests
- cURL request
- Copy/paste as cURL
- Request history
- Save response body to file
- Certificate based authentication
- Prompt variables
- Customize response preview
- Per-request settings
Create an .http file
In Solution Explorer, right-click an ASP.NET Core project.
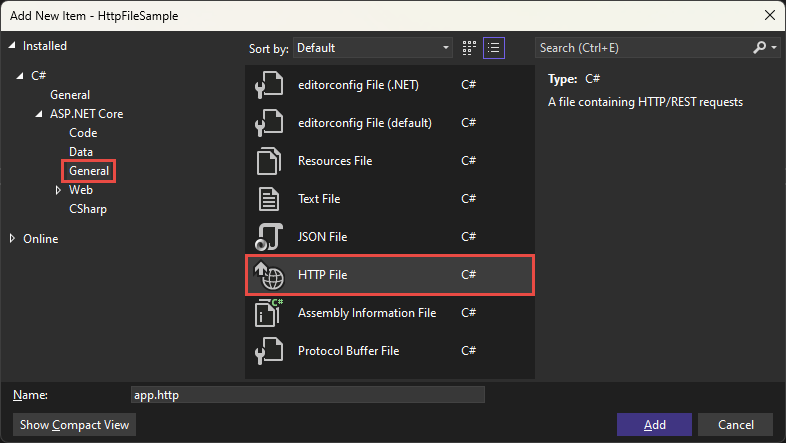
In the context menu, select Add > New Item.
In the Add New Item dialog, select ASP.NET Core > General.
Select HTTP File, and select Add.
Send an HTTP request
Add at least one request to an
.httpfile and save the file.If the request URL points to localhost and the project's port, run the project before trying to send a request to it.
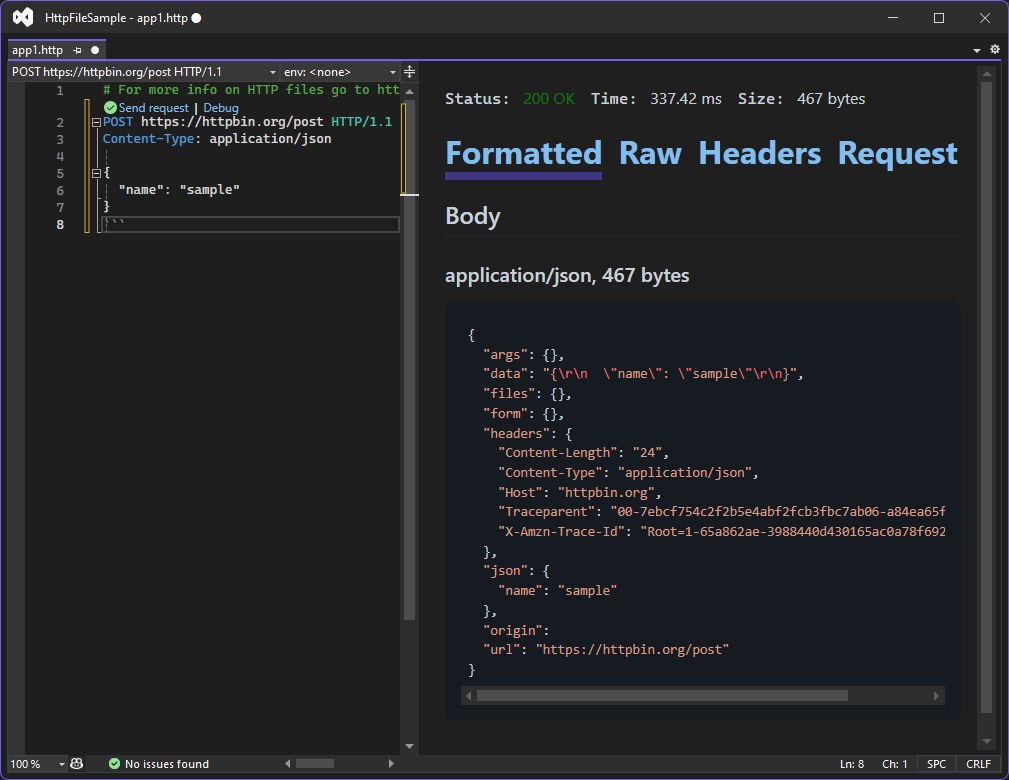
Select the
Send RequestorDebuglink that is directly above the request to be sent.The request is sent to the specified URL, and the response appears in a separate pane to the right of the editor window.
.http file options
Some aspects of .http file behavior can be configured. To see what's available, go to Tools > Options > Text Editor > Rest. For example, the timeout setting can be configured on the Advanced tab. Here's a screenshot of the Options dialog:

Use Endpoints Explorer
Endpoints Explorer is a tool window in Visual Studio 2022 that provides a UI that integrates with the .http file editor for testing HTTP requests.
Open Endpoints Explorer
Select View > Other Windows > Endpoints Explorer.
Add a request to an .http file
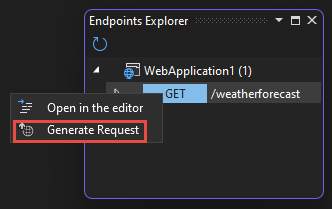
Right-click a request in Endpoints Explorer and select Generate Request.
- If an
.httpfile with the project name as the file name exists, the request is added to that file. - Otherwise, an
.httpfile is created with the project name as the file name, and the request is added to that file.
The preceding screenshot shows endpoints defined by the minimal API project template. The following example shows the request that is generated for the selected endpoint:
GET {{WebApplication1_HostAddress}}/weatherforecast/
Accept: application/json

###
Send the request as described earlier in this article.
See also
ASP.NET Core
Feedback
Coming soon: Throughout 2024 we will be phasing out GitHub Issues as the feedback mechanism for content and replacing it with a new feedback system. For more information see: https://aka.ms/ContentUserFeedback.
Submit and view feedback for