Manufacturing process preparation
The manufacturing process includes both factory-floor tasks and cloud-configuration tasks. Preparation is necessary to ensure that these tasks can be completed without interruption.
The following preparation steps will help to ensure that your manufacturing process runs smoothly:
- Set up equipment and install PC software
- Develop applications for functional testing
- Verify that applications and scripts work
- Prepare for an update of the OS
- Record IDs and other information
- Get production-signed images
Important
Some preparation steps involve the Azure CLI. You will need a PC with an internet connection and the Azure Sphere SDK to complete such steps. For SDK installation instructions, see Install the Azure Sphere SDK for Windows or Install the Azure Sphere SDK for Linux.
Set up equipment and install PC software
Both factory-floor tasks and cloud-configuration tasks require a PC. Other necessary equipment depends on which set of tasks is being performed, as described in this section. Most manufacturing tasks also require some software tools, which must be installed on the PC that is used for these tasks.
Equipment for factory-floor tasks
The factory-floor tasks require the following equipment:
A factory-floor PC. Each Azure Sphere device must be connected to a factory-floor PC. This PC must be running Windows 11, Windows 10 Anniversary update (or later), or Linux.
Linux supports only one attached device. If you want to use a single PC to communicate with multiple Azure Sphere devices simultaneously, do one of the following:
Connect to a PC that is running Windows and that has one USB port for each device to be connected.
Connect to a PC that is running one Linux virtual machine (VM) for each device to be connected. The virtualization software that you use to create your VMs must support hardware-level USB peripheral redirection so that each Azure Sphere FTDI programming interface can be routed to a separate dedicated Linux VM.
You can simultaneously connect as many Azure Sphere devices to your PC as the PC's USB subsystem will support. The PC software tools do not limit the number of devices that can be connected at one time.
A chip-to-PC interface. This interface is required by the PC software tools for USB-UART communication between the PC and the attached device.

You choose how to implement this interface:
Design an interface board that connects to your PC during manufacturing.
Design an interface that is built into each connected device. For example, the MT3620 reference board design (RDB) includes such an interface.
See MCU programming and debugging interface for details on the design requirements for the chip-to-PC interface.
A Wi-Fi access point. A device must be able to connect to Wi-Fi to verify that your customer application will be able to communicate over Wi-Fi. The Wi-Fi connection must not have internet access, because an over-the-air update may occur if the chip connects to an internet-enabled access point.
External test equipment (optional). For functional tests, you may want to connect the peripheral UARTs on the MT3620 (ISU0, ISU1, ISU2, or ISU3) to external test equipment via suitable circuitry of your own design. If you created a chip-to-PC interface on a separate board, as described in the second bulleted item, you might want to add this circuitry to that board.
Radio-frequency (RF) test equipment. This equipment is only necessary if you include RF testing and calibration in your factory-floor tasks. For details, see Equipment and software for RF testing and calibration.
Equipment for cloud-configuration tasks
The cloud-configuration tasks require the following equipment:
A PC for cloud configuration. Azure Sphere devices do not need to be connected to the cloud-configuration PC. This PC must be running Windows 11, Windows 10 Anniversary update (or later), or Linux.
An internet connection. The PC used for cloud configuration must be connected to the internet.
Equipment and software for RF testing and calibration
The requirements and design of your product determine whether you must include RF testing and calibration in your factory-floor tasks. If your product requires Wi-Fi and it incorporates either of the following, you must perform RF testing and calibration for each device:
A chip-down design
A module that is not already RF-certified—check with your supplier if you have questions.
The following equipment and PC software are required for RF testing and calibration:
RF test equipment. This equipment will be used with the RF tools package, which is described in the next bulleted item.
Integration between the RF tools C API library and the test equipment is your responsibility. Currently, Microsoft has partnered with LitePoint to provide a turnkey solution that integrates the Azure Sphere RF test library with the LitePoint equipment.
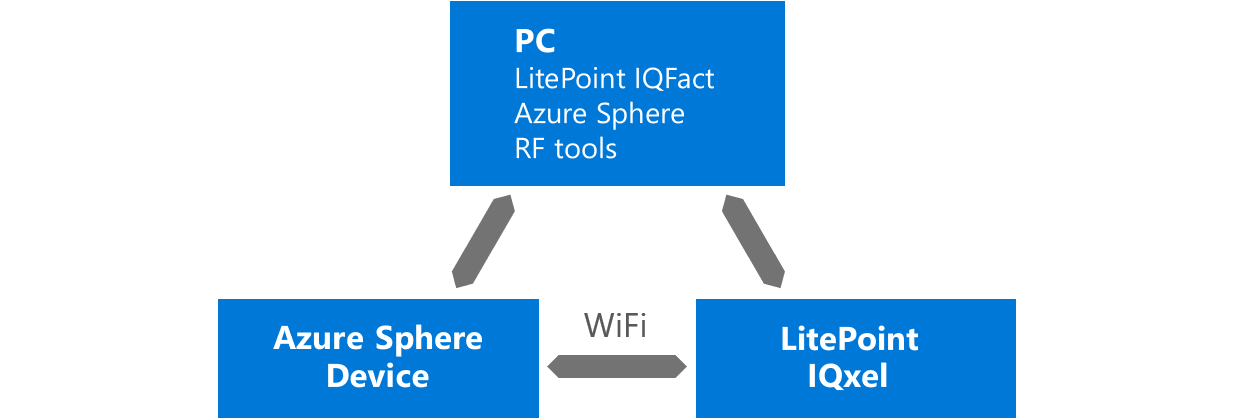
RF Tools package. This PC software includes utilities and a C API library for use in testing and calibrating RF operation. The C API library allows you to create custom applications for RF testing and calibration.
Contact your Microsoft representative to get this package. Install it on your factory-floor PC. If your test house needs to use the tool to certify your device, contact your Microsoft representative before sharing the software with them.
PC software tools
Various factory-floor tasks and cloud-configuration tasks may use the following PC software tools. These software tools must be installed on the PC that is used for these tasks.
Azure Sphere SDK. The SDK includes the Azure CLI and other tools for building and managing applications and deployments. The CLI commands can perform operations such as loading software onto an attached device, claiming a device, and retrieving details about an attached device. The SDK is needed for both factory-floor and cloud-configuration tasks.
Install the SDK for Windows or for Linux, depending on what your PC is running.
Manufacturing Samples. The Manufacturing Samples provide support for both factory-floor and cloud-configuration tasks, and include:
- Python and C# client libraries for the Device Rest API which implement direct PC to device communication for optimized manufacturing operations. These are also available from PyPI and NuGet.
- A set of manufacturing tools which are Python scripts that automate various stages of manufacturing, including device readiness checks, multi-board recovery, and multi-board OTA configuration.
RF Tools package. This package is only necessary if you include RF testing and calibration in your factory-floor tasks. For details, see Equipment and software for RF testing and calibration.
Develop applications for functional testing
Functional tests verify that your product operates correctly. The specific tests that you should run depend on your individual hardware. Functional tests must be included in the factory-floor tasks.
You can organize your tests as a single application or as a series of applications. The Overview of Azure Sphere applications, the Azure Sphere samples, and the templates in the Azure Sphere SDK provide information about application design. Whatever design you choose, your functional-testing applications need to be production signed, as described in the Get production-signed images preparation step, and then deployed as part of the factory-floor process.
To report errors, log data, or sequence tests, some functional tests will require communication with the chip that is being tested. To enable such communication, you can use the peripheral UARTs on the MT3620 (ISU0, ISU1, ISU2, or ISU3). Connect these UARTs to either your factory-floor PC or external test equipment via suitable circuitry of your own design. If you created an interface board to support chip-to-PC communication, you might want to add this circuitry to that board.
Verify that applications and scripts work
You should thoroughly test your finished product applications, test applications, and test scripts. Retesting is recommended whenever you update the Azure Sphere SDK, the Azure Sphere OS, or your software.
Follow these guidelines:
Verify that your test applications and finished product applications can be installed, run, and removed.
Verify that your test scripts, test applications, and finished product applications work with the latest versions of the Azure Sphere SDK and Azure Sphere OS.
Prepare for an update of the OS
An updated Azure Sphere OS version may need to be loaded onto devices during manufacture when a sideloaded application has updates requiring OS features that are only present in a newer version of the OS or when Microsoft releases an OS with security updates.
To prepare for an update of the Azure Sphere OS during manufacture, do the following:
Create a plan for updating devices to the new OS version. You can update devices in your own manufacturing line or by coordinating with your hardware vendor.
Verify that the version of the Azure Sphere SDK on the factory-floor and cloud-configuration PCs works with a new version of the OS. If necessary, update the SDK as described in Install the Azure Sphere SDK for Windows or Install the Azure Sphere SDK for Linux.
Ensure that your RF testing and calibration process works with the new OS version if you include RF testing and calibration in your factory-floor tasks. See Compatibility of RF tools across OS versions.
Obtain the most recently available Azure Sphere OS recovery files for MT3620-based hardware and store the files on your factory-floor PC. To get these files, accept the license terms then download the files.
Record IDs and other information
Manufacturing tasks may require that you specify an image, component, product, or device group. A record of the IDs and names used to identify these items should be created and stored on the appropriate PCs for later use during factory-floor and cloud-configuration tasks. This section explains how to get the identifying information for each item.
Image ID and component ID
Each application has a component ID and an image ID. Record the image ID and component ID during the Get production-signed images preparation task. The image ID and component ID both appear in the output of the azsphere image-package show --image-package <path-to-imagepackage> command, which is used in that preparation task.
Product name and device group
Record the names of products and device groups when you create them. Each Azure Sphere device must be assigned to a product and a device group as part of the cloud-configuration tasks.
A manufacturer should create a product for each model of a connected device, such as a dishwasher or coffeemaker. Every connected device has a single product, but a single product can be associated with many devices. When you create a product, default device groups are created within the product. You can use the default device groups or create your own.
To create a product, use the az sphere product create command as follows. Replace <product-name> and <product description> with a name and description, respectively, that are appropriate for your product.
az sphere product create --name <product-name> --description <product description>
For cloud configuration, you can either use the Production default device group or create your own. To create your own device group, use the az sphere device-group create command as follows. Replace <device-group-name> with a name of your choosing; replace <product-name> with the name of the product in which to create your device group.
az sphere device-group create --name <device-group-name> --product <product-name>
Get production-signed images
When you upload an image to the Azure Sphere Security Service (AS3) it signs the image so that it can be distributed to devices in a manner that is trusted. Devices deployed in production accept only production-signed images as part of Azure Sphere's security promise. During manufacturing, you may want to load production-signed images onto devices. To avoid the need for internet connectivity during the factory-floor process, create the production-signed images once, download them from AS3, and then save them on a factory-floor PC for sideloading during production.
Applications that are intended for use only during the factory-floor process must be explicitly identified as temporary images. This ensures that these applications can be removed at the end of the testing process. Do not use temporary images for applications that will remain on the device after manufacture; otherwise, the over-the-air update process will not operate correctly.
The steps to get a production-signed image are as follows:
Upload the image to the AS3. Use the az sphere image add command as follows, replacing
<path-to-image-package>with the path and name of the image package that contains your software. Include the--temporaryparameter to mark the image as temporary; otherwise, omit it.az sphere image add --image <path-to-image-package> --temporarySave the image ID and the component ID that the az sphere image add command displayed in its output in Step 1; you'll need these later for some factory-floor tasks and cloud-configuration tasks. The image ID will also be needed in the next step.
Download the production-signed image. Use the az sphere image download command, replacing
<image-id>with the ID of the image to download and<file-path>with the path and filename in which to save the downloaded image.az sphere image download --image <image-id> --destination <file-path>
Important
If a device might be claimed into a different catalog than the one used during the steps to get a production-signed image, you must retain the precise original (prior to upload) image files so that you can upload them to the actual catalog that a device is claimed into. This requirement is described in more detail in cloud configuration tasks.
Get an updated trusted keystore
In some circumstances, you may have a newer production-signed image that you need to apply to an older OS. This may occur if you update your application image, for example, to fix a bug.
However, this can introduce an issue. The OS includes a "trusted keystore" that causes it to trust a set of keys used in the signing of production-signed images. If your production-signed images are newer than the OS, and if in the meantime AS3 updated its image signing key, then the OS may not trust the key used to sign your image. You can determine whether this issue affects a particular combination of OS and production-signed images by following the Factory-floor tasks.
The issue can be remedied by updating the OS used in production, refer to Prepare for an update of the OS. However, if for some reason you did not want to update the OS, then you can instead use the older OS and update just the trusted keystore.
To do this, accept the license terms then download the recovery images, and from this zip file extract just the "trusted-keystore.bin" file. The Factory-floor tasks describe how to use this "trusted-keystore.bin" file to update just the trusted keystore.
Feedback
Coming soon: Throughout 2024 we will be phasing out GitHub Issues as the feedback mechanism for content and replacing it with a new feedback system. For more information see: https://aka.ms/ContentUserFeedback.
Submit and view feedback for