Redeploy the ASDK
In this article, you'll learn how to redeploy the Azure Stack Development Kit (ASDK) in a non-production environment. Because upgrading the ASDK isn't supported, you need to completely redeploy it to move to a newer version. You can also redeploy the ASDK whenever you want to start from scratch.
Important
Upgrading the ASDK to a new version isn't supported. You've to redeploy the ASDK on the ASDK host computer each time you want to evaluate a newer version of Azure Stack.
Remove Azure registration
If you've previously registered your ASDK installation with Azure, you should remove the registration resource before redeploying the ASDK. Re-register the ASDK to enable the availability of items in the marketplace when you redeploy the ASDK. If you haven't previously registered the ASDK with your Azure subscription, you can skip this section.
To remove the registration resource, use the Remove-AzsRegistration cmdlet to unregister Azure Stack. Then, use the Remove-AzResourceGroup cmdlet to delete the Azure Stack resource group from your Azure subscription.
Open a PowerShell console as an admin on a computer that has access to the privileged endpoint. For the ASDK, that's the ASDK host computer.
Run the following PowerShell commands to unregister your ASDK installation and delete the azurestack resource group from your Azure subscription:
#Import the registration module that was downloaded with the GitHub tools
Import-Module C:\AzureStack-Tools-az\Registration\RegisterWithAzure.psm1

# Provide Azure subscription admin credentials
Connect-AzAccount

# Provide ASDK admin credentials
$CloudAdminCred = Get-Credential -UserName AZURESTACK\CloudAdmin -Message "Enter the cloud domain credentials to access the privileged endpoint"

# Unregister Azure Stack
Remove-AzsRegistration `
   -PrivilegedEndpointCredential $CloudAdminCred `
   -PrivilegedEndpoint AzS-ERCS01
   -RegistrationName $RegistrationName

# Remove the Azure Stack resource group
Remove-AzResourceGroup -Name azurestack -Force
You're prompted to sign in to both your Azure subscription and the local ASDK installation when the script runs.
When the script completes, you should see messages similar to the following examples:
De-Activating Azure Stack (this may take up to 10 minutes to complete).Your environment is now unable to syndicate items and is no longer reporting usage data.Remove registration resource from Azure..."Deleting the resource..." on target "/subscriptions/<subscription information>"********** End Log: Remove-AzsRegistration *********
Azure Stack should now successfully be unregistered from your Azure subscription. The azurestack resource group should also be deleted. This resource group is the one created when you first registered the ASDK with Azure.
Deploy the ASDK
To redeploy Azure Stack, you must start over from scratch as described below. The steps are different depending on whether or not you used the Azure Stack installer (asdk-installer.ps1) script to install the ASDK.
Redeploy the ASDK using the installer script
On the ASDK computer, open an elevated PowerShell console and navigate to the asdk-installer.ps1 script in the AzureStack_Installer directory located on a non-system drive. Run the script and click Reboot.
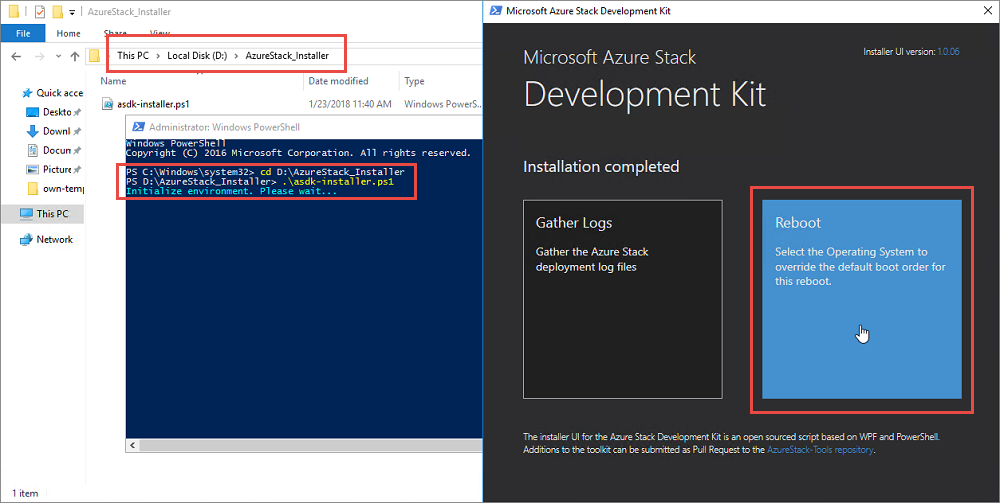
Select the base operating system (not Azure Stack) and click Next.

After the ASDK host reboots into the base operating system, log in as a local admin. Locate and delete the C:\CloudBuilder.vhdx file that was used as part of the previous deployment.
Repeat the same steps that you took to first deploy the ASDK.
Redeploy the ASDK without using the installer
If you didn't use the asdk-installer.ps1 script to install the ASDK, you must manually reconfigure the ASDK host computer before redeploying the ASDK.
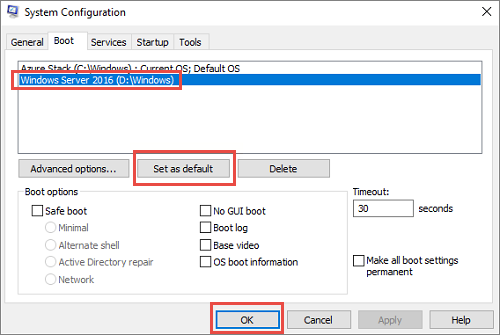
Start the System Configuration utility by running msconfig.exe on the ASDK computer. On the Boot tab, select the host computer operating system (not Azure Stack), click Set as default, and then click OK. Click Restart when prompted.
After the ASDK host reboots into the base operating system, log in as a local admin for the ASDK host computer. Locate and delete the C:\CloudBuilder.vhdx file that was used as part of the previous deployment.
Repeat the same steps that you took to first deploy the ASDK using PowerShell.
Next steps
Feedback
Coming soon: Throughout 2024 we will be phasing out GitHub Issues as the feedback mechanism for content and replacing it with a new feedback system. For more information see: https://aka.ms/ContentUserFeedback.
Submit and view feedback for