Deploy host networking with Network ATC
Applies to: Azure Stack HCI, versions 22H2 and 21H2
This article guides you through the requirements, best practices, and deployment of Network ATC. Network ATC simplifies the deployment and network configuration management for Azure Stack HCI clusters. Network ATC provides an intent-based approach to host network deployment. By specifying one or more intents (management, compute, or storage) for a network adapter, you can automate the deployment of the intended configuration. For more information on Network ATC, including an overview and definitions, please see Network ATC overview.
If you have feedback or encounter any issues, review the Requirements and best practices section, check the Network ATC event log, and work with your Microsoft support team.
Requirements and best practices
The following are requirements and best practices for using Network ATC in Azure Stack HCI:
All servers in the cluster must be running Azure Stack HCI, version 22H2 with the November update (or later).
Must use physical hosts that are Azure Stack HCI certified.
Adapters in the same Network ATC intent must be symmetric (of the same make, model, speed, and configuration) and available on each cluster node.
Asymmetric adapters lead to a failure in deploying any intent.
With Azure Stack HCI 22H2, Network ATC will automatically confirm adapter symmetry for all nodes in the cluster before deploying an intent.
For more information on adapter symmetry, see Switch Embedded Teaming (SET)
Each physical adapter specified in an intent must use the same name on all nodes in the cluster.
Ensure each network adapter has an "Up" status, as verified by the PowerShell
Get-NetAdaptercmdlet.Ensure all hosts have the November Azure Stack HCI update or later.
Each node must have the following Azure Stack HCI features installed:
- Network ATC
- Network HUD
- Hyper-V
- Failover Clustering
- Data Center Bridging
Here's an example of installing the required features via PowerShell:
Install-WindowsFeature -Name NetworkATC, NetworkHUD, Hyper-V, 'Failover-Clustering', 'Data-Center-Bridging' -IncludeManagementToolsBest practice: Insert each adapter in the same PCI slot(s) in each host. This practice leads to ease in automated naming conventions by imaging systems.
Best practice: Configure the physical network (switches) prior to Network ATC including VLANs, MTU, and DCB configuration. For more information, please see Physical Network Requirements.
Important
Updated: Deploying Network ATC in virtual machines may be used for test and validation purposes only. VM-based deployment requires an override to the default adapter settings to disable the NetworkDirect property. For more information on submission of an override, please see: Override default network settings.
Deploying Network ATC in standalone mode may be used for test and validation purposes only.
Common Network ATC commands
There are several new PowerShell commands included with Network ATC. Run theGet-Command -ModuleName NetworkATC cmdlet to identify them. Ensure PowerShell is run as an administrator.
The Remove-NetIntent cmdlet removes an intent from the local node or cluster. This command doesn't destroy the invoked configuration.
Example intents
Network ATC modifies how you deploy host networking, not what you deploy. You can deploy multiple scenarios so long as each scenario is supported by Microsoft. Here are some examples of common deployment options, and the PowerShell commands needed. These aren't the only combinations available but they should give you an idea of the possibilities.
For simplicity we only demonstrate two physical adapters per SET team, however it's possible to add more. For more information, please see Plan Host Networking.
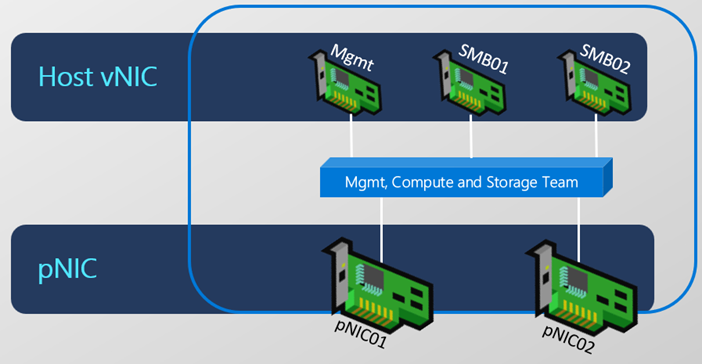
Fully converged intent
For this intent, compute, storage, and management networks are deployed and managed across all cluster nodes.
Add-NetIntent -Name ConvergedIntent -Management -Compute -Storage -AdapterName pNIC01, pNIC02
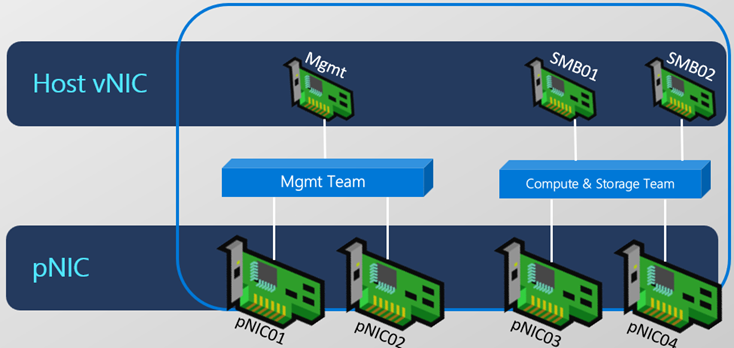
Converged compute and storage intent; separate management intent
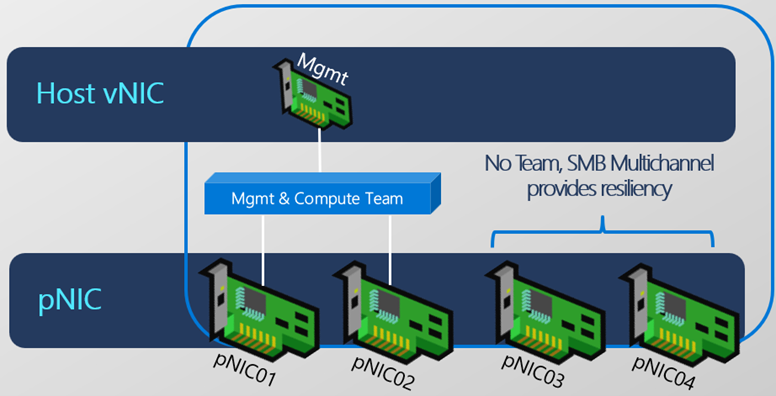
Two intents are managed across cluster nodes. Management uses pNIC01, and pNIC02; Compute and storage are on different adapters.
Add-NetIntent -Name Mgmt -Management -AdapterName pNIC01, pNIC02
Add-NetIntent -Name Compute_Storage -Compute -Storage -AdapterName pNIC03, pNIC04
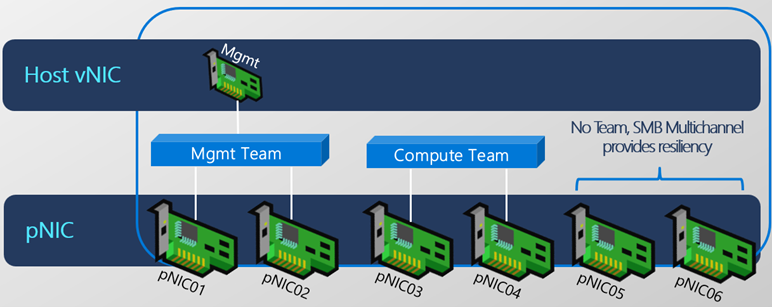
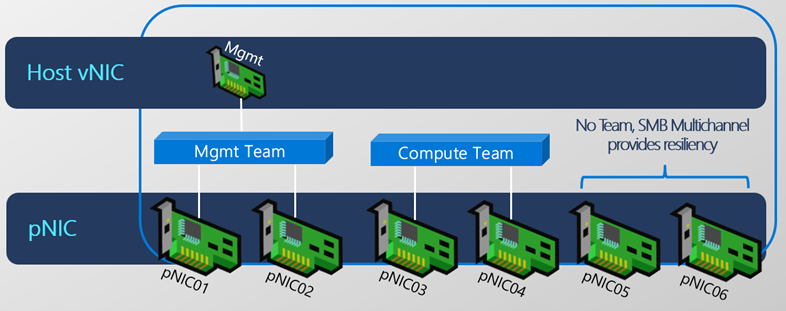
Fully disaggregated intent
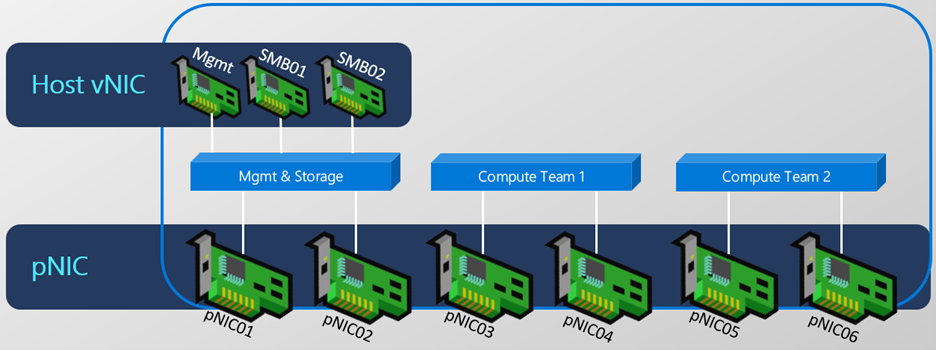
For this intent, compute, storage, and management networks are all managed on different adapters across all cluster nodes.
Add-NetIntent -Name Mgmt -Management -AdapterName pNIC01, pNIC02
Add-NetIntent -Name Compute -Compute -AdapterName pNIC03, pNIC04
Add-NetIntent -Name Storage -Storage -AdapterName pNIC05, pNIC06
Storage-only intent
For this intent, only storage is managed. Management and compute adapters aren't managed by Network ATC.
Compute and management intent
For this intent, compute and management networks are managed, but not storage.
Multiple compute (switch) intents
For this intent, multiple compute switches are managed.
Add-NetIntent -Name Compute1 -Compute -AdapterName pNIC03, pNIC04
Add-NetIntent -Name Compute2 -Compute -AdapterName pNIC05, pNIC06
Default Network ATC values
This section lists some of the key default values used by Network ATC.
Default values
This section covers additional default values that Network ATC will be setting in versions 22H2 and later.
Default VLANs
Applies to: Azure Stack HCI 21H2, 22H2
Network ATC uses the following VLANs by default for adapters with the storage intent type. If the adapters are connected to a physical switch, these VLANs must be allowed on the physical network. If the adapters are switchless, no additional configuration is required.
| Adapter Intent | Default Value |
|---|---|
| Management | Configured VLAN for management adapters isn't modified |
| Storage Adapter 1 | 711 |
| Storage Adapter 2 | 712 |
| Storage Adapter 3 | 713 |
| Storage Adapter 4 | 714 |
| Storage Adapter 5 | 715 |
| Storage Adapter 6 | 716 |
| Storage Adapter 7 | 717 |
| Storage Adapter 8 | 718 |
| Future Use | 719 |
Consider the following command:
The physical NIC (or virtual NIC if necessary) is configured to use VLANs 711, 712, 713, and 714 respectively.
Note
Network ATC allows you to change the VLANs used with the StorageVlans parameter on Add-NetIntent.
Automatic storage IP addressing
Applies to: Azure Stack HCI 22H2
Network ATC will automatically configure valid IP Addresses for adapters with the storage intent type. Network ATC does this in a uniform manner across all nodes in your cluster and verifies that the address chosen isn't already in use on the network.
The default IP Address for each adapter on each node in the storage intent will be set up as follows:
| Adapter | IP Address and Subnet | VLAN |
|---|---|---|
| pNIC1 | 10.71.1.X | 711 |
| pNIC2 | 10.71.2.X | 712 |
| pNIC3 | 10.71.3.X | 713 |
To override Automatic Storage IP Addressing, create a storage override and pass the override when creating an intent:
$StorageOverride = New-NetIntentStorageOverrides
$StorageOverride.EnableAutomaticIPGeneration = $false
Add-NetIntent -Name MyIntent -Storage -Compute -AdapterName 'pNIC01', 'pNIC02' -StorageOverrides $StorageOverride
Cluster network settings
Applies to: Azure Stack HCI 22H2
Network ATC configures a set of Cluster Network Features by default. The defaults are listed below:
| Property | Default |
|---|---|
| EnableNetworkNaming | $true |
| EnableLiveMigrationNetworkSelection | $true |
| EnableVirtualMachineMigrationPerformance | $true |
| VirtualMachineMigrationPerformanceOption | Default is calculated: SMB, TCP or Compression |
| MaximumVirtualMachineMigrations | 1 |
| MaximumSMBMigrationBandwidthInGbps | Default is calculated based on set-up |
Default Data Center Bridging (DCB) configuration
Network ATC establishes the following priorities and bandwidth reservations. This configuration should also be configured on the physical network.
| Policy | Use | Default Priority | Default Bandwidth Reservation |
|---|---|---|---|
| Cluster | Cluster Heartbeat reservation | 7 | 2% if the adapter(s) are <= 10 Gbps; 1% if the adapter(s) are > 10 Gbps |
| SMB_Direct | RDMA Storage Traffic | 3 | 50% |
| Default | All other traffic types | 0 | Remainder |
Note
Network ATC allows you to override default settings like default bandwidth reservation. For examples, see Update or override network settings.
Common Error Messages
With the new event logs in 22H2, there are some simplistic troubleshooting methods to identify intent deployment failures. This section outlines some of the common fixes when an issue is encountered. The errors shown below are from the output of the Get-NetIntentStatus cmdlet.
Error: AdapterBindingConflict
Scenario 1: An adapter is actually bound to an existing vSwitch that conflicts with the new vSwitch that is being deployed by Network ATC.
Solution: Remove the conflicting vSwitch, then Set-NetIntentRetryState
Scenario 2: An adapter is bound to the component, but not necessarily a vSwitch.
Solution: Disable the vms_pp component (unbind the adapter from the vSwitch) then run Set-NetIntentRetryState.
Error: ConflictingTrafficClass
This issue occurs because a traffic class is already configured. This preconfigured traffic class conflicts with the traffic classes being deployed by Network ATC. For example, the customer may have already deployed a traffic class called SMB when Network ATC will deploy a similar traffic class with a different name.
Solution:
Clear the existing DCB configuration on the system then run Set-NetIntentRetryState
Get-NetQosTrafficClass | Remove-NetQosTrafficClass
Get-NetQosPolicy | Remove-NetQosPolicy -Confirm:$false
Get-NetQosFlowControl | Disable-NetQosFlowControl
Error: RDMANotOperational
You may see this message:
If the network adapter uses an inbox driver. Inbox drivers aren't supported and must be updated.
Solution: Upgrade the driver for the adapter.
If SR-IOV is disabled in the BIOS.
Solution: Enable SR-IOV for the adapter in the system BIOS
If RDMA is disabled in the BIOS
Solution: Enable RDMA for the adapter in the system BIOS
Error: InvalidIsolationID
This message will occur when RoCE RDMA is in use and you have overridden the default VLAN with a value that can't be used with that protocol. For example, RoCE RDMA requires a non-zero VLAN so that Priority Flow Control (PFC) markings can be added to the frame. A VLAN value between 1 - 4094 must be used. Network ATC won't override the value you specified without administrator intervention for several reasons. To resolve this issue:
Choose iWARP as the RDMA (NetworkDirect) protocol
Solution: If supported by the adapter, Network ATC automatically chooses iWARP as its RDMA protocol which may use a VLAN ID of 0. Remove the override that enforces RoCE as the chosen protocol.
Use the default VLANs
Solution: We highly recommend using the Network ATC Default VLANs
Use a valid VLAN
When specifying a VLAN use the -StorageVLANs parameter and specify comma separated values between 1 - 4094.
Next steps
- Manage your Network ATC deployment. See Manage Network ATC.
- Learn more about Stretched clusters.
Feedback
Coming soon: Throughout 2024 we will be phasing out GitHub Issues as the feedback mechanism for content and replacing it with a new feedback system. For more information see: https://aka.ms/ContentUserFeedback.
Submit and view feedback for
