Register Azure Stack HCI with Azure
Applies to: Azure Stack HCI, versions 22H2 and 21H2
Warning
The deployment instructions provided in this article apply to an older version, Azure Stack HCI, version 22H2. For new deployments, we recommend that you use the latest generally available version, Azure Stack HCI, version 23H2. For deployment instructions, see About Azure Stack HCI, version 23H2 deployment.
Now that you've deployed the Azure Stack HCI operating system and created a cluster, you must register it with Azure.
This article describes how to register Azure Stack HCI with Azure via Windows Admin Center or PowerShell. For information on how to manage cluster registration, see Manage cluster registration.
About Azure Stack HCI registration
Azure Stack HCI is delivered as an Azure service. As per the Azure online services terms, you must register your cluster within 30 days of installation. Your cluster isn't fully supported until your registration is active. If you don't register your cluster with Azure upon deployment, or if your cluster is registered but hasn't connected to Azure for more than 30 days, the system won't allow new virtual machines (VMs) to be created or added. For more information, see Job failure when attempting to create VM.
After registration, an Azure Resource Manager resource is created to represent the on-premises Azure Stack HCI cluster. Starting with Azure Stack HCI, version 21H2, registering a cluster automatically creates an Azure Arc of the server resource for each server in the Azure Stack HCI cluster. This Azure Arc integration extends the Azure management plane to Azure Stack HCI. The Azure Arc integration enables periodic syncing of information between the Azure resource and the on-premises clusters.
Prerequisites
Before you begin cluster registration, make sure the following prerequisites are in place:
Azure Stack HCI system deployed and online. Make sure the system is deployed and all servers are online.
Network connectivity. Azure Stack HCI needs to periodically connect to the Azure public cloud. For information on how to prepare your firewalls and set up a proxy server, see Firewall requirements for Azure Stack HCI and Configure proxy settings for Azure Stack HCI.
Azure subscription and permissions. Make sure you have an Azure subscription and you know the Azure region where the cluster resources should be created. For more information about Azure subscription and supported Azure regions, see Azure requirements.
Management computer. Make sure you have access to a management computer with internet access. Your management computer must be joined to the same Active Directory domain in which you've created your Azure Stack HCI cluster.
Windows Admin Center. If you're using Windows Admin Center to register the cluster, make sure you:
Install Windows Admin Center on a management computer and register Windows Admin Center with Azure. For registration, use the same Microsoft Entra ID (tenant) ID that you plan to use for the cluster registration. To get your Azure subscription ID, visit the Azure portal, navigate to Subscriptions, and copy/paste your ID from the list. To get your tenant ID, visit the Azure portal, navigate to Microsoft Entra ID, and copy/paste your tenant ID.
To register your cluster in Azure China, install Windows Admin Center version 2103.2 or later.
Azure policies. Make sure you don't have any conflicting Azure policies that might interfere with cluster registration. Some of the common conflicting policies can be:
Resource group naming: Azure Stack HCI registration provides two configuration parameters for naming resource groups:
-ResourceGroupNameand-ArcServerResourceGroupName. See Register-AzStackHCI for details on the resource group naming. Make sure that the naming does not conflict with the existing policies.Resource group tags: Currently Azure Stack HCI does not support adding tags to resource groups during cluster registration. Make sure your policy accounts for this behavior.
.msi download: Azure Stack HCI downloads the Arc agent on the cluster nodes during cluster registration. Make sure you don't restrict these downloads.
Credentials lifetime: By default, the Azure Stack HCI service requests two years of credential lifetime. Make sure your Azure policy doesn't have any configuration conflicts.
Note
If you have a separate resource group for Arc-for-Server resources, we recommend using a resource group having Arc-for-Server resources related only to Azure Stack HCI. The Azure Stack HCI resource provider has permissions to manage any other Arc-for-Server resources in the ArcServer resource group.
Assign Azure permissions for registration
This section describes how to assign Azure permissions for registration from the Azure portal or using PowerShell.
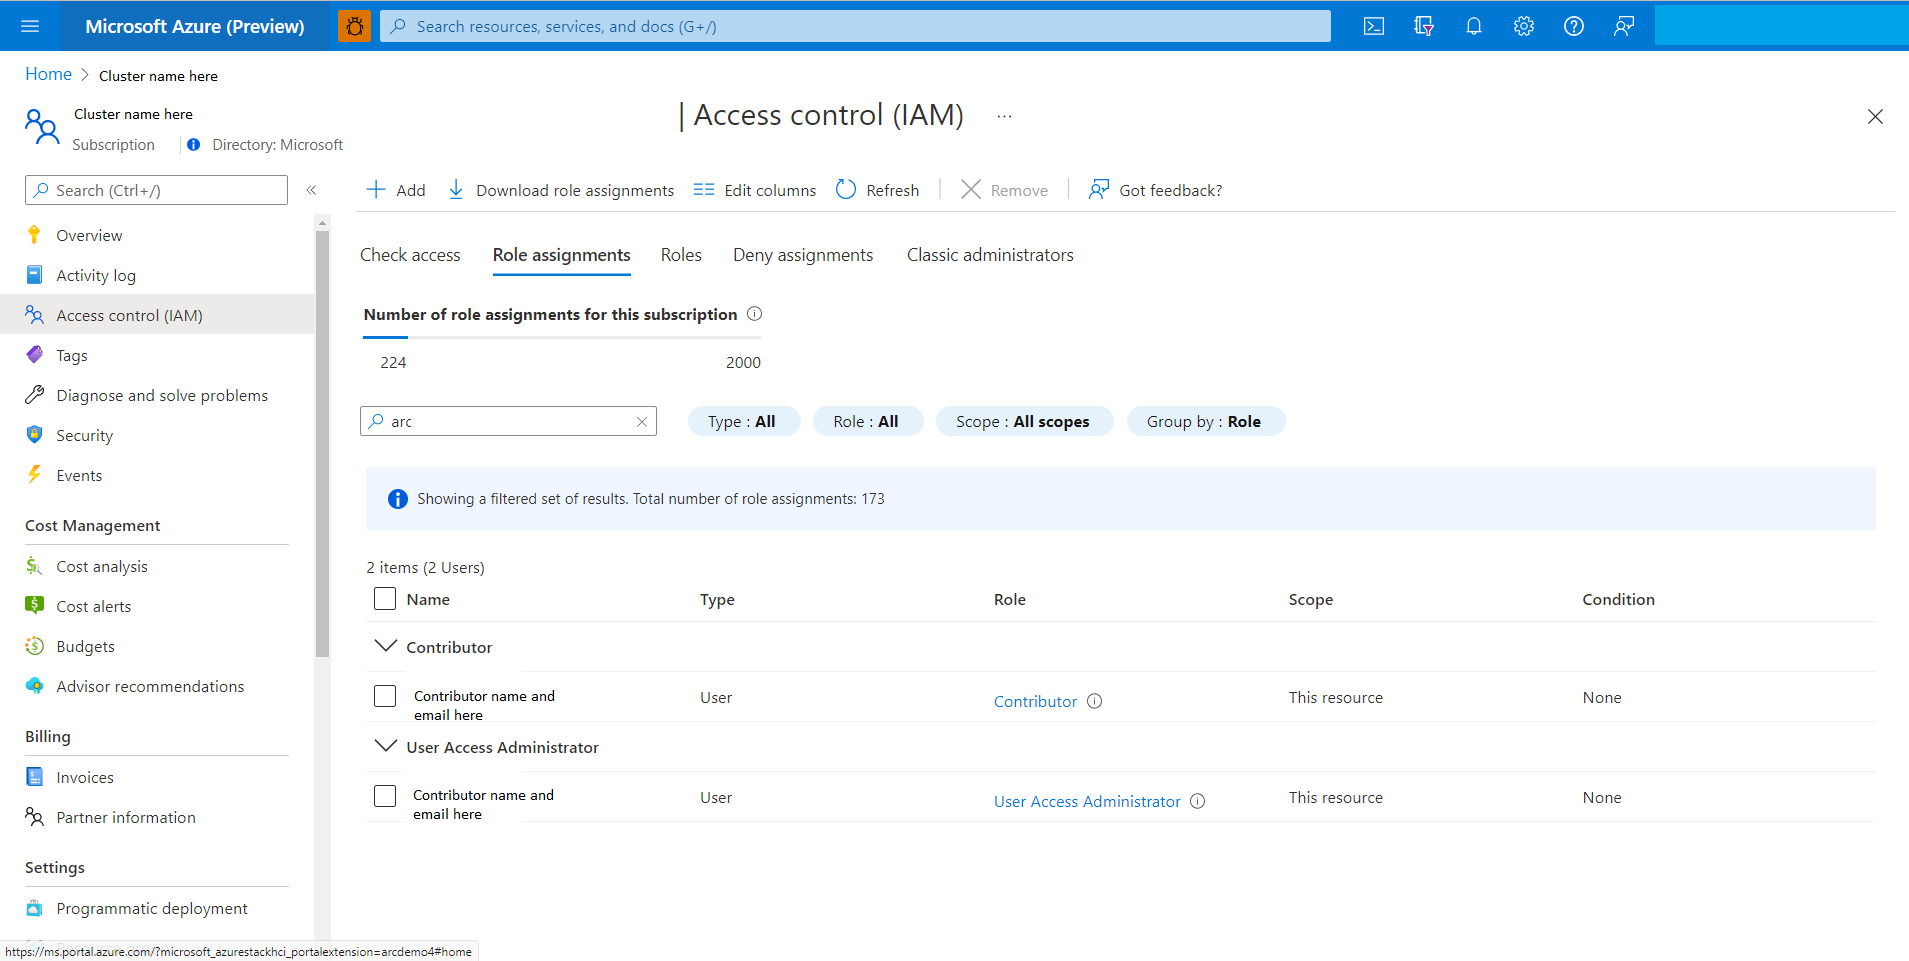
Assign Azure permissions from the Azure portal
If your Azure subscription is through an EA or CSP, ask your Azure subscription admin to assign Azure subscription level privileges of:
User Access Administrator role: Required to Arc-enable each server of an Azure Stack HCI cluster.
Contributor role: Required to register and unregister the Azure Stack HCI cluster.

Assign Azure permissions using PowerShell
Some admins may prefer a more restrictive option. In this case, it's possible to create a custom Azure role specific for Azure Stack HCI registration. The following procedure provides a typical set of permissions to the custom role; to set more restrictive permissions, see How do I use a more restricted custom permissions role?
Create a json file called customHCIRole.json with following content. Make sure to change
<subscriptionID>to your Azure subscription ID. To get your subscription ID, visit the Azure portal, navigate to Subscriptions, and copy/paste your ID from the list.{ "Name": "Azure Stack HCI registration role", "Id": null, "IsCustom": true, "Description": "Custom Azure role to allow subscription-level access to register Azure Stack HCI", "Actions": [ "Microsoft.Resources/subscriptions/resourceGroups/read", "Microsoft.Resources/subscriptions/resourceGroups/write", "Microsoft.Resources/subscriptions/resourceGroups/delete", "Microsoft.AzureStackHCI/register/action", "Microsoft.AzureStackHCI/Unregister/Action", "Microsoft.AzureStackHCI/clusters/*", "Microsoft.Authorization/roleAssignments/write", "Microsoft.Authorization/roleAssignments/read", "Microsoft.HybridCompute/register/action", "Microsoft.GuestConfiguration/register/action", "Microsoft.HybridConnectivity/register/action" ], "NotActions": [ ], "AssignableScopes": [ "/subscriptions/<subscriptionId>" ] }Create the custom role:
New-AzRoleDefinition -InputFile <path to customHCIRole.json>Assign the custom role to the user:
$user = get-AzAdUser -DisplayName <userdisplayname>
$role = Get-AzRoleDefinition -Name "Azure Stack HCI registration role"
New-AzRoleAssignment -ObjectId $user.Id -RoleDefinitionId $role.Id -Scope /subscriptions/<subscriptionid>
The following table explains why these permissions are required:
| Permissions | Reason |
|---|---|
| "Microsoft.Resources/subscriptions/resourceGroups/read", "Microsoft.Resources/subscriptions/resourceGroups/write", "Microsoft.Resources/subscriptions/resourceGroups/delete" "Microsoft.AzureStackHCI/register/action", "Microsoft.AzureStackHCI/Unregister/Action", "Microsoft.AzureStackHCI/clusters/*","Microsoft.Authorization/roleAssignments/read", | To register and unregister the Azure Stack HCI cluster. |
| "Microsoft.Authorization/roleAssignments/write", "Microsoft.HybridCompute/register/action", "Microsoft.GuestConfiguration/register/action", "Microsoft.HybridConnectivity/register/action" | To register and unregister the Arc for server resources. |
Register a cluster
You can register your Azure Stack HCI cluster using Windows Admin Center or PowerShell.
Follow these steps to register Azure Stack HCI with Azure via Windows Admin Center:
Make sure all the prerequisites are met.
Launch Windows Admin center and sign in to your Azure account. Go to Settings > Account, and then select Sign in under Azure Account.
In Windows Admin Center, select Cluster Manager from the top drop-down arrow.
Under Cluster connections, select the cluster you want to register.
On Dashboard, under Azure Arc, check the status of Azure Stack HCI registration and Arc-enabled servers.
- Not configured means your cluster isn't registered.
- Connected means your cluster is registered with Azure and is successfully synced to the cloud within the last day. Skip rest of the registration steps and see Manage the cluster to manage your cluster.
If your cluster isn't registered, under Azure Stack HCI registration, select Register to proceed.
Note
If you didn't register Windows Admin Center with Azure earlier, you are asked to do so now. Instead of the cluster registration wizard, you'll see the Windows Admin Center registration wizard.
Specify the Azure subscription ID to which you want to register the cluster. To get your Azure subscription ID, visit the Azure portal, navigate to Subscriptions, and copy/paste your ID from the list.
Select the Azure region from the drop-down menu.
Select one of the following options to select the Azure Stack HCI resource group:
Select Use existing to create the Azure Stack HCI cluster and Arc for Server resources in an existing resource group.
Select Create new to create a new resource group. Enter a name for the new resource group.
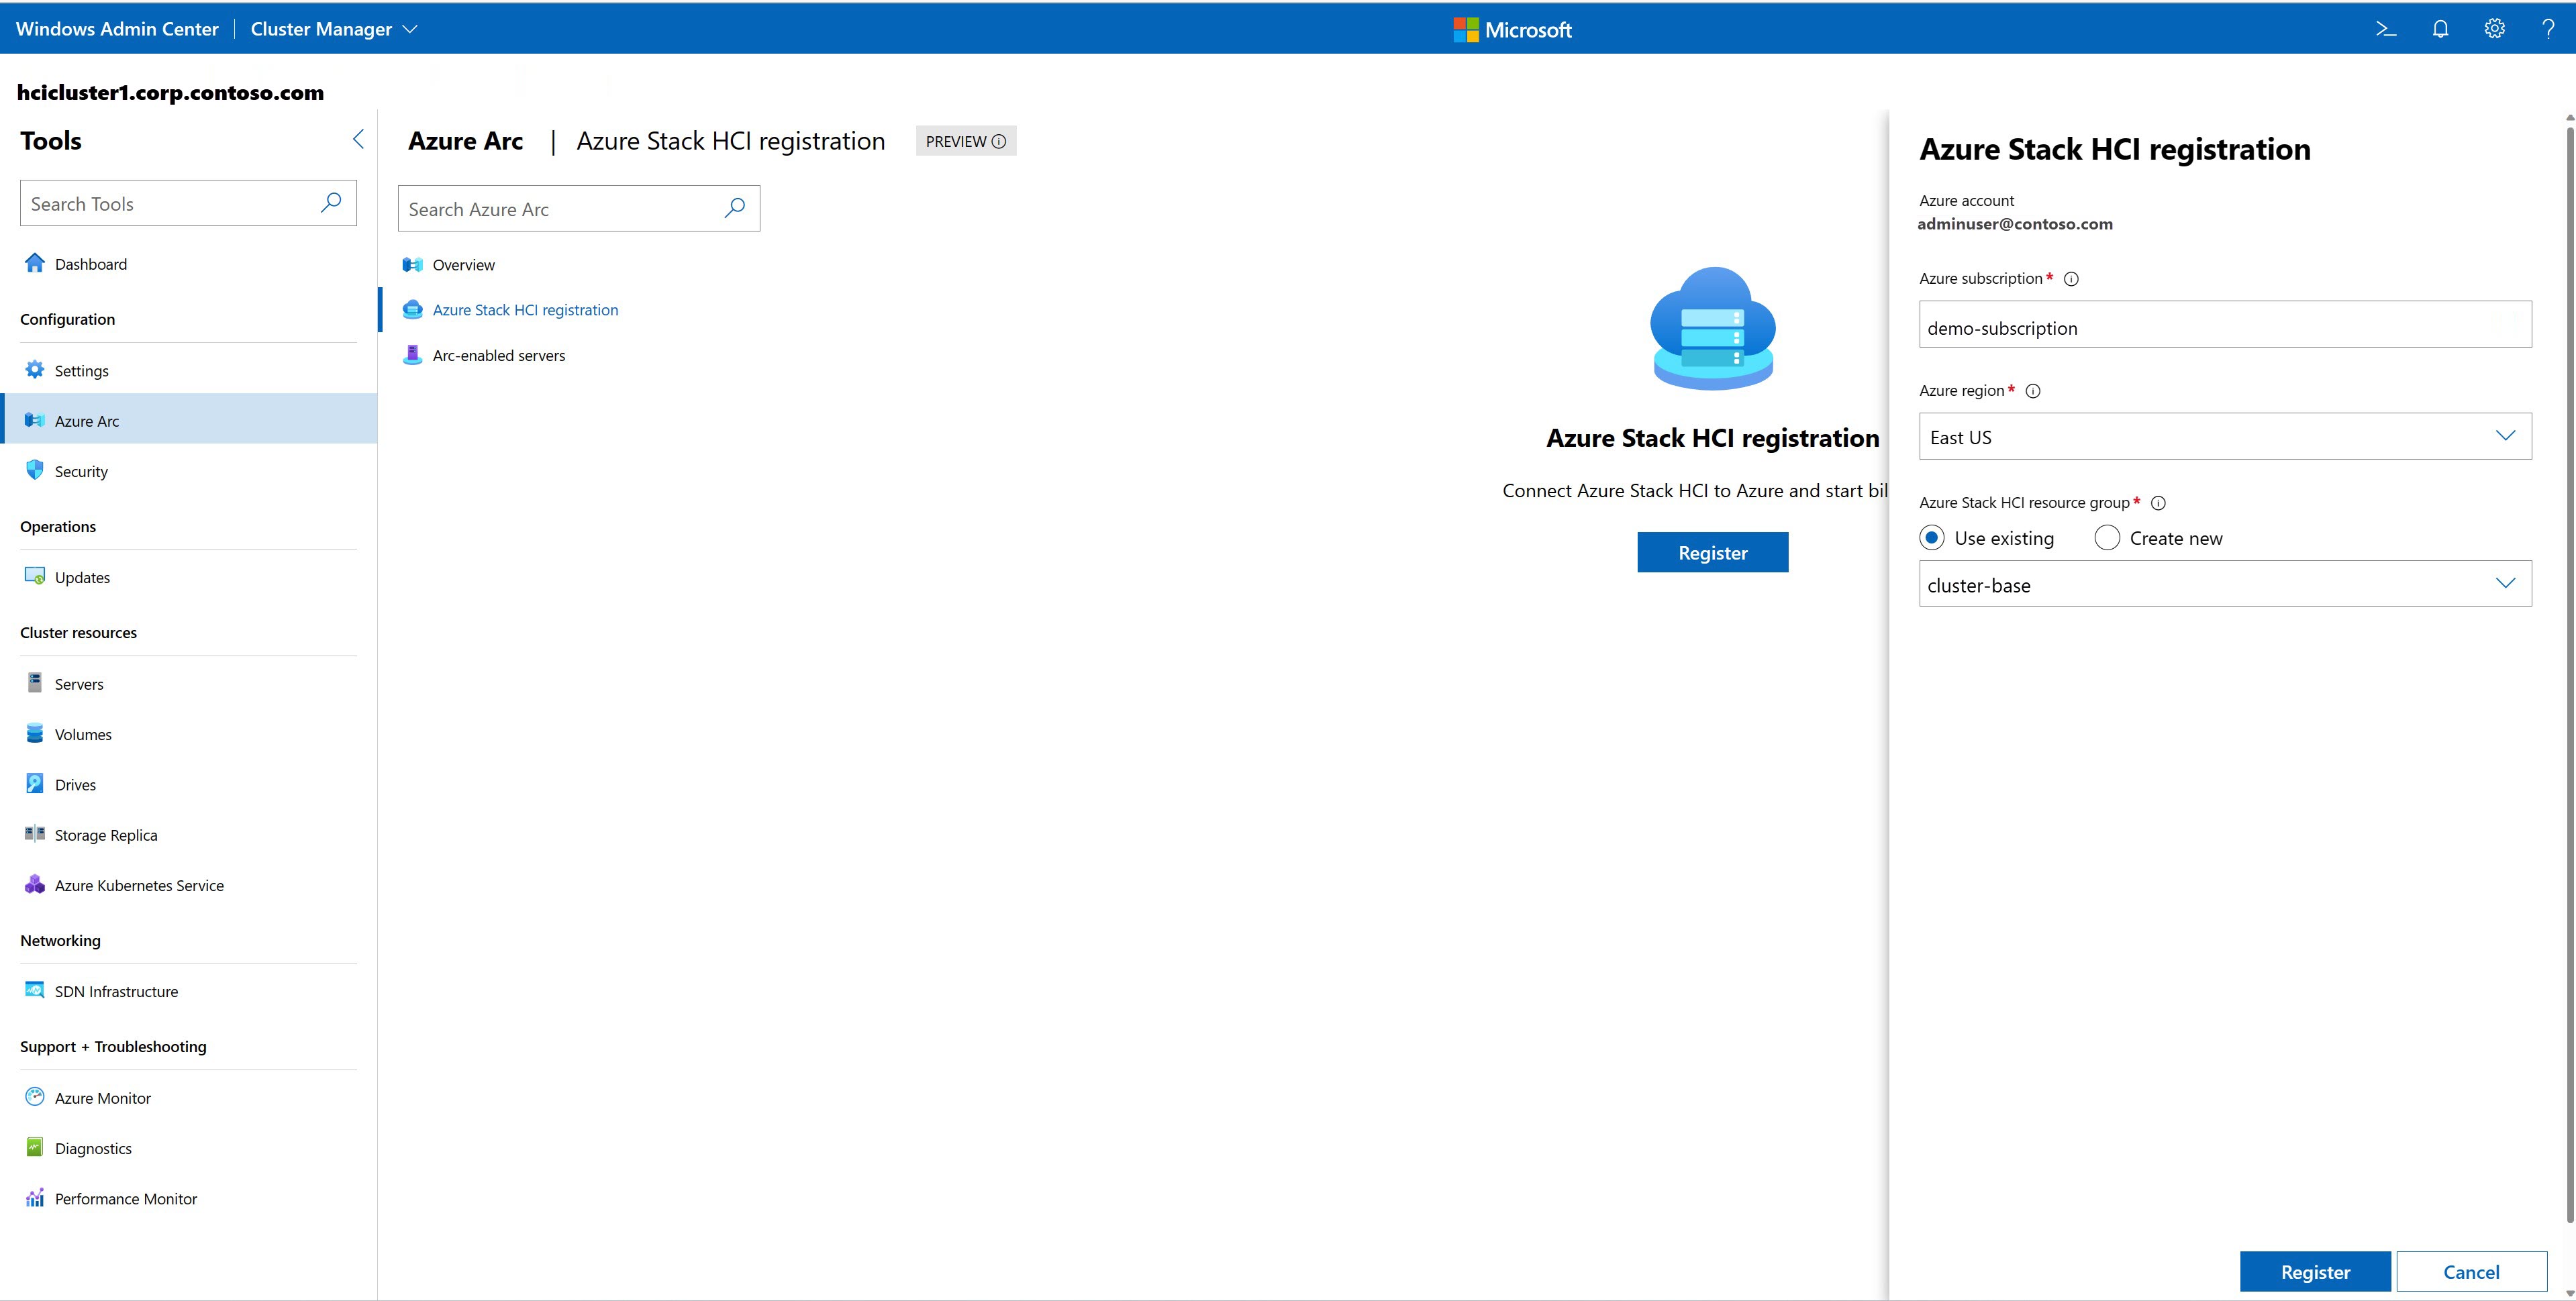
Select Register. It takes a few minutes to complete the registration.

Additional registration options
You have other options to register your cluster:
Manage cluster registration
After you've registered your cluster with Azure, you can manage its registration through Windows Admin Center, PowerShell, or the Azure portal.
Depending on your cluster configuration and requirements, you may need to take the following actions to manage the cluster registration:
- View status of registration and Arc-enabled servers
- Enable Azure Arc integration
- Upgrade Arc agent on cluster servers
- Unregister the cluster
- Review FAQs
For information on how to manage your cluster registration, see Manage cluster registration.
Next steps
To perform the next management task related to this article, see:
Feedback
Coming soon: Throughout 2024 we will be phasing out GitHub Issues as the feedback mechanism for content and replacing it with a new feedback system. For more information see: https://aka.ms/ContentUserFeedback.
Submit and view feedback for