Configure multi-tenancy in Azure Stack Hub
You can configure Azure Stack Hub to support sign-ins from users that reside in other Microsoft Entra directories, allowing them to use services in Azure Stack Hub. These directories have a "guest" relationship with your Azure Stack Hub directory, and are considered guest Microsoft Entra tenants.
For example, consider this scenario:
- You're the service administrator of contoso.onmicrosoft.com, the home Microsoft Entra tenant that provides identity and access management services to Azure Stack Hub.
- Mary is the directory administrator of adatum.onmicrosoft.com, the guest Microsoft Entra tenant where guest users are located.
- Mary's company (Adatum) uses IaaS and PaaS services from your company. Adatum wants to allow users from the guest directory (adatum.onmicrosoft.com) to sign in and use Azure Stack Hub resources secured by contoso.onmicrosoft.com.
This guide provides the steps required, in the context of this scenario, to enable or disable multi-tenancy in Azure Stack Hub for a guest directory tenant. You and Mary accomplish this process by registering or unregistering the guest directory tenant, which enables or disables Azure Stack Hub sign-ins and service consumption by Adatum users.
If you're a Cloud Solution Provider (CSP), you have other ways to configure and manage a multi-tenant Azure Stack Hub.
Prerequisites
Before you register or unregister a guest directory, you and Mary must complete administrative steps for your respective Microsoft Entra tenants: the Azure Stack Hub home directory (Contoso), and the guest directory (Adatum):
Download the Azure Stack Hub Tools, and then import the Connect and Identity modules:
Import-Module .\Identity\AzureStack.Identity.psm1
Register a guest directory
To register a guest directory for multi-tenancy, you need to configure both the home Azure Stack Hub directory and the guest directory.
Configure Azure Stack Hub directory
As the service administrator of contoso.onmicrosoft.com, you must first onboard the Adatum's guest directory tenant to Azure Stack Hub. The following script configures Azure Resource Manager to accept sign-ins from users and service principals in the adatum.onmicrosoft.com tenant:
## The following Azure Resource Manager endpoint is for the ASDK. If you're in a multinode environment, contact your operator or service provider to get the endpoint, formatted as adminmanagement.<region>.<FQDN>.
$adminARMEndpoint = "https://adminmanagement.local.azurestack.external"

## Replace the value below with the Azure Stack Hub directory
$azureStackDirectoryTenant = "contoso.onmicrosoft.com"

## Replace the value below with the guest directory tenant.
$guestDirectoryTenantToBeOnboarded = "adatum.onmicrosoft.com"

## Replace the value below with the name of the resource group in which the directory tenant registration resource should be created (resource group must already exist).
$ResourceGroupName = "system.local"

## Replace the value below with the region location of the resource group.
$location = "local"

# Subscription Name
$SubscriptionName = "Default Provider Subscription"

Register-AzSGuestDirectoryTenant -AdminResourceManagerEndpoint $adminARMEndpoint `
 -DirectoryTenantName $azureStackDirectoryTenant `
 -GuestDirectoryTenantName $guestDirectoryTenantToBeOnboarded `
 -Location $location `
 -ResourceGroupName $ResourceGroupName `
 -SubscriptionName $SubscriptionName
Configure guest directory
Next, Mary (directory admin of Adatum) must register Azure Stack Hub with the adatum.onmicrosoft.com guest directory by running the following script:
## The following Azure Resource Manager endpoint is for the ASDK. If you're in a multinode environment, contact your operator or service provider to get the endpoint, formatted as management.<region>.<FQDN>.
$tenantARMEndpoint = "https://management.local.azurestack.external"

## Replace the value below with the guest directory tenant.
$guestDirectoryTenantName = "adatum.onmicrosoft.com"

Register-AzSWithMyDirectoryTenant `
 -TenantResourceManagerEndpoint $tenantARMEndpoint `
 -DirectoryTenantName $guestDirectoryTenantName `
 -Verbose
Important
If your Azure Stack Hub administrator installs new services or updates in the future, you might need to run this script again.
Run this script again at any time to check the status of the Azure Stack Hub apps in your directory.
If you notice issues with creating VMs in Managed Disks (introduced in the 1808 update), a new disk resource provider was added, which requires this script to be run again.
Direct users to sign in
Finally, Mary can direct Adatum users with @adatum.onmicrosoft.com accounts to sign in by visiting the Azure Stack Hub user portal. For multinode systems, the user portal URL is formatted as https://portal.<region>.<FQDN>. For an ASDK deployment, the URL is https://portal.local.azurestack.external.
Mary must also direct any foreign principals (users in the Adatum directory without the suffix of adatum.onmicrosoft.com) to sign in using https://<user-portal-url>/adatum.onmicrosoft.com. If they don't specify the /adatum.onmicrosoft.com directory tenant in the URL, they're sent to their default directory and receive an error that says their administrator hasn't consented.
Unregister a guest directory
If you no longer want to allow sign-ins to Azure Stack Hub services from a guest directory tenant, you can unregister the directory. Again, both the home Azure Stack Hub directory and guest directory need to be configured:
As the administrator of the guest directory (Mary in this scenario), run
Unregister-AzsWithMyDirectoryTenant. The cmdlet uninstalls all the Azure Stack Hub apps from the new directory.## The following Azure Resource Manager endpoint is for the ASDK. If you're in a multinode environment, contact your operator or service provider to get the endpoint, formatted as management.<region>.<FQDN>. $tenantARMEndpoint = "https://management.local.azurestack.external" ## Replace the value below with the guest directory tenant. $guestDirectoryTenantName = "adatum.onmicrosoft.com" Unregister-AzsWithMyDirectoryTenant ` -TenantResourceManagerEndpoint $tenantARMEndpoint ` -DirectoryTenantName $guestDirectoryTenantName ` -VerboseAs the service administrator of Azure Stack Hub (you in this scenario), run the
Unregister-AzSGuestDirectoryTenantcmdlet:## The following Azure Resource Manager endpoint is for the ASDK. If you're in a multinode environment, contact your operator or service provider to get the endpoint, formatted as adminmanagement.<region>.<FQDN>. $adminARMEndpoint = "https://adminmanagement.local.azurestack.external" ## Replace the value below with the Azure Stack Hub directory $azureStackDirectoryTenant = "contoso.onmicrosoft.com" ## Replace the value below with the guest directory tenant. $guestDirectoryTenantToBeDecommissioned = "adatum.onmicrosoft.com" ## Replace the value below with the name of the resource group in which the directory tenant resource was created (resource group must already exist). $ResourceGroupName = "system.local" Unregister-AzSGuestDirectoryTenant -AdminResourceManagerEndpoint $adminARMEndpoint ` -DirectoryTenantName $azureStackDirectoryTenant ` -GuestDirectoryTenantName $guestDirectoryTenantToBeDecommissioned ` -ResourceGroupName $ResourceGroupNameWarning
The steps to disable multi-tenancy must be performed in order. Step #1 fails if step #2 is completed first.
Retrieve Azure Stack Hub identity health report
Replace the <region>, <domain>, and <homeDirectoryTenant> placeholders, then execute the following cmdlet as the Azure Stack Hub administrator.
$AdminResourceManagerEndpoint = "https://adminmanagement.<region>.<domain>"
$DirectoryName = "<homeDirectoryTenant>.onmicrosoft.com"
$healthReport = Get-AzsHealthReport -AdminResourceManagerEndpoint $AdminResourceManagerEndpoint -DirectoryTenantName $DirectoryName
Write-Host "Healthy directories: "
$healthReport.directoryTenants | Where status -EQ 'Healthy' | Select -Property tenantName,tenantId,status | ft


Write-Host "Unhealthy directories: "
$healthReport.directoryTenants | Where status -NE 'Healthy' | Select -Property tenantName,tenantId,status | ft
Update Microsoft Entra tenant permissions
This action clears an alert in Azure Stack Hub, indicating that a directory requires an update. Run the following command from the Azurestack-tools-master/identity folder:
Import-Module ..\Identity\AzureStack.Identity.psm1

$adminResourceManagerEndpoint = "https://adminmanagement.<region>.<domain>"

# This is the primary tenant Azure Stack Hub is registered to:
$homeDirectoryTenantName = "<homeDirectoryTenant>.onmicrosoft.com"

Update-AzsHomeDirectoryTenant -AdminResourceManagerEndpoint $adminResourceManagerEndpoint `
   -DirectoryTenantName $homeDirectoryTenantName -Verbose
The script prompts you for administrative credentials on the Microsoft Entra tenant, and takes several minutes to run. The alert clears after you run the cmdlet.
Portal-based management isn't supported for this version
Multi-tenancy management using the administrator portal is only available for versions 2102 and later. Select a later version by using the selector in the upper-left part of the page.
Register a guest directory
To register a guest directory for multi-tenancy, you need to configure both the home Azure Stack Hub directory and the guest directory.
Configure Azure Stack Hub directory
The first step is to make your Azure Stack Hub system aware of the guest directory. In this example, the directory from Mary's company, Adatum, is called adatum.onmicrosoft.com.
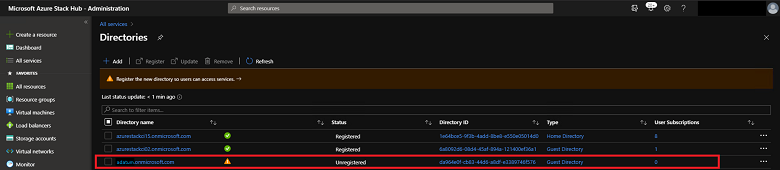
Sign in to the Azure Stack Hub administrator portal and go to All services - Directories.

Select Add to start the onboarding process. Enter the guest directory name "adatum.onmicrosoft.com", and then select Add.

The guest directory appears in the list view, with a status of unregistered.
Only Mary has the credentials to authenticate to the guest directory, so you must send her the link to complete the registration. Select the adatum.onmicrosoft.com checkbox, and then select Register.
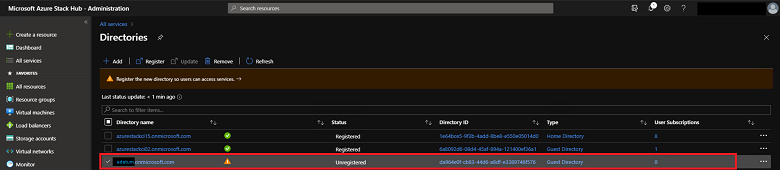
A new browser tab opens. Select Copy link at the bottom of the page, and provide it to Mary.
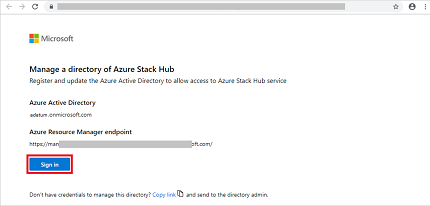
If you have the credentials for the guest directory, you can complete the registration yourself by selecting Sign in.


Configure guest directory
Mary received the email with the link to register the directory. She opens the link in a browser and confirms the Microsoft Entra ID and the Azure Resource Manager endpoint of your Azure Stack Hub system.
Mary signs in by using her global admin credentials for adatum.onmicrosoft.com.
Note
Make sure pop-up blockers are disabled before signing in.
Mary reviews the status for the directory and sees it isn't registered.
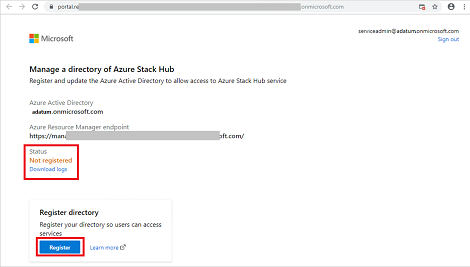
Mary selects Register to start the process.
Note
Required objects for Visual Studio Code might not be able to be created, and must use PowerShell.
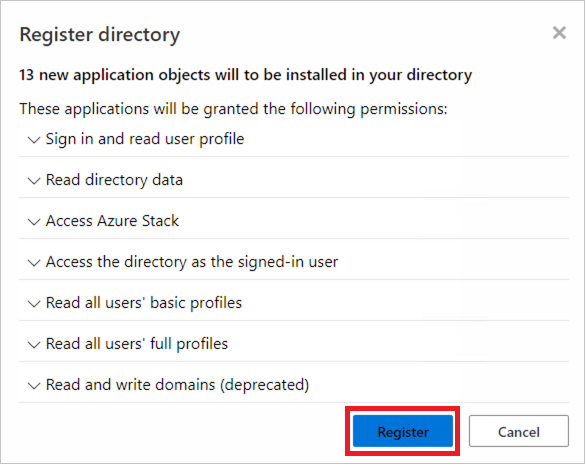
After the registration process is finished, Mary can review all the applications that were created in the directory, and check their status.
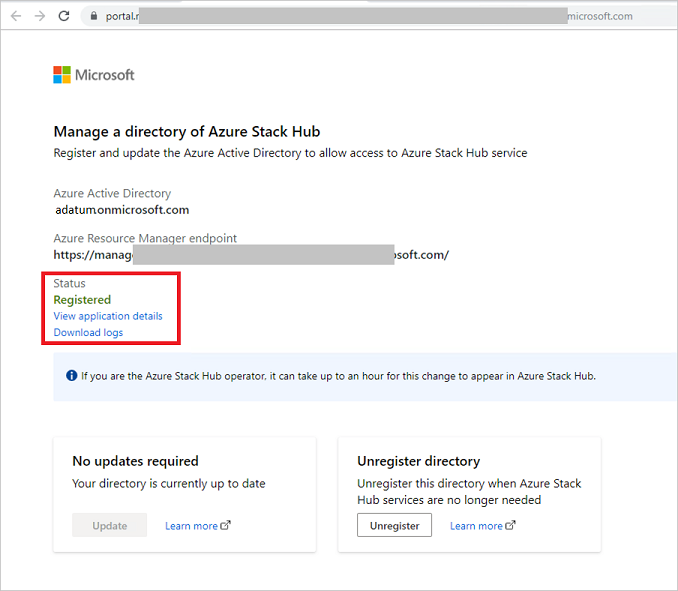
Mary has successfully completed the registration process and can now direct Adatum users with @adatum.onmicrosoft.com accounts to sign in by visiting the Azure Stack Hub user portal. For multinode systems, the user portal URL is formatted as
https://portal.<region>.<FQDN>. For an ASDK deployment, the URL ishttps://portal.local.azurestack.external.

Important
It can take up to one hour for the Azure Stack operator to see the directory status updated in the admin portal.
Mary must also direct any foreign principals (users in the Adatum directory without the suffix of adatum.onmicrosoft.com) to sign in using https://<user-portal-url>/adatum.onmicrosoft.com. If they don't specify the /adatum.onmicrosoft.com directory tenant in the URL, they're sent to their default directory and receive an error that says their administrator hasn't consented.
Unregister a guest directory
If you no longer want to allow sign-ins to Azure Stack Hub services from a guest directory tenant, you can unregister the directory. Again, both the home Azure Stack Hub directory and guest directory need to be configured:
Configure guest directory
Mary no longer uses services on Azure Stack Hub and must remove the objects. She opens the URL again that she received via email to unregister the directory. Before starting this process, Mary removes all the resources from the Azure Stack Hub subscription.
Mary signs in by using her global admin credentials for adatum.onmicrosoft.com.
Note
Make sure pop-up blockers are disabled before signing in.
Mary sees the status of the directory.
Mary selects Unregister to start the action.

When the process has finished, the status is shown as Not registered:
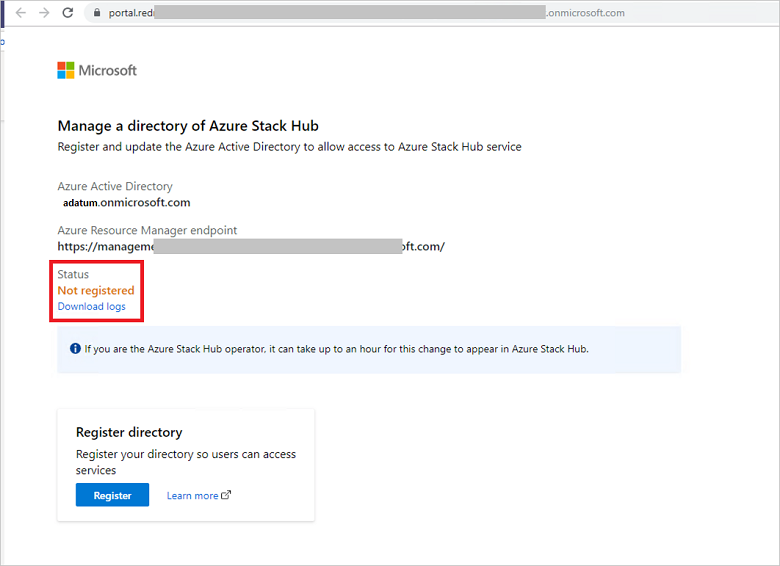
Mary has successfully unregistered the directory adatum.onmicrosoft.com.
Note
It can take up to one hour to show the directory as not registered in the Azure Stack admin portal.

Configure Azure Stack Hub directory
As an Azure Stack Hub operator, you can remove the guest directory at any point, even if Mary has not previously unregistered the directory.
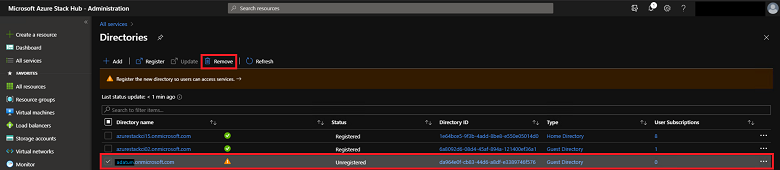
Sign in to the Azure Stack Hub administrator portal and go to All services - Directories.
Select the adatum.onmicrosoft.com directory checkbox, and then select Remove.
Confirm the delete action by typing yes and selecting Remove.
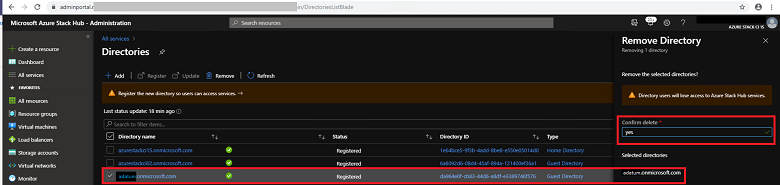
You have successfully removed the directory.


Managing required updates
Azure Stack Hub updates can introduce support for new tools or services that might require an update of the home or guest directory.
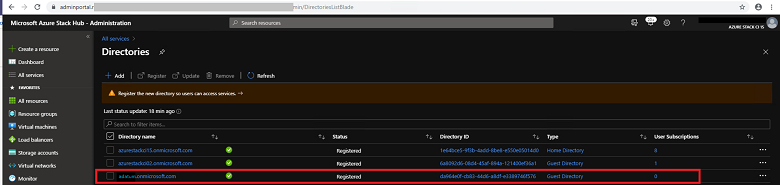
As an Azure Stack Hub operator, you get an alert in the admin portal that informs you about a required directory update. You can also determine whether an update is required for home or guest directories by viewing the directories pane in the admin portal. Each directory listing shows the type of directory. The type can be a home or guest directory, and its status is shown.
Update the Azure Stack Hub directories
When an Azure Stack Hub directory update is required, a status of Update Required is shown. For example:

To update the directory, select the Directory name checkbox, and then select Update.
Update the guest directory
An Azure Stack Hub operator should also inform the guest directory owner that they need to update their directory by using the URL shared for registration. The operator can resend the URL, but it doesn't change.
Mary, the owner of the guest directory, opens the URL that she received via email when she registered the directory:
Mary signs in by using her global admin credentials for adatum.onmicrosoft.com. Make sure pop-up blockers are disabled before signing in.
Mary sees the status of the directory saying an update is required.
The Update action is available for Mary to update the guest directory. It can take up to one hour to show the directory as registered in the Azure Stack admin portal.

Additional capabilities
An Azure Stack Hub operator can view the subscriptions associated with a directory. In addition, each directory has an action to manage the directory directly in the Azure portal. To manage, the target directory must have manage permissions in the Azure portal.
Next steps
Feedback
Coming soon: Throughout 2024 we will be phasing out GitHub Issues as the feedback mechanism for content and replacing it with a new feedback system. For more information see: https://aka.ms/ContentUserFeedback.
Submit and view feedback for