Azure Site Recovery failback tool
In a connected environment, you can use Azure Site Recovery to protect virtual machines (VMs) running on Azure Stack Hub. This article describes how to set up the environment, and how Site Recovery helps contribute to the overall business continuity and disaster recovery strategy for these workloads.
In the event of an outage, the Azure Stack Hub operator goes through the failover procedure; once Azure Stack Hub is up and running again, they go through a failback process. The failover process is described in this Site Recovery article, but the failback process involves several manual steps:
- Stop the VM running in Azure.
- Download the VHDs.
- Upload the VHDs to Azure Stack Hub.
- Recreate the VMs.
- Finally, start that VM running on Azure Stack Hub.
As this process can be error prone and time consuming, we've built scripts to help accelerate and automate this process.
Note
The Azure Site Recovery tool requires the Azure Stack Hub Az modules. If you are running the Azure Stack Hub AzureRM modules, you must upgrade your workstation or use the Azure Site Recovery failback tool in an isolated environment with the Az modules. For more information, see Install PowerShell Az module for Azure Stack Hub.
Failback procedure
The automated failback process contains three main parts:
Copy-AzSiteRecoveryVmVHD:
- Shuts down the Azure VM.
- Prepares the disk export.
- Copies the disk either through AzCopy or StorageBlobCopy.
- Uploads the disk to an Azure Stack Hub storage account.
Once the disk is copied, there are two scenarios covered by Prepare-AzSiteRecoveryVMFailBack:
- The original Azure Stack Hub has recovered. The original VM still exists, and you only need to change its VHDs.
- In the case of a disaster, if the original VMs are lost, you must rebuild the entire VM.
This procedure covers both scenarios by creating the template and the parameter file required.
The actual deployment of the Azure Resource Manager template using the parameter file, and deploy/create the VM on Azure Stack Hub.
Prerequisites
The following prerequisites are required to perform the failback procedure:
Copy the Azure Site Recovery failback tool.
Import the FailbackTool.psm1 module in PowerShell.
Follow the procedure in this article to install the Az module for Azure Stack Hub.
(optional) Download AzCopy version 10.
- Copying the blob using AzCopy is faster, but requires extra local disk space to temporarily store the blob file.
- If AzCopy is not used, the VHD copy is done using AzStorageBlobCopy. This means no local storage is required, but the process takes longer.
Access to the resources on the Azure portal, and access to create these resources on Azure Stack Hub.
Step 1: Copy blob from Azure to Azure Stack Hub
Call the Copy-AzSiteRecoveryVmVHD PowerShell cmdlet to stop the Azure VM, download the VHDs from Azure, and upload them to Azure Stack Hub. For example:
$uris = Copy-AzSiteRecoveryVmVHD `
        -SourceVM $vmOnAzure `
        -TargetStorageAccountName "targetaccountName" `
        -TargetStorageEndpoint "redmond.ext-v.masd.stbtest.microsoft.com" `
        -TargetStorageAccountKey $accountKey `
        -AzCopyPath "C:\azcopy_v10\azcopy.exe" `
        -VhdLocalFolder "C:\tempfolder"
Note the following considerations:
This example uses
$uristo hold theSourceDiskVhdUrisvalue used in step 2.The
-SourceVMparameter is a VM object retrieved byGet-AzVM.- This is the protected VM from Azure Stack Hub that was failed over on Azure.
- It doesn't matter if the VM is running, as the script shuts down the VM. However, it is recommended that you explicitly shut it down and stop the services inside the VM accordingly.
You can provide either an account key (using
TargetStorageAccountKey) or the SAS token (usingTargetStorageAccountSasToken) of the storage account on the Azure Stack Hub side. The SAS token must be created at the storage account level, with at least the following permissions: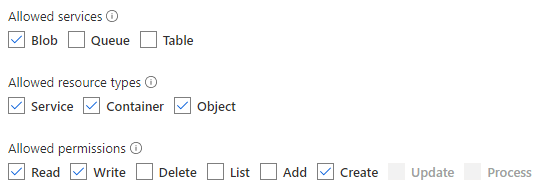
You can provide either the storage endpoint, which includes the region and FQDN; for example,
regionname.azurestack.microsoft.com, or the environment name of the Azure Stack Hub, such asAzureStackTenant. If the environment name is used, it should be listed using Get-AzEnvironment.You can choose to use AzCopy or AzStorageBlobCopy to copy the VHD from Azure to Azure Stack Hub. AzCopy is faster, but it must download VHD files to a local folder first:
- To use AzCopy, provide the parameters
-AzCopyPathand-VhdLocalFolder(the path where the VHDs will be copied). - If there is not enough space locally, you can choose to copy the VHD directly, without AzCopy, by omitting the parameters
-AzCopyPathand-VhdLocalFolder. By default, this command uses AzStorageBlobCopy to copy directly to the Azure Stack Hub storage account.
- To use AzCopy, provide the parameters
Step 2: Generate Resource Manager templates
After the disk is copied, use the Prepare-AzSiteRecoveryVMFailBack cmdlet to create the $templateFile and $parameterFile required to deploy the VM on Azure Stack Hub:
$templateFile, $parameterFile = Prepare-AzSiteRecoveryVMFailBack `
                                -SourceContextName "PublicAzure" `
                                -SourceVM $vmOnAzure `
                                -SourceDiskVhdUris $uris `
                                -TargetResourceLocation "redmond" `
                                -ArmTemplateDestinationPath "C:\ARMtemplates" `
                                -TargetVM $vmOnHub `
                                -TargetContextName "AzureStack"
Note the following considerations:
This example uses
-SourceDiskVhdUrisas a return value from step 1 (using$uris).This cmdlet supports two scenarios:
- By specifying
-TargetVM, you assume that the VM is active on the Azure Stack Hub side, and you want to replace its disks with the latest ones copied from Azure. - The script generates a Resource Manager template to deploy this VM, and deletes the existing VM from Azure Stack Hub.
Note
Deleting the Azure Stack Hub VM itself doesn't remove the other objects (such as VNET, resource group, NSGs). It only removes the VM resource itself, and then the template is deployed with the
-incrementalparameter.- By not providing the
-TargetVMparameter, the script assumes that the VM no longer exists on the Azure Stack Hub side, so the script creates a Resource Manager template to deploy a completely new VM.
- By specifying
The generated Resource Manager template files are placed under
-ArmTemplateDestinationPath, and the full path of the template file or parameter file is returned.If the
-TargetVMparameter is provided, the cmdlet deletes the VM, so you can continue with the following steps.
Step 3: Deploy the Resource Manager template
At this point, the VHD is uploaded to Azure Stack Hub, and the Resource Manager template and respective parameter files are created. All that's left is to deploy the VM on Azure Stack Hub.
In some scenarios, you might want to edit this template and add, remove, or change some names or resources. This is permitted, as you can edit and adjust the template as needed.
When ready, and after confirming the resources in the Resource Manager template are as expected, you can call the New-AzResourceGroupDeployment cmdlet to deploy the resources. For example:
New-AzResourceGroupDeployment `
  -Name "Failback" `
  -ResourceGroupName "failbackrg" `
  -TemplateFile $templateFile `
  -TemplateParameterFile $parameterFile `
  -Mode Incremental
Note the following considerations:
- The
-ResourceGroupNameparameter should be an existing resource group. - The
-TemplateFileand-TemplateParameterFileparameters come from the return values in step 2.
Next steps
Feedback
Coming soon: Throughout 2024 we will be phasing out GitHub Issues as the feedback mechanism for content and replacing it with a new feedback system. For more information see: https://aka.ms/ContentUserFeedback.
Submit and view feedback for